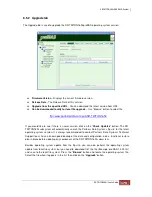
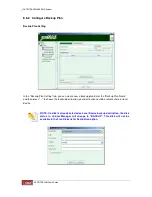


Use the following guidelines to ensure that you are using a valid backup plan name:
♦
Names cannot be longer than 256 characters.
♦
Names should be unique. It cannot be a duplicate with other Backup plan names.
♦
Names cannot contain blank spaces.
♦
Names cannot begin with a dash (-) and cannot consist of only a single dash.
♦
Names cannot contain the following characters: /\[]";:|<>+=,?*
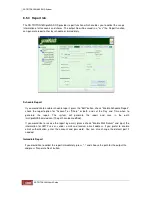
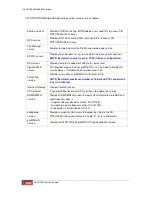
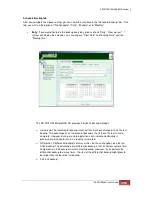
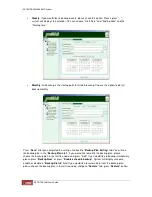
If you choose remote share, please input the IP address in the "path" field. Choose Samba or NFS of
the protocol and enter account and password.
Example:
For
Samba:
Path = //192.168.100.164/Share You cannot use the directory under the share.
Example:
//192.168.100.164/Share/dir1 <==Incorrect
//192.168.100.164/Share <==Correct
If you are not sure of the share name on the remote
machine, you may query it by using the command
"smbclient".
-bash-3.00# smbclient -L 192.168.100.164
Login = account
Account that has full access permission on the remote
share.
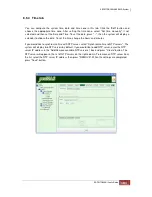
For NFS:
Path =
192.168.100.164:/PathToShareN
ame
Example:
192.168.100.164:/mnt/proNAS/vol1/share1
If you are not sure of the correct path of the remote
NFS server, you may use the command "showmount".
-bash-3.00# showmount -e 192.168.100.164
Login
For NFS, it will assume the root account to be used.
Please verify that root account can access the remote
NFS share.
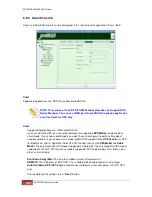
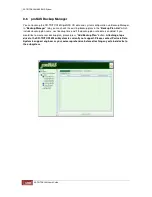
If Backup Manager fails to mount the remote share, you may need to verify it manually via
console. That is to connect to the remote machine and mount the remote share. First we need to
create a directory as our mount point.
-bash-3.00# mkdir /mnt/temp/
For Samba:
-bash-3.00# mount //ServerIP/ShareName /mnt/temp -o lfs,
username=account,password=password
For NFS:
-bash-3.00# mount ServerIP:/PathToShareName /mnt/temp
Summary of Contents for TRITON 16Ni
Page 1: ...SurfRAID TRITON 16Ni User s Guide Revision 1 1...
Page 40: ......
Page 41: ......
Page 42: ......
Page 43: ......
Page 67: ...5 3 7 Stop Volume Check Use this option to stop current running Check Volume Set process...
Page 111: ...4 Verify the new LV size...
Page 135: ...4 The iSCSI logical volume capacity is extended...
Page 236: ...2 Select Set LAN Configuration and press Enter key 3 Setup LAN Configuration...
Page 247: ......


