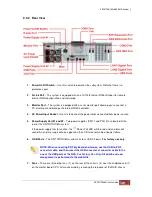
2.3.2 Rear View
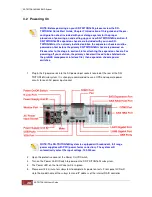
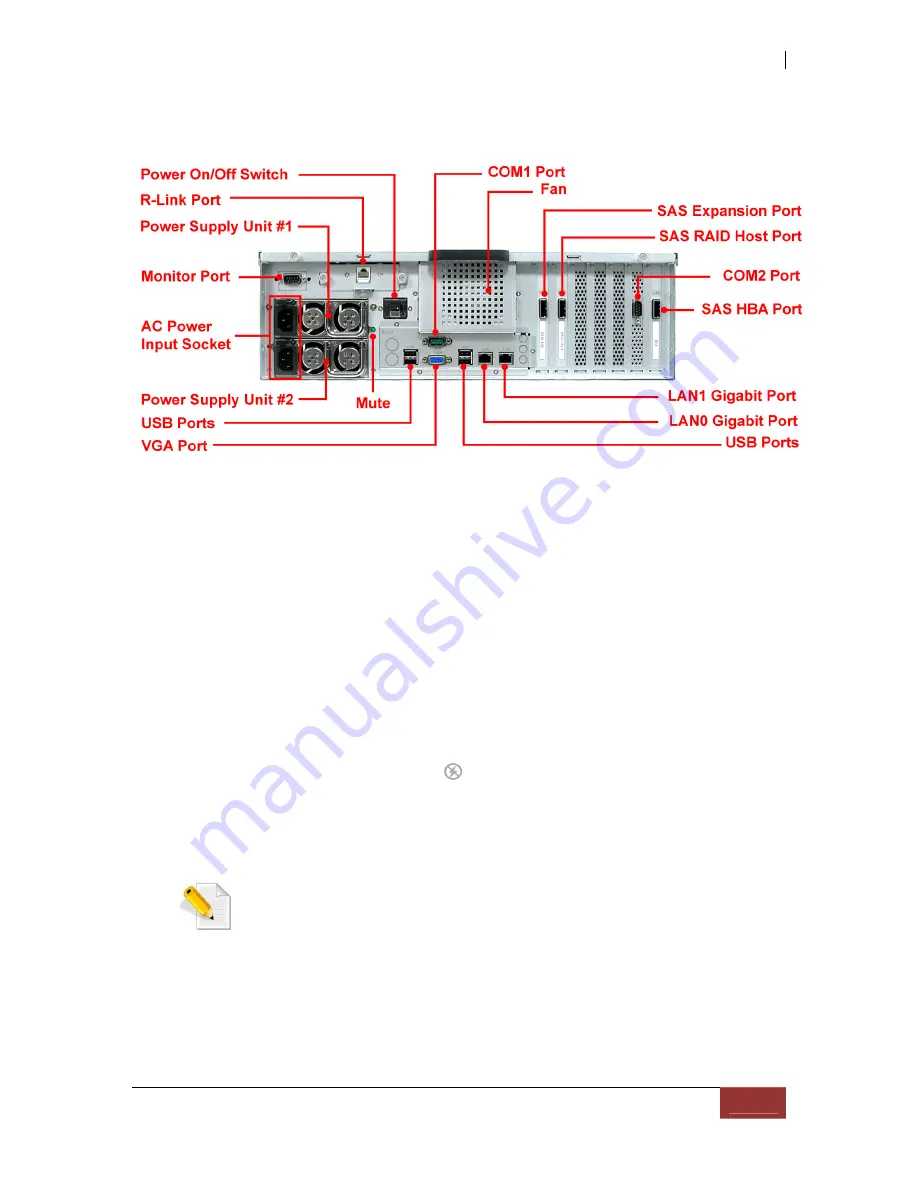
1. Power On/Off Switch
– Use this switch to power on the subsystem. Note that there is a
protective cover.
2. R-Link Port
– The system is equipped with one 10/100 Ethernet RJ45 LAN port for remote
internal RAID configuration and monitoring.
3. Monitor Port
– The system is equipped with a serial monitor port allowing you to connect a
PC or terminal and manage the internal RAID controller.
4. AC Power Input Socket
- Use this to connect the power cords connected from power source.
5. Power Supply Unit #1 and #2
– Two power supplies (PSU 1 and PSU 2) are located at the
rear of the SR-TRITON16Ni system.
If the power supply fails to function, the
Power Fail LED will turn red and an alarm will
sound. An error message will also appear on the LCD screen warning of power failure.
6. USB Ports
– The SR-TRITON16Ni system has four USB 2.0 ports.
For factory use only.
NOTE: When connecting PS/2 keyboard and mouse, use the USB-to-PS/2
converter cable, and then insert the USB connector of converter cable to the
one of the USB ports of the NAS.
For Factory Use Only
. All admin and user
management is performed via the web GUIs.
7. Fans –
There are
(5) cooling fans, (1) on the rear of the chassis, (3) near the midplane and (1)
on the mother board CPU. All are accessed by removing the top cover of the RAID chassis.
Summary of Contents for TRITON 16Ni
Page 1: ...SurfRAID TRITON 16Ni User s Guide Revision 1 1...
Page 40: ......
Page 41: ......
Page 42: ......
Page 43: ......
Page 67: ...5 3 7 Stop Volume Check Use this option to stop current running Check Volume Set process...
Page 111: ...4 Verify the new LV size...
Page 135: ...4 The iSCSI logical volume capacity is extended...
Page 236: ...2 Select Set LAN Configuration and press Enter key 3 Setup LAN Configuration...
Page 247: ......

