


9
6.
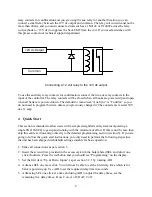
If you have connected an LED to the 12V dc output for remote signaling, step through the
menu until you reach “12V dc Output”. Then advance ADJ one click to select “LED”. This
selection will make the remote LED mimic the LED on the front panel which flashes while
the unit is powering up or powering down.
7.
Turn SEL fully counter-clockwise and press the red button to exit programming. Place two of
the black plugs from the accessory kit into the adjustment holes to deter tampering and the
unit is ready for use.
Although the above steps are all that are required the get the SEQ running, you may want to take
a look at the following programming options to see if you want to make use of any of these
functions. You will find these listed on the reverse side of the Programming and Connection
Guide, and they reside near the end of the menu that you step through by turning SEL.
Low Voltage Shutdown
Shuts unit off if AC voltage drops below the set point
High Voltage Shutdown
Shuts unit off if AC voltage rises above the set point
Self-Test Shutdown
Shuts down unit if self-test fails
Power Fail Restore
Turns unit back on after a power failure if unit
was powered up when the power failed
5
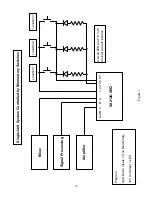
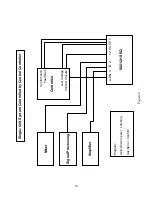
Programming
The SX2120-SEQ is a very versatile sequencer and has 21 menu items that control its operation.
Some menu items allow predetermined options to be selected and others allow time delays or
voltage limits to be adjusted. All adjustments are made via the front panel and are achieved by
turning the two screwdriver-accessible rotary encoders labeled SEL (select) and ADJ (adjust).
Turning SEL steps through the menu items (shown on the second line of the display), and
turning ADJ allows each menu item to be changed (shown on the third line of the display). The
accessory kit contains a screwdriver suitable for making adjustments and black plugs to cover the
holes when programming is complete.
To get into the programming mode first turn SEL one click clockwise. The display will then tell
you to press the red button. Doing so puts you into the programming mode. All the options, delay
times and voltage adjustments are set using this mode. When you have completed the set-up turn
SEL all the way counter-clockwise until the display tells you to press the red button. Doing so
saves the new set-up information in non-volatile memory and puts you back into normal
operation.
A password can be set while in the programming mode. Once a password has been set, you need
to enter the same password before you can get back into the programming mode again. This
prevents unauthorized personnel from changing the set-up information. The password option is
the last menu item and can be from one to six letters (A-Z).