• Protection against electric shock: Class II including AC/DC Adapter.
• Applied parts : No applied parts.
• Protection against harmful ingress of water: ordinary IPXO.
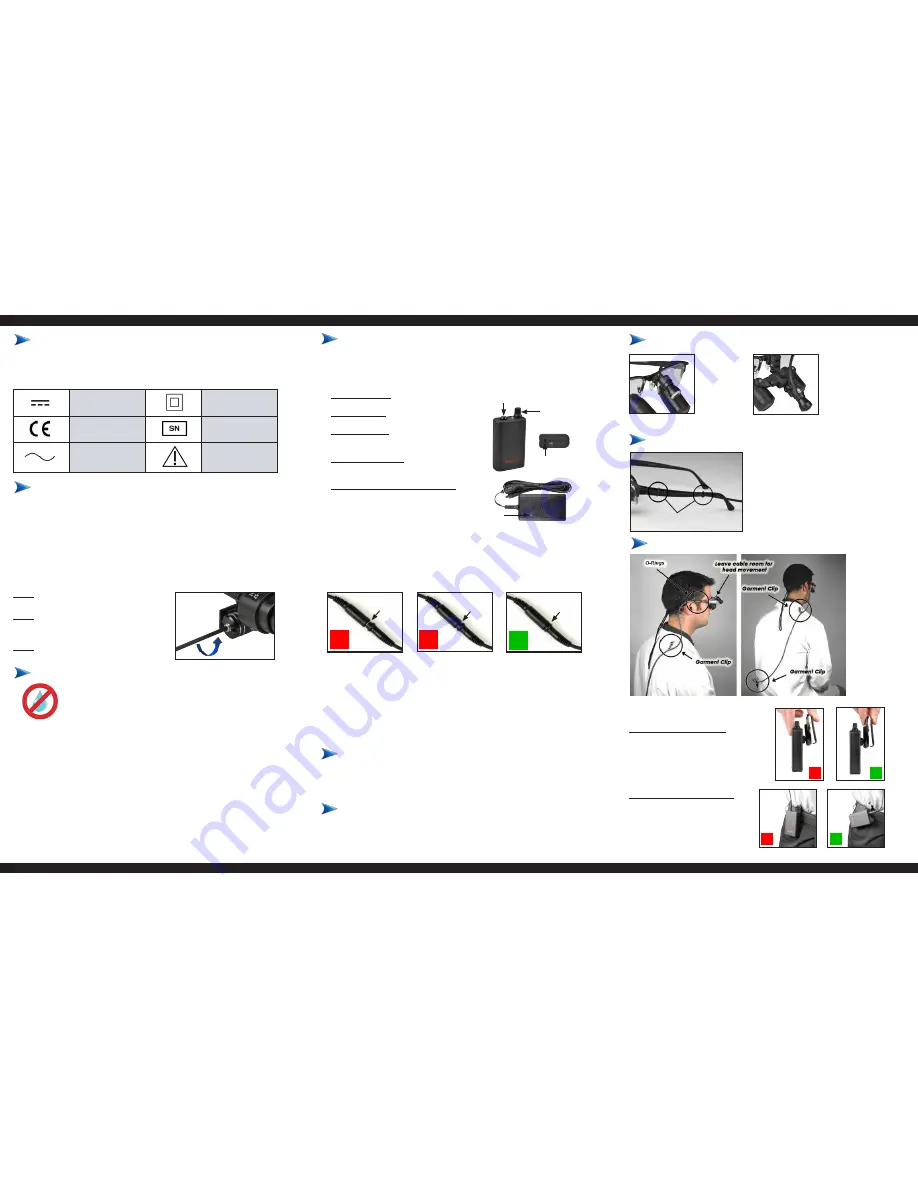
Direct current
Class II
equipment
CE mark
Serial No.
Alternating
current
Attention, consult
accompanying
documents
CLASSIFICATION
Storing the LED system in a safe place will prolong the life of the unit. The
following guidelines will help in sustaining the LED systems useful life:
• Keep the optical face on the light unit from touching hard surfaces which may
cause scratches on the surface. Scratches on the surface will diminish the light
quality.
• When cuts or punctures are visible on the system’s light cord, the wireless LED
system is no longer safe to use; it should be taken out of service immediately.
MAINTENANCE
• Do not immerse in water or any liquid; wipe down with damp cloth. Do not use
HOT or COLD water; using “room-temperature” water is acceptable
• Avoid using running water and disinfectant sprays on or near open slots located
on light unit. Carefully wiping with damp cloth is ok.
• Do not use Lysol® or any disinfectants containing glutaraldehydes, iodophors,
ammonia, alcohol, or ethanol
• Do not autoclave
Disinfection: Use SciCan® “OPTIM 33 TB” wipes/solution only.
*Note: SciCan® OPTIM 33 TB solution can be purchased through SurgiTel in 8 oz.
bottles
FACTORY REFURBISHMENT CLEANING: is available if you come across a difficult
cleaning situation. Call customer support for details: 800-959-0153
*IMPORTANT*
CLEANING
OPERATION
Dove Tail
Adapter
Clip
Adapter
ATTACHING LIGHT ADAPTER TO LOUPE
• Attach the LED light to loupes or glasses using appropriate adapter
ADJUSTMENTS
Note about light-cured composites
• Although it is not recommended to use this LED Light while working with
light-cured composites, setting the light to a lower light intensity may allow
you to work briefly with materials before hardening
• Using the appropriate COLOR FILTER (orange filter) is STRONGLY
RECOMMENDED when using light-cured materials with the LED Light
• Ambient temperature range 10 to 40
o
C
• Relative humidity range 30 to 75%
• Atmospheric pressure range 70 to 106 kPa
• Ambient temperature range -40 to 70
o
C
• Relative humidity range 10 to 100%
• Atmospheric pressure range 50 to 106 kPa
OPERATING CONDITION
TRANSPORT & STORAGE CONDITION
Fixing Hinge Tension (too loose or too tight):
Step 1: Use provided hex key to remove hinge
set screw (see photo to the right)
Step 2
: Use two flat-head screwdrivers (placed
on each side) to loosen/tighten special
screw and nut
Step 3
: Once desired tension is met,
reassemble and tighten set screw
• Charge Time (Battery Pack) = approximately 2-3 hours
• Maximum continuous operation at full load is approximately 7 hours
• Attach the LED light to loupes or glasses using an appropriate adapter
• Use the included garment clips to route the cable appropriately
• LED cable inlet (1)
:
Provides power to LED light unit
• Power switch (2)
:
Rotate to turn light off/on
• Light intensity (2)
:
Adjust the position of the knob to adjust
the light level
• Rechargeable inlet (3)
:
Recharges the battery with the aid of an
AC charger
• Battery charge level indicator light (4)
:
GREEN = fully charged, RED = charging,
FLASHING RED = Error
Warning:
Battery Control Pack Belt Clip
• Improper use of the belt clip
can lead to product damage.
Refer to photos shown to the
right for correct use.
Battery Control Pack Placement
• Positioning the battery pack
incorrectly can lead to belt
clip damage. Refer to the photos
shown to the right for correct
placement.
• Attach light cord to frame by
sliding both o-rings onto
temple arm, as shown
Note: O-rings are attached to
LED cord
CABLE ROUTING
LED Extension Cable Connection
Make sure the cable connection is complete
ly secure as shown in
Figure 3
.
Figure 1
and
Figure 2
both show a connection that is insecure. Even if you hear
or feel a click when connecting, and there is no metal connection showing, the
connection may still be loose. Be sure the connection is as tight as possible.
Ideally, you will feel two clicks when the connection is completely secure.
3
4
2
1
O-rings
Figure 1
Figure 2
Figure 3
Visible Gap
Small Gap
Very Small Gap


