background image

41

E N G L I S H

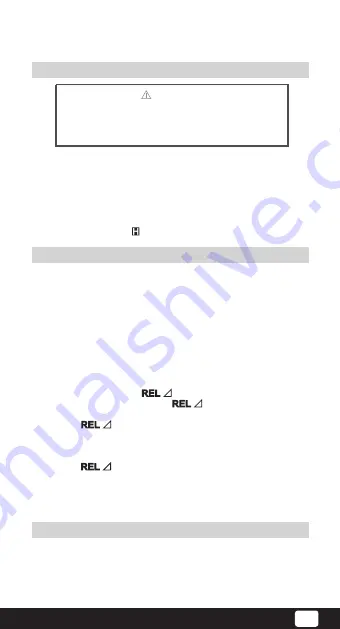
The, REL mode applies to all measurement functions 

except frequency/duty cycle, diode and continuity 

measurement. It subtracts a stored value from the 

present measurement value and displays the result.

For instance, if the stored value is 20 V and the present, 

measurement value is 22 V, the reading would be 2 V. If 

a new measurement value is equal to the stored value 

then display 0 V.

To enter or exit REL mode: 

• Use rotary switch to select the measurement function 

before selecting 

. If measurement function 

changes manually, after 

 is selected, the Meter 

exits the 

REL

 mode.

• Press 

 to enter 

REL

 mode, auto ranging turns 

off except under capacitance testing mode, and the 

present measurement range is locked and display 'O' 

as the stored value.

• Press 

 again or turn the rotary switch to reset 

the stored value and exit 

REL

 mode.

• Pressing HOLD in REL mode makes the Meter stop 

updating.

• Pressing HOLD again to resume updating. 


Warning

To avoid possibility of electric shock, do not 

use Hold mode to determine if circuits are 

without power. The Hold mode will not 

capture unstable or noisy readings.

The Hold mode is applicable to all measurement 

functions.

• Press 

HOLD

 to enter Hold mode; the Meter beeps.

• Press 

HOLD

 again or turn the rotary switch to exit 

Hold mode; the Meter beeps. 

• In 

HOLD

 mode,   is displayed.

OPERATION OF HOLD MODE

THE USE OF RELATIVE VALUE MODE

THE BLUE BUTTON 

It uses for selecting the required measurement function 

when there is more than one function at one position of 

the rotary switch.

Summary of Contents for 111005

Page 1: ...Clamp Multimeter 111005 Manual de Usuario y Garantía User s Manual and Warranty Atención Lea entienda y siga todas las instrucciones de seguridad de este manual antes de usar esta herramienta Warning Read understand and keep the safety rules before using this tool ...

Page 2: ......

Page 3: ...de Diodo 14 F Medición de la capacitancia 15 G Medición de la Frecuencia 16 H Medición de la función de ciclo 17 I Medición de amperaje CA 18 Operación del modo HOLD 19 Uso del modo de valor relativo 19 El Botón AZUL 19 Encendido de la luz del visor 20 Modo de ahorro de energía 20 Especificaciones Generales 20 Especificaciones de Precisión 21 A Voltaje CD 21 B Voltaje CA 21 C Resistencia 21 D Prue...

Page 4: ... El multímetro digital con abrazadera tiene alto rendimiento en protección de sobrecarga y modo de ahorro de energía Si falta alguna pieza o está dañada por favor contacte al disribuidor inmediatamente INTRODUCCIÓN INSPECCIÓN DE PARTES INFORMACIÓN DE SEGURIDAD Abra el empaque y saque el multímetro Verifique las siguientes partes con cuidado y vea si faltan o si están dañadas Este multímetro cumple...

Page 5: ...les o entre alguna terminal y tierra El interruptor giratiorio deberá ser colocado en la posición correcta y no deberá moverse durante la medición para evitar daños en el multímetro Cuando el multímetro esté trabajando con voltaje mayor a los 60 V en DC o 30 V rms en AC tenga cuidado ya que corre el riesgo de electrochoque Utilice terminales correctas y cuide el correcto funcionamiento y rangos en...

Page 6: ...emplace la batería tan pronto como aparezca la señal Trabajar con la batería baja puede dar falsas lecturas y por lo tanto provocar electrochoque o lesiones personales Remueva las cables de prueba clips de prueba y sondeo de temperatura del multímetro y apague el equipo antes de abrir el multímetro Cuando le dé mantenimiento al multímetro reemplace las partes únicamente por el mismo número de mode...

Page 7: ... Luz indicadora de mandíbula abierta 3 Botón HOLD 4 LCD Display 5 Botón de función 6 Terminal de entrada V Entrada para medición de voltaje 7 Terminal de entrada COM Entrada de regreso para todas las mediciones 8 Hz Ω Entrada de capacitancia continuidad diodo frecuencia función de ciclo y medición de resistencia 9 Interruptor giratorio 10 Gatillo Presione la palanca para abrir la mandíbula y encie...

Page 8: ... frecuencia el rango es entre 1 Hz 1kHz se escuchará un sonido 2 Presione de nuevo para entrar a la función de ciclo se escuchará un sonido 3 Presione de nuevo para regresar al voltaje o al modo actual se escuchará un sonido Al elegir entre el voltaje CD y CA se escuchará un sonido El voltaje CD se da por default Azul Presione para entrar y salir de cualquier modo de medición excepto de frecuencia...

Page 9: ...ecturas que puedan provocar un posible cortocircuito o lesiones personales reemplace la batería tan pronto como el indicador aparezca Centígrado La unidad de la temperatura Prueba de diodo El sonidode continuidad está activo Ω Ohm La unidad de resistencia kΩ kilohm 1 x 10 o 1 000 ohms MΩ Megaohm 1 x 10⁶ o 1 000 000 ohms F Faradio La unidad de capacitancia µF Microfaradios 1 x 10 6 o 0 000001 farad...

Page 10: ...able de prueba negro dentro de la terminal COM 2 Coloque el interruptor giratorio en V la medición en CD se da por default o presione el BOTÓN AZUL para seleccionar el modo de medición CD 3 Conecte los cables de prueba al objeto que va a medir El valor de la medida aparecerá en el visor Nota En cada rango el multímetro tiene una entrada de impedancia de aproximadamente 10M Este efecto de carga pue...

Page 11: ...ión CD 3 Conecte los cables de prueba al objeto que se va a medir El valor de la medida aparecerá en el visor Nota En cada rango el multímetro tiene una entrada de impedancia de aproximadamente 10M Este efecto de carga puede causar error en la medición en circuitos de alta impedancia Si la impedancia del circuito es menor o igual a 10k el error es mínimo 0 1 o menos Cuando la medición del voltaje ...

Page 12: ...entar de 0 1 a 0 3 como error en la medición de la resistencia Para obtener lecturas con precisión en mediciones de baja resistencia en un rango de 400 provoque un corto circuito en las terminales de entrada usando la medición relativa del botón de función REL y automáticamente restará el valor de medición cuando los cables de prueba hagan el corto circuito en la lectura Si la lectura de Ω con cor...

Page 13: ...ro de la terminal Hz Ω y el cable de prueba rojo dentro de la terminal COM 2 Coloque el interruptor giratorio en y seleccione el Botón Azul para seleccionar el modo de medición 3 Escuchará un sonido si la resistencia del circuito a probar es menor a los 70Ω Nota El visor LCD mostrará OL indicando que el circuito a probar está abierto Cuando la prueba de continuidad se haya completado desconecte la...

Page 14: ...t o presione el Botón Azul para seleccionar el modo de medición 3 Para lecturas de descenso de voltaje hacia delante sobre cualquier componente semiconductor coloque el cable de prueba rojo sobre el componente ánodo y coloque el cable de prueba negro sobre el componente cátodo El valor de la medición se mostrará en el visor Nota En un circuito un buen diodo podría producir voltaje hacia delante y ...

Page 15: ...edido El valor de la medición se mostrará en el visor Nota Para probar el condensador con polaridad conecte el clip rojo al ánodo y el clip negro al cátodo en lugar de los cables de prueba mencionados anteriormente Para minimizar el efecto del almacenaje de la capacitancia en los cables de prueba los cables de prueba debben ser cortos Para medición de un pequeño valor del condensador use el modo R...

Page 16: ...eccione el modo de medición Hz 3 Conecte los cables de prueba al objeto a ser medido El valor de la medición se mostrará en el visor Nota Cuando la medición de frecuencia se haya completado desconecte la conexión entre los cables de prueba y el circuito a probar y remueva los cables de prueba de las terminales de salida del multímetro Cuando haga mediciones de frecuencia en rango de voltaje o corr...

Page 17: ...ión de ciclo presione Hz hasta que el símbolo se muestre en el visor 3 Conecte los cables de prueba al objeto a ser medido El valor de la medición se mostrará en el visor Nota El visor LCD mostrará 000 0 indicando que la señal de entrada es de mayor o menor nivel Cuando la medición de la función de ciclo se haya completado desconecte la conexión entre los cables de prueba y el circuito a probar y ...

Page 18: ...s 600 V Utilice la función y el rango apropiado para la medición Los rangos de medición de corriente son 400 A y 1 000 A Para medir la corriente haga lo siguiente 1 Coloque el interruptor giratorio en 1 000 A 2 Presione la palanca para abrir la mandíbula 3 Centre el conductor dentro de la mandíbula El valor de la medición se mostrará en el visor correspondiente al efectivo valor de seno de onda va...

Page 19: ...ia y el actual rango de medición estará bloqueado y mostrará O como valor almacenado Presione nuevamente o gire el interruptor giratorio para borrar el valor almacenado y salir del modo REL Presione los modos HOLD y REL el multímetro para actualizar Si presiona HOLD de nuevo reanuda la actualización Advertencia Para evitar la posibilidad de electrochoque no utilice el modo HOLD para determinar si ...

Page 20: ...do Temperatura Operación 5 C a 35 C 41 F a 95 F Almacenamiento 10 C a 50 C 14 F a 122 F Humedad relativa 75 0 30 C 50 31 C 40 C Altitud Operación 2 000 m Almacenamiento 10 000 m Tipo de batería Una batería 9 V NEDA 1604 o 6F22 o 006 P Para la luz de la mandíbula una batería de 1 5 V AAA Batería baja Imagen Dimensiones 260 mm x 104 mm x 52 mm Peso Aproximado 530 g batería incluida Seguridad Acuerdo...

Page 21: ...5 5 Protección de Sobrecarga 600 V rms Comentarios Entrada de impedancia 10MΩ Voltaje CD A Rango Resolución 400 mV 4 V 40 V 400 V 600 V 100 µV 1 mV 10 mV 100 mV 1 V Precisión 0 8 3 0 8 1 1 3 Protección de Sobrecarga 600 V rms 600 AC rms contínuos Comentarios Circuitos con voltaje abierto aproximado 0 45 V Resistencia C Rango Resolución 400 Ω 4 kΩ 40 kΩ 400 kΩ 4 MΩ 40 MΩ 100 mΩ 1 Ω 10 Ω 100 Ω 1 kΩ ...

Page 22: ...4 10 Protección de Sobrecarga 600 Vp Frecuencia y Función de Ciclo G Comentarios 10 Hz 10 MHz Rango Sensibilidad de entrada como sigue 1 MHz 300 mV rms 1 MHz 600 mV rms 0 1 99 9 La lectura es sólo con propósito de referencia Rango Resolución 10 Hz 100 Hz 1 kHz 10 kHz 100 kHz 1 MHz 0 1 99 9 1 pF 10 pF 100 pF 1 nF 10 nF 100 nF 0 1 Precisión 0 1 3 Protección de Sobrecarga 600 Vp Comentarios Frecuenci...

Page 23: ...retire la batería cuando no lo vaya a usar por periodos largos de tiempo No guarde el multímetro en lugares con humedad altas temperaturas lugares explosivos inflamables o con fuertes campos magnéticos Advertencia Para evitar falsas lecturas electrochoque o lesiones personales por utilizar una batería baja cambie la misma en cuanto el indicador de batería baja aparezca Asegúrese que la mandíbula y...

Page 24: ...N O T A S ...

Page 25: ...ing Diodes 36 F Capacitance Measurement 37 G Frequency Measurement 38 H MeasuringDutyCycle 39 I AC Current Measurement 40 Operation of Hold Mode 41 The use of relative value mode 41 The BLUE Button 41 Turning on the display backlight 42 Sleep Mode 42 General Specifications 42 Accuracy Specifications 43 A DC Voltage Auto ranging 43 B AC Voltage Auto ranging 43 C Resistance 43 D ContinuityTest 43 E ...

Page 26: ... 3 4 digits hand held digital auto ranging clamp multimeters with stabilize functions safety operations and reliable performance In addition to the conventional measuring functions there is a unique jaw opening light and display backlight features enabling user to work in a dim condition This is also a highly applied digital clamp multimeter of good performance with full overload protection and sl...

Page 27: ...test leads are inserted into the input terminals Before using the meter inspect the case or part of the case is removed Look for cracks or missing plastic Pay attention to the insulation around the connectors Inspect the test leads for damaged insulation or exposed metal Check the test leads for continuity Replace damaged test leads with identical model number or electrical specifications before u...

Page 28: ...es or capacitance Replace the battery as soon as the battery indicator appears With a low battery the Meter might produce false readings that can lead to electric shock and personal injury Remove test leads temperature probe and test clip from the Meter and turn the Meter power off before opening the Meter case When servicing the Meter use only the same model number or identical electrical specifi...

Page 29: ... current flowing through the conductor 2 The jaw opening light 3 HOLD button 4 LCD display 5 Function button 6 V input terminal Input for voltage measurement 7 COM input terminal Return terminal for all measurements 8 Hz Ω Input for capacitance continuity diode frequency duty cycle and resistance measurements 9 Rotary Switch 10 Trigger Press the lever to open the transformer jaws and turn the jaw ...

Page 30: ...he frequency counter the range is between 1Hz 1kHz the Meter beeps 2 Press again to enter duty cycle mode the Meter beeps 3 Press again to return voltage or current mode the Meter beeps Switches between DC and AC voltage the Meter beeps DC voltage is default Blue Press to enter and exit the REL mode in any measuring mode except in frequency duty cycle diode and continuity the Meter beeps Any rotar...

Page 31: ...shock or personal injury replace the battery as soon as the battery indicator appears Centigrade The unit of temperature Test of diode The continuity buzzeris on Ω Ohm The unit of resistance kΩ kilohm 1 x 10 or 1 000 ohms MΩ Megaohm 1 x 10⁶ or 1 000 000 ohms F Farad The unit of capacitance µF Microfarad 1 x 10 6 or 0 000001 farads nF Nanofarad 1 x 10 9 or 0 000000001 farads Hz Hertz The unit of fr...

Page 32: ... switch to V DC measurement is default or press BLUE button to select DC measurement mode 3 Connect the test leads across with the object being measured The measured value shows on the display Note In each range the Meter has an input impedance of 10 M This loading effect can cause measurement errors in high impedance circuits If the circuit impedance is less than or equal to 10 k the error is neg...

Page 33: ...the test leads across with the object being measured The measured value shows on the display Note In each range the Meter has an input impedance of 10M This loading effect can cause measurement errors in high impedance circuits If the circuit impedance is less than or equal to 10 k the error is negligible 0 1 or less When AC voltage measurement has been completed disconnect the connection between ...

Page 34: ...btain precision readings in low resistance measurement that is the range of 400Ω short circuit the input terminals beforehand using the relative measurement function button REL to automatically subtract the value measured when the testing leads are short circuited from the reading If Ω reading with shorted test leads is not 0 5Ω check for loose test leads incorrect function selection or enabled Da...

Page 35: ... the Hz Ω terminal and the black test lead into the COM terminal 2 Set the rotary switch to and press BLUE button to select measurement mode 3 The buzzer sounds if the resistance of a circuit under test is less than around 70Ω Note The LCD displays OL indicating the circuit being tested is open When continuity testing has been completed disconnect the connection between the testing leads and the c...

Page 36: ...select measurement mode 3 For forward voltage drop readings on any semiconductor component place the red test lead on the component s anode and place the black test lead on the component s cathode The measured value shows on the display Note In a circuit a good diode should still produce a forward voltage drop reading of 0 5 V to 0 8 V however the reverse voltage drop reading can vary depending on...

Page 37: ...ote For testing the capacitor with polarity connect the red clip to anode black clip to cathode instead of test leads as mentioned above To minimize the effect of capacitance stored in the test leads the test lead should be as short as possible To measure a small value of capacitor use REL mode to remove the test leads capacitance Remaining voltage insulated impedance dielectric absorption from th...

Page 38: ...3 Connect the test leads across with the object being measured The measured value shows on the display Note When frequency measurement has been completed disconnect the connection between the testing leads and the circuit under test and remove the testing leads away from the input terminals of the Meter When making frequency measurement at voltage or current range please mind the following signal ...

Page 39: ...til the symbol is shown on the display 3 Connect the test leads across with the object being measured The measured value shows on the display Note The LCD displays 000 0 indicating the input signal is high or low level When duty cycle measurement has been completed disconnect the connection between the testing leads and the circuit under test and remove the testing leads away from the input termin...

Page 40: ... Use proper function and range for the measurement The measurement ranges of current are 400 A and 1 000 A To measure current do the following 1 Set the rotary switch to 1 000 A 2 Press the lever to open the transformer jaws 3 Center the conductor within the transformer jaw The measured value shows on the display it is an effective value of sine wave mean value response Note When current measureme...

Page 41: ...tance testing mode and the present measurement range is locked and display O as the stored value Press again or turn the rotary switch to reset the stored value and exit REL mode Pressing HOLD in REL mode makes the Meter stop updating Pressing HOLD again to resume updating Warning To avoid possibility of electric shock do not use Hold mode to determine if circuits are without power The Hold mode w...

Page 42: ...F Storage 10 C to 50 C 14 F to 122 F Relative humidity 75 0 30 C 50 31 C 40 C Altitude Operating 2000 m Storage 10000 m Battery tipe The meter one piece of 9 V NEDA 1604 or 6F22 or 006P The jaw opening light one piece of 1 5 V AAA Battery deficiency Display Dimensions H x W x L 260 x 104 x 52 mm Weight Approximate 530 g battery included Safety Compliances IEC61010 CAT II 1000 V CAT III 600 V overv...

Page 43: ...1 V Accuracy 1 2 5 1 5 5 Overload Protection 600 V rms Remark Input impedance 10MΩ DC Voltage A Range Resolution 400 mV 4 V 40 V 400 V 600 V 100 µV 1 mV 10 mV 100 mV 1 V Accuracy 0 8 3 0 8 1 1 3 Overload Protection 600 V rms 600 AC rms continuous Remark Open circuit voltage approximate 0 45 V Resistance C Range Resolution 400 Ω 4 kΩ 40 kΩ 400 kΩ 4 MΩ 40 MΩ 100 mΩ 1 Ω 10 Ω 100 Ω 1 kΩ 10 kΩ Accuracy...

Page 44: ...ode 5 40 3 5 4 10 Overload Protection 600 Vp Frequency Duty Cycle G Remark 10 Hz 10 MHz Range Input sensitivity as follows 1 MHz 300 mV rms 1 MHz 600 mV rms 0 1 99 9 Reading is only for reference purpose Range Resolution 10 Hz 100 Hz 1 kHz 10 kHz 100 kHz 1 MHz 0 1 99 9 1 pF 10 pF 100 pF 1 nF 10 nF 100 nF 0 1 Accuracy 0 1 3 Overload Protection 600 Vp Remark Frequency response 50 Hz 60 Hz Display ef...

Page 45: ...y when it is not using for a long time Do not use or store the Meter in a place of humidity high temperature explosive inflammable and strong magnetic field Warning To avoid false readings which could lead to possible electric shock or personal injury replace the battery as soon as the battery indicator appears Make sure the transformer jaw and the tets leads are disconected from the circuit being...

Page 46: ...N O T E S ...

Page 47: ......

Page 48: ...mplimiento de esta garantía serán cubiertos por Urrea Herramientas Profesionales S A de C V Esta garantía no será efectiva en los siguientes casos a Cuando la herramienta se haya utilizado en condiciones distintas a las normales b Cuando el producto hubiera sido alterado de su composición original o reparado por personas no autorizadas por el fabricante o importador respectivo This product has 1 y...

Reviews: