Bringing the Benefits of Real-Time Data Collection to the World
Sutron Corporation, Tel: 703-406-2800,
http://www.sutron.com
36
Measurement Schedules
To create a new measurement schedule, select the “[New Measurement]” entry and press the
“Edit” button. To edit an existing measurement, select the entry in the tree and click “Edit”. To
delete a measurement schedule, select the entry and click “Delete”. When creating or editing a
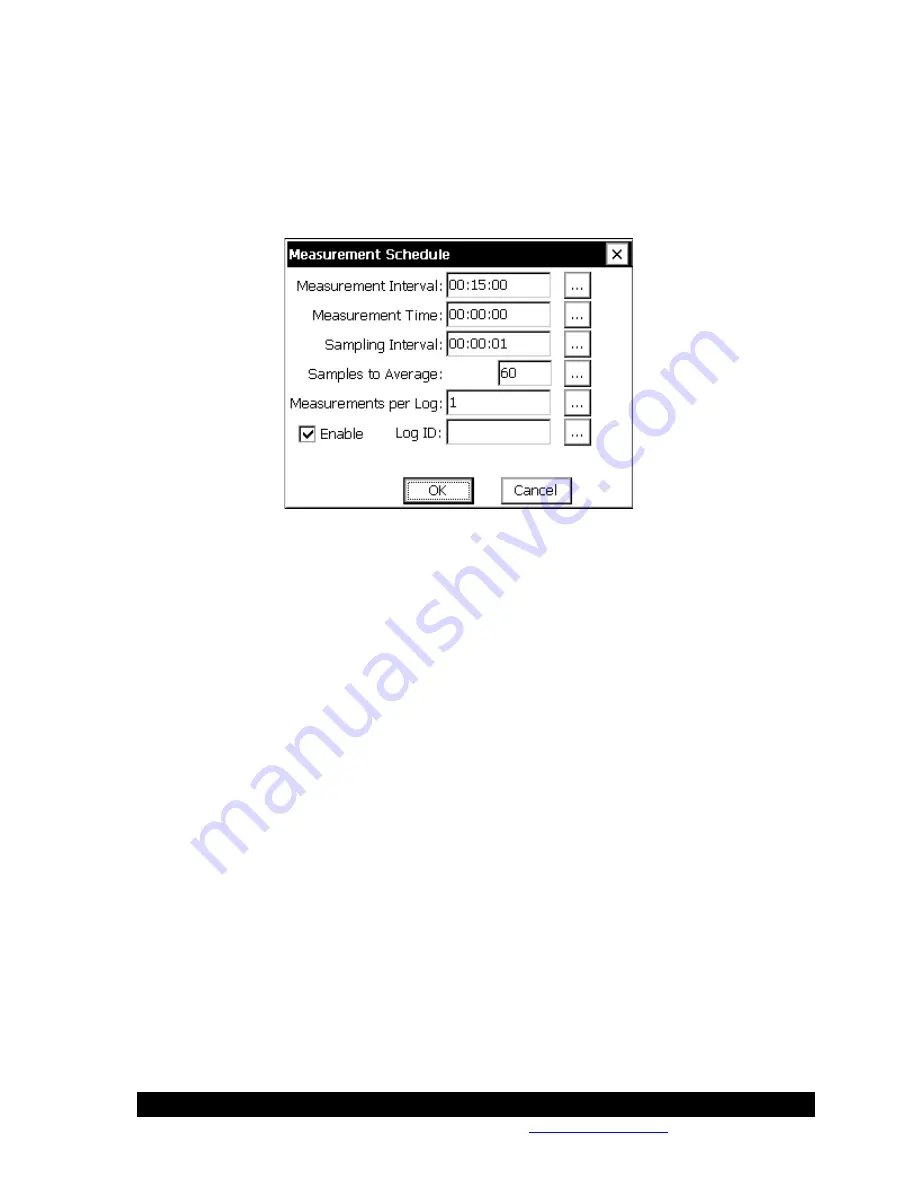
measurement schedule, the following dialog is shown:
Differences from an 8210:
Editing an EzSetup measurement is very much like the measurement
schedules on the 8210 with a few differences. The 8210 has two fields named Power Time and
Sampling Time which are not supported, and the order of processing has also been changed a
little. Specifically, on the Xpert, all the non-averaged sensors are measured first, so these
measurements occur as close as possible to the measurement time. Then averaging starts
immediately following, and continues until either the “Samples to Average” is exceeded or the
average time has expired. The average time expires when the next scheduled Measurement
Interval is to start or the sampling window defined by the Sampling Interval and Samples to
Average is exceeded.
MEASUREMENT INTERVAL:
Specifies how often the measurement is performed.
MEASUREMENT TIME:
Specifies when the measurement is performed. This is can be
viewed as an offset into the measurement interval and will typically be 00:00:00 as shown above.
Setting it to 00:05:00 would cause the measurments to occur at 5 minutes, 20 minutes, 35
minutes, and 50 minutes past the hour. In other words, at 00:05:00 and every 15 minutes
thereafter.
SAMPLING INTERVAL:
For sensors with averaging enabled, the sampling interval specifies
the timing between samples. Note: This should be at least as long as the time required to take the
samples. If not, the “Samples to Average” takes on a new meaning described below.
SAMPLES TO AVERAGE:
Specifies how many samples to take in averaging a sensor. Note:
The sampling interval along with the samples to average defines a sampling window over which
the samples will be taken. Sixty samples taken at a one second interval defines a sixty second
sampling window. In situations where the sampling interval is shorter than the time required to
take the samples, the unit will take consecutive samples for the duration defined by the sampling
window. In other words, if an SDI-12 sensor that took 2 seconds was being measured by the
above setup, the averaging would be for 60 seconds (00:00:01 times 60) instead of 120 seconds
Summary of Contents for Xpert2
Page 2: ......
Page 11: ...Chapter 1 Introduction...
Page 16: ......
Page 17: ...Chapter 2 Getting Started...
Page 86: ......
Page 87: ...Chapter 4 Graphical Setup Diagrams...
Page 104: ......
Page 105: ...CHAPTER 5 EXAMPLE SETUPS...
Page 128: ......
Page 129: ......
Page 130: ......
Page 131: ...Chapter 7 Installation...
Page 140: ......
Page 141: ...Chapter 8 Maintenance and Troubleshooting...
Page 145: ...Appendix A Setup Blocks...
Page 266: ......
Page 267: ...Appendix B Updating the Firmware...
Page 290: ......
Page 291: ...Appendix E Software Development Kit SDK...
Page 293: ...Appendix F Creating Custom Voice Files...
Page 330: ......


