Bringing the Benefits of Real-Time Data Collection to the World
Sutron Corporation, Tel: 703-406-2800,
http://www.sutron.com
60
the filename for the setup file being saved, click the change button (“…”) and using the virtual
keypad to enter the desired name of the file.
Append
The
Append
option is used to append blocks from another setup file to the current one. Note that
only blocks are appended. No other settings from the setup file selected are imported (e.g.,
Satlink settings remain unchanged after appending a new setup file).
Note: The system saves the setup file as changes are made so that it is never necessary to
perform an explicit save (and, hence, there is no
Save
option).
SNTP
The
SNTP
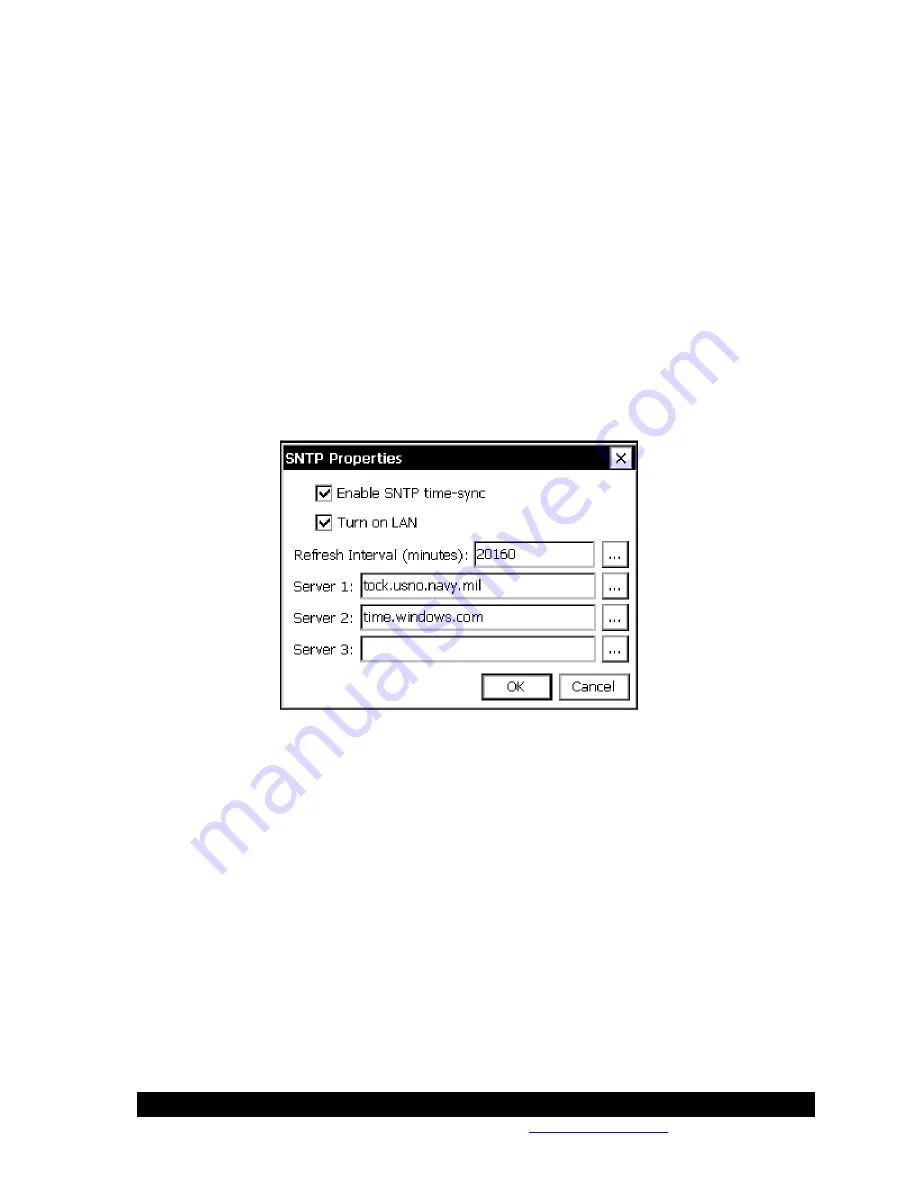
branch of the setup tab is used to configure time synchronization with an NTP
network time source. Pressing
Edit
with this branch selected brings up a window with
configuration options.
When
Enable SNTP time-sync
enabled, the logger attempts to set system time using the NTP
time source defined by
Server 1
. If
Server 1
can’t be reached for some reason,
Server 2
is tried.
Likewise, if
Server 2
is unavailable,
Server 3
is tried. The attempts to set system time occur at
the interval specified in
Refresh Interval
. The default setting of 20160 minutes equates to once
every 14 days. The minimum value for this setting is 5 minutes.
When
Turn On LAN
is checked, the logger will turn on the LAN when SNTP is enabled. Note:
power to the LAN is continuous, not just when the time synchronizations occur.
Note, when deploying the logger on a network having public access, it’s recommended that
additional security be utilized such as an external VPN Firewall (virtual private network) that
would restrict access, and provide encrypted and secure communications.
Users
The
Users
branch of the setup tab is used to manage the list of user login accounts to the system.
Pressing
Edit
with this branch selected brings up a window with all the users accounts that have
Summary of Contents for Xpert2
Page 2: ......
Page 11: ...Chapter 1 Introduction...
Page 16: ......
Page 17: ...Chapter 2 Getting Started...
Page 86: ......
Page 87: ...Chapter 4 Graphical Setup Diagrams...
Page 104: ......
Page 105: ...CHAPTER 5 EXAMPLE SETUPS...
Page 128: ......
Page 129: ......
Page 130: ......
Page 131: ...Chapter 7 Installation...
Page 140: ......
Page 141: ...Chapter 8 Maintenance and Troubleshooting...
Page 145: ...Appendix A Setup Blocks...
Page 266: ......
Page 267: ...Appendix B Updating the Firmware...
Page 290: ......
Page 291: ...Appendix E Software Development Kit SDK...
Page 293: ...Appendix F Creating Custom Voice Files...
Page 330: ......


