Bringing the Benefits of Real-Time Data Collection to the World
Sutron Corporation, Tel: 703-406-2800,
http://www.sutron.com
70
Export
This button is used to retrieve the log file. Clicking this button will cause the system to lead you
through the steps to create an ASCII file of the data in the log. The log file is a compressed file.
If you were to try to view the file, you would see gibberish because of the compression.
Converting the file to ASCII allows the contents of the file to be viewed.
As a part of this Export process, you are asked to specify a destination for the file. If you do not
get a prompt to save the file on the PC, you should change the directory for the file to be \Temp.
To do this, press the button labeled
Up
and then select
Temp
. If you were to select \flash disk\ as
the destination directory, you could fill the flash disk with the new file and shut down the
system.
If the Xpert contains a storage card (USB or SD), then when the button labeled
UP
is pressed,
you will be able to select one of “\USB Card” or “\SD Card” as a destination.
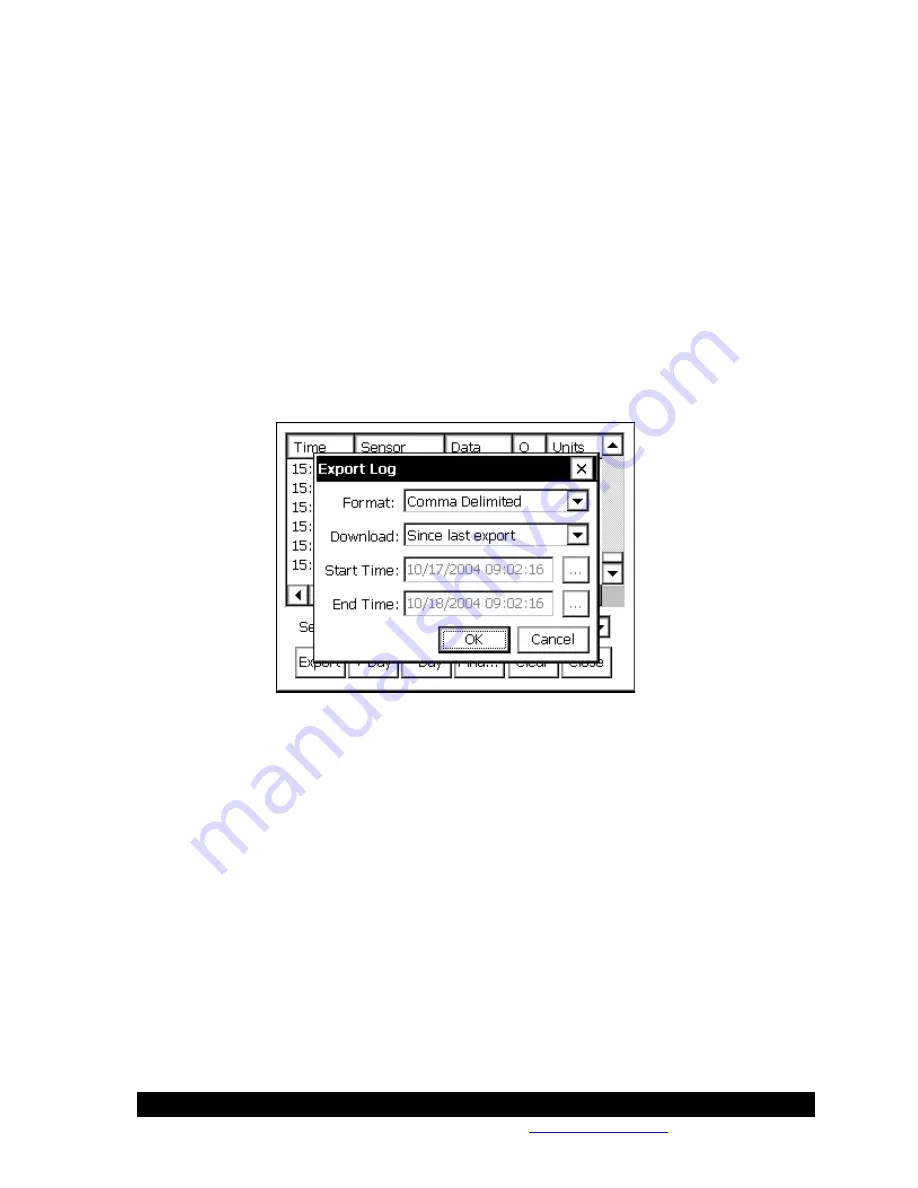
When you press the Export button, the following dialog is displayed:
This dialog allows you to define what the exported log file should look like.
The
Format
options are: Comma delimited, Tab delimited and Fixed Column. The comma
delimited format works well with spreadsheets. The Tab Delimited and Fixed Column formats
can work well when printing.
The
Download
options are defined as follows:
Since last export
- When this option is selected, the system exports only data that
is more than the time of the last log export. If the log has never
been exported, the system exports the entire log.
Start time to end
time
- When this option is selected, the system exports only the data
that has a timestamp between the dates and times specified in
Start Time
and
End Time
.
Start time to end log - When this option is selected, the system exports only the data
that has a timestamp between the time specified in
Start Time
and the end of the log.
Summary of Contents for Xpert2
Page 2: ......
Page 11: ...Chapter 1 Introduction...
Page 16: ......
Page 17: ...Chapter 2 Getting Started...
Page 86: ......
Page 87: ...Chapter 4 Graphical Setup Diagrams...
Page 104: ......
Page 105: ...CHAPTER 5 EXAMPLE SETUPS...
Page 128: ......
Page 129: ......
Page 130: ......
Page 131: ...Chapter 7 Installation...
Page 140: ......
Page 141: ...Chapter 8 Maintenance and Troubleshooting...
Page 145: ...Appendix A Setup Blocks...
Page 266: ......
Page 267: ...Appendix B Updating the Firmware...
Page 290: ......
Page 291: ...Appendix E Software Development Kit SDK...
Page 293: ...Appendix F Creating Custom Voice Files...
Page 330: ......


