Bringing the Benefits of Real-Time Data Collection to the World
Sutron Corporation, Tel: 703-406-2800,
http://www.sutron.com
79
AN EXAMPLE SETUP DIAGRAM
Pressing
Edit
with the
Graphical Setup
item highlighted on the
Setup
tab brings up a screen
similar to the one shown below. The tabs at the top of the screen have been replaced with the
buttons
Zoom, Wire, Add,
and
Exit,
with the rest of the screen reserved for placing and
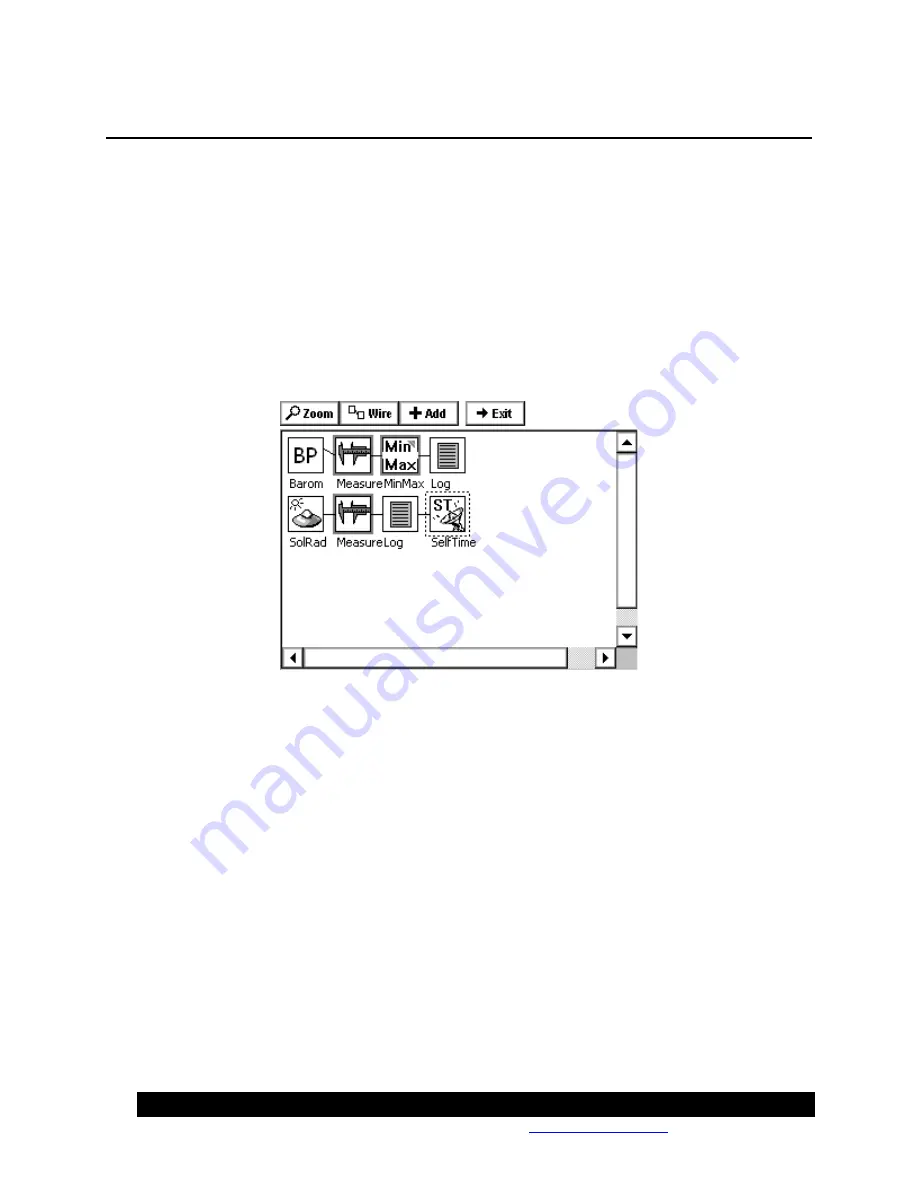
connecting setup blocks. From this screen, we can get a quick view of where data is coming
from, how it is getting sampled and processed, and where it is going. Below, for example, we
see:
A parameter from the barometric pressure sensor is being periodically sampled and its maximum
or minimum being stored to a log at some rate; and,
Solar radiation is being regularly sampled, logged and periodically transmitted via satellite to a
main station.
Block Categories
Setup blocks come in general categories –
Input, Processing, Logging, Telemetry, Miscellaneous,
and
Output
. Four of these types of block are represented above. On the left are the
input blocks
representing barometric pressure and solar radiation sensors hooked to the system. Next to them
are the Measure and MinMax
processing blocks
which request and/or perform operations on the
data from the sensor blocks. Note how these two blocks have darkened borders. This is an
indication that the block is “active”, i.e., that it initiates data flow through a chain of blocks.
After the Measure and MinMax blocks come two
log blocks,
which indicate where the data is
being stored. Finally, there is a
telemetry block
which indicates how the data is being transmitted.
Blocks of a certain type are not restricted to a particular column in the display, but data does
always flow from the left side of the screen to the right.
Block Inputs and Outputs
Setup blocks are hooked together via their inputs and outputs. A block with an input can
accept
data from another block and a block with an output can
send
data to another block. To see this
more clearly, we’ll zoom in on our example using the
Zoom
button on the top of the screen:
Summary of Contents for Xpert2
Page 2: ......
Page 11: ...Chapter 1 Introduction...
Page 16: ......
Page 17: ...Chapter 2 Getting Started...
Page 86: ......
Page 87: ...Chapter 4 Graphical Setup Diagrams...
Page 104: ......
Page 105: ...CHAPTER 5 EXAMPLE SETUPS...
Page 128: ......
Page 129: ......
Page 130: ......
Page 131: ...Chapter 7 Installation...
Page 140: ......
Page 141: ...Chapter 8 Maintenance and Troubleshooting...
Page 145: ...Appendix A Setup Blocks...
Page 266: ......
Page 267: ...Appendix B Updating the Firmware...
Page 290: ......
Page 291: ...Appendix E Software Development Kit SDK...
Page 293: ...Appendix F Creating Custom Voice Files...
Page 330: ......


