background image

Body Structure:  9E-4

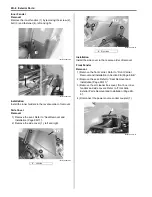
Front Carrier Removal and Installation

B831G29506005

Removal

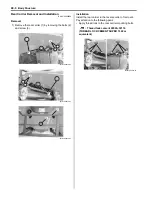
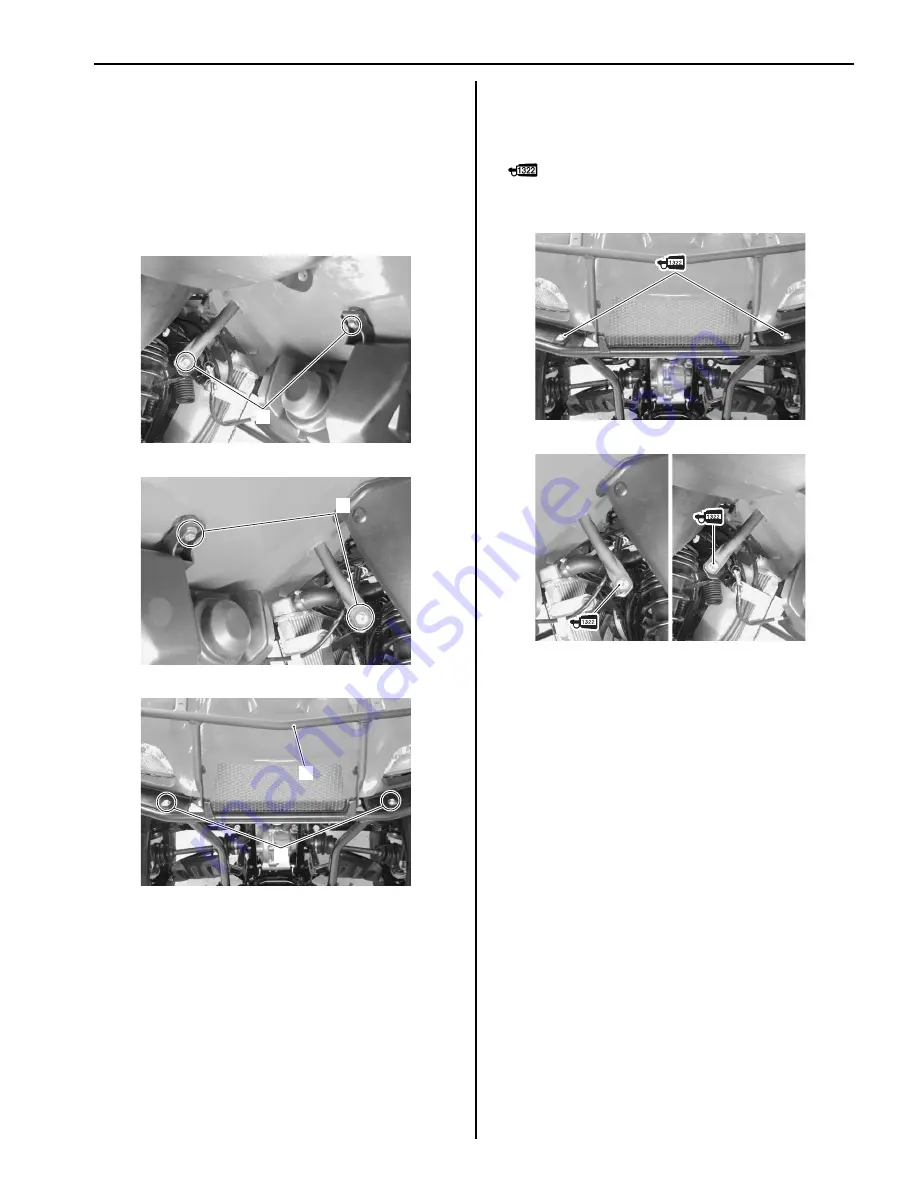
1) Remove the front grill upper cover. Refer to “Front 

Side Exterior Parts Removal and Installation in 
Section 9D (Page 9D-6)”.

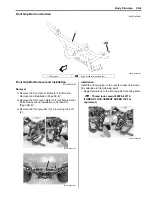
2) Remove the front carrier (1) by removing the bolts 

(2).

Installation

Install the front carrier in the reverse order of removal. 
Pay attention to the following point:
• Apply thread lock to the front carrier mounting bolts.

:  Thread lock cement 99000–32110 

(THREAD LOCK CEMENT SUPER 1322 or 
equivalent)

2

I831G1950007-01

2

I831G1950008-02

2

1

I831G1950009-01

I831G1950010-01

I831G1950011-01

Summary of Contents for 2009 LT-A750XK9

Page 1: ...tions at the time of publication If modifi cations have been made since then differences may exist between the content of this manual and the actual vehicle Illustrations in this manual are used to show the basic principles of operation and work procedures They may not represent the actual vehicle exactly in detail This manual is written for persons who have enough knowledge skills and tools inclu...

Page 2: ......

Page 3: ...ons 2 1 Suspension General Diagnosis 2A 1 Front Suspension 2B 1 Rear Suspension 2C 1 Wheels and Tires 2D 1 Driveline Axle 3 i Precautions 3 1 Drive Chain Drive Train Drive Shaft 3A 1 Differential 3B 1 Transfer 3C 1 Propeller Shafts 3D 1 Brake 4 i Precautions 4 1 Brake Control System and Diagnosis 4A 1 Front Brakes 4B 1 Rear Brakes 4C 1 Parking Brake 4D 1 Transmission Transaxle 5 i Precautions 5 1 ...

Page 4: ......

Page 5: ...SUPPLEMENTS L LT A750XK9 09 MODEL 10 LT A750XPK9 09 MODEL 11 ...

Page 6: ...Table of Contents 00 i 00 Section 00 CONTENTS Precautions Precautions 00 1 Precautions 00 1 Warning Caution Note 00 1 General Precautions 00 1 Precautions for Electrical Circuit Service 00 2 ...

Page 7: ...u follow all of the material manufacturer s instructions Never use gasoline as a cleaning solvent To avoid getting burned do not touch the engine engine oil radiator and exhaust system until they have cooled After servicing the fuel oil water exhaust or brake systems check all lines and fittings related to the system for leaks CAUTION If parts replacement is necessary replace the parts with Suzuki...

Page 8: ...Inspect each terminal on the connector coupler for looseness or bending Push in the coupler straightly An angled or skewed insertion may cause the terminal to be deformed possibly resulting in poor electrical contact Inspect each terminal for corrosion and contamination The terminals must be clean and free of any foreign material which could impede proper terminal contact Before refitting the seal...

Page 9: ...he fuse Do not use a fuse of different capacity Do not use wire or any other substitute for the fuse Switch Never apply grease material to switch contact points to prevent damage ECM Various sensors Since each component is a high precision part great care should be taken not to apply any severe impacts during removal and installation Be careful not to touch the electrical terminals of the electron...

Page 10: ... measurements may not be obtained and personal injury may result Electrical Circuit Inspection Procedure While there are various methods for electrical circuit inspection described here is a general method to check for open and short circuit using an ohmmeter and a voltmeter Open circuit check Possible causes for the open circuit are as follows As the cause can exist in the connector coupler or te...

Page 11: ...inals A and C 2 Disconnect the coupler B and measure resistance between couplers A and B 1 If no continuity is indicated the circuit is open between couplers A and B 1 If continuity is indicated there is an open circuit between couplers B 2 and C or an abnormality in coupler B 2 or coupler C Voltage check If voltage is supplied to the circuit being checked voltage check can be used as circuit chec...

Page 12: ...it to be checked branches to other parts as shown disconnect all connectors couplers of those parts Otherwise diagnosis will be misled 3 Measure resistance between terminal at one end of circuit A terminal in figure and body ground If continuity is indicated there is a short circuit to ground between terminals A and C 4 Disconnect the connector coupler included in circuit coupler B and measure res...

Page 13: ...display Check that no voltage is applied before making the measurement If voltage is applied the tester may be damaged After using the tester turn the power off Special tool 09900 25008 Multi circuit tester set NOTE When connecting the multi circuit tester use the needle pointed probe to the back side of the lead wire coupler and connect the probes of tester to them Use the needle pointed probe to...

Page 14: ...arance Inspection and Adjustment 0B 4 Spark Plug Replacement 0B 9 Spark Plug Inspection and Cleaning 0B 9 Spark Arrester Cleaning 0B 10 Fuel Line Inspection 0B 10 Engine Oil and Filter Replacement 0B 10 Front Differential Gear Oil Inspection 0B 12 Front Differential Gear Oil Replacement 0B 13 Final Gear Oil Inspection 0B 14 Final Gear Oil Replacement 0B 14 Throttle Cable Play Inspection and Adjust...

Page 15: ...ne Control Module Engine Control Unit ECU FI Control Unit ECT Sensor Engine Coolant Temperature Sensor ECTS Water Temp Sensor WTS F FI Fuel Injection Fuel Injector FP Fuel pump FPR Fuel Pressure Regulator FP Relay Fuel Pump Relay Symbol Definition Torque control required Data beside it indicate specified torque Apply oil Use engine oil unless otherwise specified Apply molybdenum oil solution Mixtu...

Page 16: ... B C Crankshaft Position Sensor CKP Sensor Crankshaft Position Sensor CKPS Crank Angle D Data Link Connector DLC Dealer Mode Coupler Diagnostic Test Mode DTM Diagnostic Trouble Code DTC Diagnostic Code Malfunction Code E Electronic Ignition EI Engine Control Module ECM Engine Control Module ECM Fl Control Unit Engine Control Unit ECU Engine Coolant Level ECL Coolant Level Engine Coolant Temperatur...

Page 17: ...pump octane R 2 M 2 or 91 octane or higher rated by the research method Gasoline containing MTBE Methyl Tertiary Butyl Ether less than 10 ethanol or less than 5 methanol with appropriate cosolvents and corrosion inhibitor is permissible Fuel For Other Countries Gasoline used should be graded 91 octane Research Method or higher Unleaded gasoline is recommended Engine Oil For USA Oil quality is a ma...

Page 18: ...ator Anti freeze Engine coolant The engine coolant perform as a corrosion and rust inhibitor as well as anti freeze Therefore the engine coolant should be used at all times even though the atmospheric temperature in your area does not go down to freezing point Suzuki recommends the use of SUZUKI COOLANT anti freeze engine coolant If this is not available use an equivalent which is compatible with ...

Page 19: ...with Green tracer Gr Gray O R Orange with Red tracer O Orange O W Orange with White tracer P Pink O Y Orange with Yellow tracer R Red O B Orange with Black tracer W White O Bl Orange with Blue tracer Y Yellow P W Pink with White tracer B Bl Black with Blue tracer R B Red with Black tracer B Br Black with Brown tracer R G Red with Green tracer B G Black with Green tracer W B White with Black tracer...

Page 20: ...r warning label For P 17 28 5 Tire air pressure label For P 17 24 28 33 17 Rear carrier warning label For P 24 33 6 Tire air pressure label and warning no passenger label For P 28 18 Rear carrier warning label For P 17 28 7 General warning AGE 16 label For P 17 24 28 33 19 ICES Canada label For P 28 8 General warning label For P 28 20 Compliance label No 2 For P 28 9 Warning no passenger label For...

Page 21: ... I831G1010006 02 1 Battery 7 4WD Diff lock relay 13 Ignition switch 2 Starter relay Main fuse 8 Mode selection switch coupler 14 Power source 3 Fuse box 9 Starter motor 15 Ignition coil 4 Neutral relay 10 ECT sensor 16 Rear brake switch 5 Fuel pump relay 11 4WD Diff lock switch 17 Gear position switch 6 ECM 12 Brake lever switch R ...

Page 22: ...itch 24 Parking brake switch 30 High position diode 19 Resister 25 Brake lever switch 31 Low position diode 20 4WD Diff lock actuator diode 26 Regulator Rectifier 32 Speed sensor 21 Neutral relay diode 27 Parking brake relay 33 CKP sensor 22 Cooling fan 28 Diff lock relay 34 Generator 23 Handlebar switch 29 Actuator ...

Page 23: ...pe 4 stroke liquid cooled DOHC Number of cylinders 1 Bore 104 0 mm 4 094 in Stroke 85 0 mm 3 346 in Displacement 722 cm3 44 1 cu in Compression ratio 10 0 1 Fuel system Fuel injection Air cleaner Non woven fabric element Starter system Electric and recoil starter Lubrication system Wet sump Idle speed 1 300 100 r min Item Specification Remark Clutch Wet shoe automatic centrifugal type Transmission...

Page 24: ...I Ignition timing 7 B T D C at 1 300 r min Spark plug NGK CR6E or DENSO U20ESR N Battery 12 V 64 8 kC 18 Ah 10 HR Generator Three phase A C generator Main fuse 30 A Fuse 10 10 10 10 15 15 A Headlight 12 V 35 35 W x 2 Auxiliary light 12 V 35 35 W Brake light Taillight 12 V 21 5 W Revercing light 12 V 21 W P 17 Speedometer light LED Neutral indicator light LED High beam indicator light LED P 17 Cool...

Page 25: ...mm 49 0 in Wheelbase 1 280 mm 50 4 in Ground clearance 270 mm 10 6 in Seat height 880 mm 34 6 in Curb mass 302 kg 666 lbs P 28 33 304 kg 670 lbs P 17 24 Front track 930 mm 36 6 in Rear track 940 mm 37 0 in 09900 06107 Snap ring pliers 09900 06108 Snap ring pliers 09900 20101 Vernier calipers 1 15 mm 150 mm 09900 20102 Vernier calipers 1 20 mm 200 mm 09900 20202 Micrometer 1 100 mm 25 50 mm 09900 2...

Page 26: ...tachment 09912 34510 Cylinder disassembling tool 09913 50121 Oil seal remover 09913 60910 Bearing remover 09913 61510 Bearing puller 09913 70210 Bearing installer set 09913 75520 Bearing installer 09913 84510 Bearing installer 09915 40610 Oil filter wrench 09915 63311 Compression gauge attachment 09915 64512 Compression gauge 09915 74511 Oil pressure gauge set 09915 74521 Oil pressure gauge hose 0...

Page 27: ... nut wrench 09917 47011 Vacuum pump gauge 09919 28610 Sleeve protector 09920 13120 Crankcase separating tool 09920 31020 Extension handle 09920 33540 Clutch shoe remover 09920 53740 Clutch sleeve hub holder 09921 20240 Bearing remover set 09921 21910 Bearing holder 09922 21410 Long socket 46 mm 09922 31430 Clutch spring compressor 09923 73210 Bearing remover 09923 74511 Bearing remover 09924 41830...

Page 28: ...3 Rotor holder 09930 40131 Balancer drive sprocket holder 09930 73140 Starter torque limiter socket 09930 73170 Starter torque limiter holder 09930 82720 Mode select switch 09940 40211 Fuel pressure gauge adapter 09940 40220 Fuel pressure gauge hose attachment 09940 92430 Rear axel wrench A 09941 34513 Steering race installer 09941 51012 Ring locknut wrench 09941 53610 Front fork installer hammer ...

Page 29: ...0A 15 General Information 99565 01010 013 CD ROM Ver 13 ...

Page 30: ...0A Page 0A 4 Scheduled Maintenance Periodic Maintenance Schedule Chart B931G20205001 NOTE I Inspect and clean adjust replace or lubricate as necessary C Clean R Replace T Tighten Item Interval km Initial 200 Every 1 000 Every 2 000 miles Initial 100 Every 600 Every 1 200 months Initial 1 Every 3 Every 6 Air cleaner element polyurethane foam element C C non woven fabric element I I Exhaust pipe nut...

Page 31: ...en operated under wet or rainy conditions Lubricate exposed parts Every 1 000 km 600 miles 3 months Brake fluid I I Replace every 2 years Brake hose I Replace every 4 years Tires I I Steering I I I Suspensions I Chassis nuts and bolts T T T General lubrications L L Item Interval km Initial 200 Every 1 000 Every 2 000 miles Initial 100 Every 600 Every 1 200 months Initial 1 Every 3 Every 6 1 4 6 4 ...

Page 32: ... is in good condition at all times Life of the engine depends largely on this component 3 After finishing the air cleaner element inspection reinstall the removed parts Cleaning 1 Remove the air cleaner element assembly Refer to Air Cleaner Element Removal and Installation in Section 1D Page 1D 5 2 Separate the polyurethane from element 3 Carefully use compressed air to clean the air cleaner eleme...

Page 33: ...bf ft Valve Clearance Inspection and Adjustment B931G20206003 Inspect valve clearance Initially at 200 km 100 miles 1 month and every 2 000 km 1 200 miles 6 months thereafter Inspection Valve clearance adjustment must be checked and adjusted a at the time of periodic inspection b when the valve mechanism is serviced and c when the camshafts are removed for servicing 1 Remove the front inner fender...

Page 34: ...generator rotor to the lug mark B 9 Remove the cylinder head cover Refer to Engine Top Side Disassembly in Section 1D Page 1D 17 NOTE Check the engraved lines C on the camshafts so it is parallel with the mating surface D on the cylinder head cover The valve clearance should be taken cylinder is at Top Dead Center TDC of compression stroke The clearance specification is for COLD state To turn the ...

Page 35: ... 1 and shim 2 by fingers or magnetic hand 3 Check the figures printed on the shim These figures indicate the thickness of the shim as illustrated 4 Select a replacement shim that will provide a clearance within the specified range For the purpose of this adjustment a total of 25 sizes of tappet shim are available ranging from 2 50 to 3 50 mm in steps of 0 05 mm CAUTION Both the right and left valv...

Page 36: ...5 3 50 3 50 2 65 2 70 2 85 2 90 2 95 3 00 3 05 3 10 3 15 3 20 3 25 3 30 3 35 3 40 3 45 3 50 3 50 2 70 2 75 2 90 2 95 3 00 3 05 3 10 3 15 3 20 3 25 3 30 3 35 3 40 3 45 3 50 3 50 2 75 2 80 2 95 3 00 3 05 3 10 3 15 3 20 3 25 3 30 3 35 3 40 3 45 3 50 3 50 2 80 2 85 3 00 3 05 3 10 3 15 3 20 3 25 3 30 3 35 3 40 3 45 3 50 3 50 2 85 2 90 3 05 3 10 3 15 3 20 3 25 3 30 3 35 3 40 3 45 3 50 3 50 2 90 2 95 3 1...

Page 37: ... 35 3 40 3 45 3 50 3 50 2 45 2 50 2 55 2 60 2 75 2 80 2 85 2 90 2 95 3 00 3 05 3 10 3 15 3 20 3 25 3 30 3 35 3 40 3 45 3 50 3 50 2 50 2 55 2 60 2 65 2 80 2 85 2 90 2 95 3 00 3 05 3 10 3 15 3 20 3 25 3 30 3 35 3 40 3 45 3 50 3 50 2 55 2 60 2 65 2 70 2 85 2 90 2 95 3 00 3 05 3 10 3 15 3 20 3 25 3 30 3 35 3 40 3 45 3 50 3 50 2 60 2 65 2 70 2 75 2 90 2 95 3 00 3 05 3 10 3 15 3 20 3 25 3 30 3 35 3 40 3...

Page 38: ...Remove the spark plug Refer to Spark Plug Cap and Spark Plug Removal and Installation in Section 1H Page 1H 3 2 Check carbon deposits on the spark plug If carbon is deposited remove it using a spark plug cleaner machine or carefully use a tool with a pointed end 3 After finishing the spark plug inspection reinstall the removed parts Spark Plug Gap 1 Remove the spark plug Refer to Spark Plug Cap an...

Page 39: ...e Exterior Parts Removal and Installation in Section 9D Page 9D 9 3 Remove the fuel tank side cover Refer to Fuel Tank Removal and Installation in Section 1G Page 1G 8 4 Inspect the fuel feed hose for damage and fuel leakage If any defects are found the fuel feed hose must be replaced 5 After finishing the fuel feed hose inspection or replacement reinstall the removed parts Engine Oil and Filter R...

Page 40: ...to run for several minutes at idling speed after tightening the oil filler cap 7 Turn off the engine and wait about three minutes and then check the oil level on the dipstick 3 The oil level should be between the low level line A and full level line B If the oil level is lower than the low level line A add oil to the full level line B Oil Level Inspection 1 Place the vehicle on a level ground and ...

Page 41: ... ring contacts the oil filter mounting surface Then tighten the oil filter two full turns or to specified torque using the special tool NOTE To properly tighten the oil filter use the special tool Never tighten the oil filter by hand only Special tool A 09915 40610 Oil filter wrench Tightening torque Oil filter a 20 N m 2 0 kgf m 14 5 lbf ft 6 Add new engine oil and check the oil level is as descr...

Page 42: ... torque CAUTION Replace the gasket washers with a new one Tightening torque Front differential gear oil drain plug a 32 N m 3 2 kgf m 23 0 lbf ft 5 Pour fresh oil through the oil filler hole until it overflows from the oil level hole When performing an oil change the front differential will hold about 500 ml 0 53 US qt 0 44 Imp qt of oil Use hypoid gear oil SAE 90 API grade GL 5 NOTE Use hypoid ge...

Page 43: ...vel ground 2 Remove the rear under cover Refer to Under Cover Removal and Installation in Section 9D Page 9D 12 3 Place an oil pan below the final gear case 4 Drain oil by removing the oil drain plug 1 and oil filler plug 2 5 Tighten the oil drain plug 1 to the specified torque and pour fresh oil through the oil filler hole until the oil level reaches the bottom tip of the thread Use Mobil fluid 4...

Page 44: ...y dirt or mud is found clean it Refer to Throttle Body Removal and Installation in Section 1D Page 1D 8 Cooling System Inspection B931G20206015 Replace engine coolant Every 2 years Engine Coolant Level Inspection 1 Place the vehicle on a level ground 2 Check the engine coolant level by observing the full and lower lines on the engine coolant reservoir tank If the level is below the lower line add ...

Page 45: ... parts Air Bleeding From the Cooling Circuit 1 Place the vehicle on a level ground and set the brake lock 2 Pour engine coolant up to the radiator inlet 3 Slowly swing the vehicle right and left to bleed the air trapped in the cooling circuit 4 Add engine coolant up to the radiator inlet 5 Start up the engine and bleed air from the radiator inlet completely 6 Add engine coolant up to the radiator ...

Page 46: ...oved parts Refer to V belt Type Continuously Variable Automatic Transmission Removal and Installation in Section 5A Page 5A 5 Drive Shaft Boots Inspection B931G20206017 Inspect drive shaft Initially at 200 km 100 miles 1 month and every 1 000 km 600 miles 3 months thereafter Inspect the boots for wear or damage If any defects are found replace them with new ones Front Brake System Inspection B931G...

Page 47: ...rcuit in Section 4A Page 4A 5 Front Brake Pads Check The extent of front brake pad wear can be checked by observing the grooved limit line A on the pad When the wear exceeds the grooved limit line replace the pads with new ones Refer to Front Brake Pad Replacement in Section 4B Page 4B 2 CAUTION Replace the brake pad as a set otherwise braking performance will be adversely affected Front Brake Hos...

Page 48: ...5 22 5 mm 0 5 0 9 in 2 Loosen the lock nut 1 3 Turn the adjuster 2 until the brake pedal becomes 12 5 22 5 mm 0 5 0 9 in a higher from the top of the footrest 4 Tighten the lock nut 1 securely Brake Pedal Free Travel Inspection Inspect and adjust the rear brake pedal free travel a as follows Rear brake pedal free travel a 20 30 mm 0 8 1 2 in Adjustment Turn the adjuster nut 1 so the rear brake ped...

Page 49: ...adjusting the play check that the rear wheels roll freely without applying the brake the transmission in neutral and the rear wheels off the ground Readjust the rear brake lever if the rear wheels could not roll freely Rear Brake Friction Plate Wear Limit Inspection B931G20206020 Replace rear brake friction plate Every 10 000 km 6 000 miles After adjusted rear brake pedal and rear brake lever insp...

Page 50: ...When filling air into the tires never exceed 70 kPa 0 7 kgf cm2 10 psi CAUTION The standard tire fitted on this vehicle is an AT25 x 8 12 for the front and a AT25 x 10 12 for the rear The use of tires other than those specified may cause instability It is highly recommended to use the specified tires Tire type DUNLOP Front DUNLOP KT411 Rear DUNLOP KT415 Steering System Inspection B931G20206022 Ins...

Page 51: ... until the proper tor out is obtained and distances C and D become equal 5 After adjustment has been made tighten the four lock nuts to the specified torque Tightening torque Tie rod lock nut a 45 N m 4 5 kgf m 32 5 lbf ft Suspensions Inspection B931G20206024 Inspect suspension Every 2 000 km 1 200 miles 6 months 1 Support the vehicle with a jack and wooden blocks 2 Remove the front and rear wheel...

Page 52: ...ering shaft holder bolt 23 N m 2 3 kgf m 16 5 lb ft 4 Steering shaft lower nut 162 N m 16 2 kgf m 117 0 lb ft 5 Tie rod end nut 29 N m 2 9 kgf m 21 0 lb ft a 1 a 1 I831G1020062 01 b 2 b 2 c 3 I831G1020063 01 d 4 e 5 I831G1020064 01 6 Tie rod lock nut 45 N m 4 5 kgf m 32 5 lb ft 7 Front suspension arm pivot nut Upper 60 N m 6 0 kgf m 43 5 lb ft 8 Front suspension arm pivot nut Lower 65 N m 6 5 kgf ...

Page 53: ... m 5 5 kgf m 40 0 lb ft b 10 b 10 d 11 I831G1020067 04 f 13 f 12 f 13 I831G1020068 04 b 14 i 15 I831G1020069 04 16 Front brake air bleeder valve 6 N m 0 6 kgf m 4 5 lb ft 17 Front brake caliper mounting bolt 26 N m 2 6 kgf m 19 0 lb ft 18 Footrest bar mounting bolt M8 26 N m 2 6 kgf m 19 0 lb ft 19 Footrest bar mounting bolt M10 55 N m 5 5 kgf m 40 0 lb ft 20 Brake hose union bolt 23 N m 2 3 kgf m...

Page 54: ...per 60 N m 6 0 kgf m 43 5 lb ft 27 Rear suspension arm pivot nut Upper and Lower 60 N m 6 0 kgf m 43 5 lb ft m 22 I831G1020074 04 k 23 k 23 k 23 k 23 m 24 k 23 I831G1020075 05 b 26 b 27 b 25 I831G1020076 02 28 Rear knuckle nut 60 N m 6 0 kgf m 43 5 lb ft 29 Rear stabilizer joint nut Up to 5SAAR41A497105526 34 N m 3 4 kgf m 24 5 lb ft From 5SAAR41A497105527 60 N m 6 0 kgf m 43 5 lb ft 30 Trailer to...

Page 55: ... and note the engine speed r min when the vehicle begins to move forward Special tool 09900 26006 Engine tachometer solar cell type 09900 25008 Multi circuit tester set Engagement speed 1 500 2 000 r min 6 Disconnect the tachometer and install the frame front cover Clutch Lock up Inspection Perform this inspection to determine if the clutch is engaging fully and not slipping 1 Warn up the engine 2...

Page 56: ... 4 Muffler mounting bolt 23 2 3 16 5 Page 0B 4 Muffler connecting bolt 23 2 3 16 5 Page 0B 4 Oil drain plug 21 2 1 15 0 Page 0B 11 Oil filter 20 2 0 14 5 Page 0B 12 Front differential gear oil level plug 8 5 0 85 6 0 Page 0B 13 Front differential gear oil filler plug 35 3 5 25 5 Page 0B 13 Page 0B 13 Front differential gear oil drain plug 32 3 2 23 0 Page 0B 13 Front differential gear oil level pl...

Page 57: ...0B 28 Maintenance and Lubrication 09915 40610 Oil filter wrench Page 0B 12 Page 0B 12 ...

Page 58: ...14 Valve stem runout IN EX 0 05 0 002 Valve head thickness IN EX 0 5 0 02 Valve seat width IN EX 0 9 1 1 0 035 0 043 Valve head radial runout IN EX 0 03 0 001 Valve spring free length IN EX 46 1 1 81 Valve spring tension IN EX 182 210 N 18 6 21 4 kgf 41 0 47 2 lbs at length 36 35 mm 1 43 in Item Standard Limit Cam height IN 36 330 36 380 1 4303 1 4323 36 030 1 4185 EX 35 300 35 350 1 3898 1 3917 3...

Page 59: ...0059 Piston ring groove width 1st 0 83 0 85 0 0327 0 0335 1 30 1 32 0 0512 0 0520 2nd 1 01 1 03 0 0398 0 0406 Oil 2 01 2 03 0 0791 0 0799 Piston ring thickness 1st 0 76 0 81 0 0299 0 0319 1 08 1 10 0 0425 0 0433 2nd 0 97 0 99 0 0382 0 0390 Piston pin bore I D 23 002 23 008 0 9056 0 9058 23 030 0 9067 Piston pin O D 22 992 23 000 0 9052 0 9055 22 980 0 9047 Item Standard Limit Conrod small end I D ...

Page 60: ... gear backlash 0 05 0 10 0 002 0 004 Rear drive final gear blacklash Without gear cover specification 0 02 0 06 0 0008 0 0024 Gear cover assembled specification 0 08 0 15 0 0031 0 0059 Front differential gear oil type Hypoid gear oil SAE 90 API grade GL 5 Rear drive gear oil type Mobil 424 or equivalent gear oil Front differential gear oil capacity 500 ml 0 53 0 44 US lmp qt Rear drive gear oil ca...

Page 61: ...V TP sensor output voltage Closed Approx 1 1 V Opened Approx 4 3 V ECT sensor input voltage 4 5 5 5 V ECT sensor output voltage 0 15 4 85 V ECT sensor resistance Approx 2 45 kΩ at 20 C 68 F IAT sensor input voltage 4 5 5 5 V IAT sensor output voltage 0 15 4 85 V IAT sensor resistance Approx 1 60 kΩ at 20 C 68 F TO sensor resistance 19 20 kΩ TO sensor voltage Normal 0 4 1 4 V Leaning 3 7 4 4 V When...

Page 62: ...nd more at 5 000 r min Regulated voltage 13 5 15 5 V at 5 000 r min Starter motor brush length Standard 12 5 0 49 Limit 6 0 0 24 Starter torque limiter slip torque Standard 41 2 62 8 N m 4 2 6 4 kgf m 14 5 32 5 lb ft Starter relay resistance 3 5 Ω Battery Type designation YTX20CH BS Capacity 12 V 64 8 kC 18 Ah 10 HR Fuse size Headlight HI 10 A LO 10 A Fuel 10 A Ignition 15 A Power source 10 A Fan ...

Page 63: ...rd Limit Cold inflation tire pressure Solo riding Front 35 kPa 0 35 kgf cm2 5 1 psi Rear 30 kPa 0 30 kgf cm2 4 4 psi Tire size Front AT25 x 8 12 tubeless Rear AT25 x 10 12 tubeless Tire tread depth Front 4 0 0 16 Rear 4 0 0 16 Item Standard Limit Front shock absorber spring adjustor 2 5 position Rear shock absorber spring adjustor 2 5 position Item Specification Note Fuel type Use only unleaded ga...

Page 64: ...ing nut 110 11 0 79 5 Clutch outer cover bolt 8 0 8 6 0 Clutch inner cover bolt 9 0 9 6 5 Generator rotor nut 160 11 0 115 5 Generator starter set bolt 11 1 1 8 0 Speed sensor bolt 10 1 0 7 0 Starter clutch bolt 26 2 6 19 0 Exhaust pipe nut 23 2 3 16 5 Muffler connecting bolt 23 2 3 16 5 Muffler mounting bolt 23 2 3 16 5 Engine oil drain plug 21 2 1 15 0 Engine coolant drain plug 13 1 3 9 5 Drive ...

Page 65: ...65 6 5 47 0 Rear propeller shaft boot clamp screw 2 0 2 1 5 Final gear oil drain plug 23 2 3 16 5 Rear propeller shaft coupling nut 100 10 0 72 5 Front output shaft bolt 10 1 0 7 0 Rear output shaft nut 100 10 0 72 5 Rear output shaft drive bevel gear nut 100 10 0 72 5 Rear output shaft driven gear nut 100 10 0 72 5 Front propeller shaft boot clamp screw 1 3 0 13 1 0 Rear propeller shaft boot clam...

Page 66: ...4 5 Front brake pad mounting pin 18 1 8 13 0 Front brake caliper mounting bolt 26 2 6 19 0 Caliper holder pin 18 1 8 13 0 Caliper holder slide pin 23 2 3 16 5 Brake pipe flare nut 16 1 6 11 5 Front brake disc mounting bolt 23 2 3 16 5 Brake master cylinder mounting bolt 10 1 0 7 0 Footrest mounting bolt M8 26 2 6 19 0 Footrest mounting bolt M10 55 5 5 40 0 Rear stabilizer joint nut Up to 5SAAR41A4...

Page 67: ...arked bolt N m kgf m lb ft N m kgf m lb ft 4 1 5 0 15 1 0 2 3 0 23 1 5 5 3 0 3 2 0 4 5 0 45 3 0 6 5 5 0 55 4 0 10 1 0 7 0 8 13 1 3 9 5 23 2 3 16 5 10 29 2 9 21 0 50 5 0 36 0 12 45 4 5 32 5 85 8 5 61 5 14 65 6 5 47 0 135 13 5 97 5 16 105 10 5 76 0 210 21 0 152 0 18 160 16 0 115 5 240 24 0 173 5 3 2 1 a a a I649G1030001 04 1 Conventional bolt 2 4 marked bolt 3 7 marked bolt ...

Page 68: ...0C 11 Service Data ...

Page 69: ...nction 1A 59 DTC C32 P0201 Fuel Injector Circuit Malfunction 1A 59 DTC C40 P05057 ISC Valve Circuit Malfunction 1A 62 DTC C41 P230 H L FP Relay Circuit Malfunction 1A 67 Specifications 1A 69 Service Data 1A 69 Special Tools and Equipment 1A 70 Special Tool 1A 70 Emission Control Devices 1B 1 Precautions 1B 1 Precautions for Emission Control Devices 1B 1 Repair Instructions 1B 1 Crankcase Breather ...

Page 70: ...nkshaft Oil Seal Inspection 1D 61 Bearing Inspection 1D 61 Bearing Removal and Installation 1D 61 Specifications 1D 66 Service Data 1D 66 Tightening Torque Specifications 1D 68 Special Tools and Equipment 1D 69 Recommended Service Material 1D 69 Special Tool 1D 69 Engine Lubrication System 1E 1 Precautions 1E 1 Precautions for Engine Oil 1E 1 Schematic and Routing Diagram 1E 1 Engine Lubrication S...

Page 71: ... Repair Instructions 1H 3 Spark Plug Cap and Spark Plug Removal and Installation 1H 3 Spark Plug Inspection and Cleaning 1H 3 Ignition Coil and Plug Cap Inspection 1H 3 CKP Sensor Inspection 1H 5 CKP Sensor Removal and Installation 1H 6 Engine Stop Switch Inspection 1H 6 Ignition Switch Inspection 1H 6 Ignition Switch Removal and Installation 1H 7 Override Switch Inspection 1H 7 Specifications 1H ...

Page 72: ...stallation 1J 4 Regulator Rectifier Inspection 1J 8 Battery Components 1J 9 Battery Charging 1J 9 Battery Removal and Installation 1J 12 Battery Visual Inspection 1J 12 Specifications 1J 12 Service Data 1J 12 Tightening Torque Specifications 1J 13 Special Tools and Equipment 1J 13 Recommended Service Material 1J 13 Special Tool 1J 13 Exhaust System 1K 1 Precautions 1K 1 Precautions for Exhaust Sys...

Page 73: ...cautions 1 1 Engine Precautions Precautions Precautions for Engine B831G21000001 Refer to General Precautions in Section 00 Page 00 1 and Precautions for Electrical Circuit Service in Section 00 Page 00 2 ...

Page 74: ...me Injection Volume The factors to determine the injection time include the basic fuel injection time which is calculated on the basis of the intake air pressure engine speed and throttle opening angle and various compensations These compensations are determined according to the signals from various sensors that detect the engine and driving conditions I718H1110268 03 ...

Page 75: ...gnal form ECM and the panel indicates CHEC Signal Descriptions ENGINE COOLANT TEMPERATURE SENSOR SIGNAL When engine coolant temperature is low injection time volume is increased INTAKE AIR TEMPERATURE SENSOR SIGNAL When intake air temperature is low injection time volume is increased BATTERY VOLTAGE SIGNAL ECM operates on the battery voltage and at the same time it monitors the voltage signal for ...

Page 76: ... switch The memorized malfunction code is displayed on LCD DISPLAY panel Malfunction means that the ECM does not receive signal from the devices These affected devices are indicated in the code form CAUTION Before checking the malfunction code do not disconnect the ECM coupler If the coupler form the ECM is disconnected the malfunction code memory is erased and the malfunction code can not be chec...

Page 77: ... air temperature sensor IAT sensor Tip over sensor TO sensor ISC valve Diff lock switch Diff lock relay Starter relay Neutral relay Brake switch L Ignition switch Ignition coil Fuel injector Fuel pump relay Fuel pump Engine stop switch START button Starter motor Parking brake relay Diff lock position switch Override switch Gear position switch N L H 30 A 15 A 10 A Speedometer 23 9 18 6 14 13 11 28...

Page 78: ...tch BRK 22 Serial data for self diagnosis SDL 6 Power source for sensors VCC 23 Serial data for speedometer TECH 7 ECM ground E1 24 Sensor ground E2 8 Forward sensor signal FOW 25 Override switch OVR 9 CKP sensor signal CKP 26 Neutral switch NT 10 TO sensor signal TO 27 Test switch TS 11 ECT sensor signal ECT 28 IAT sensor signal IAT 12 Starter relay STR 29 Diff lock switch DL 13 IAP sensor signal...

Page 79: ...d Diagnosis 1A 6 Component Location FI System Parts Location B831G21103001 I E B C D G H A F I831G1110004 02 A ECM C TP sensor E IAT sensor G Speed sensor I Diff lock relay B ISC valve D IAP sensor F CKP sensor H Combination meter ...

Page 80: ...1A 7 Engine General Information and Diagnosis J K N L A M I I831G1110005 03 A ECM J TO sensor L Ignition coil N Fuel pump I ECT sensor K Fuel injector M FP relay ...

Page 81: ...e Defective ECM Replace Open circuited wiring connections Check and repair Engine will not start or is hard to start Incorrect fuel air mixture TP sensor out of adjustment Adjust Defective fuel pump Replace Defective fuel pressure regulator Replace Defective TP sensor Replace Defective CKP sensor Replace Defective IAP sensor Replace Defective ECM Replace Defective ECT sensor Replace Defective IAT ...

Page 82: ...nt journal bearings Replace Engine noisy Noise seems to come from balancer Worn and burnt journal bearings Replace Engine noisy Noise seems to come from transmission Worn or rubbing gears Replace Worn splines Replace Worn or rubbing primary gears Replace Worn bearings Replace Engine noisy Noise seems to come from water pump Worn or damaged impeller shaft Replace Worn or damaged mechanical seal Rep...

Page 83: ...ctive CKP sensor Replace Defective IAP sensor Replace Defective AP sensor Replace Defective ECM Replace TP sensor out of adjustment Adjust Defective STP sensor or STVA Replace Defective fuel tank pressure control valve Replace Engine overheats Defective engine internal parts Heavy carbon deposit on piston crown Clean Not enough oil in the engine Add oil Defective oil pump or clogged oil circuit Re...

Page 84: ...n Section 9D Page 9D 11 2 Connect the special tool to the mode select switch at the wiring harness Special tool A 09930 82720 Mode select switch 3 Start the engine or crank the engine for more than 4 seconds 4 Turn the special tool s switch ON 5 Check the DTC to determine the malfunction part Refer to DTC Table Page 1A 19 Special tool A 09930 82720 Mode select switch 6 After repairing the trouble ...

Page 85: ...ECM memory DTC stored in ECM memory can be checked by the SDS Be sure to read Precautions for Electrical Circuit Service in Section 00 Page 00 2 before inspection and observe what is written there 1 Remove the seat Refer to Seat Removal and Installation in Section 9D Page 9D 11 2 Set up the SDS tools Refer to the SDS operation manual for further details Special tool A 09904 41010 SDS Set B 99565 0...

Page 86: ...DS tool and turn the ignition switch OFF 8 Disconnect the SDS tool and install the right frame cover Use of SDS Diagnosis Reset Procedures B831G21104003 NOTE The malfunction code is memorized in the ECM also when the wire coupler of any sensor is disconnected Therefore when a wire coupler has been disconnected at the time of diagnosis erase the stored malfunction history code using SDS 1 After rep...

Page 87: ... or not where the motorcycle was running or stopped when a malfunction was detected by checking the show data when trouble This show data when trouble function can record the maximum of two Diagnostic Trouble Codes in the ECM Also ECM has a function to store each show data when trouble for two different malfunctions in the order of occurrence as the malfunction is detected Utilizing this function ...

Page 88: ...past filed data value at time of normal condition can allow the specific engine failure to be determined Also in the case of a customer vehicle which is not periodically brought in for service with no past data value having been saved if the data value of a good vehicle condition have been already saved as a master STD comparison between the same models helps to facilitate the troubleshooting 1 Re...

Page 89: ... starting through warm up Data at 3 000 r min under no load Check the engine r min 1 300 r min Check the manifold absolute pressure XXX kPa Check the engine coolant temperature XX C I831G1110009 03 Check the manifold absolute pressure XXX kPa Approx 3 000 r min I831G1110010 04 ...

Page 90: ...1A 17 Engine General Information and Diagnosis Data at the time of racing Throttle Quick wide open Throttle Slowly open I831G1110011 01 ...

Page 91: ... how changes have occurred with the passing of time and identify what problem is currently occurring NOTE With DTC not output if the value of engine coolant temperature is found to be lower than the data saved previously the possible cause may probably lie in a sensor circuit opened ground circuit opened or influence of internal resistance value changes etc No DTC output Abnormal graph curve of th...

Page 92: ... In this case it is necessary to bring the vehicle to the workshop for complete repair Code Malfunction Part Remarks C00 None No defective part C12 P0335 Page 1A 24 Crankshaft position sensor CKP sensor Pick up coil signal signal generator C13 P0105 H L Page 1A 27 Intake air pressure sensor IAP sensor C14 P0120 H L Page 1A 34 Throttle position sensor TP sensor 1 C15 P0115 H L Page 1A 41 Engine coo...

Page 93: ...ack fire After fire No combustion Lack of power Poor starting at Surging cold warm always Abnormal knocking Other Engine rpm jumps briefly Other Poor Idling Engine Stall when Poor fast Idle Immediately after start Abnormal idling speed Throttle valve is opened High Low r min Throttle valve is closed Unstable Load is applied Hunting r min to r min Other Other OTHERS VEHICLE ENVIRONMENTAL CONDITION ...

Page 94: ...F Page 1F 4 Fuel level and leakage Refer to Fuel Line Inspection in Section 0B Page 0B 10 Clogged air cleaner element Refer to Air Cleaner Element Inspection and Cleaning in Section 0B Page 0B 3 Battery condition Throttle cable play Refer to Throttle Cable Play Inspection and Adjustment in Section 0B Page 0B 15 Vacuum hose looseness bend and disconnection Broken fuse FI light operation Refer to Co...

Page 95: ...owing 0 15 V sensor voltage 4 85 V In other than the above range C15 P0115 is indicated ECT sensor lead wire coupler connection P0115 H Sensor voltage is higher than specified value ECT sensor circuit open or ground circuit open L Sensor voltage is lower than specified value ECT sensor circuit shorted to the ground C20 Diff lock relay No voltage is applied to 4WD diff lock actuator although igniti...

Page 96: ...alve The circuit voltage of motor drive is unusual ISC valve circuit open or shorted to the ground Power source circuit open P0505 C41 Fuel pump relay No voltage is applied to the fuel pump although fuel pump relay is turned ON or voltage is applied to fuel pump although fuel pump relay is turned OFF Fuel pump relay lead wire coupler connection power source to the fuel pump relay and fuel injector...

Page 97: ...prevent the terminal damage or terminal bend NOTE After repairing the trouble clear the DTC using SDS tool Refer to Use of SDS Diagnosis Reset Procedures Page 1A 13 Detected Condition Possible Cause The signal does not reach ECM for 3 sec or more after receiving the starter signal Metal particles or foreign material being stuck on the CKP sensor and rotor tip CKP sensor circuit open or short CKP s...

Page 98: ...ose or poor contacts If OK then measure the CKP sensor resistance 3 Disconnect the CKP sensor coupler and measure the resistance Special tool A 09900 25008 Multi circuit tester set Tester knob indication Resistance Ω CKP sensor resistance 150 250 Ω Bl W Go to Step 2 Replace the CKP sensor with a new one I831G1110020 02 A I831G1110007 01 ...

Page 99: ...inal W 2 Repeat the above test procedure a few times and measure the highest peak voltage Is the voltage OK Bl or W wire open or shorted to the ground or poor 9 or 18 connection If wire and connection are OK intermittent trouble or faulty ECM Recheck each terminal and wire harness for open circuit and poor connection Replace the ECM with a known good one and inspect it again Refer to ECM Removal a...

Page 100: ...sor voltage is not within the following range 0 5 V Sensor voltage 4 85 V NOTE Note that atmospheric pressure varies depending on weather conditions as well as altitude Take that into consideration when inspecting voltage Clogged vacuum passage between throttle body and IAP sensor Air being drawn from vacuum passage between throttle body and IAP sensor IAP sensor circuit open or shorted to the gro...

Page 101: ... IAP sensor input voltage 4 Disconnect the IAP sensor coupler 5 Turn the ignition switch ON 6 Measure the voltage at the R wire and ground If OK then measure the voltage at the R wire and B Br wire Special tool A 09900 25008 Multi circuit tester set Tester knob indication Voltage IAP sensor input voltage 4 5 5 5 V terminal R terminal Ground terminal R terminal B Br Is the voltage OK Go to Step 2 L...

Page 102: ... Check the IAP sensor coupler for loose or poor contacts If OK then check the IAP sensor lead wire continuity 4 Disconnect the IAP sensor coupler 5 Check the continuity between the R wire and G B wire If the sound is not heard from the tester the circuit condition is OK Special tool A 09900 25008 Multi circuit tester set Tester knob indication Continuity Go to Step 3 G B wire shorted to VCC or B B...

Page 103: ...wire coupler 8 Check the continuity between the G B wire B and terminal 13 If OK then check the continuity between the B Br wire C and terminal 24 Special tool A 09900 25008 Multi circuit tester set B 09900 25009 Needle pointed probe set Tester knob indication Continuity test ECM coupler Harness side Is the continuity OK Go to Step 3 G B wire shorted to VCC or B Br wire open 13 24 A B C B I831G111...

Page 104: ...oose or poor contacts If OK then check the IAP sensor lead wire continuity 4 Disconnect the IAP sensor coupler 5 Check the continuity between the G B wire and ground Also check the continuity between the G B wire and B Br wire If the sound is not heard from the tester the circuit condition is OK Special tool A 09900 25008 Multi circuit tester set Tester knob indication Continuity Go to Step 2 R an...

Page 105: ...round 2 1 Turn the ignition switch OFF 2 Connect the IAP sensor coupler 3 Insert the needle pointed probes to the lead wire coupler 4 Start the engine at idle speed and measure the IAP sensor output voltage at the wire side coupler between G B wire and B Br wire IAP sensor output voltage Approx 2 63 V at idle speed Special tool A 09900 25008 Multi circuit tester set B 09900 25009 Needle pointed pr...

Page 106: ...ter knob indication Voltage Is the voltage OK G B R or B Br wire open or shorted to ground or poor 6 13 or 24 connection If wire and connection are OK intermittent trouble or faulty ECM Recheck each terminal and wire harness for open circuit and poor connection Replace the ECM with a known good one and inspect it again Refer to ECM Removal and Installation in Section 1C Page 1C 1 If check result i...

Page 107: ...of SDS Diagnosis Reset Procedures Page 1A 13 Detected Condition Possible Cause C14 Output voltage is not within the following range Difference between actual throttle opening and opening calculated by ECM is larger than specified value 0 2 V Sensor voltage 4 8 V TP sensor maladjusted TP sensor circuit open or short TP sensor malfunction ECM malfunction P0120 H Sensor voltage is higher than specifi...

Page 108: ...5 Turn the ignition switch ON 6 Insert the pointed probes to the lead wire coupler 7 Measure the input voltage at the R wire A and ground If OK then measure the input voltage at the R wire A and B Br wire C Special tool A 09900 25008 Multi circuit tester set B 09900 25009 Needle pointed probe set Tester knob indication Voltage TP sensor input voltage 4 5 5 5 V terminal R terminal Ground terminal R...

Page 109: ...ts If OK then check the TP sensor lead wire continuity 4 Disconnect the TP sensor coupler 5 Insert the needle pointed probes to the lead wire coupler 6 Check the continuity between R wire A and Y wire B If sound is not heard from the tester the circuit condition is OK Special tool A 09900 25008 Multi circuit tester set B 09900 25009 Needle pointed probe set Tester knob indication Continuity Go to ...

Page 110: ...eck the continuity between R wire A and terminal 6 Also check the continuity between B Br wire C and terminal 24 Special tool A 09900 25008 Multi circuit tester set B 09900 25009 Needle pointed probe set Tester knob indication Continuity ECM coupler Harness side Is the continuity OK Go to Step 2 R wire shorted to VCC or B Br wire open 24 6 A B A C I831G1110036 02 ...

Page 111: ... lead wire continuity 4 Disconnect the TP sensor coupler 5 Insert the needle pointed probes to the lead wire coupler 6 Check the continuity between Y wire B and ground Also check the continuity between Y wire B and B Br wire C If sound is not heard from the tester the circuit condition is OK Special tool A 09900 25008 Multi circuit tester set B 09900 25009 Needle pointed probe set Tester knob indi...

Page 112: ...y test ECM coupler Harness side Is the continuity OK Go to Step 2 Y or R wire open or Y wire shorted to ground 2 1 Correct the ECM coupler 2 Turn the ignition switch ON 3 Measure the input voltage between the R wire and ground If OK the measure the input voltage between the R wire and B Br wire Special tool A 09900 25008 Multi circuit tester set Tester knob indication Voltage TP sensor input volta...

Page 113: ...ication Voltage TP sensor output voltage Throttle valve is closed Approx 1 12 V Throttle valve is opened Approx 4 32 V Is the voltage OK Y B Br or R wire open or shorted to ground or poor 14 24 or 6 connection If wire and connection are OK intermittent trouble or faulty ECM Recheck each terminal and wire harness for open circuit and poor connection Replace the ECM with a known good one and inspect...

Page 114: ...al bend NOTE After repairing the trouble clear the DTC using SDS tool Refer to Use of SDS Diagnosis Reset Procedures Page 1A 13 Detected Condition Possible Cause C15 Output voltage is not with in the following range 0 15 V Sensor voltage 4 85 V ECT sensor circuit open or short ECT sensor malfunction ECM malfunction P0115 H Sensor voltage is higher than specified value ECT sensor circuit is open or...

Page 115: ...ire side coupler 4 Disconnect the coupler and turn the ignition switch ON 5 Measure the voltage between the B Bl wire terminal and ground If OK then measure the input voltage between B Bl wire terminal and B Br wire terminal Special tool A 09900 25008 Multi circuit tester set Tester knob indication Voltage ECT sensor voltage 4 5 5 5 V terminal B Bl terminal Ground terminal B Bl terminal B Br 6 Is ...

Page 116: ...ect the ECT sensor coupler 5 Disconnect the ECM coupler Refer to ECM Removal and Installation in Section 1C Page 1C 1 6 Insert the needle pointed probes to lead wire coupler 7 Check the continuity between B Bl wire A and terminal 11 Also check the continuity between B Br wire B and terminal 24 Special tool A 09900 25008 Multi circuit tester set B 09900 25009 Needle pointed probe set Tester knob in...

Page 117: ...f OK then check the ECT sensor lead wire continuity 4 Disconnect the ECT sensor coupler 5 Check the continuity between B Bl wire and ground If sound is not heard from the tester the circuit condition is OK Special tool A 09900 25008 Multi circuit tester set Tester knob indication Continuity test 6 Connect the ECT sensor coupler 7 Insert the needle pointed probes to the lead wire coupler Go to Step...

Page 118: ...between B Bl wire and ground Special tool A 09900 25008 Multi circuit tester set B 09900 25009 Needle pointed probe set Tester knob indication Voltage Output voltage 0 1 4 6 V terminal B Bl terminal Ground Are the continuity and voltage OK Go to Step 2 B Bl wire shorted to ground If wire is OK go to Step 2 A V B I831G1110046 01 ...

Page 119: ...rminal Terminal NOTE Refer to ECT Sensor Inspection in Section 1C Page 1C 4 for details Is the resistance OK B Br or B Bl wire open or shorted to ground or poor 24 or 11 connection If wire and connection are OK intermittent trouble or faulty ECM Recheck each terminal and wire harness for open circuit and poor connection Replace the ECM with a known good one and inspect it again Refer to ECM Remova...

Page 120: ...al bend NOTE After repairing the trouble clear the DTC using SDS tool Refer to Use of SDS Diagnosis Reset Procedures Page 1A 13 Detected Condition Possible Cause No voltage is applied to diff lock motor although ignition switch is turned ON or voltage is applied to diff lock motor although ignition switch is turned OFF Diff lock relay circuit open or short Diff lock relay malfunction ECM malfuncti...

Page 121: ...ntacts If OK then check the diff lock relay insulation and continuity Refer to 2WD 4WD Diff lock System Inspection in Section 3B Page 3B 17 Is the diff lock relay OK Inspect the 4WD diff lock switch Y B wire open or shorted to ground or poor 21 connection If wire and connection are OK intermittent trouble or faulty ECM Recheck each terminal and wire harness for open circuit and poor connection Rep...

Page 122: ...minal bend NOTE After repairing the trouble clear the DTC using SDS tool Refer to Use of SDS Diagnosis Reset Procedures Page 1A 13 Detected Condition Possible Cause C21 Output voltage is not with in the following range 0 15 V Sensor voltage 4 85 V IAT sensor circuit open or short IAT sensor malfunction ECM malfunction P0110 H Sensor voltage is higher than specified value IAT sensor circuit open or...

Page 123: ...tage 4 Disconnect the coupler and turn the ignition switch ON 5 Measure the voltage between the Dg wire terminal and ground If OK then measure the input voltage between Dg wire terminal and B Br wire terminal Special tool A 09900 25008 Multi circuit tester set Tester knob indication Voltage IAT sensor input voltage 4 5 5 5 V terminal Dg terminal Ground terminal Dg terminal B Br Is the voltage OK G...

Page 124: ...oupler Refer to ECM Removal and Installation in Section 1C Page 1C 1 Also check the continuity between B Br wire B and terminal 24 6 Insert the needle pointed probes to the lead wire coupler 7 Check the continuity between the Dg wire A and terminal 28 Also check the continuity between the B Br wire B and terminal 24 Special tool A 09900 25008 Multi circuit tester set B 09900 25009 Needle pointed p...

Page 125: ...er to ECT Sensor Inspection in Section 1C Page 1C 4 Is the resistance OK Dg or B Br wire open or shorted to ground or poor 28 or 24 connection If wire and connection are OK intermittent trouble or faulty ECM Recheck each terminal and wire harness for open circuit and poor connection Replace the ECM with a known good one and inspect it again Refer to ECM Removal and Installation in Section 1C Page ...

Page 126: ...e clear the DTC using SDS tool Refer to Use of SDS Diagnosis Reset Procedures Page 1A 13 Detected Condition Possible Cause C23 The sensor voltage should be the following for 2 sec and more after ignition switch is turned ON 0 2 V Sensor voltage 4 8 V TO sensor circuit open or short TO sensor malfunction ECM malfunction P1651 H Sensor voltage is higher than specified value TO sensor circuit open or...

Page 127: ...acts If OK then measure the TO sensor resistance 4 Remove the TO sensor 5 Disconnect the TO sensor coupler 6 Measure the resistance between terminal A and terminal B Special tool A 09900 25008 Multi circuit tester set Tester knob indication Resistance Ω TO sensor resistance 19 0 20 0 kΩ Terminal A Terminal B Is the resistance OK Go to Step 2 Replace the TO sensor with a new one Refer to TO Sensor ...

Page 128: ... for loose or poor contacts If OK then check the TO sensor lead wire continuity 4 Remove the TO sensor 5 Disconnect the TO sensor coupler 6 Check the continuity between the R wire A and B Br wire B If the sound is not heard from the tester the circuit condition is OK Special tool A 09900 25008 Multi circuit tester set Tester knob indication Continuity test Go to Step 2 Br W wire shorted to VCC or ...

Page 129: ...be set Tester knob indication Continuity test ECM coupler Harness side Is the continuity OK Go to Step 2 Br W wire shorted to VCC or B Br wire open B C A B 10 24 I831G1110058 03 Step Action Yes No 1 1 Remove the air cleaner box Refer to Air Cleaner Box Removal and Installation in Section 1D Page 1D 5 2 Turn the ignition switch OFF 3 Check the TO sensor coupler for loose or poor contacts If OK then...

Page 130: ... from the tester the circuit condition is OK 8 Disconnect the ECM coupler Refer to ECM Removal and Installation in Section 1C Page 1C 1 9 Check the continuity between R wire A and terminal 6 Also then check the continuity between Br W wire B and terminal 10 Special tool A 09900 25008 Multi circuit tester set B 09900 25009 Needle pointed probe set Tester knob indication Continuity test Is the conti...

Page 131: ...ned 65 and more left and right from the horizontal level Special tool A 09900 25008 Multi circuit tester set B 09900 25009 Needle pointed probe set Tester knob indication Voltage TO sensor voltage 3 7 4 4 V terminal Br W terminal B Br Is the voltage OK R B Br or Br W wire open or shorted to ground or poor 6 24 or 10 connection If wire and connection are OK intermittent trouble or faulty ECM Rechec...

Page 132: ...er with a needle pointed tester probe to prevent the terminal damage or terminal bend NOTE After repairing the trouble clear the DTC using SDS tool Refer to Use of SDS Diagnosis Reset Procedures Page 1A 13 Injector voltage can be detected only for 3 seconds after ignition switch is turned ON Detected Condition Possible Cause CKP signal is produced but fuel injector signal is interrupted by 4 times...

Page 133: ...or poor contacts If OK then measure the injector resistance 4 Disconnect the injector coupler and measure the resistance between terminals Special tool A 09900 25008 Multi circuit tester set Tester knob indication Resistance Ω Injector resistance Approx 11 13 Ω at 20 C 68 F Terminal Terminal Go to Step 2 Replace the injector with a new one Refer to Throttle Body Disassembly and Assembly in Section...

Page 134: ...2 1 Turn the ignition switch ON 2 Measure the injector voltage between Y R wire and ground Special tool A 09900 25008 Multi circuit tester set Tester knob indication Voltage Injector voltage Battery voltage terminal Y R terminal Ground Is the voltage OK Gr W or Y R wire open or shorted to ground or poor 2 or 20 connection If wire and connection are OK intermittent trouble or faulty ECM Recheck eac...

Page 135: ...eration When using the multi circuit tester do not strongly touch the terminal of the ECM coupler with a needle pointed tester probe to prevent the terminal damage or terminal bend NOTE After repairing the trouble clear the DTC using SDS tool Refer to Use of SDS Diagnosis Reset Procedures Page 1A 13 Detected Condition Possible Cause No voltage is applied to ISC valve motor although ignition switch...

Page 136: ...eck the ISC valve lead wire continuity 4 Disconnect the ISC valve coupler 5 Check the continuity between terminals A and 34 terminals B and 4 terminals C and 17 terminals D and 33 terminals E and 4 and terminals F and 16 Special tool A 09900 25008 Multi circuit tester set Tester knob indication Continuity test ECM coupler Harness side Is the continuity OK Go to Step 2 B Lg R B P W G or W Bl wire o...

Page 137: ...pprox Terminal A Terminal C Terminal B Terminal D 2 If OK then measure the resistance between terminals A and B terminals C and D ISC valve resistance Approx 31 kΩ at 20 C Terminal A Terminal B Terminal C Terminal D Is the resistance OK If wire is OK intermittent trouble or faulty ECM Replace the ISC valve with a new one Step Action Yes No A A C B D I831G1110066 02 A A D B C I831G1110067 03 ...

Page 138: ... is within the specified idle rpm Check 2 1 Click the button 4 and decrease the Spec 2 to 1 100 rpm slowly 2 Check that the Desired idle speed 3 is nearly equal to the Spec 2 At the same time check that the number of steps 5 in the ISC valve position decreases 3 Click the button 6 and increase the Spec 2 slowly 4 Check that the Desired idle speed 3 is nearly equal to the Spec 2 Also check that the...

Page 139: ...nd increase the Spec 2 to 1 600 rpm 2 Check that the Desired idle speed 3 is approx 1 600 rpm 3 Check that the Engine speed 7 is close to 1 600 rpm NOTE Be careful not to increase the Spec to 1 650 rpm or the Engine speed may reach the upper limit If the ISC valve does not function properly replace the ISC valve or inspect the ISC valve Refer to Throttle Body Disassembly and Assembly in Section 1D...

Page 140: ...C41 No voltage is applied to fuel pump although fuel pump relay is turned ON or voltage is applied to fuel pump although fuel pump relay is turned OFF Fuel pump relay circuit open or short Fuel pump relay malfunction ECM malfunction P0230 H Voltage is applied to fuel pump although fuel pump relay is turned OFF Fuel pump relay switch circuit shorted to power source Faulty fuel pump relay switch sid...

Page 141: ... wire harness for open circuit poor connection Replace the ECM with a known good one and inspect it again Refer to ECM Removal and Installation in Section 1C Page 1C 1 Replace the FP relay with a new one Step Action Yes No 1 1 Remove the seat Refer to Front Side Exterior Parts Removal and Installation in Section 9D Page 9D 6 2 Turn the ignition switch to OFF 3 Check the FP relay coupler for loose ...

Page 142: ...known good one and inspect it again Replace the FP relay with a new one I831G1110078 01 Item Specification Note Injector resistance 11 13 Ω at 20 C 68 F Item Specification Note CKP sensor resistance 150 250 Ω CKP sensor peak voltage 5 0 V and more When cranking IAP sensor input voltage 4 5 5 5 V IAP sensor output voltage Approx 2 63 V at idle speed TP sensor input voltage 4 5 5 5 V TP sensor outpu...

Page 143: ...2 Page 1A 43 Page 1A 44 Page 1A 45 Page 1A 46 Page 1A 50 Page 1A 51 Page 1A 52 Page 1A 54 Page 1A 55 Page 1A 56 Page 1A 57 Page 1A 58 Page 1A 58 Page 1A 60 Page 1A 61 Page 1A 61 Page 1A 63 Page 1A 64 Page 1A 30 Page 1A 32 Page 1A 32 Page 1A 35 Page 1A 36 Page 1A 37 Page 1A 38 Page 1A 39 Page 1A 40 Page 1A 43 Page 1A 45 Page 1A 51 Page 1A 56 Page 1A 57 Page 1A 58 Page 1A 58 09904 41010 09917 47011 ...

Page 144: ...in Section 9D Page 9D 6 3 Inspect the PCV hose 1 for wear or damage If it is worn or damaged replace the PCV hose with a new one Check that the PCV hose 1 is securely connected Crankcase Breather PCV Hose Removal and Installation B831G21206002 Removal 1 Remove the seat Refer to Seat Removal and Installation in Section 9D Page 9D 11 2 Remove the left side cover Refer to Front Side Exterior Parts Re...

Page 145: ... Installation in Section 9D Page 9D 11 2 Remove the battery lead wire 3 Disconnect the ECM coupler 1 and remove the ECM 2 Installation NOTE When replacing the ECM turn the ignition switch ON and OFF Install the ECM in the reverse order of removal CKP Sensor Inspection B831G21306002 Refer to CKP Sensor Inspection in Section 1H Page 1H 5 CKP Sensor Removal and Installation B831G21306003 Removal 1 Re...

Page 146: ...r Box Removal and Installation in Section 1D Page 1D 5 2 Disconnect the TP sensor coupler 1 and remove the TP sensor 2 Installation NOTE When replacing the TP sensor turn the ignition switch ON and OFF Install the TP sensor in the reverse order of removal Pay attention to the following points Apply a thin coat of engine oil to the O ring Install the TP sensor 1 and tighten the TP sensor mounting s...

Page 147: ...bring the line to the middle 7 Tighten the TP sensor mounting screw Tightening torque TP sensor mounting screw 2 N m 0 2 kgf m 1 5 lb ft 8 Turn the ignition switch OFF and disconnect the mode select switch 9 Reinstall the removed parts IAT Sensor Inspection B831G21306009 Refer to DTC C21 P0110 H L IAT Sensor Circuit Malfunction in Section 1A Page 1A 49 IAT Sensor Removal and Installation B831G2130...

Page 148: ...Circuit Malfunction in Section 1A Page 1A 41 Inspect the ECT sensor in the following procedures 1 Remove the ECT sensor Refer to ECT Sensor Removal and Installation Page 1C 4 2 Connect the ECT sensor 1 to a circuit tester and place it in the oil 2 contained in a pan which is placed on a stove 3 Heat the oil to raise its temperature slowly and read the column thermometer 3 and the ohmmeter If the E...

Page 149: ...o DTC C40 P05057 ISC Valve Circuit Malfunction in Section 1A Page 1A 62 ISC Valve Removal and Installation B831G21306016 Removal CAUTION Be careful not to disconnect the ISC valve coupler at least 3 seconds after ignition switch is turned to OFF If the ECM coupler or ISC valve coupler is disconnected within 3 seconds after ignition switch is turned to OFF there is a possibility of an unusual valve...

Page 150: ... FI Sensors 2 1 I831G1130015 01 Item Specification Note CKP sensor resistance 150 250 Ω CKP sensor peak voltage 5 0 V and more When cranking IAP sensor input voltage 4 5 5 5 V IAP sensor output voltage Approx 2 63 V at idle speed TP sensor input voltage 4 5 5 5 V TP sensor output voltage Closed Approx 1 1 V Opened Approx 4 3 V ECT sensor input voltage 4 5 5 5 V ECT sensor output voltage 0 15 4 85 ...

Page 151: ...vice Material B831G21308001 Special Tool B831G21308002 Fastening part Tightening torque Note N m kgf m lb ft TP sensor mounting screw 2 0 2 1 5 Page 1C 2 Page 1C 3 ECT sensor 18 1 8 13 0 Page 1C 4 ISC valve mounting screw 2 0 2 1 5 Page 1C 6 Material SUZUKI recommended product or Specification Note Grease SUZUKI SUPER GREASE A or equivalent P No 99000 25010 Page 1C 2 09900 25008 09930 82720 Multi ...

Page 152: ...outing Diagram Throttle Cable Routing Diagram B831G21402001 1 1 2 3 5 4 A B I831G1140002 02 1 Throttle cable 5 Throttle cable guide 2 Brake hose A Pass through the throttle cable inside of pin 3 Handlebar B Pass through the throttle cable inside of brake hose 4 Pin ...

Page 153: ...l pump relay coupler 1 4 Remove the spark plug Refer to Spark Plug Cap and Spark Plug Removal and Installation in Section 1H Page 1H 3 5 Install the compression gauge and adaptor in the spark plug hole Make sure that the connection is tight Special tool A 09915 64512 Compression gauge B 09915 63311 Compression gauge attachment 6 Keep the throttle grip in the fully opened position 7 Press the start...

Page 154: ...Body Inspection and Cleaning Page 1D 13 Refer to Throttle Body Removal and Installation Page 1D 9 Cylinder head Refer to Engine Top Side Disassembly Page 1D 17 Refer to Cylinder Head Related Parts Inspection Page 1D 35 Refer to Engine Top Side Assembly Page 1D 21 Cam chain tension adjuster Refer to Engine Top Side Disassembly Page 1D 17 Refer to Cam Chain Tension Adjuster Inspection Page 1D 30 Ref...

Page 155: ...n Switch Inspection in Section 1I Page 1I 9 Refer to Gear Position GP Switch Removal and Installation in Section 3C Page 3C 13 Item Removal Inspection Installation Generator Refer to Generator Removal and Installation in Section 1J Page 1J 4 Refer to Generator Inspection in Section 1J Page 1J 3 Refer to Generator Removal and Installation in Section 1J Page 1J 4 Starter clutch Refer to Starter Torq...

Page 156: ...nspection and Cleaning B831G21406003 Refer to Air Cleaner Element Inspection and Cleaning in Section 0B Page 0B 3 Air Cleaner Box Removal and Installation B831G21406004 Removal 1 Remove the front fender Refer to Front Side Exterior Parts Removal and Installation in Section 9D Page 9D 6 2 Disconnect the IAP sensor lead wire coupler 1 and vacuum hose 2 3 Remove the air cleaner box mounting bolts 4 L...

Page 157: ...ove the right handlebar switch box Refer to Handlebars Removal and Installation in Section 6B Page 6B 3 3 Remove the throttle cable as shown in the cable routing diagram Refer to Throttle Cable Routing Diagram Page 1D 1 Installation Install the throttle cables in the reverse order of removal Pay attention to the following points Install the throttle cable as shown in the cable routing diagram Refe...

Page 158: ...r 6 Fuel injector 11 TP sensor mounting screw Apply grease 2 ISC valve 7 Cushion seal 12 ISC valve mounting screw Apply engine oil 3 IAP sensor 8 Vacuum hose 13 Fuel delivery pipe mounting screw Do not reuse 4 Fuel delivery pipe 9 Throttle linkage cover 2 N m 0 2 kgf m 1 5 Ib ft 5 O ring 10 IAP sensor cover 5 N m 0 5 kgf m 3 5 Ib ft ...

Page 159: ...Page 1D 5 2 Place a rug under the fuel feed hose 1 and disconnect the fuel feed hose 1 from the fuel delivery pipe WARNING Gasoline is highly flammable and explosive Keep heat spark and flame away 1 1 2 2 3 5 5 4 A 2 3 FR LH RH RR FR LH RH RR A I831G1140018 01 1 Air cleaner box 4 IAP sensor hose 2 Fuel hose 5 Clamp 3 PCV hose A Pass through the fuel hose between air cleaner guide ribs 1 I831G11400...

Page 160: ... throttle valve and throttle body 7 Loosen the throttle body clamp screw and remove the throttle body assembly Installation NOTE When replacing the throttle body turn the ignition switch ON and OFF Install the throttle body in the reverse order of removal Pay attention to the following points Install the throttle body NOTE When installing the throttle body fit the concave part A of the intake pipe...

Page 161: ...ection and Adjustment in Section 0B Page 0B 15 Throttle Body Disassembly and Assembly B831G21406011 Refer to Throttle Body Removal and Installation Page 1D 9 Disassembly 1 Disconnect the vacuum hose 1 2 Remove the fuel delivery pipe assembly 2 by removing its mounting screws 3 Remove the fuel injector 3 4 Remove the ISC valve 4 I831G1140027 01 I831G1140028 01 1 I831G1140030 01 2 I831G1140031 01 3 ...

Page 162: ... coat of engine oil to the O ring With the throttle valve fully closed install the TP sensor 1 and tighten the TP sensor mounting screw to the specified torque NOTE Align the secondary throttle shaft end A with the groove B of TP sensor Apply grease to the secondary throttle shaft end A if necessary Grease 99000 25010 SUZUKI SUPER GREASE A or equivalent Special tool 09930 11950 Torx wrench Tighten...

Page 163: ...3 CAUTION Replace the cushion seal and O ring with the new ones Install the fuel injector 4 by pushing it straight to the throttle body CAUTION Never turn the injector while pushing it Install the fuel delivery pipe assembly 5 to the fuel injector CAUTION Never turn the fuel injector while installing them Tighten the fuel delivery pipe mounting screws to the specified torque Tightening torque Fuel...

Page 164: ...llowing items for any defects or clogging Replace the throttle body if necessary O ring Throttle valve Vacuum hose ISC Valve Visual Inspection Check the ISC valve for carbon deposits or other damage If carbon is deposited remove it with a brush and clean with a compressed air CAUTION Normally the removed O ring must be replaced with a new one However this O ring is not available for the spare part...

Page 165: ...mbly Refer to Shift Lever Assembly Removal and Installation in Section 5A Page 5A 24 7 Disconnect the spark plug cap 4 8 Disconnect the starter motor lead wire 5 and ground lead wire 6 9 Disconnect the radiator inlet hose 7 and outlet hose 8 10 Remove the air cleaner box Refer to Air Cleaner Box Removal and Installation Page 1D 5 11 Remove the throttle body assembly Refer to Throttle Body Removal ...

Page 166: ...rear brake pedal Refer to Rear Brake Pedal Removal and Installation in Section 4A Page 4A 14 19 Remove the rear propeller shaft 15 Refer to Rear Propeller Shaft Removal and Installation in Section 3D Page 3D 17 20 Remove the front differential mounting bolts and slide the front differential assembly 16 forward Refer to Front Drive Differential Assembly Removal and Installation in Section 3B Page 3...

Page 167: ...per 2 keep that the clearance are equal Tighten the engine mounting damper stopper bolts 3 to the specified torque Tightening torque Engine mounting damper stopper bolt b 23N m 2 3 kgf m 16 5 lb ft Install the front propeller shaft and front differential assembly Refer to Front Drive Differential Assembly Removal and Installation in Section 3B Page 3B 4 Install the rear propeller shaft and rear di...

Page 168: ...age 0B 19 Parking Brake cable play Refer to Rear Brake Pedal Rear Brake Parking Brake Lever Inspection and Adjustment in Section 0B Page 0B 19 Engine oil and coolant leakage Refer to Cooling Circuit Inspection in Section 1F Page 1F 4 Engine Top Side Disassembly B831G21406015 It is unnecessary to remove the engine assembly from the frame when servicing the engine top side CAUTION Identify the posit...

Page 169: ...et hose 3 Exhaust Pipe Remove the exhaust pipe Refer to Exhaust Pipe Muffler Removal and Installation in Section 1K Page 1K 2 Spark Plug Cap Spark Plug Remove the spark plug cap and spark plug Refer to Spark Plug Cap and Spark Plug Removal and Installation in Section 1H Page 1H 3 Recoil Starter Remove the recoil starter 1 by removing the bolts 1 I831G1140073 01 2 I831G1140076 01 1 I831G1140079 01 ...

Page 170: ...nal holders 1 CAUTION Be sure to loosen the camshaft journal holder bolts evenly by shifting the wrench diagonally 4 Remove the dowel pins 2 and camshafts 3 NOTE Be careful not to drop the dowel pins into the crankcase Cam Chain Tension Adjuster 1 Remove the cam chain tension adjuster cap bolt 1 2 Remove the cam chain tension adjuster 2 with the spring 3 O ring 4 and bar 5 1 I831G1140084 02 I831G1...

Page 171: ...ylinder head bolts M10 and washers NOTE When loosening the cylinder head bolts loosen each bolt little by little diagonally 4 Remove the cylinder head 7 NOTE If the cylinder head does not come off easily lightly tap using a plastic hammer Cylinder 1 Remove the dowel pins 1 and gasket 2 2 Remove the cam chain guide 3 3 Remove the cylinder 5 by removing the cylinder nuts 4 NOTE If the cylinder does ...

Page 172: ...he engine top side in the reverse order of disassembly Pay attention to the following points CAUTION When turning the crankshaft pull the cam chain upward or the chain will be caught between the crankcase and the cam drive sprocket Piston When installing the piston pin apply a light coat molybdenum oil solution onto piston pin M O Molybdenum oil MOLYBDENUM OIL SOLUTION Install the piston and pisto...

Page 173: ...t 99000 31110 SUZUKI BOND No 1215 or equivalent Fit the dowel pins 1 and the new gasket 2 CAUTION Replace the cylinder gasket 2 with a new one Position the piston ring gaps as shown in the figure Before inserting each piston into its cylinder check that the gaps are properly positioned Cylinder Insert the piston into the cylinder 1 Temporarily tighten the cylinder base nuts 2 Apply engine oil to s...

Page 174: ...ads and both sides of washers Tighten the cylinder head bolts to the specified two step torque with a torque wrench sequentially and diagonally Tightening torque Cylinder head bolt L 200 Initial 25 N m 2 5 kgf m 18 0 lb ft Cylinder head bolt L 200 Final 37 N m 3 7 kgf m 27 0 lb ft After firmly tightening the cylinder head bolts 4 install the cylinder head bolts Tightening torque Cylinder head bolt...

Page 175: ...copper washer 3 and shim 4 CAUTION When checking the positions remove the cam chain slack at the cam chain guide side by holding the cam drive idle gear sprocket by hand NOTE Due to special valve train mechanism aligning of the three elements the punched mark C embossed line D and the gear tooth root on the cam drive idle gear sprocket can occur once every other rotation of crankshaft CAUTION If t...

Page 176: ...djuster Install the cam chain tension adjuster 1 and tighten the its mounting bolts to the specified torque CAUTION Use a new gasket to prevent oil leakage Tightening torque Cam chain tension adjuster bolt a 10 N m 1 0 kgf m 7 0 lb ft C Punched mark F Root of tooth D Embossed line G Top of tooth E White paint E E F C D I831G1140120 03 C D G E E I831G1140121 04 C D G E E I831G1140122 03 a 2 I831G11...

Page 177: ...kcase Install the dowel pins 1 The camshafts are identified by the engraved letters Before replacing the camshafts on cylinder head apply engine oil to their journals and cam faces Apply engine oil to the camshaft journal holders NOTE Before installing the camshaft check that the tappets are installed correctly Align the engraved mark C and D on the camshaft sprockets so it is parallel with the ma...

Page 178: ... the head cover bolts to the specified two step torque with a torque wrench sequentially and diagonally Tightening torque Head cover bolt Initial a 10 N m 1 0 kgf m 7 0 lb ft Head cover bolt Final a 14 N m 1 4 kgf m 10 0 lb ft Spark plug Install the spark plug Refer to Spark Plug Cap and Spark Plug Removal and Installation in Section 1H Page 1H 3 Valve Timing Inspection Plug Tighten the valve timi...

Page 179: ...e the cam height a with a micrometer Replace a camshaft if the cams are worn to the service limit Special tool 09900 20202 Micrometer 1 100 mm 25 50 mm Cam height a Service limit IN 36 030 mm 1 4185 in Service limit EX 35 000 mm 1 3780 in Camshaft Runout Measure the runout using the dial gauge Replace the camshaft if the runout exceeds the limit Special tool A 09900 20607 Dial gauge 1 100 mm 10 mm...

Page 180: ... width of the compressed plastigauge using the envelope scale 6 This measurement should be taken at the widest part of the compressed plastigauge Camshaft journal oil clearance IN EX Service limit 0 150 mm 0 0059 in 7 If the camshaft journal oil clearance exceeds the limit measure the inside diameter of the camshaft journal holder and the outside diameter of the camshaft journal Replace the camsha...

Page 181: ...to Engine Top Side Disassembly Page 1D 17 2 Check that the push rod slides smoothly when releasing stopper 1 If it does not slide smoothly replace the cam chain tension adjuster with a new one 3 Install the cam chain tension adjuster Refer to Engine Top Side Assembly Page 1D 21 Cam Chain Guide Removal and Installation B831G21406021 Removal 1 Remove the cylinder head Refer to Engine Top Side Disass...

Page 182: ...Cylinder Head Disassembly and Assembly B831G21406024 Refer to Engine Top Side Disassembly Page 1D 17 CAUTION Identify the position of each removed part Organize the parts in their respective groups i e intake exhaust so that they can be installed in their original locations Disassembly 1 Remove the tappet 1 and shim 2 by fingers or magnetic hand 2 Using the special tools compress the valve spring ...

Page 183: ...t Removal and Installation in Section 1F Page 1F 11 Assembly Assembly is in the reverse order of disassembly Pay attention to the following points Install the thermostat Refer to Thermostat Removal and Installation in Section 1F Page 1F 11 Instal the ECT sensor Refer to ECT Sensor Removal and Installation in Section 1C Page 1C 4 Tighten the oil gallery plug 1 cylinder head to the specified torque ...

Page 184: ...take pipe bolt b 9 N m 0 9 kgf m 6 5 lb ft Thread lock cement 99000 32050 THREAD LOCK CEMENT 1342 or equivalent Apply thread lock to the water bypass union 2 and tighten it to the specified torque Tightening torque Water bypass union c 12 N m 1 2 kgf m 8 5 lb ft Thread lock cement 99000 32050 THREAD LOCK CEMENT 1342 or equivalent Install the valve spring seat Apply engine oil to the oil seal 2 and...

Page 185: ...lves to wedge in between retainer and stem CAUTION Be sure to restore each spring and valve to their original positions Be careful not to damage the valve and valve stem when handling them To prevent damage of the tappet sliding surface with the special tool use the sleeve protector Special tool A 09916 14510 Valve spring compressor B 09916 14910 Valve spring compressor attachment C 09916 84511 Tw...

Page 186: ...replace the cylinder head Special tool 09900 20803 Thickness gauge Cylinder head distortion Service limit 0 05 mm 0 002 in Valve Stem Runout Support the valve using V blocks as shown and check its runout using the dial gauge If the runout exceeds the service limit replace the valve Special tool A 09900 20607 Dial gauge 1 100 mm 10 mm B 09900 20701 Magnetic stand C 09900 21304 V block 100 mm Valve ...

Page 187: ... the guide should be replaced with a new one Special tool A 09900 20607 Dial gauge 1 100 mm 10 mm B 09900 20701 Magnetic stand Valve stem deflection IN EX Service limit 0 35 mm 0 014 in Valve Stem Wear Measure the valve stem O D using the micrometer If it is out of specification replace the valve with a new one If the valve stem O D is within specification but the valve stem deflection is not repl...

Page 188: ...nsion IN EX Standard 182 210 N 18 6 21 4 kgf 41 0 47 2 Ibs 36 35 mm 1 43 in Valve Seat Width 1 Visually check for valve seat width on each valve face If the valve face has worn abnormally replace the valve 2 Coat the valve seat with a red lead Prussian Blue and set the valve in place 3 Rotate the valve with light pressure Special tool A 09916 10911 Valve lapper set 4 Check that the transferred red...

Page 189: ...e Guide Replacement B831G21406026 1 Remove the cylinder head Refer to Engine Top Side Disassembly Page 1D 17 2 Remove the valves Refer to Cylinder Head Disassembly and Assembly Page 1D 31 3 Using the valve guide remover drive the valve guide out toward the intake or exhaust camshaft side Special tool A 09916 44910 Valve guide remover installer NOTE Discard the removed valve guide sub assemblies On...

Page 190: ...910 Valve guide remover installer D 09916 57360 Attachment 8 After installing the valve guides refinish their guiding bores using the reamer Be sure to clean and oil the guides after reaming Special tool C 09916 34542 Reamer handle E 09916 34550 Valve guide reamer 5 5 mm NOTE Be sure to cool down the cylinder head to ambient air temperature Insert the reamer from the combustion chamber and always ...

Page 191: ...er head has been reinstalled Refer to Valve Clearance Inspection and Adjustment in Section 0B Page 0B 4 Cam Drive Idle Gear Sprocket Thrust Clearance Inspection and Adjustment B831G21406028 Inspection Install the cam drive idle gear sprocket 1 and tighten the shaft 2 to the specified torque Tightening torque Cam drive idle gear sprocket shaft a 41 N m 4 1 kgf m 29 5 lb ft Measure the thrust cleara...

Page 192: ...union bolt Cylinder Inspection B831G21406030 Refer to Engine Top Side Disassembly Page 1D 17 Refer to Engine Top Side Assembly Page 1D 21 Cylinder Distortion Check the gasket surface of the cylinder for distortion Use a straightedge and thickness gauge Take clearance readings at several places If any reading exceeds the service limit replace the cylinder Special tool 09900 20803 Thickness gauge Cy...

Page 193: ...opening with your thumbs and then push up the opposite side of the 1st ring to remove it NOTE Do not expand the piston ring excessively since it is apt to be broken down 3 Remove the 2nd ring and oil ring in the same manner Installation NOTE When installing the piston ring be careful not to damage the piston Do not expand the piston ring excessively since it is apt to be broken down 1 Install the ...

Page 194: ...ge 1D 42 Piston Diameter Measure the piston diameter using the micrometer at 15 mm 0 6 in a from the skirt end If the piston diameter is less than the service limit replace the piston Special tool A 09900 20210 Micrometer 100 125 mm Piston diameter Service limit 103 880 mm 4 0898 in Piston to cylinder Clearance Subtract the piston diameter from the cylinder bore diameter If the piston to cylinder ...

Page 195: ...hickness Standard 1st 0 76 0 81 mm 0 0299 0 0319 Standard 1st 1 08 1 10 mm 0 0425 0 0433 Standard 2nd 0 97 0 99 mm 0 0382 0 0390 in Piston Ring Free End Gap and Piston Ring End Gap Measure the piston ring free end gap using vernier calipers Next fit the piston ring squarely into the cylinder and measure the piston ring end gap using the thickness gauge If any of the measurements exceed the service...

Page 196: ...y of the measurements are out of specification replace the piston pin Special tool C 09900 20205 Micrometer 0 25 mm Piston pin O D Service limit 22 980 mm 0 9047 in Engine Bottom Side Disassembly B831G21406033 Remove the engine assembly Refer to Engine Assembly Removal Page 1D 13 Starter Motor Remove the starter motor 1 Engine Top Side Remove the engine top side 1 Refer to Engine Top Side Disassem...

Page 197: ...nd Installation in Section 1J Page 1J 4 Starter Torque Limiter Starter Idle Gear 1 Remove the starter torque limiter 1 with the washers 2 2 Remove the starter idle gear 3 and shaft 4 3 Remove the bushings 5 from the crankcase and generator cover Starter Driven Gear Remove the key 1 and starter driven gear 2 1 I831G1140192 01 1 2 I831G1140193 01 1 I831G1140194 01 1 3 4 2 I831G1140196 02 5 5 I831G11...

Page 198: ...07 Snap ring pliers 2 Remove the drive gear spacer 3 and output shaft spacer 4 Cam Chain Cam Chain Tensioner 1 Remove the cam chain tensioner bolt 1 cam chain tensioner 2 and washer 3 2 Remove the cam chain 4 Oil Pump 1 Remove the snap ring 1 NOTE Do not drop the snap ring 1 into the crankcase Special tool 09900 06107 Snap ring pliers 2 Remove the oil pump drive chain 2 and oil pump driven gear 3 ...

Page 199: ...2460 Socket 52 mm 2 Remove the water pump drive gear 2 and oil pump drive gear 3 3 Remove the crank balancer shaft driven gears 4 4 Remove the keys 5 5 Unlock the crank balancer drive gear nut 6 Remove the crank balancer drive gear nut 5 with the special tools Special tool A 09924 52460 Socket 52 mm B 09920 53740 Clutch sleeve hub holder 09920 31020 Extension handle 5 6 4 I831G1140209 01 A 1 1 I83...

Page 200: ...on in Section 5A Page 5A 5 and Clutch Shoe Removal and Installation in Section 5A Page 5A 16 Oil Jet Remove the oil jet 1 from crankcase Oil Gallery Plug Remove the oil gallery plug 1 and gasket 2 Gear Position Switch 1 Remove the gear position switch 1 2 Remove the gear position switch contacts 2 and its springs 3 6 7 I831G1140215 01 8 I831G1140216 01 1 I831G1140217 01 1 I831G1140218 01 1 2 I831G...

Page 201: ...kcase half Special tool A 09920 13120 Crankcase separating tool 4 Remove the collar 2 5 Remove the dowel pins 3 Oil Strainer Remove the oil strainer 1 Transfer Rear Output Shaft Rear Output Shaft Bevel Gear Remove the transfer component parts 1 rear output shaft 2 and rear output shaft bevel gear component parts 3 Refer to Transfer Removal and Installation in Section 3C Page 3C 3 Crank Balancer Re...

Page 202: ...following points NOTE Apply engine oil to each running and sliding part before reassembling Crankshaft CAUTION Never fit the crankshaft into the crankcase by striking it with a plastic mallet Always use the special tool otherwise the accuracy of the crankshaft alignment will be affected Install the crankshaft to left crankcase with the special tools Special tool A 09910 32812 Crankshaft installer ...

Page 203: ...ear Shim Inspection and Adjustment in Section 3D Page 3D 11 Install the transfer component parts 3 Refer to Transfer Removal and Installation in Section 3C Page 3C 3 Crankcase Wipe the crankcase mating surface both surfaces Insert the dowel pins 1 onto the left crankcase Apply engine oil to the conrod big end and each gear Apply bond to the mating surface of the right crankcase Sealant 99000 31110...

Page 204: ...lt M8 26 N m 2 6 kgf m 19 0 lb ft After the crankcase bolts have been tightened check if the each shaft rotate smoothly Apply grease to the O ring CAUTION Use the new O ring to prevent oil leakage Grease 99000 25010 SUZUKI SUPER GREASE A or equivalent Install the collar 2 Gear Position Switch Install each gear shift switch contact and spring Apply grease to the O ring CAUTION Replace the O ring wi...

Page 205: ... kgf m 13 0 lb ft Oil Jet When installing the oil jet apply grease to the O ring CAUTION Use a new O ring to prevent oil pressure leak Automatic Transmission Install the automatic transmission component parts 1 Refer to V belt Type Continuously Variable Automatic Transmission Removal and Installation in Section 5A Page 5A 5 and Clutch Shoe Removal and Installation in Section 5A Page 5A 16 Crank Ba...

Page 206: ...n handle Tightening torque Crank balancer drive gear nut 150 N m 15 0 kgf m 108 5 lb ft Lock the crank balancer drive gear nut with a center punch Install the keys 4 Install the crank balancer driven gears 5 water pump drive gear 6 and oil pump drive gear 7 NOTE Align the punch mark A of crank balancer drive gear with the punch marks B of each crank balancer driven gear as shown Be careful directi...

Page 207: ...ten the bolts Thread lock cement 99000 32050 THREAD LOCK CEMENT 1342 or equivalent Install the washer 1 and pin 2 Install the oil pump drive gear 3 with chain 4 Install the snap ring 5 NOTE Be careful not to drop the snap ring 5 into the crankcase Cam Chain Tensioner Install the cam chain tensioner 1 along with the washer 2 Tighten the cam chain tensioner bolt 3 to the specified torque Tightening ...

Page 208: ...earshift cam stopper moves smoothly Locate the gearshift cam in the neutral position Install the gearshift cam stopper plate 5 NOTE Align the gearshift cam pin B with the gearshift cam stopper plate hole C Install the gearshift shaft 6 NOTE Align the punch mark D with the concave mark E of gearshift cam of surface Starter Driven Gear Install the starter driven gear 1 and key 2 3 I831G1140277 01 1 ...

Page 209: ...the bushings M O Molybdenum oil MOLYBDENUM OIL SOLUTION Install the starter torque limiter 3 with washers 4 Generator Install the generator component parts Refer to Generator Removal and Installation in Section 1J Page 1J 4 NOTE Fit the clamp to the bolt A Starter Cup Apply grease to the O ring and lip of the oil seal Install the starter cup 1 Grease 99000 25010 SUZUKI SUPER GREASE A or equivalent...

Page 210: ...tarter Motor Install the starter motor Refer to Starter Motor Removal and Installation in Section 1I Page 1I 4 Engine Top Side Assemble the engine top side Refer to Engine Top Side Assembly Page 1D 21 Conrod and Crankshaft Inspection B831G21406035 Refer to Engine Bottom Side Disassembly Page 1D 45 Conrod Small End I D Measure the conrod small end inside diameter with the dial calipers If conrod sm...

Page 211: ...g end side clearance Service limit 1 0 mm 0 04 in 2 If the clearance exceeds the limit replace the crankshaft assembly and conrod with a new one Crankshaft Runout Measure the crankshaft runout with V blocks and dial gauge NOTE Place the crankshaft onto the V blocks so that it becomes horizontally Measure the runout from the tips of the crankshaft Crankshaft runout Service limit 0 08 mm 0 003 in Sp...

Page 212: ... Rotate the bearing inner race by finger to inspect for abnormal play noise and smooth rotation while the bearings are in the crankcase Replace the bearing if there is anything unusual Left crankcase Right crankcase Generator cover Bearing Removal and Installation B831G21406039 Removal Left crankcase 1 Remove the each bearing retainers 2 Remove the drive shaft bearing 1 with the special tool Speci...

Page 213: ... 2 with the special tool Special tool B 09921 20240 Bearing remover set 4 Remove the front output shaft bearing 3 with the special tools Special tool C 09923 74511 Bearing remover D 09930 30104 Rotor remover slide shaft 5 Remove the crankshaft bearing 4 with the special tools Special tool D 09930 30104 Rotor remover slide shaft E 09941 64511 Bearing remover 2 2 2 2 B I831G1140304 01 I831G1140305 0...

Page 214: ...the snap rings 1 with the special tool Special tool 09900 06108 Snap ring pliers 3 Remove the each bearings 2 with the special tool Special tool A 09921 20240 Bearing remover set 4 Remove the oil seal 3 with the special tool Special tool B 09913 50121 Oil seal remover 5 Remove the speed sensor 4 6 Remove the oil seals 5 F 5 I831G1140310 01 1 I831G1140311 01 A 2 2 2 I831G1140312 01 3 B I831G1140313...

Page 215: ... installer set 3 Install the snap rings 3 CAUTION The removed snap rings must be replaced with new ones 4 Apply grease to O ring and install the speed sensor 4 CAUTION Replace the O ring with a new one Grease 99000 25010 SUZUKI SUPER GREASE A or equivalent 5 Tighten the bolt to the specified torque Tightening torque Speed sensor bolt a 10 N m 1 0 kgf m 7 0 lb ft 6 Install the removed parts Refer t...

Page 216: ...screws and tighten them Thread lock cement 99000 32050 THREAD LOCK CEMENT 1342 or equivalent Left crankcase 1 Install the bearings 1 with the special tool CAUTION Use the special tool suitable size for each bearing to prevent damage NOTE The stamped mark side of the bearing faces inside of crankcase Special tool A 09913 70210 Bearing installer set 2 Apply thread lock to the screws and install the ...

Page 217: ... runout IN EX 0 05 0 002 Valve head thickness IN EX 0 5 0 02 Valve seat width IN EX 0 9 1 1 0 035 0 043 Valve head radial runout IN EX 0 03 0 001 Valve spring free length IN EX 46 1 1 81 Valve spring tension IN EX 182 210 N 18 6 21 4 kgf 41 0 47 2 lbs at length 36 35 mm 1 43 in Item Standard Limit Cam height IN 36 330 36 380 1 4303 1 4323 36 030 1 4185 EX 35 300 35 350 1 3898 1 3917 35 000 1 3780 ...

Page 218: ... 10 0 25 0 004 0 010 0 50 0 020 2nd RN 0 10 0 25 0 004 0 010 0 50 0 020 Piston ring to groove clearance 1st 0 180 0 0071 2nd 0 150 0 0059 Piston ring groove width 1st 0 83 0 85 0 0327 0 0335 1 30 1 32 0 0512 0 0520 2nd 1 01 1 03 0 0398 0 0406 Oil 2 01 2 03 0 0791 0 0799 Piston ring thickness 1st 0 76 0 81 0 0299 0 0319 1 08 1 10 0 0425 0 0433 2nd 0 97 0 99 0 0382 0 0390 Piston pin bore I D 23 002 ...

Page 219: ...ge 1D 23 Cylinder head bolt L 70 10 1 0 7 0 Page 1D 23 Cylinder head bolt L 100 10 1 0 7 0 Page 1D 23 Cylinder base nut 10 1 0 7 0 Page 1D 24 Cam drive idle gear sprocket shaft 41 4 1 29 5 Page 1D 25 Page 1D 40 Cam chain tension adjuster bolt 10 1 0 7 0 Page 1D 25 Cam chain tension adjuster cap bolt 7 0 7 5 0 Page 1D 26 Camshaft journal holder bolt 10 1 0 7 0 Page 1D 26 Page 1D 29 Head cover bolt ...

Page 220: ... 58 Sealant SUZUKI BOND No 1215 or equivalent P No 99000 31110 Page 1D 22 Page 1D 52 SUZUKI BOND No 1216B or equivalent P No 99000 31230 Page 1D 27 Thread lock cement THREAD LOCK CEMENT SUPER 1303 or equivalent P No 99000 32030 Page 1D 16 Page 1D 56 THREAD LOCK CEMENT 1342 or equivalent P No 99000 32050 Page 1D 33 Page 1D 33 Page 1D 56 Page 1D 65 Page 1D 65 09900 06107 09900 06108 Snap ring pliers...

Page 221: ...35 Page 1D 36 Page 1D 60 Page 1D 60 Page 1D 35 Page 1D 40 Page 1D 41 Page 1D 44 Page 1D 44 Page 1D 60 09900 21304 09900 22301 V block 100 mm Plastigauge 0 025 0 076 mm Page 1D 28 Page 1D 35 Page 1D 35 Page 1D 60 Page 1D 60 Page 1D 29 09900 22302 09900 22403 Plastigauge 0 051 0 152 mm Small bore gauge 18 35 mm Page 1D 29 Page 1D 29 Page 1D 45 09910 32812 09910 32860 Crankshaft installer Attachment ...

Page 222: ...16 14910 09916 34542 Valve spring compressor attachment Reamer handle Page 1D 34 Page 1D 38 Page 1D 39 09916 34550 09916 34580 Valve guide reamer 5 5 mm Valve guide reamer 10 8 mm Page 1D 39 Page 1D 38 09916 44910 09916 57360 Valve guide remover installer Attachment Page 1D 38 Page 1D 39 Page 1D 39 09916 84511 09919 28610 Valve adjuster driver Sleeve protector Page 1D 31 Page 1D 34 Page 1D 31 Page...

Page 223: ... Page 1D 62 Page 1D 63 09923 74511 09924 52460 Bearing remover Socket 52 mm Page 1D 62 Page 1D 48 Page 1D 48 Page 1D 55 Page 1D 56 09930 11950 09930 30104 Torx wrench Rotor remover slide shaft Page 1D 11 Page 1D 12 Page 1D 62 Page 1D 62 09941 53610 09941 64511 Front fork installer hammer Bearing remover Page 1D 51 Page 1D 62 ...

Page 224: ...ELIEF VALVE OIL FILTER OIL JET DRIVE SHAFT GEARS CRANK CASE R CYLINDER CAM FACE TAPPET CAMSHAFT JOURNAL R EX CAMSHAFT CAM FACE TAPPET ONE WAY CLUCH CLUCH SHOE CONROD BIG END BEARING CYLINDER WALL PISTON MAIN GALLERY OIL PAN EX CAMSHAFT JOURNAL L IN CAMSHAFT JOURNAL L CAM FACE TAPPET IN CAMSHAFT CAMSHAFT JOURNAL R CAM FACE TAPPET CAM CHAIN IDLE GEAR CAM CHAIN ONE WAY CLUCH CAM CHAIN STARTER DRIVEN ...

Page 225: ...to V belt Cooling Duct Removal and Installation in Section 5A Page 5A 5 3 Remove the main oil gallery plug 1 4 Install the oil pressure gauge and attachment into the main oil gallery 5 Connect the tachometer to the high tension cord Special tool A 09915 74511 Oil pressure gauge set B 09915 74533 Oil pressure gauge attachment 09900 26006 Engine tachometer solar cell type 6 Warm up the engine as fol...

Page 226: ...emoved parts Repair Instructions Engine Oil and Filter Replacement B831G21506001 Refer to Engine Oil and Filter Replacement in Section 0B Page 0B 10 Engine Oil Level Inspection B831G21506002 Refer to Engine Oil and Filter Replacement in Section 0B Page 0B 10 Oil Sump Filter Removal and Installation B831G21506003 Removal 1 Remove the engine assembly from the frame Refer to Engine Assembly Removal i...

Page 227: ...ter Refer to Oil Sump Filter Removal and Installation Page 1E 3 2 If the oil sump filter is clogged with sediment or rust clean the oil sump filter using compressed air NOTE When the filter is dirtied excessively replace the oil sump filter with a new one 3 Install the oil sump filter Refer to Oil Sump Filter Removal and Installation Page 1E 3 Oil Jet Removal and Installation B831G21506005 Removal...

Page 228: ... 0B Page 0B 10 2 Remove the starter motor 1 Refer to Starter Motor Removal and Installation in Section 1I Page 1I 4 3 Remove the starter torque limiter and starter idle gear 2 Refer to Starter Torque Limiter Starter Clutch Removal and Installation in Section 1I Page 1I 10 4 Remove the generator rotor assembly 3 and starter driven gear 4 Refer to Generator Removal and Installation in Section 1J Pag...

Page 229: ...ts Thread lock cement 99000 32050 THREAD LOCK CEMENT 1342 or equivalent Install the new snap ring 1 Special tool 09900 06107 Snap ring pliers Install the oil pump drive gear 2 with chain NOTE The flange side of the oil pump drive gear 2 inside Apply thread lock super to the oil pump drive gear bolt 3 Thread lock cement 99000 32030 THREAD LOCK CEMENT SUPER 1303 or equivalent 7 8 9 10 11 I831G115001...

Page 230: ...available only as an assembly 3 Install the oil pump Refer to Oil Pump Removal and Installation Page 1E 5 Specifications Service Data B831G21507001 Oil Pump Oil Tightening Torque Specifications B831G21507002 Reference For the tightening torque of fastener not specified in this section refer to Tightening Torque List in Section 0C Page 0C 7 A a 3 I831G1150018 03 I831G1150019 01 Item Standard Limit ...

Page 231: ...cement THREAD LOCK CEMENT SUPER 1303 or equivalent P No 99000 32030 Page 1E 6 THREAD LOCK CEMENT 1342 or equivalent P No 99000 32050 Page 1E 6 09900 06107 09900 26006 Snap ring pliers Engine tachometer solar cell type Page 1E 6 Page 1E 6 Page 1E 2 09915 74511 09915 74533 Oil pressure gauge set Oil pressure gauge attachment Page 1E 2 Page 1E 2 09920 53740 Clutch sleeve hub holder Page 1E 5 Page 1E ...

Page 232: ...ion Engine Coolant Description B831G21601001 CAUTION Use a high quality ethylene glycol base anti freeze mixed with distilled water Do not mix an alcohol base anti freeze and different brands of anti freeze Do not put in more than 60 anti freeze or less than 50 Refer to Fig 1 and 2 At the time of manufacture the cooling system is filled with a 50 50 mixture of distilled water and ethylene glycol a...

Page 233: ...1F 2 Schematic and Routing Diagram Cooling Circuit Diagram B831G21602001 WATER PUMP RADIATOR COOLING FAN THERMO SWITCH ENGINE COOLANT TEMPERATURE SWITCH THERMOSTAT CYLINDER HEAD CYLINDER RESERVOIR TANK BYPASS I831G1160001 02 ...

Page 234: ... A A a b A I831G1160002 05 1 Thermostat 6 Radiator outlet hose D Face the tip of the clip to upper 2 Radiator 7 Water pump 17 N m 1 7 kgf m 12 5 lb ft 3 Reservoir tank A Yellow mark 12 N m 1 2 kgf m 8 5 lb ft 4 Radiator inlet hose B White mark 5 Bypass hose C Face the tip of the clip to forward ...

Page 235: ...UTION Do not exceed the radiator cap release pressure or the radiator cap and subsequently the radiator can be damaged 4 After finishing the cooling circuit inspection reinstall the removed parts Condition Possible cause Correction Reference Item Engine overheats Not enough engine coolant Add engine coolant Radiator core clogged with dirt or scale Clean Faulty cooling fan Repair or replace Defecti...

Page 236: ... Page 0B 15 Radiator Inspect the radiator for water leaks If any defects are found replace the radiator with a new one If the fins are bent or dented repair them by carefully straightening them with the blade of a small screwdriver Radiator Cleaning Blow out any foreign matter that is stuck in the radiator fins using compressed air CAUTION Make sure not to bend the fins when using compressed air A...

Page 237: ...emoving the bolts 6 Disconnect the cooling fan thermo switch 5 7 Disconnect the inlet hose 6 and outlet hose 7 8 Remove the radiator 8 by removing the bolts 9 Remove the radiator cover 9 3 I831G1160055 01 4 I831G1160004 01 4 I831G1160007 01 5 I831G1160008 01 6 7 I831G1160009 01 8 I831G1160010 01 9 I831G1160011 02 ...

Page 238: ... Refer to Water Hose Routing Diagram Page 1F 3 Installation 1 Install the water hose as shown in the water hose routing diagram Refer to Water Hose Routing Diagram Page 1F 3 2 Pour engine coolant and bleed air from the cooling circuit Refer to Cooling System Inspection in Section 0B Page 0B 15 3 Reinstall the removed parts Cooling Fan Inspection B931G21606006 Inspect the cooling fan in the followi...

Page 239: ...t the radiator reservoir tank hoses securely Refer to Water Hose Routing Diagram Page 1F 3 Fill the reservoir tank to the upper level Radiator Reservoir Tank Inspection B831G21606008 Inspect the radiator reservoir tank cooling leaks If any defects are found replace the radiator reservoir tank with a new one Water Hose Inspection B831G21606009 Inspect the water hoses in the following procedures 1 R...

Page 240: ...Page 1C 4 ECT Sensor Inspection B831G21606011 Refer to ECT Sensor Inspection in Section 1C Page 1C 4 Cooling Fan Thermo switch Removal and Installation B831G21606012 Removal 1 Remove the front fender Refer to Front Side Exterior Parts Removal and Installation in Section 9D Page 9D 6 2 Drain engine coolant Refer to Cooling System Inspection in Section 0B Page 0B 15 3 Disconnect the cooling fan ther...

Page 241: ...the thermo switch closing or opening temperatures by testing it at the bench as shown in the figure 3 Connect the thermo switch 1 to a circuit tester and place it in the water A contained in a pan which is placed on the stove 4 Heat the water to raise its temperature slowly and read the column thermometer 2 when the switch closes or opens If any abnormality is found replace the cooling fan thermo ...

Page 242: ...e thermostat in the reverse order of removal Pay attention to the following points Apply engine coolant to the rubber seal on the thermostat Install the thermostat NOTE Align the protrusions on the thermostat with the groove on the cylinder head The jiggle valve of the thermostat faces upside Tighten the thermostat cover bolts 1 to the specified torque Tightening torque Thermostat cover bolt a 23 ...

Page 243: ...t 1 in the water contained in a beaker and note that the immersed thermostat is in suspension 5 Heat the water by placing the beaker on a stove and observe the rising temperature on a thermometer 2 6 Read the thermometer just when opening the thermostat If this reading which is the temperature level at which the thermostat valve begins to open is out of the standard value replace the thermostat wi...

Page 244: ... Front Side Exterior Parts Removal and Installation in Section 9D Page 9D 6 2 Remove the left mud guard Refer to Front Side Exterior Parts Removal and Installation in Section 9D Page 9D 6 3 Drain engine oil and coolant Refer to Engine Oil and Filter Replacement in Section 0B Page 0B 10 and Cooling System Inspection in Section 0B Page 0B 15 4 Disconnect the outlet hose 1 and water bypass hose 2 5 R...

Page 245: ... 0 lb ft Connect the water hoses securely Refer to Water Hose Routing Diagram Page 1F 3 Pour engine oil and coolant Refer to Engine Oil and Filter Replacement in Section 0B Page 0B 10 and Cooling System Inspection in Section 0B Page 0B 15 Bleed air from the cooling circuit Refer to Front Differential Gear Oil Inspection in Section 0B Page 0B 12 Water Pump Disassembly and Assembly B831G21606018 Ref...

Page 246: ...he mechanical seal with the special tool NOTE If there is no abnormal condition the mechanical seal removal is not necessary Special tool A 09921 20240 Bearing remover set 8 Remove the oil seal 12 NOTE If there is no abnormal condition the oil seal removal is not necessary 7 8 I831G1160040 02 9 I831G1160041 01 11 10 I831G1160042 01 A I831G1160043 01 12 I831G1160044 01 ...

Page 247: ...KI SUPER GREASE A or equivalent 3 Install a new mechanical seal using a suitable size socket wrench CAUTION Replace the mechanical seal with a new one NOTE On the new mechanical seal the sealer A has been applied 4 Install the rubber seal 1 into the impeller 5 After wiping off the oily or greasy matter from the mechanical seal ring 2 install it into the impeller NOTE The paint marked side B of mec...

Page 248: ...r 3 and pin 4 to the impeller shaft 9 Install the water pump driven gear 5 washer 6 and snap ring 7 CAUTION The convex part C of water pump driven gear should face the water pump side 10 Install a new O ring 8 and apply engine coolant to it CAUTION Use a new O ring to prevent engine coolant leakage I831G1160051 01 4 3 I831G1160050 02 C I831G1160052 02 6 5 7 I831G1160053 04 8 I831G1160054 02 ...

Page 249: ...with particular attention given to the sealing face Replace the mechanical seal that shows indications of leakage Oil Seal Visually inspect the oil seal for damage with particular attention given to the lip Replace the oil seal that shows indications of leakage Impeller Visually inspect the impeller and its shaft for damage Replace the impeller if necessary Impeller Shaft Journal Visually inspect ...

Page 250: ...2 45 kΩ 50 C 122 F Approx 0 811 kΩ 80 C 176 F Approx 0 318 kΩ 110 C 230 F Approx 0 142 kΩ Radiator cap valve opening pressure 110 140 kPa 1 1 1 4 kgf cm2 15 6 19 9 psi Cooling fan thermo switch operating temperature OFF ON Approx 93 C 199 F ON OFF Approx 87 C 189 F Engine coolant type Use an antifreeze coolant compatible with aluminum radiator mixed with distilled water only at the ratio of 50 50 ...

Page 251: ...following Water Pump Components Page 1F 13 Special Tool B831G21608002 Material SUZUKI recommended product or Specification Note Grease SUZUKI SUPER GREASE A or equivalent P No 99000 25010 Page 1F 14 Page 1F 16 Page 1F 17 09900 25008 09913 70210 Multi circuit tester set Bearing installer set Page 1F 10 Page 1F 16 09921 20240 Bearing remover set Page 1F 15 ...

Page 252: ...use care to minimize spillage of gasoline Spilled gasoline should be wiped off immediately Work in a well ventilated area CAUTION To prevent the fuel system fuel tank fuel hose etc from contamination with foreign particles blind all openings After removing the throttle body tape the cylinder intake section to prevent foreign particles from entering ...

Page 253: ... is regulated by the fuel pressure regulator 6 As the fuel pressure applied to the fuel injector 7 the fuel pressure in the fuel delivery pipe is always kept at absolute fuel pressure of 300 kPa 3 0 kgf cm2 43 psi the fuel is injected into the throttle body in conic dispersion when the injector 7 opens according to the injection signal from the ECM The fuel relieved by the fuel pressure regulator ...

Page 254: ...ram Fuel Hose Routing Diagram B831G21702001 A FR RR RR RH RH LH LH FR Intake pipe Outlet tube 1 5 2 2 1 3 4 3 1 VIEW A I831G1170002 04 1 Fuel hose 4 IAP sensor hose 2 Air cleaner box 5 Pass the fuel hose between the air cleaner guide 3 PCV hose ...

Page 255: ...G21702002 1 3 2 7 2 3 5 6 4 1 2 6 8 a A I831G1170003 04 1 Frame 5 Valve Black A Align the fuel pump nipple with the mark 2 Fuel tank breather hose 6 Valve Orange 35 N m 3 5 kgf m 25 5 lb ft 3 Check valve hose 7 Mark 4 Fuel tank 8 Fuel tank pressure control valve ...

Page 256: ...orrect fuel air mixture Defective IAP sensor or circuit Repair or replace Clogged fuel filter Clean or replace Defective fuel pump Replace Defective fuel pressure regulator Replace Damaged or cracked vacuum hose Replace Defective ECT sensor Replace Defective thermostat Replace Defective IAT sensor Replace Engine stalls often Fuel injector improperly operating Defective fuel injectors Replace No in...

Page 257: ...ssure Approx 294 kPa 2 9 kgf cm2 41 psi If the fuel pressure is lower than the specification check for the followings Fuel hose leakage Clogged fuel filter Pressure regulator Fuel pump If the fuel pressure is higher than the specification check for the followings Fuel pump Pressure regulator 6 Remove the special tools WARNING Before removing the special tools turn the ignition switch OFF and relea...

Page 258: ... pump side and apply 12 V to the fuel pump between Y R wire and B W wire for 10 seconds and measure the amount of fuel discharged If the discharge amount is out of the specification the probable cause may be failure of the fuel pump or clogged fuel filter NOTE The battery must be in fully charged condition Fuel discharge amount 55 5 ml 1 88 1 95 US lmp oz and more 10 sec 7 After finishing the fuel...

Page 259: ... to Rear Side Exterior Parts Removal and Installation in Section 9D Page 9D 9 Fuel Level Gauge Inspection B831G21706007 Refer to Fuel Level Gauge Inspection in Section 9C Page 9C 6 Fuel Level Indicator Inspection B831G21706008 Refer to Fuel Level Indicator Inspection in Section 9C Page 9C 5 Fuel Tank Removal and Installation B831G21706009 Removal WARNING Keep away from fire or spark Spilled gasoli...

Page 260: ...Remove the fuel pump retainer 1 with the special tool Special tool 09941 51012 Ring locknut wrench 3 Remove the fuel pump assembly 2 Installation Install the fuel pump assembly in the reverse order of removal Pay attention the following points Align the fuel pump nipple 1 with alignment mark A on the fuel tank Tighten the fuel pump retainer with the special tool to the specified torque Special too...

Page 261: ...ssembly Removal and Installation Page 1G 9 Fuel Injector Inspection and Cleaning B831G21706014 Inspect the fuel injector in the following procedures 1 Remove the fuel injector Refer to Fuel Injector Fuel Delivery Pipe Removal and Installation Page 1G 10 2 Check the fuel injector filter for evidence of dirt and contamination If present clean and check for presence of dirt in the fuel lines and fuel...

Page 262: ...attention to the following points Apply a thin coat of engine oil to the new cushion seal 1 and O ring 2 CAUTION Replace the cushion seal and O ring with the new ones Install the fuel injector 3 by pushing it straight to the delivery pipe 4 CAUTION Never turn the injector while pushing it NOTE Align the coupler A of injector with boss B of the delivery pipe 2 1 I831G1170023 01 4 3 I831G1170024 01 ...

Page 263: ...rrier Removal and Installation in Section 9E Page 9E 5 2 Remove the seat Refer to Seat Removal and Installation in Section 9D Page 9D 11 3 Remove the side covers left and right Refer to Front Side Exterior Parts Removal and Installation in Section 9D Page 9D 6 4 Remove the engine side cover Refer to Rear Side Exterior Parts Removal and Installation in Section 9D Page 9D 9 5 Remove the mad guard mo...

Page 264: ... After finishing the FTPC valve inspection reinstall the FTPC valve Refer to Fuel Tank Pressure Control FTPC Valve Removal and Installation Page 1G 12 Specifications Service Data B831G21707001 Injector Fuel Pump Fuel Pressure Regulator Fuel 4 5 I831G1170032 01 A Orange A I705H1170014 02 Item Specification Note Injector resistance 11 13 Ω at 20 C 68 F Fuel pump discharge amount 55 5 ml 1 88 1 95 US...

Page 265: ...Page 0C 7 Special Tools and Equipment Special Tool B831G21708001 Fastening part Tightening torque Note N m kgf m lb ft Fuel pump retainer 35 3 5 25 5 Page 1G 9 Fuel delivery pipe mounting screw 5 0 5 3 5 Page 1G 12 09900 25008 09915 74521 Multi circuit tester set Oil pressure gauge hose Page 1G 8 Page 1G 6 09915 77331 09940 40211 Meter for high pressure Fuel pressure gauge adapter Page 1G 6 Page 1...

Page 266: ... once again be limited by the speed limiter In forward Differential Lock made the override mode can be used for an indefinite period of time simply by holding the button in continuously Operation 1 Set the diff lock position or R Reverse position 2 Operate the override switch while pushing it Schematic and Routing Diagram Ignition System Diagram B831G21802001 Refer to Wire Color Symbols in Section...

Page 267: ...irty air cleaner element Clean or replace Incorrect spark plug Change to correct spark plug Spark plug quickly becomes fouled with oil or carbon Worn piston rings Replace Worn piston Replace Worn cylinder Rebore or replace Excessive valve stem to valve guide clearance Replace Worn valve stem oil seals Replace Spark plug electrodes overheat or burn Incorrect spark plug Change to correct spark plug ...

Page 268: ...ug Inspection and Cleaning in Section 0B Page 0B 9 Ignition Coil and Plug Cap Inspection B831G21806003 Refer to Electrical Components Location in Section 0A Page 0A 7 Ignition Coil Primary Peak Voltage 1 Remove the right side cover and right inner fender Refer to Front Side Exterior Parts Removal and Installation in Section 9D Page 9D 6 2 Disconnect the spark plug cap Refer to Spark Plug Cap and S...

Page 269: ... turn the ignition switch ON b Press the starter button and allow the engine to crank for a few seconds and then measure the ignition coil primary peak voltage 6 Repeat the b procedure few times and measure the highest peak voltage If the voltage is lower than standard range inspect the ignition coil and the CKP sensor Ignition coil primary peak voltage 80 V and more 7 After measuring the ignition...

Page 270: ...peak volt adaptor as follows CAUTION Before using the multi circuit tester and peak voltage adaptor refer to the appropriate instruction manual Special tool A 09900 25008 Multi circuit tester set Tester knob indication Voltage 4 Measure the CKP sensor peak voltage in the following procedures a Shift the transfer to the neutral turn the ignition switch ON b Press the starter button and allow the en...

Page 271: ...Engine Stop Switch Inspection B831G21806006 Inspect the engine stop switch in the following procedures 1 Turn the ignition switch OFF 2 Remove the left inner fender Refer to Front Side Exterior Parts Removal and Installation in Section 9D Page 9D 6 3 Disconnect the handlebar switch coupler 1 4 Inspect the engine stop switch for continuity with a tester If any abnormality is found replace the handl...

Page 272: ...attention to the following point Route the wiring harness properly Refer to Wiring Harness Routing Diagram in Section 9A Page 9A 4 Override Switch Inspection B831G21806009 1 Remove the left inner fender Refer to Front Side Exterior Parts Removal and Installation in Section 9D Page 9D 6 2 Disconnect the override switch read wire coupler 3 Check the continuity B W wire and Br wire of the override sw...

Page 273: ...plug Type NGK CR6E DENSO U20ESR N Gap 0 7 0 8 0 028 0 031 Spark performance Over 8 0 3 at 1 atm CKP sensor resistance 150 250 Ω CKP sensor peak voltage 5 0 V and more Ignition coil resistance Primary 0 1 0 6 Ω Terminal Ground Secondary 12 19 kΩ Plug cap Terminal Ignition coil primary peak voltage 80 V and more When cranking Fastening part Tightening torque Note N m kgf m lb ft Spark plug 11 1 1 8 ...

Page 274: ...in fuse Starter relay B W Y B R Neutral relay Starter button Engine stop switch Ignition fuse Ignition switch Parking brake relay Parking brake switch Neutral indicator light Neutral relay diode O Y Y G Battery Gear position switch N Bl B B Bl B W O Y B R Bl B B W I831G1190001 01 Condition Possible cause Correction Reference Item Starter button is not effective Run down battery Repair or replace D...

Page 275: ...hin wire because a large amount of current flows Does the starter motor run Faulty starter relay Loose or disconnected starter motor lead wire Loose or disconnected between starter relay and battery terminal Faulty starter motor 3 Measure the starter relay voltage at the starter relay connectors between Y B and B W when the starter button is pushed Is the voltage OK Go to Step 4 Faulty ignition sw...

Page 276: ...906001 4 1 2 3 5 6 4 a FWD FWD b I831G1190002 04 1 O ring 5 Starter motor case Apply grease to sliding surface 2 Housing end Inside 6 Housing end Outside Apply moly paste to sliding surface 3 Armature 6 N m 0 6 kgf m 4 5 lb ft Do not reuse 4 O ring 10 N m 1 0 kgf m 7 0 lb ft ...

Page 277: ...w one Tighten the starter motor mounting bolts 1 with the battery lead wire 2 and starter motor lead wire mounting nut 3 to the specified torque Refer to Wiring Harness Routing Diagram in Section 9A Page 9A 4 Tightening torque Starter motor mounting bolt a 10 N m 1 0 kgf m 7 0 lb ft Starter motor lead wire mounting nut b 6 N m 0 6 kgf m 4 5 lb ft Starter Motor Disassembly and Assembly B831G2190600...

Page 278: ...bolts Starter Motor Inspection B831G21906004 Refer to Starter Motor Disassembly and Assembly Page 1I 4 Carbon Brush Inspect the carbon brushes for abnormal wear cracks or smoothness in the brush holder If either carbon brush is defective replace the brush holder set with a new one Measure the length a of the carbon brushes using a vernier calipers If the measurement is less than the service limit ...

Page 279: ...t Tester knob indication Continuity set Oil Seal Check the seal lip for damage If any damage is found replace the housing end Inside Bearing Check the bearing of housing end for damage If any damage is found replace the housing end Starter Relay Removal and Installation B831G21906005 Refer to Electrical Components Location in Section 0A Page 0A 7 Removal 1 Turn the ignition switch OFF position 2 R...

Page 280: ...ster set Tester knob indication Continuity test 3 Measure the relay coil resistance between the terminals using the multi circuit tester If the resistance is not within the specified value replace the starter relay with a new one Special tool A 09900 25008 Multi circuit tester set Starter relay resistance 3 5 Ω 4 Install the starter relay Refer to Starter Relay Removal and Installation Page 1I 6 N...

Page 281: ...r Parts Removal and Installation in Section 9D Page 9D 6 2 Disconnect the neutral relay diode 1 3 Measure the voltage between the A and B terminals using the multi circuit tester Special tool 09900 25008 Multi circuit tester set Tester knob indication Diode test NOTE If the multi circuit tester reads 1 4 V and below when the tester probes are not connected replace its battery 4 Connect the neutral...

Page 282: ...g brake switch for continuity with a tester If any abnormality is found replace the parking brake switch with a new one Refer to Handlebars Removal and Installation in Section 6B Page 6B 3 Special tool 09900 25008 Multi circuit tester set Tester knob indication Continuity 4 After finishing the parking brake switch inspection reinstall the removed parts Gear Position Switch Inspection B831G21906013...

Page 283: ...tarter torque limiter 2 with the washers 3 4 Remove the bushings 4 from the crankcase and generator cover 5 Remove the idle gear shaft 5 and starter idle gear 6 6 Remove the generator rotor assembly 7 Refer to Generator Removal and Installation in Section 1J Page 1J 4 7 Remove the key 8 and starter driven gear 9 8 Hold the generator rotor with a 41 mm offset wrench and remove the starter clutch bo...

Page 284: ...nerator rotor side Apply thread lock to the bolts and then tighten them to the specified torque Thread lock cement 99000 32030 THREAD LOCK CEMENT SUPER 1303 or equivalent Tightening torque Starter clutch bolt a 26 N m 2 6 kgf m 19 0 lb ft Apply engine oil to the bearing of the starter driven gear Install the generator rotor assembly onto crankshaft Refer to Generator Removal and Installation in Se...

Page 285: ... Bearing installer set Starter Related Parts Inspection B831G21906016 Refer to Starter Torque Limiter Starter Clutch Removal and Installation Page 1I 10 Starter Clutch 1 Install the starter driven gear onto the starter clutch 2 Turn the starter driven gear by hand to inspect the starter clutch for smooth movement The gear turns in one direction only If a large resistance is felt for rotation inspe...

Page 286: ...the starter idle gear for wear or damage If any damage is found replace it with a new one Starter Button Inspection B831G21906017 Inspect the starter button in the following procedures 1 Remove the left inner fender Refer to Front Side Exterior Parts Removal and Installation in Section 9D Page 9D 6 2 Disconnect the handlebar switch coupler 1 3 Measure the voltage between Y G and O lead wires Speci...

Page 287: ...il starter assembly in the reverse order of removal Pay attention to the following point Apply a small quantity of thread lock to the recoil starter bolts Thread lock cement 99000 32050 THREAD LOCK CEMENT 1342 or equivalent 1 2 3 4 FWD FWD I831G1190046 04 1 Ratchet set 3 Spiral spring Apply grease 2 Reel 4 Rope assembly Apply thread lock to the thread part 1 I831G1190047 02 I831G1190048 04 ...

Page 288: ...use an injury 1 Remove the nut 1 and friction plate 2 2 Remove the ratchet guide 3 ratchet 4 and ratchet pin 5 3 Remove the spring cover 6 spring 7 and spacer 8 4 Disengage the rope 9 from the handle 10 5 Hook the rope to groove A of the reel 11 6 Turn the rope on the reel 11 properly 7 Remove the reel 11 8 Remove the spiral spring 12 1 2 I831G1190049 03 3 5 4 I831G1190050 02 6 7 8 I831G1190051 02...

Page 289: ...9000 25010 SUZUKI SUPER GREASE A or equivalent Turn the rope on the reel properly After installing the spiral spring engage the part B of the reel with the spiral spring end C Hook the rope onto the hook part D of the reel turn the reel clockwise five or six times with the rope Connect the handle 1 to the rope 2 Install the ratchet related parts Apply grease to the shaft and ratchet guide Grease 9...

Page 290: ...or damage If any defects are found replace the ratchet set with a new one Reel Inspect the reel for wear or damage If any defects are found replace the reel with a new one Rope Inspect the rope for damage If any defects are found replace the rope with a new one I831G1190061 01 I831G1190062 02 I831G1190063 01 ...

Page 291: ...fication Note Starter motor brush length Standard 12 5 0 49 Limit 6 0 0 24 Starter torque limiter slip torque Standard 41 2 62 8 N m 4 2 6 4 kgf m 14 5 32 5 lb ft Starter relay resistance 3 5 Ω Fastening part Tightening torque Note N m kgf m lb ft Starter motor mounting bolt 10 1 0 7 0 Page 1I 4 Starter motor lead wire mounting nut 6 0 6 4 5 Page 1I 4 Starter clutch bolt 26 2 6 19 0 Page 1I 11 Mat...

Page 292: ...mm 200 mm Multi circuit tester set Page 1I 5 Page 1I 6 Page 1I 7 Page 1I 7 Page 1I 8 Page 1I 8 Page 1I 9 Page 1I 9 Page 1I 9 Page 1I 13 09913 70210 09930 73140 Bearing installer set Starter torque limiter socket Page 1I 12 Page 1I 12 Page 1I 13 09930 73170 Starter torque limiter holder Page 1I 13 ...

Page 293: ...d or open generator coil Replace Short circuited or punctured regulator rectifier Replace Generator does charge but charging rate is below the specification Lead wires tend to get short or open circuited or loosely connected at terminals Repair or retighten Grounded or open circuited generator coil Replace Defective regulator rectifier Replace Defective cell plates in the battery Replace the batte...

Page 294: ...rence Item Step Action Yes No 1 Check accessories which use excessive amounts of electricity Are accessories being installed Remove accessories Go to Step 2 2 Check the battery for current leakage Refer to Battery Current Leakage Inspection Page 1J 3 Is the battery for current leakage OK Go to Step 3 Short circuit of wire harness Faulty electrical equipment 3 Measure the regulated voltage between ...

Page 295: ... the regulated voltage in the following procedures 1 Remove the seat Refer to Seat Removal and Installation in Section 9D Page 9D 11 2 Start the engine and keep it running at 5 000 r min with the dimmer switch turned HI position 3 Measure the DC voltage between the and battery terminals using the multi circuit tester If the voltage is not within the specified value inspect the generator and regula...

Page 296: ... lead wires If the tester reads under the specified value replace the generator with a new one Special tool 09900 25008 Multi circuit tester set Tester knob indication Voltage Generator no load performance When engine is cold 75 V AC and more at 5 000 r min Generator Removal and Installation B831G21A06004 Removal 1 Disconnect the battery lead wire Refer to Battery Removal and Installation Page 1J ...

Page 297: ... Remove the starter cup 7 12 Remove the generator cover 8 13 Remove the gasket 9 and dowel pins 14 Hold the generator rotor with a 41 mm offset wrench 15 Remove the generator rotor nut 16 Install the special tool to the crankshaft end Special tool A 09930 31921 Rotor remover 3 4 I831G11A0015 01 5 6 I831G11A0006 02 7 I831G11A0005 02 8 I831G11A0008 03 9 I831G11A0009 01 I831G11A0010 01 A I831G11A0011...

Page 298: ...bolts and CKP sensor mounting bolts to the specified torque NOTE Be sure the grommet 1 is set to the generator cover Tightening torque Generator stator set bolt a 11 N m 1 1 kgf m 8 0 lb ft CKP sensor mounting bolt b 6 N m 0 6 kgf m 4 5 lb ft Lead wire clamp bolt c 6 N m 0 6 kgf m 4 5 lb ft Degrease the tapered portion A of generator rotor assembly and also the crankshaft B Use nonflammable cleani...

Page 299: ... pins and new gasket 3 CAUTION Use a new gasket to prevent oil leakage Install the generator cover and tighten the generator cover bolts WARNING Be careful not to pinch the finger between the generator cover and the crankcase CAUTION Fit the clamp to the bolt C Apply grease to the O ring 4 and oil seal lip Grease 99000 25010 SUZUKI SUPER GREASE A or equivalent CAUTION Replace the O ring 4 with a n...

Page 300: ...ntity of thread lock to the bolts Thread lock cement 99000 32050 THREAD LOCK CEMENT 1342 or equivalent Regulator Rectifier Inspection B831G21A06005 Inspect the regulator rectifier in the following procedures 1 Turn the ignition switch OFF 2 Remove the rear fender Refer to Rear Side Exterior Parts Removal and Installation in Section 9D Page 9D 9 3 Disconnect the regulator rectifier coupler 1 and re...

Page 301: ...er and reinstall the removed parts Battery Components B831G21A06006 Battery Charging B831G21A06007 Initial Charging Filling electrolyte NOTE When filling electrolyte the battery must be removed from the vehicle and must be put on the level ground 1 Remove the aluminum tape 1 which seals the battery filler holes A C A B D E F I831G11A0027 01 A B C D E F probe of tester to A 0 4 1 2 0 3 0 7 0 3 0 7 ...

Page 302: ...r and leave in this position for about more than 20 minutes NOTE If no air bubbles come out from a filler port tap the bottom of the electrolyte container two or three times Never remove the container from the battery 6 After confirming that the electrolyte has entered the battery completely remove the electrolyte containers from the battery 7 Wait for about 20 minutes 8 Insert the caps 2 into the...

Page 303: ... discharge 1 Remove the battery from the vehicle Refer to Battery Removal and Installation Page 1J 12 2 Measure the battery voltage using the multi circuit tester If the voltage reading is less than the 12 V DC recharge the battery with a battery charger Recharging time 1 8 A for 5 to 10 hour 3 After recharging wait at least 30 minutes and then measure the battery voltage using the multi circuit t...

Page 304: ...he seat Refer to Seat Removal and Installation in Section 9D Page 9D 11 2 Visually inspect the surface of the battery container If any signs of cracking or electrolyte leakage from the sides of the battery have occurred replace the battery with a new one If the battery terminals are found to be coated with rust or an acidic white powdery substance clean the battery terminals with sandpaper 3 Insta...

Page 305: ...ge 1J 6 CKP sensor mounting bolt 6 0 6 4 5 Page 1J 6 Lead wire clamp bolt 6 0 6 4 5 Page 1J 6 Generator rotor nut 160 16 0 115 5 Page 1J 7 Starter cup nut 38 3 8 27 5 Page 1J 8 Material SUZUKI recommended product or Specification Note Grease SUZUKI SUPER GREASE A or equivalent P No 99000 25010 Page 1J 7 Molybdenum oil MOLYBDENUM OIL SOLUTION Page 1J 7 Thread lock cement THREAD LOCK CEMENT 1342 or ...

Page 306: ...stem should be performed when the system is cool CAUTION Make sure that the exhaust pipe and muffler have enough clearance from the rubber parts and plastic parts to avoid melting Repair Instructions Exhaust System Construction B831G21B06001 a 4 1 3 2 a 5 a 6 I831G11B0001 03 1 Exhaust pipe 4 Exhaust pipe nut 23 N m 2 3 kgf m 16 5 lb ft 2 Muffler 5 Exhaust pipe mounting bolt Do not reuse 3 Connecto...

Page 307: ...r Refer to Rear Side Exterior Parts Removal and Installation in Section 9D Page 9D 9 5 Loosen the muffler connecting bolt 1 6 Remove the exhaust pipe 2 NOTE Support the exhaust pipe to prevent it from falling 7 Remove the muffler 3 NOTE Support the muffler to prevent it from falling 8 Remove the muffler cover 4 Installation Install the exhaust pipe muffler in the reverse order of removal Pay atten...

Page 308: ... connection for exhaust gas leakage and mounting condition If any defect are found replace the exhaust pipe assembly or muffler with a new one Check the exhaust pipe nuts 1 muffler connecting bolt 2 and muffler mounting bolts 3 are tightened to their specified torque Tightening torque Exhaust pipe nut a 23 N m 2 3 kgf m 16 5 lb ft Muffler connecting bolt b 23 N m 2 3 kgf m 16 5 lb ft Muffler mount...

Page 309: ... Construction Page 1K 1 Reference For the tightening torque of fastener not specified in this section refer to Tightening Torque List in Section 0C Page 0C 7 Fastening part Tightening torque Note N m kgf m lb ft Muffler mounting bolt 23 2 3 16 5 Page 1K 2 Page 1K 3 Exhaust pipe nut 23 2 3 16 5 Page 1K 3 Page 1K 3 Muffler connecting bolt 23 2 3 16 5 Page 1K 3 Page 1K 3 ...

Page 310: ...1K 5 Exhaust System ...

Page 311: ...t 2B 15 Recommended Service Material 2B 15 Special Tool 2B 16 Rear Suspension 2C 1 Repair Instructions 2C 1 Rear Suspension Components 2C 1 Rear Suspension Assembly Construction 2C 2 Rear Shock Absorber Removal and Installation 2C 3 Rear Suspension Inspection 2C 4 Rear Shock Absorber Inspection 2C 4 Spring Pre load Adjustment 2C 4 Rear Wheel Hub Suspension Knuckle Removal and Installation 2C 4 Rea...

Page 312: ...They must be tightened to the specified torque periodically and if the suspension effect is lost replace it with a new one CAUTION Never attempt to heat quench or straighten any suspension part Replace it with a new one or damage to the part may result NOTE The right and left suspension related parts shock absorbers suspension arms and knuckles are installed symmetrically and therefore the removal...

Page 313: ...r shaft Replace Bent front upper or lower suspension arm Replace Improperly suspension setting Adjust Front suspension too noisy Loose front suspension fastener Tighten Worn front suspension related bushings Replace Wobbly rear wheel Distorted wheel rim Replace Worn hub bearings Replace Defective or incorrect tire Replace Loose rear wheel nut Tighten Worn rear suspension bushings Replace Loose rea...

Page 314: ...ber 11 Suspension arm pivot nut Lower 55 N m 5 5 kgf m 40 0 lb ft 3 Front shock absorber mounting nut 12 Suspension lower arm set 60 N m 6 0 kgf m 43 5 lb ft 4 Suspension arm bolt Upper 13 Knuckle end 65 N m 6 5 kgf m 47 0 lb ft 5 Suspension upper arm 14 Hub bearing 29 N m 2 9 kgf m 21 0 lb ft 6 Bushing 15 Outer dust seal Apply water resistance grease 7 Inner dust seal 16 Inner dust seal Apply thr...

Page 315: ...12 Outer dust seal 3 Front suspension arm pivot nut Upper a Position of the bushing 7 0 mm 0 28 in from edge of suspension arm 4 Front suspension arm pivot nut Lower 55 N m 5 5 kgf m 40 0 lb ft 5 Tie rod end nut 60 N m 6 0 kgf m 43 5 lb ft 6 Steering knuckle end nut Upper Lower 65 N m 6 5 kgf m 47 0 lb ft 7 Front wheel hub nut 29 N m 2 9 kgf m 21 0 lb ft 8 Washer The conical side of washer faces o...

Page 316: ...t Upper a 55 N m 5 5 kgf m 40 0 lb ft Front shock absorber mounting nut Lower b 60 N m 6 0 kgf m 43 5 lb ft Front Suspension Inspection B831G22206004 Refer to Suspensions Inspection in Section 0B Page 0B 22 Front Shock Absorber Inspection B831G22206005 Inspect the front shock absorber in the following procedures 1 Remove the front shock absorber Refer to Front Shock Absorber Removal and Installati...

Page 317: ...ve the cotter pin 1 and loosen the hub nut 2 2 Remove the front wheel assembly Refer to Front Rear Wheel Removal and Installation in Section 2D Page 2D 2 CAUTION Make sure that the vehicle is supported securely 3 Remove the front drive shaft cover 3 4 Remove the brake caliper Refer to Front Brake Caliper Removal and Installation in Section 4B Page 4B 3 5 Remove the front wheel hub 4 by removing hu...

Page 318: ...lly available bearing joint remover 11 Remove the steering knuckle 11 Installation Install the steering knuckle in the reverse order of removal Pay attention to the following points Apply grease to the lip of inner dust seal Grease 99000 25160 Water resistance grease Install the washer 1 and lock washer 2 and tighten the knuckle end nuts 3 to the specified torque Tightening torque Steering knuckle...

Page 319: ...e brake disc cover mounting bolts 9 and tighten them to the specified torque Thread lock cement 99000 32130 THREAD LOCK CEMENT SUPER 1360 or equivalent Tightening torque Brake disc cover mounting bolt c 10 N m 1 0 kgf m 7 0 lb ft Apply grease to the wheel hub spline and lip of dust seal Grease 99000 25160 Water resistance grease Install the wheel hub 10 washer 11 and front hub nut 12 NOTE The coni...

Page 320: ...ng by hand while they are in the steering knuckle Rotate the inner races by hand to inspect for abnormal noise and smooth rotation If there is anything unusual replace the front hub bearing with a new one Front Hub Bearing Removal and Installation B831G22206009 Refer to Front Wheel Hub Steering Knuckle Removal and Installation Page 2B 4 Removal 1 Remove the outer dust seal 1 with the special tool ...

Page 321: ...press and special tool CAUTION Never reuse wheel hub bearing 1 Special tool A 09913 70210 Bearing installer set Install the snap ring 2 with the special tool CAUTION Never reuse snap ring 2 Special tool 09900 06108 Snap ring pliers Install a new inner dust seal 3 using a suitable size socket wrench CAUTION Replace the inner dust seal 3 with a new one Apply grease to the lip of inner dust seal Grea...

Page 322: ...nd Installation in Section 4A Page 4A 7 4 Remove the steering knuckle Refer to Front Wheel Hub Steering Knuckle Removal and Installation Page 2B 4 5 Remove the shock absorber mounting lower bolt 1 and nut 2 6 Remove the suspension upper arm 3 by removing the suspension upper bolt 4 and pivot nut 5 7 Remove the suspension lower arm 6 by removing suspension lower bolts 7 and pivot nuts 8 Installatio...

Page 323: ... 43 5 lb ft 7 Install the brake hose Refer to Front Brake Hose Removal and Installation in Section 4A Page 4A 7 8 Install the inner fender Refer to Front Side Exterior Parts Removal and Installation in Section 9D Page 9D 6 9 Install the front wheel assembly Refer to Front Rear Wheel Removal and Installation in Section 2D Page 2D 2 Steering Knuckle End Inspection B831G22206011 Inspect the steering ...

Page 324: ...with the special tool Special tool A 09913 70210 Bearing installer set Lower Remove the snap ring 1 with the special tool Special tool 09900 06107 Snap ring pliers Remove the front lower knuckle end 2 with the special tools and vise as shown in the figure Special tool A 09913 70210 Bearing installer set B 09941 53610 Front fork installer hammer Installation Upper Install the knuckle end 1 with the...

Page 325: ...ated Parts Inspection B831G22206013 Refer to Front Suspension Upper Lower Arm Removal and Installation Page 2B 9 Upper arm 1 Inspect the following parts for wear or damage If any defects are found replace defective parts with new ones Upper arm 1 Dust seal 2 Washer 3 Spacer 4 2 Insert the spacer into bushings 3 Check the play by moving the spacer up and down If excessive play is noted replace the ...

Page 326: ...arts from the front upper arm Dust seal 1 Washer 2 Spacer 3 2 Remove the front upper arm bushings along with inner dust seals Special tool A 09923 73210 Bearing remover B 09930 30104 Rotor remover slide shaft Installation 1 Install the front upper arm bushings and inner dust seals with the special tool and suitable socket wrench NOTE Position the bushings and dust seals by referring to Front Suspe...

Page 327: ...allation B831G22206015 Refer to Front Suspension Upper Lower Arm Removal and Installation Page 2B 9 Removal Remove the front suspension lower arm bushings with the special tool and hydraulic press Special tool A 09913 70210 Bearing installer set Installation Install the front suspension lower arm bushings with the special tool and hydraulic press CAUTION The removed bushings must be replaced with ...

Page 328: ...ck absorber spring adjustor 2 5 position Fastening part Tightening torque Note N m kgf m lb ft Front shock absorber mounting bolt Upper 55 5 5 40 0 Page 2B 3 Front shock absorber mounting nut Lower 60 6 0 43 5 Page 2B 3 Steering knuckle end nut 29 2 9 21 0 Page 2B 5 Tie rod end nut 29 2 9 21 0 Page 2B 6 Brake disc cover mounting bolt 10 1 0 7 0 Page 2B 6 Front hub nut 110 11 0 79 5 Page 2B 7 Suspe...

Page 329: ... 09913 70210 Oil seal remover Bearing installer set Page 2B 7 Page 2B 7 Page 2B 8 Page 2B 8 Page 2B 11 Page 2B 11 Page 2B 11 Page 2B 12 Page 2B 14 Page 2B 14 09923 73210 09930 30104 Bearing remover Rotor remover slide shaft Page 2B 13 Page 2B 13 09941 34513 09941 53610 Steering race installer Front fork installer hammer Page 2B 13 Page 2B 11 09942 72410 Tie rod end remover Page 2B 5 ...

Page 330: ...rease From 5SAAR41A197105887 3 Rear stabilizer bushing 12 Hub bearing 60 N m 6 0 kgf m 43 5 lb ft 4 Rear stabilizer bracket 13 Snap ring Up to 5SAAR41A497105526 34 N m 3 4 kgf m 24 5 lb ft From 5SAAR41A497105527 60 N m 6 0 kgf m 43 5 lb ft 5 Rear stabilizer joint 14 Dust seal Apply water resistance grease 6 Rear suspension arm upper 15 Rear shock absorber mounting nut Apply silicone grease Up to 5...

Page 331: ...Rear Suspension 2C 2 Rear Suspension Assembly Construction B931G22306002 9 9 7 a 1 a a 8 7 b 3 4 3 a a 7 8 8 7 7 c 12 a a 9 9 7 7 7 a 6 a a a 5 7 9 9 8 a 10 a 11 a 2 9 9 9 9 a 2 7 A I931G1230001 04 ...

Page 332: ...ut a 60 N m 6 0 kgf m 43 5 lbf ft Install the rear wheel assembly Refer to Front Rear Wheel Removal and Installation in Section 2D Page 2D 2 1 Rear suspension arm pivot nut upper 11 Rear shock absorber mounting nut lower 2 Rear suspension arm pivot nut lower 12 Stabilizer joint nut 3 Rear wheel hub nut A Do not apply grease From 5SAAR41A197105887 4 Washer The conical side of washer faces outside 6...

Page 333: ...e 3 Install the rear shock absorber Refer to Rear Shock Absorber Removal and Installation Page 2C 3 Spring Pre load Adjustment B931G22306006 WARNING Be sure to adjust the spring pre load on the both suspensions equally After installing the rear suspension adjust the spring pre load as follows Turn the spring tension ring 1 to the desired position NOTE Position 1 provides the softest spring tension...

Page 334: ...er resistance grease or equivalent Install the rear wheel hub 1 to the rear suspension knuckle 2 Apply grease to the lip of outer dust seal and rear wheel hub spline Grease 99000 25160 Water resistance grease or equivalent Tighten the rear knuckle nuts 3 to the specified torque Tightening torque Rear knuckle end nut Upper and Lower a 60 N m 6 0 kgf m 43 5 lbf ft Install the washer 4 and hub nut 5 ...

Page 335: ...while it is in the rear knuckle Rotate the inner race by hand to inspect for abnormal noise and smooth rotation If there is anything unusual replace the rear hub bearing with a new one Rear Hub Bearing Removal and Installation B931G22306009 Removal 1 Remove the outer dust seal 1 with the special tool Special tool A 09913 50121 Oil seal remover 2 Remove the snap ring 2 with the special tool Special...

Page 336: ...e Special tool A 09913 75520 Bearing installer Install the snap ring 2 with the special tool CAUTION Never reuse snap ring 2 Special tool 09900 06108 Snap ring pliers Install a new inner dust seal 3 using a suitable size socket wrench CAUTION Replace the inner dust seal 3 with a new one Apply grease to the lip of inner dust seal 3 Grease 99000 25160 Water resistance grease or equivalent Install a ...

Page 337: ...C 4 4 Remove the rear upper suspension arm 2 5 Disconnect the stabilizer joint 3 from the rear suspension lower arm 4 6 Remove the shock absorber mounting lower bolt 5 and nut 6 7 Remove the rear suspension lower arm 4 Installation Install the suspension arms in the reverse order of removal Pay attention to the following points Tighten the suspension arm pivot nuts to the specified torque Tighteni...

Page 338: ...kgf m 43 5 lbf ft Install the rear suspension knuckle arm and wheel hub Refer to Rear Wheel Hub Suspension Knuckle Removal and Installation Page 2C 4 Rear Suspension Arm Related Parts Inspection B931G22306011 Refer to Rear Suspension Arm Upper Lower Removal and Installation Page 2C 8 Upper Arm 1 Inspect the following parts for wear or damage If any defects are found replace defective parts with ne...

Page 339: ...sion Lower Arm Bushing Removal and Installation Page 2C 12 Suspension Knuckle 1 Inspect the following parts for wear or damage If any defects are found replace defective parts with new ones Suspension knuckle 1 Dust seal 2 Washer 3 Spacer 4 2 Insert the spacer into bushings 3 Check the play by moving the spacer up and down If excessive play is noted replace the bushings with a new one Refer to Rea...

Page 340: ...stallation 1 Install the rear suspension upper arm bushing and inner dust seal with the special tool and suitable socket wrench NOTE Position the bushing and dust seals by referring to Rear Suspension Assembly Construction Page 2C 2 CAUTION The removed bushings and dust seals must be replaced with new ones Special tool A 09941 34513 Steering race installer 2 Apply grease to the lip of inner dust s...

Page 341: ... remover 09930 30104 Rotor remover sliding shaft 3 Remove the another inner dust seal 6 with the special tool Special tool B 09943 88211 Bearing remover installer Installation 1 Install the rear lower arm bushings 1 and inner dust seals 2 with the special tool and suitable socket NOTE Position the bushings and dust seals by referring to Rear Suspension Assembly Construction Page 2C 2 CAUTION The r...

Page 342: ...e Dust seal 1 Washer 2 Spacer 3 2 Remove the suspension knuckle bushings along with inner dust seals with the special tools Special tool A 09923 73210 Bearing remover B 09930 30104 Rotor remover sliding shaft Installation 1 Install the suspension knuckle bushing and inner dust seal with the special tool and suitable socket wrench NOTE Position the bushing s and dust seals by referring to Rear Susp...

Page 343: ...lizer bar 3 Remove the stabilizer plates 2 and bushings 3 4 Remove the stabilizer bar 4 Installation Install the stabilizer in the reverse order of removal Pay attention to the following points Applicable model Up to 5SAAR41A197105886 Install the stabilizer in the reverse order of removal Pay attention to the following points Apply grease to the inside of stabilizer bushing Grease 99000 25100 SUZU...

Page 344: ...r Removal and Installation Page 2C 14 Stabilizer Bar Inspect for damage or deformation If any defects are found replace the stabilizer bar with a new one Stabilizer Bushing Plate Inspect the bushing and plate for wear or damage If any defects are found replace the bushing and or plate with a new one Stabilizer Joint Inspect the stabilizer joint for wear or damage If any defects are found replace t...

Page 345: ...ng adjustor 2 5 position Fastening part Tightening torque Note N m kgf m lbf ft Rear shock absorber mounting nut 60 6 0 43 5 Page 2C 3 Page 2C 9 Rear knuckle end nut Upper and Lower 60 6 0 43 5 Page 2C 5 Rear wheel hub nut 121 12 1 87 5 Page 2C 6 Suspension arm lower pivot nut 60 6 0 43 5 Page 2C 8 Rear stabilizer joint nut Up to 5SAAR41A497105526 34 3 4 24 5 Page 2C 9 Page 2C 15 Rear stabilizer j...

Page 346: ...e 2C 6 09913 70210 09913 75520 Bearing installer set Bearing installer Page 2C 7 Page 2C 7 09923 73210 09930 30104 Bearing remover Rotor remover sliding shaft Page 2C 11 Page 2C 12 Page 2C 13 Page 2C 11 Page 2C 12 Page 2C 13 09941 34513 09943 88211 Steering race installer Bearing remover installer Page 2C 11 Page 2C 12 Page 2C 13 Page 2C 12 ...

Page 347: ...of control Replace the wheel if find damage such as crack nick or scratch When tire replacement is necessary the original equipment type tire should be used Do not mix different types of tires on the same vehicle except in emergencies because handling may be seriously affected and may result in loss of control Replacement wheel must be equivalent to the original equivalent wheel Repair Instruction...

Page 348: ...o the wheel rotation when remounting the wheel Tighten the wheel nuts to the specified torque NOTE Tighten the wheel nuts diagonally Tightening torque Wheel nut a 60 N m 6 0 kgf m 43 5 lb ft Tire Removal and Installation B831G22406003 1 Remove the wheel from vehicle Refer to Front Rear Wheel Removal and Installation Page 2D 2 2 After removing the air valve caps release the tire pressure by depress...

Page 349: ...ified tire 3 Mount the tire on the rim by hand as shown in the figure 4 When installing each tire make sure the arrow A on the tire points in the direction of rotation Also make sure the outer side of the wheel rim is facing outward 5 Inflate the tire to seat the tire bead Maximum tire bead seat pressure Front 250 kPa 2 5 kgf cm2 36psi Rear 250 kPa 2 5 kgf cm2 36 psi CAUTION Place the tire under a...

Page 350: ...the tire size shown on the sidewall The number of on the tire indications the maximum operating pressure Maximum operating pressure 25 kPa 0 25 kgf cm2 3 6 psi 35 kPa 0 35 kgf cm2 5 1 psi 45 kPa 0 45 kgf cm2 6 5 psi Specifications Service Data B831G22407001 Tire Tightening Torque Specifications B831G22407002 NOTE The specified tightening torque is also described in the following Front and Rear Whe...

Page 351: ...tial Gear Shim Inspection and Selection 3B 14 2WD 4WD Diff lock System Inspection 3B 17 Rear Drive Breather Hose Routing Diagram 3B 20 Final Gear Components 3B 21 Final Gear Construction 3B 22 Final Gear Oil Level Inspection 3B 23 Final Gear Oil Replacement 3B 23 Final Gear Assembly Removal and Installation 3B 23 Final Gear Assembly Disassembly and Assembly 3B 24 Final Gear Related Parts Inspectio...

Page 352: ...t Disassembly and Assembly 3D 8 Rear Output Shaft Related Parts Inspection 3D 10 Rear Output Shaft Drive Bevel Gear Shim Inspection and Adjustment 3D 11 Front Propeller Shaft Components 3D 14 Front Propeller Shaft Removal and Installation 3D 14 Front Propeller Shaft Related Parts Inspection 3D 16 Rear Propeller Shaft Components 3D 17 Rear Propeller Shaft Removal and Installation 3D 17 Rear Propell...

Page 353: ...xle Precautions Precautions Precautions for Driveline Axle B831G23000001 Refer to General Precautions in Section 00 Page 00 1 WARNING Support the vehicle with a jack or wooden block when servicing the drive shafts and drive train ...

Page 354: ...nts B831G23106001 Condition Possible cause Correction Reference Item Noisy Drive Shaft Worn drive shaft joints Replace Worn wheel hub bearings Replace Loose wheel nuts Tighten 1 2 3 4 5 6 7 9 8 10 FWD FWD I831G1310001 05 1 Circlip 5 Inner boot 9 Outer boot 2 Snap ring 6 Inner boot band Small 10 Outer boot band Large 3 Stopper ring 7 Drive shaft Apply grease 4 Inner boot band Large 8 Outer boot ban...

Page 355: ...p must be replaced with a new one Apply grease to the spline of the front drive shafts and install the front drive shafts to the front differential gear case Grease 99000 25160 Water resistance grease CAUTION Be careful not to damage the front differential gear case oil seals NOTE After installing both drive shafts make sure the stopper rings are seated properly by pulling both inboard joints ligh...

Page 356: ...an the inside and outside of the boots with a cloth Do not wash the boots in any commercially available degreaser such as gasoline or kerosene Washing in a degreaser causes deterioration of the boots 1 Fit a boot on the drive shaft end fitting the small diameter side of the boot to the shaft groove fix its end with a new boot band CAUTION Replace the boot band with a new one 2 Install the cage 1 o...

Page 357: ...per ring with a new one Position the opening of stopper ring C so that it will not be lined up with a ball 6 After installing the boot on the outer race insert a screw driver into the boot on the outer race side and allow air to enter the boot so that the air pressure in the boot becomes the same as the atmospheric pressure at the positions indicated in the figure 7 Fix the boot on the outer race ...

Page 358: ...ve Shaft Inspection B831G23106004 Inspect the front drive shaft in the following procedures 1 Remove the front drive shaft assembly Refer to Front Drive Shaft Assembly Removal and Installation Page 3A 2 2 Inspect the boots circlip and boot bands for wear or damage If any damages are found replace them with new ones 3 Install the front drive shaft assembly Refer to Front Drive Shaft Assembly Remova...

Page 359: ... rear suspension arm Refer to Rear Wheel Hub Suspension Knuckle Removal and Installation in Section 2C Page 2C 4 4 Hold the in board joint 1 of the rear drive shaft and tug the drive shaft horizontally NOTE If it is difficult to remove the rear drive shaft from the rear differential gear case using the suitable tool FWD FWD 1 2 3 5 6 7 8 9 10 4 I831G1310002 05 1 Circlip 5 Inner boot 9 Outer boot 2...

Page 360: ...ear Drive Shaft Disassembly and Assembly B831G23106007 Refer to Rear Drive Shaft Assembly Removal and Installation Page 3A 6 Rear drive shaft disassembly and assembly as the same manner of front drive shaft Rear Drive Shaft Inspection B831G23106008 Refer to Rear Drive Shaft Assembly Removal and Installation Page 3A 6 Rear drive shaft inspection as the same manner of front drive shaft Special Tools...

Page 361: ...djust or replace Too large rear drive gear thrust clearance Adjust or replace Power will not transmit from the engine to the front wheel Broken drive and driven bevel gear teeth Replace Worn or broken propeller shaft serration Replace Broken or damaged front drive differential gear or pinion Replace Improperly operated front differential shifting motor Repair or replace Worn or damaged shifting sl...

Page 362: ...t side 14 Bearing 25 Front drive differential gear case mounting nut 4 Bearing 15 Drive bevel gear 26 Front drive differential gear case cover bolt 5 Front drive differential gear case 16 Bearing 27 Actuator mounting bolt 6 Bearing 17 Snap ring 50 N m 5 0 kgf m 36 0 lb ft 7 Shim Left Side 18 2WD 4WD shifting sleeve 22 N m 2 2 kgf m 16 0 lb ft 8 2WD 4WD shifting cam 19 Snap ring Apply water resista...

Page 363: ...02 a 2 1 1 A I831G1320002 07 1 Shim 1 3 N m 0 13 kgf m 0 94 lb ft Apply thread lock to the thread part 2 Front drive differential case cover bolt Apply grease Apply bond to matching surface A Matching surface Apply water resistance grease Apply molybdenum oil solution ...

Page 364: ...on in Section 0B Page 0B 12 3 Remove the inner fender left and right Refer to Front Side Exterior Parts Removal and Installation in Section 9D Page 9D 6 4 Remove the drive shaft Refer to Front Drive Shaft Assembly Removal and Installation in Section 3A Page 3A 2 5 Disconnect the rear brake light switch lead wire 6 Remove the lead wire clamps 7 Disconnect the 2WD 4WD diff lock actuator lead wire co...

Page 365: ...ing the front drive differential check the wiring harness routing and pour the front differential gear oil Refer to Wiring Harness Routing Diagram in Section 9A Page 9A 4 and Front Differential Gear Oil Inspection in Section 0B Page 0B 12 Front Drive Differential Assembly Disassembly and Assembly B831G23206006 Refer to Front Drive Differential Assembly Removal and Installation Page 3B 4 Disassembl...

Page 366: ...WD 4WD shifting cam 6 9 Remove the oil seals Special tool B 09913 70210 Bearing installer set 10 Remove the snap ring 7 Special tool 09900 06108 Snap ring pliers 11 Remove the 2WD 4WD shifting cam bearing with the special tool NOTE If there is no abnormal noise the bearing removal is not necessary Special tool C 09921 20240 Bearing remover set 12 Remove 2WD 4WD gear shifting fork shaft 8 and 4WD d...

Page 367: ...l noise the bearing removal is not necessary Special tool D 09913 60910 Bearing remover 16 Remove the snap ring 16 and pinion gear 17 Special tool 09900 06108 Snap ring pliers 17 Remove the pinion gear bearing with the special tool NOTE If there is no abnormal noise the bearing removal is not necessary Special tool D 09913 60910 Bearing remover 11 10 I831G1320017 01 12 13 I831G1320018 01 14 I831G1...

Page 368: ...09913 60910 Bearing remover Assembly CAUTION The removed oil seals snap rings and bearings must be replaced with new ones 1 Install the bearings 1 to the front drive differential gear assembly with the special tool Special tool A 09913 70210 Bearing installer set 2 Install the pinion gear pilot bearing 2 into the front drive differential gear case with the special tool Special tool A 09913 70210 B...

Page 369: ...ly a small quantity of grease to the oil seal lip Grease 99000 25010 SUZUKI SUPER GREASE A or equivalent 9 Install the oil seal with the special tool Special tool A 09913 70210 Bearing installer set B 09924 74520 Oil seal installer remover C 09924 74570 Final drive gear bearing installer remover 10 Install the oil seal cap 7 with the special tool Special tool D 09922 21410 Long socket 46 mm 11 Ins...

Page 370: ...9900 06108 Snap ring pliers 16 Install the oil seals 12 into the front drive differential gear case cover with the special tool NOTE Insert the oil seal until the specified value as shown in the figure Special tool A 09913 70210 Bearing installer set 17 Install the 2WD 4WD shifting cam 13 18 Install the snap ring 14 Special tool 09900 06108 Snap ring pliers 9 I831G1320033 02 I831G1320034 01 A 10 1...

Page 371: ...fting cam 13 clockwise and install 2WD 4WD shifting fork pin to the bottom 24 Align the 2WD 4WD shifting fork pin 17 with the groove C of the 2WD 4WD shifting cam when reassembling 25 Apply a small quantity of thread lock to the front drive differential case cover bolts and tighten then to the specified torque diagonally NOTE Fit clamp to the bolt B Thread lock cement 99000 32030 THREAD LOCK CEMEN...

Page 372: ...act Refer to Front Drive Differential Gear Shim Inspection and Selection Page 3B 14 30 Install the Front drive differential assembly Refer to Front Drive Differential Assembly Removal and Installation Page 3B 4 Front Drive Differential Related Parts Inspection B831G23206007 Refer to Front Drive Differential Assembly Disassembly and Assembly Page 3B 5 Front Drive Gear Oil Seals Inspect the lip of o...

Page 373: ...WD 4WD Shifting Cam Inspect the 2WD 4WD shifting cam for wear or damage If any defects are found replace the 2WD 4WD shifting cam with new ones 2WD 4WD Shifting Sleeve Inspect the 2WD 4WD shifting sleeve for wear or damage If any defects are found replace the 2WD 4WD shifting sleeve with new one Input Shaft Inspect the input shaft for wear or damage Inspect the input shaft bearing for abnormal noi...

Page 374: ...If any defects are found replace the breather rubber case with new one Front Drive Differential Gear Shim Inspection and Selection B831G23206009 Refer to Front Drive Differential Assembly Disassembly and Assembly Page 3B 5 Backlash Install the pinion gear input shaft left and right side shim s and front drive differential gear assembly 1 Install the front drive differential case 2 and tighten the ...

Page 375: ...ed shims a guide List of shims for right side If the backlash is too small replace the right side shim s with a thicker one If the backlash is too large replace the right side shim s with a thinner one If the right side shim was changed with a 0 10 mm thicker shim replace the left side shim with one that is 0 10 mm thinner Left Side Shim Selection Install the right side shim s 1 and front drive di...

Page 376: ...rrect tooth contact cannot be maintained when adjusting the backlash replace the pinion gear and final drive differential gear as a set Clean and degreas several teeth on the final drive differential gear and pinion gear and the apply a coating of machinist s layout dye or paste to several teeth of the pinion gear Install the left and right side shims and front drive differential assembly Install ...

Page 377: ...ection B831G23206010 Actuator Refer to Front Drive Differential Assembly Removal and Installation Page 3B 4 1 Remove the actuator assembly 1 2 Connect the 12 V battery to the actuator lead wires Bl wire and Y wire If the motor does not run replace the diff lock transfer actuator assembly with a new one 2WD 4WD Diff lock Switch Continuity check 1 Remove the left inner fender Refer to Front Side Ext...

Page 378: ...cuit tester set Tester knob indication Continuity 4 After finishing the 4WD diff lock inspection reinstall the removed parts SDS Operation Check 1 Check that the transfer selecting switch diff lock position switch 1 and diff lock switch 2 is turned OFF 2 Set up the SDS tool Refer to the SDS operation manual for further details 3 Click the Date monitor button 3 2WD 4WD Diff lock Color Position Bl R...

Page 379: ...tion properly inspect the 4WD diff lock switch for continuity check Drive Relay 1 Remove the seat Refer to Front Side Exterior Parts Removal and Installation in Section 9D Page 9D 6 2 Remove the drive relay 1 3 Check the continuity between A and D between D and F terminals with the multi circuit tester Check the insulation between A and E between E and F Apply 12 V to the terminals C and E to E an...

Page 380: ...check the continuity between A and B If there is no continuity replace the diff lock relay with a new one Special tool 09900 25008 Multi circuit tester set Rear Drive Breather Hose Routing Diagram B831G23206011 D E F A B I831G1320078 03 A B C D I831G1320079 02 1 2 2 3 1 5 6 A B a FWD 4 I831G1320145 02 1 Breather hose 6 V belt cooling duct 2 Rear drive assembly A Press the breather hose between the...

Page 381: ... 55 N m 5 5 kgf m 40 0 lb ft 4 Shim Right side 14 Pinion gear nut 65 N m 6 5 kgf m 47 0 lb ft 5 Shim Left side 15 Bearing stopper 23 N m 2 3 kgf m 16 5 lb ft 6 Bearing 16 Final drive gear case cover bolt M8 Apply grease 7 Oil seal 17 Final drive gear case cover bolt M10 Apply water resistance grease 8 Oil seal 18 Final gear case mounting nut Apply thread lock to the thread part 9 Washer 19 Final g...

Page 382: ...im Left side 6 Lock nut Apply water resistance grease 2 Shim Right side A Matching surface Apply thread lock to thread part 3 Pinion gear shim s 26 N m 2 6 kgf m 19 0 lb ft Apply bond 4 Pinion gear nut 100 N m 10 0 kgf m 72 5 lb ft Apply molybdenum oil solution 5 Final drive bearing stopper Apply grease ...

Page 383: ... Section 0B Page 0B 14 4 Remove the rear wheel Refer to Front Rear Wheel Removal and Installation in Section 2D Page 2D 2 5 Remove the rear suspension upper arms Refer to Rear Suspension Arm Upper Lower Removal and Installation in Section 2C Page 2C 8 6 Remove the rear drive shaft Refer to Rear Drive Shaft Assembly Removal and Installation in Section 3A Page 3A 6 7 Remove the rear brake adjust nut...

Page 384: ...r to Front Suspension Upper Lower Arm Removal and Installation in Section 2B Page 2B 9 Install the trailer towing Refer to Trailer Towing Removal and Instruction in Section 9E Page 9E 7 Adjust the rear brake pedal free travel Refer to Rear Brake Pedal Rear Brake Parking Brake Lever Inspection and Adjustment in Section 0B Page 0B 19 Adjust the parking brake lever play Refer to Rear Brake Pedal Rear...

Page 385: ...aring 7 with the special tool NOTE If there is no abnormal condition the bearing removal is not necessary Special tool B 09913 70210 Bearing installer set C 09944 66010 Bearing installer 8 Remove the shim s 9 Remove the oil seal 8 with the special tool Special tool A 09913 50121 Oil seal remover 3 4 I831G1320095 01 5 I831G1320096 02 A 6 I831G1320097 01 B C 7 I831G1320098 01 I831G1320099 01 A 8 I83...

Page 386: ...ol Special tool D 09924 41830 Bearing retainer wrench 13 Remove the final drive gear 12 and shim s 13 14 Unlock the rear final drive nut 14 with a chisel 15 Remove the final drive gear nut 14 with the special tool Special tool E 09924 52470 Fixed final drive gear holder F 09940 92430 Rear axel wrench A 16 Remove the washer 15 9 I831G1320101 01 10 I831G1320102 01 D 11 I831G1320103 01 12 13 I831G132...

Page 387: ... Bearing remover 19 Remove the final drive gear bearing 18 with the special tool NOTE If there is no abnormal condition the bearing removal is not necessary Special tool I 09921 20240 Bearing remover set Assembly CAUTION The removed oil seals O rings and bearings must be replaced with new ones Install the gear case bearing to the gear case with the special tool Special tool A 09913 70210 Bearing i...

Page 388: ... CAUTION The removed lock nut 4 must be replaced with a new one Tighten the lock nut 4 to the specified torque with the special tool Tightening torque Final drive lock nut a 100 N m 10 0 kgf m 72 5 lb ft Special tool D 09924 52470 Fixed final drive gear holder E 09940 92430 Rear axel wrench A Lock the nut with a center punch Install the shim s 5 and final drive gear 6 to the final gear case 1 A I8...

Page 389: ...ed stake the collar of bearing stopper into the notch Install the oil seal to the final gear case with the special tool Special tool G 09951 15810 Bearing installer Apply a small quantity of grease to the oil seal lip Grease 99000 25160 Water resistance grease Install the final driven gear bearing cover with the special tool Special tool G 09951 15810 Bearing installer Install the oil seal with th...

Page 390: ...bolt M10 d 55 N m 5 5 kgf m 40 0 lb ft Check the backlash and tooth contact Refer to Final Gear Shim Inspection and Selection Page 3B 31 Install the rear brake assembly Refer to Rear Brake Assembly Removal and Installation in Section 4C Page 4C 2 Final Gear Related Parts Inspection B831G23206018 Refer to Final Gear Assembly Removal and Installation Page 3B 23 Final Driven Gear Oil Seal Inspect the...

Page 391: ... ft Install the left side shim s and final driven gear Special tool 09900 20607 Dial gauge 1 100 mm 10 mm 09900 20701 Magnetic stand Final gear backlash Standard 0 02 0 06 mm 0 0008 0 0024 in without gear cover specification Standard 0 08 0 15 mm 0 0031 0 0059 in Gear cover assembled specification Measure the backlash with the dial gauge as shown Take backlash readings at several places while turn...

Page 392: ...er 0 25 mm Shim thickness Compressed solder thickness 0 10 mm Select the proper size of shim s from the table according as the compressed solder thickness LIst of shims for left side After selecting the proper size of shim s check or adjust the backlash and tooth contact Tooth Connect Remove the final driven gear assembly 1 Clean and degreas several teeth on the final drive gear and final driven g...

Page 393: ...e re checked until the tooth contact is found to be correct example B CAUTION Make sure to check the backlash and shim thickness after the tooth contact has been adjusted since it may have changed Adjust the tooth contact and backlash until they are both within specification If the correct tooth contact cannot be maintained when adjusting the backlash replace the final drive gear and final driven ...

Page 394: ...0 0040 Front gear backlash Without gear cover specification 0 02 0 06 0 0008 0 0024 Gear cover assembled specification 0 08 0 15 0 0031 0 0059 Fastening part Tightening torque Note N m kgf m lb ft Front drive differential mounting nut 50 5 0 36 0 Page 3B 5 Front drive differential case cover bolt 22 2 2 16 0 Page 3B 11 4WD Diff lock actuator mounting bolt 22 2 2 16 0 Page 3B 12 Front drive differe...

Page 395: ...B 24 Page 3B 29 Page 3B 29 Sealant SUZUKI BOND No 1215 or equivalent P No 99000 31110 Page 3B 11 Thread lock cement THREAD LOCK CEMENT SUPER 1303 or equivalent P No 99000 32030 Page 3B 5 Page 3B 11 Page 3B 12 Page 3B 24 Page 3B 30 09900 06108 09900 20205 Snap ring pliers Micrometer 0 25 mm Page 3B 6 Page 3B 6 Page 3B 7 Page 3B 7 Page 3B 9 Page 3B 9 Page 3B 10 Page 3B 10 Page 3B 16 Page 3B 32 09900...

Page 396: ...7 09922 21410 09924 41830 Long socket 46 mm Bearing retainer wrench Page 3B 9 Page 3B 26 Page 3B 29 Page 3B 31 09924 52470 09924 74520 Fixed final drive gear holder Oil seal installer remover Page 3B 26 Page 3B 28 Page 3B 9 09924 74570 09924 84521 Final drive gear bearing installer remover Bearing installer set Page 3B 9 Page 3B 8 Page 3B 27 09940 92430 09944 66010 Rear axel wrench A Bearing insta...

Page 397: ...Replace shaft Worn bearing Replace Worn splines Replace Transfer will not shift back Broken return spring on shift shaft Replace Distorted gearshift forks Replace Worn gearshift shaft Replace Broken gearshift cam Replace Improperly adjusted gearshift cable Adjust Transfer jumps out of gear Worn shifting gears on drive shaft or counter shaft Replace Distorted or worn gearshift forks Replace Weakene...

Page 398: ...gear No 2 4 Reverse idle gear bearing 17 Reverse driven gear 30 Snap ring 5 Oil seal 18 Lock washer 31 Output shaft bearing Right side 6 Spacer 19 Lock washer 32 Transfer output drive gear shaft 7 O ring 20 High gearshift dog 33 Spacer 8 Drive shaft bearing Right side 21 Select spacer 34 Output shaft bearing Left side 9 Drive shaft 22 High driven gear 35 Oil seal 10 Drive shaft bearing Left side 2...

Page 399: ...D Page 1D 45 Special tool A 09920 13120 Crankcase separating tool 4 Remove the torque limiter and starter idle gear No 2 Refer to Starter Torque Limiter Starter Clutch Removal and Installation in Section 1I Page 1I 10 5 Remove the gearshift fork shaft 1 and gearshift cam 2 6 Remove the gearshift forks 3 7 Remove the snap ring 4 drive gear No 2 5 and spacer 6 Special tool 09900 06107 Snap ring plie...

Page 400: ... the transfer output shaft The transfer output driven gear and transfer output shaft is available only as an assembly Installation Install the transfer in the reverse order of removal Pay attention to the following points CAUTION Apply engine oil to each gears and shafts Install the bevel gear Refer to Rear Output Shaft Removal and Installation in Section 3D Page 3D 6 Install the drive shaft 1 wit...

Page 401: ...nd install them properly Install the gearshift cam 4 With engaging each fork and to the cam groove insert the fork shaft 5 Assemble the engine Refer to Engine Bottom Side Assembly in Section 1D Page 1D 51 Remount engine assembly Refer to Engine Assembly Installation in Section 1D Page 1D 16 and Engine Top Side Assembly in Section 1D Page 1D 21 2 3 I831G1330016 01 2 3 I831G1330017 01 4 I831G1330018...

Page 402: ...ective groups so that they can be reinstalled in their original position Disassembly Refer to Transfer Removal and Installation Page 3C 3 Counter shaft 1 Remove the counter shaft assembly Refer to Transfer Removal and Installation Page 3C 3 2 Remove the low driven gear 1 and washer 2 3 1 2 I831G1330002 03 1 Counter shaft 2 Drive shaft 3 Snap ring Assembly snap ring with edge side out 1 2 I831G1330...

Page 403: ...the lock washer 9 by aligning the teeth A of the lock washer with the spline grooves B 7 Remove the high gearshift dog 10 and select spacer 11 8 Remove the high driven gear 12 with the wave washer 13 9 Remove the high driven gear bushing 14 and washer 15 3 4 I831G1330021 01 5 6 7 I831G1330022 01 8 I831G1330023 01 9 A B I831G1330024 02 10 11 I831G1330025 01 12 13 I831G1330026 01 14 15 I831G1330027 ...

Page 404: ... ring Refer to Transfer Construction Page 3C 6 Before installing the gears coat lightly engine oil to the counter shaft component parts Assemble the counter shaft and reverse idle gear in the reverse order of disassembly Pay attention the following points Before installing the high driven gear 1 set the wave washer 2 as shown in the figure Install the lock washer 3 Install the lock washer 4 1 I831...

Page 405: ...0033 05 D C I831G1330034 03 FWD FWD 5 1 7 8 9 10 13 16 17 20 22 21 2 3 11 12 15 4 14 18 18 19 6 I831G1330003 05 1 Gear position switch 10 Snap ring 19 Snap ring 2 O ring 11 Bearing 20 Gearshift shaft No 2 3 Gearshift shaft No 1 12 Gearshift cam stopper plate 21 Shift gear 4 Snap ring 13 Reverse gearshift fork 22 Shift arm return spring 5 Reverse gearshift cam 14 High Low gearshift fork Apply greas...

Page 406: ...arshift fork shaft Apply engine oil 7 Washer 16 Gearshift cam stopper Do not reuse 8 Spring 17 Gearshift arm 9 Gearshift cam 18 Washer 4 4 4 4 1 2 3 I831G1330004 04 1 Gearshift shaft 3 Gearshift cam 2 Reverse gearshift cam 4 Snap ring Assemble snap ring with sharp edge side out ...

Page 407: ...mbly NOTE When reassembling the gearshift cams attention must be given to the locations and positions of washer and snap rings The cross sectional view shows the correct position of the cams washer and snap rings Refer to Gearshift System Construction Page 3C 10 CAUTION Never reuse a snap rings After a snap rings has been removed from a shaft it should be discarded and a new snap rings must be ins...

Page 408: ...ngs as shown in the bearing inspection Refer to Bearing Inspection in Section 1D Page 1D 61 Transfer Related Parts Inspection B831G23306010 Refer to Transfer Removal and Installation Page 3C 3 and Counter Shaft Reverse Idle Gear Disassembly and Assembly Page 3C 6 Gearshift Fork to Groove Clearance NOTE The clearance for each gearshift fork plays an important role in the smoothness and positiveness...

Page 409: ...G23306011 Refer to Bearing Inspection in Section 1D Page 1D 61 Gear Position GP Switch Inspection B831G23306012 Refer to Gear Position Switch Inspection in Section 1I Page 1I 9 Gear Position GP Switch Removal and Installation B831G23306013 Removal 1 Turn the ignition switch OFF 2 Remove the left and right side cover Refer to Front Side Exterior Parts Removal and Installation in Section 9D Page 9D ...

Page 410: ...Refer to V belt Type Continuously Variable Automatic Transmission Removal and Installation in Section 5A Page 5A 5 Install the removed parts Gearshift Shaft No 2 Gearshift Cam Plate Removal and Installation B831G23306014 Removal Refer to Shift Lever Assembly Removal and Installation in Section 5A Page 5A 24 1 Drain engine oil Refer to Engine Oil and Filter Replacement in Section 0B Page 0B 10 2 Dr...

Page 411: ...ate in the reverse order of removal Pay attention to the following points Install the gearshift cam stopper 1 bolt 2 washer 3 and return spring 4 NOTE Hook the return spring end A to the gearshift cam stopper CAUTION Make sure that the gearshift cam stopper moves smoothly Tighten the gearshift cam stopper bolt 2 securely Check the gearshift cam stopper moves smoothly Locate the gearshift cam in th...

Page 412: ...ng 6 and washer 7 CAUTION the removed snap ring 6 must be replaced with new one Install the gearshift assembly by aligning the punch mark G of shift gear with the match mark H of gearshift cam stopper plate Install the generator cover Refer to Generator Removal and Installation in Section 1J Page 1J 4 Pour engine coolant and engine oil Refer to Cooling System Inspection in Section 0B Page 0B 15 an...

Page 413: ...e the oil seal with a new one Gearshift Shaft Oil Seal Removal and Installation B831G23306016 Removal Remove the generator cover Refer to Generator Removal and Installation in Section 1J Page 1J 4 Remove the gearshift shaft oil seal 1 Installation Install the oil seal in the reverse order of removal Pay attention to the following points CAUTION The removed oil seal must be replaced with new one In...

Page 414: ...240 31 25 Reverse 1 882 32 17 Shift fork to groove clearance Low 0 10 0 30 0 0040 0 0120 0 50 0 020 High 0 10 0 30 0 0040 0 0120 0 50 0 020 Reverse 0 10 0 30 0 0040 0 0120 0 50 0 020 Shift fork groove width Low 5 50 5 60 0 217 0 220 High 5 50 5 60 0 217 0 220 Reverse 5 50 5 60 0 217 0 220 Shift fork thickness Low 5 30 5 40 0 209 0 213 High 5 30 5 40 0 209 0 213 Reverse 5 30 5 40 0 209 0 213 Materi...

Page 415: ...efer to Engine Top Side Disassembly in Section 1D Page 1D 17 3 Separate the crankcase with the special tool Refer to Engine Bottom Side Disassembly in Section 1D Page 1D 45 Special tool A 09920 13120 Crankcase separating tool 1 2 3 5 6 7 4 FWD FWD I831G1340001 03 1 Front output shaft bearing Rear 7 Front drive collar assembly 2 Front output shaft Apply grease 3 Front output shaft housing Apply wat...

Page 416: ...99000 25010 SUZUKI SUPER GREASE A or equivalent Install the front output shaft to the right crankcase Tighten the front output shaft bolts Front Output Shaft Disassembly and Assembly B831G23406003 Refer to Front Output Shaft Removal and Installation Page 3D 1 Disassembly 1 Remove the C ring 1 and snap ring 2 Special tool 09900 06107 Snap ring pliers 2 Remove the front drive collar 3 front drive ou...

Page 417: ...t with the special tool NOTE If there is no abnormal noise the bearing removed is not necessary Special tool B 09921 20240 Bearing remover set 7 Remove the front output shaft bearing rear with the special tool NOTE If there is no abnormal noise the bearing removed is not necessary Special tool C 09923 74511 Bearing remover D 09930 30104 Rotor remover slide shaft 6 I831G1340007 02 A 7 I831G1340008 ...

Page 418: ...tool 09900 06108 Snap ring pliers 4 Install the oil seal 4 with the suitable socket wrench 5 Apply grease to the oil seal lip Grease 99000 25160 Water resistance grease 6 Install the O ring 5 to the front drive collar 7 Apply grease to the O ring 5 Grease 99000 25010 SUZUKI SUPER GREASE A or equivalent 8 Install the output shaft housing 6 and front drive collar assembly 7 to the front output shaft...

Page 419: ...ssembly Page 3D 2 Front Output Shaft Inspect the front output shaft for distortion If distortion is found replace the front output shaft with a new one Inspect the gear of the front output shaft for wear or damage If any defects are found replace the drive and driven bevel gears as a set Oil Seal Visually inspect the oil seal for damage with particular attention given to the lip Replace the oil se...

Page 420: ...ial tool Refer to Engine Bottom Side Disassembly in Section 1D Page 1D 45 Special tool A 09920 13120 Crankcase separating tool 1 2 3 4 a 11 a 10 a 12 8 9 6 FWD FWD 5 7 8 13 I831G1340022 05 1 Rear output shaft drive bevel gear 7 Shim s 13 Rear output shaft yoke 2 Shim s 8 Bearing 100 N m 10 0 kgf m 72 5 lb ft 3 Rear output shaft driven bevel gear 9 Oil seal Apply water resistance grease 4 Front out...

Page 421: ...sher 3 drive bevel gear 4 and shim 5 Installation Install the rear output shaft in the reverse order of removal Pay attention to the following points Hold the transfer output driven gear with the special tool and tighten the drive bevel gear nut to the specified torque CAUTION The removed drive bevel gear nut must be replaced with a new one Special tool A 09920 53740 Clutch sleeve hub holder Tight...

Page 422: ...isassembly and Assembly B831G23406007 Refer to Rear Output Shaft Removal and Installation Page 3D 6 Disassembly 1 Using a chisel unlock the nut Remove the rear output shaft nut 2 Remove the washer 1 rear output shaft driven gear 2 bearing 3 and rear output shaft driven bevel gear 4 3 Remove the rear output shaft yoke 5 and oil seal 6 Refer to Rear Propeller Shaft Removal and Installation Page 3D 1...

Page 423: ...fter installed rear output shaft yoke to the rear output shaft install the washer 5 and tighten the output shaft nut 6 to the specified torque CAUTION Do not reuse the output shaft nut 6 Tightening torque Rear output shaft nut a 100 N m 10 0 kgf m 72 5 lb ft Lock the rear output shaft nut with a center punch Install the rear output shaft driven bevel gear 7 and bearing 8 NOTE The wider side a of t...

Page 424: ...h a new one Rear Output Shaft Bevel Gear Inspect the drive and driven bevel gear for wear or damage If any defects are found replace the drive and driven bevel gears as a set Rear Output Shaft Gear Inspect the rear output shaft gear for wear or damage If any defects are found replace the rear output shaft gear with the new one Bearing Inspect the rear output shaft bearing and rear driven bevel gea...

Page 425: ...haft on the left crankcase half and hold bearings with the special tool Special tool C 09921 21910 Bearing holder Set the dial gauge on the drive bevel gear as shown in the figure Special tool D 09900 20607 Dial gauge 1 100 mm 10 mm E 09900 20701 Magnetic stand Measure the backlash by turning the drive bevel gear shaft in each direction reading the total backlash with the dial gauge If the backlas...

Page 426: ... Part No Shim thickness 24945 03G50 055 0 550 mm 0 022 in 24945 03G50 058 0 575 mm 0 023 in 24945 03G50 060 0 600 mm 0 024 in 24945 03G50 063 0 625 mm 0 025 in 24945 03G50 065 0 650 mm 0 026 in 24945 03G50 068 0 675 mm 0 027 in 24945 03G50 070 0 700 mm 0 028 in 24945 03G50 073 0 725 mm 0 029 in 24945 03G50 075 0 750 mm 0 030 in 24945 03G50 078 0 775 mm 0 031 in 24945 03G50 080 0 800 mm 0 031 in 24...

Page 427: ...0 0256 in 24935 03G50 068 0 675 mm 0 0266 in 24935 03G50 070 0 700 mm 0 0276 in 24935 03G50 073 0 725 mm 0 0285 in 24935 03G50 075 0 750 mm 0 0295 in 24935 03G50 078 0 775 mm 0 0305 in 24935 03G50 080 0 800 mm 0 0315 in 24935 03G50 083 0 825 mm 0 0325 in 24935 03G50 085 0 850 mm 0 0335 in 24935 03G50 088 0 875 mm 0 0344 in 24935 03G50 090 0 900 mm 0 0354 in 24935 03G50 093 0 925 mm 0 0364 in 24935...

Page 428: ...2 Loosen the boot clamp screw and remove the universal joint boot 3 NOTE Apply oil to the removing direction of the universal joint boot before removing 3 Using a screwdriver or the like into a notch of the universal joint and remove the front propeller shaft 4 4 Remove the universal joint 5 from the joint portion at the engine side with special tools Special tool A 09923 74511 Bearing remover B 0...

Page 429: ...r resistance grease 5 Connect the universal joint to the joint portion at the engine side 6 Attach the boot to the front drive collar and tighten the boot clamp screw to the specified torque Tightening torque Front propeller shaft boot clamp screw 1 3 N m 0 13 kgf m 1 0 lb ft 7 Install the front propeller shaft spring 8 Apply grease approx 4 grams to the spline of front propeller shaft and spring ...

Page 430: ...t the front propeller shaft spring for damage or fatigue If any defects are found replace the front propeller shaft spring with a new one Universal Joint Inspect the play by turning the universal joint If excessive play is noted replace it with a new one CAUTION Do not attempt to disassemble the universal joint Boots Inspect the front propeller shaft boot 1 and universal joint boot 2 for crack or ...

Page 431: ...nstallation in Section 3B Page 3B 23 2 Remove the rear propeller shaft joint 1 3 Remove the O ring 2 6 5 4 3 2 1 7 8 9 10 11 a b I831G1340057 04 1 O ring 9 Universal joint set 2 Rear propeller shaft joint 10 Rear output shaft yoke 3 Rear propeller shaft boot 11 Oil seal 4 Rear propeller shaft spring 100 N m 10 0 kgf m 72 5 lb ft 5 Rear propeller shaft 2 N m 0 2 kgf m 1 5 lb ft 6 O ring Apply water...

Page 432: ...oint boot 6 8 Remove the O ring 7 9 Remove the circlips from the universal joint 10 Remove the bearings 8 by tapping with the special tool and remove the universal joint and propeller shaft yoke Special tool A 09913 70210 Bearing installer set 11 Remove the circlips and joint 9 3 I831G1340061 01 4 I831G1340062 01 5 I831G1340063 01 6 I831G1340064 01 7 I831G1340065 01 I831G1340066 03 8 8 8 A I831G13...

Page 433: ...000 25160 Water resistance grease 3 Shift into the low gear 4 Apply thread lock to the rear output shaft Thread lock cement 99000 32030 THREAD LOCK CEMENT SUPER 1303 or equivalent 5 Install the rear output shaft yoke 1 and washer 2 Tighten the rear output shaft nut 3 to the specified torque Tightening torque Rear output shaft nut a 100 N m 10 0 kgf m 72 5 lb ft 6 Lock the rear output shaft nut 3 w...

Page 434: ...l tool Special tool A 09913 70210 Bearing installer set 12 Install the circlips to the universal joint 13 Install the O ring 7 to the rear propeller shaft 14 Install the rear propeller shaft boot 8 and tighten the clamp screw to the specified torque Tightening torque Rear propeller shaft boot clamp screw b 2 N m 0 2 kgf m 1 5 lb ft A 4 6 6 5 I831G1340074 03 I831G1340075 01 6 6 5 A I831G1340076 04 ...

Page 435: ...propeller shaft spring 10 Grease 99000 25160 Water resistance grease 19 Install the rear propeller shaft spring 10 20 Install the O ring 11 to the rear propeller shaft joint 21 Apply grease approx 4 grams to the spline of rear propeller shaft joint Grease 99000 25160 Water resistance grease 22 Install the rear propeller shaft joint 12 23 Install the final gear assembly Refer to Final Gear Assembly...

Page 436: ...new one Universal Joint Inspect the universal joint in the following procedures 1 Inspect the universal joint and outer surface of the bearing for scuffing wear or damage If any defects are found replace the bearings and universal joint as a set 2 Insert the universal joint to the bearing and check the play by turning the universal joint as shown in the figure If excessive play is found replace th...

Page 437: ...r Propeller Shaft Components Page 3D 17 Item Standard Limit Front Rear output shaft bevel gear backlash 0 03 0 15 0 001 0 006 Fastening part Tightening torque Note N m kgf m lb ft Rear output shaft drive bevel gear nut 100 10 0 72 5 Page 3D 7 Page 3D 11 Rear output shaft nut 100 10 0 72 5 Page 3D 9 Page 3D 19 Rear output shaft driven gear nut 100 10 0 72 5 Page 3D 9 Front propeller shaft boot clam...

Page 438: ... remover Bearing installer set Page 3D 3 Page 3D 4 Page 3D 4 Page 3D 18 Page 3D 19 Page 3D 20 Page 3D 20 09920 13120 09920 31020 Crankcase separating tool Extension handle Page 3D 1 Page 3D 6 Page 3D 11 09920 53740 09921 20240 Clutch sleeve hub holder Bearing remover set Page 3D 7 Page 3D 7 Page 3D 11 Page 3D 3 09921 21910 09923 74511 Bearing holder Bearing remover Page 3D 11 Page 3D 3 Page 3D 14 ...

Page 439: ...ghtening Torque Specifications 4A 15 Special Tools and Equipment 4A 16 Recommended Service Material 4A 16 Special Tool 4A 16 Front Brakes 4B 1 Precautions 4B 1 Precautions for Front Brakes 4B 1 Repair Instructions 4B 1 Front Brake Components 4B 1 Front Brake Pad Inspection 4B 2 Front Brake Pad Replacement 4B 2 Front Brake Caliper Removal and Installation 4B 3 Front Brake Caliper Disassembly and As...

Page 440: ...er Removal and Installation 4D 4 Parking Rear Brake Light Switch Inspection 4D 4 Parking Rear Brake Relay Inspection 4D 4 Specifications 4D 5 Tightening Torque Specifications 4D 5 Special Tools and Equipment 4D 5 Recommended Service Material 4D 5 ...

Page 441: ...st servicing or which has been stored for a long period of time When storing brake fluid seal the container completely and keep it away from children When replenishing brake fluid take care not to get dust into the fluid When washing brake components use new brake fluid Never use cleaning solvent A contaminated brake disc or brake pad reduces braking performance Discard contaminated pads and clean...

Page 442: ...le 3 Front brake pipe D Fix the brake hose to the it guide firmly 4 Front brake hose No 2 E Face the black mark on the brake hose to forward 5 Front brake caliper F Tighten flare nut firmly 6 Frame G Pass the brake pipe front of the steering shaft 7 Steering shaft H Pass the brake pipe behind the frame bridge 8 Union bolt I Pass the brake hose inside of the suspension arm 9 Stopper After the brake...

Page 443: ...is 4A 2 Rear Blake Cable Routing Diagram B831G24102002 1 2 A 1 3 5 6 4 Front side I831G1410035 05 1 Rear brake cable 3 Rear brake pedal 5 Washer A Fix the rear brake cable to the footrest bar with clamp 2 Adjust nut 4 Pin 6 Cotter pin ...

Page 444: ...ndpaper Tilted pad Correct pad fitting or replace Damaged hub bearing Replace Worn pads and disc Replace Foreign material in brake fluid Replace brake fluid Clogged return port of master cylinder Disassemble and clean master cylinder Excessive brake lever stroke Air in hydraulic system Bleed air Insufficient brake fluid Replenish fluid to specified level bleed air Improper quality of brake fluid R...

Page 445: ...ect the rear brake light switch in the following procedures 1 Remove the left front inner fender Refer to Front Side Exterior Parts Removal and Installation in Section 9D Page 9D 6 2 Disconnect the rear brake light switch lead wire coupler 1 3 Inspect the switch for continuity with a tester If any abnormality is found replace the rear brake light switch with a new one Special tool 09900 25008 Mult...

Page 446: ...Bleeding from Front Brake Fluid Circuit B831G24106009 Air trapped in the brake fluid circuit acts like a cushion to absorb a large proportion of the pressure developed by the master cylinder and thus interferes with the full braking performance of the brake caliper The presence of air is indicated by sponginess of the brake lever and also by lack of braking force Considering the danger to which su...

Page 447: ...e air bleeder valve 6 N m 0 6 kgf m 4 5 lb ft 8 Fill the reservoir with brake fluid to the upper mark of the reservoir 9 Install the reservoir cap Brake Fluid Replacement B831G24106010 CAUTION Make sure that the vehicle is supported securely Handle brake fluid with care the fluid reacts chemically with paint plastic rubber materials etc 1 Support the vehicle on a level surface with a jack and keep...

Page 448: ...ke fluid Refer to Brake Fluid Replacement Page 4A 6 2 Loosen the flare nuts 1 and disconnect the brake pipe 3 Remove the front brake hoses as shown in the front brake hose routing diagram Refer to Front Brake Hose Routing Diagram Page 4A 1 Installation CAUTION The seal washers should be replaced with the new ones to prevent fluid leakage 1 Install the front brake hose as shown in the front brake h...

Page 449: ... holder nut 4 5 Remove the rear brake holder nut 4 and brake cable 5 6 Remove the rear brake cable bolt 7 from the right footrest 7 Remove the rear brake cable adjuster nut 7 and cable 8 Installation 1 Install the rear brake cable as shown in the rear brake cable routing diagram Refer to Rear Blake Cable Routing Diagram Page 4A 2 2 After installed rear brake cable adjust the adjuster nut Refer to ...

Page 450: ...s Removal and Installation in Section 6B Page 6B 3 3 Disconnect the front brake light switch coupler 1 1 2 3 4 5 6 a 7 b c 10 c 9 FWD FWD FWD FWD 8 I831G1410019 04 1 Reservoir cap 7 Brake hose union bolt 6 N m 0 6 kgf m 4 5 lb ft 2 Diaphragm 8 Brake lever Apply silicone grease 3 Plate 9 Brake lever pivot bolt Apply brake fluid 4 Separator 10 Brake lever pivot bolt lock nut Do not reuse 5 Master cy...

Page 451: ...Section 6B Page 6B 2 Tightening torque Master cylinder holder bolt Upper and Lower a 10 N m 1 0 kgf m 7 0 lb ft Set the brake hose union as shown in the front brake hose routing diagram Refer to Front Brake Hose Routing Diagram Page 4A 1 After setting the brake hose union to the stopper tighten the union bolt 3 to the specified torque CAUTION The seal washers should be replaced with the new ones t...

Page 452: ...condary cup 7 Piston 8 Primary cup 9 Spring 10 Assembly Assemble the master cylinder in the reverse order of disassembly Pay attention to the following points CAUTION Wash the master cylinder components with new brake fluid before reassembly Do not wipe the brake fluid off after washing the components When washing the components use the specified brake fluid Never use different types of fluid or c...

Page 453: ...rque Tightening torque Brake lever pivot bolt 6 N m 0 6 kgf m 4 5 lb ft Brake lever pivot bolt lock nut 6 N m 0 6 kgf m 4 5 lb ft Front Brake Master Cylinder Parts Inspection B831G24106016 Refer to Front Brake Master Cylinder Brake Lever Disassembly and Assembly Page 4A 11 Master Cylinder Inspect the master cylinder bore for any scratches or other damage Piston Inspect the piston surface for any s...

Page 454: ...Pedal Construction B831G24106017 a 1 2 3 a 4 I831G1410038 04 1 Brake pedal 4 Brake pedal pivot bolt Apply water resistance grease 2 Brake light switch a 17 5 mm 0 69 in Apply thread lock to the thread part 3 O ring 11 N m 1 1 kgf m 8 0 lb ft Do not reuse ...

Page 455: ...ention to the following points Apply grease to the O rings as shown in the rear brake pedal construction Refer to Rear Brake Pedal Construction Page 4A 13 CAUTION Replace the O rings with new ones Grease 99000 25160 Water resistance grease Apply grease to the pivot part of brake pedal Grease 99000 25160 Water resistance grease Apply thread lock to the bolt 1 and tighten to the specified torque Thr...

Page 456: ...t in Section 0C Page 0C 7 Item Standard Limit Rear brake pedal height 12 5 22 5 0 5 0 9 Front master cylinder bore 14 000 14 043 0 5512 0 5529 Front master cylinder piston diam 13 957 13 984 0 5495 0 5506 Item Specification Note Brake fluid type DOT 4 Fastening part Tightening torque Note N m kgf m lb ft Front brake air bleeder valve 6 0 6 4 5 Page 4A 6 Page 4A 7 Brake pipe flare nut 16 1 6 11 5 P...

Page 457: ...age 4A 13 Special Tool B831G24108002 Material SUZUKI recommended product or Specification Note Brake fluid DOT 4 Page 4A 6 Page 4A 11 Grease SUZUKI Silicone Grease or equivalent P No 99000 25100 Page 4A 12 Water resistance grease P No 99000 25160 Page 4A 14 Page 4A 14 Thread lock cement THREAD LOCK CEMENT 1342 or equivalent P No 99000 32050 Page 4A 14 09900 06108 09900 25008 Snap ring pliers Multi...

Page 458: ... the vehicle on a level ground and support the vehicle with a jack NOTE The right and left calipers brake pads and discs are installed symmetrically and therefore the removal procedure for one side is the same as that for the other side Repair Instructions Front Brake Components B831G24206001 b b a c e 5 2 4 3 FWD FWD 1 6 d 7 8 I831G1420001 11 ...

Page 459: ...ile dismounting the pads 3 Remove the front brake caliper by removing the brake caliper mounting bolts 2 Refer to Front Brake Caliper Removal and Installation Page 4B 3 4 Remove the brake pads 5 Clean up the caliper especially around the caliper piston 6 Install the new brake pads CAUTION Replace the brake pads as a set otherwise braking performance will be adversely affected 1 Front brake caliper...

Page 460: ...er to Brake Fluid Replacement in Section 4A Page 4A 6 3 Remove the brake hose from the caliper by removing the union bolt 1 and catch the brake fluid in a suitable receptacle NOTE Place a rag underneath the union bolt on the brake caliper to catch any spilt brake fluid 4 Remove the brake caliper by removing the brake caliper mounting bolts 2 Installation Install the brake caliper in the reverse or...

Page 461: ...ake fluid if it leaks will interfere with safe running and discolor painted surfaces Check the brake hose and hose joints for cracks and fluid leakage Front Brake Caliper Disassembly and Assembly B831G24206005 Refer to Front Brake Caliper Removal and Installation Page 4B 3 Disassembly 1 Remove the brake caliper Refer to Front Brake Caliper Removal and Installation Page 4B 3 2 Remove the pad spring...

Page 462: ...gf m 13 0 lb ft Brake caliper Wash the caliper bores and pistons with specified brake fluid Particularly wash the dust seal groove and piston seal groove BF Brake fluid DOT 4 CAUTION Wash the caliper components with fresh brake fluid before reassembly Never use cleaning solvent or gasoline to wash them Do not wipe the brake fluid off after washing the components When washing the components use the...

Page 463: ...w ones Tightening torque Front brake hose union bolt a 23 N m 2 3 kgf m 16 5 lb ft Front Brake Caliper Parts Inspection B831G24206006 Refer to Front Brake Caliper Disassembly and Assembly Page 4B 4 Brake Caliper Cylinder Inspect the brake caliper cylinder wall for nicks scratches or other damage If any damage is found replace the caliper with a new one Brake Caliper Piston Inspect the brake calipe...

Page 464: ...Front Rear Wheel Removal and Installation in Section 2D Page 2D 2 2 Remove the front wheel hub Refer to Front Wheel Hub Steering Knuckle Removal and Installation in Section 2B Page 2B 4 3 Remove the brake disc 1 from the front wheel hub Installation Install the front brake disc in the reverse order of removal Pay attention to the following points Make sure that the brake discs are clean and free o...

Page 465: ...Dismount the front brake caliper Refer to Front Brake Caliper Removal and Installation Page 4B 3 2 Measure the runout using the dial gauge Replace the disc if the runout exceeds the service limit Special tool A 09900 20607 Dial gauge 1 100 mm 10 mm 09900 20701 Magnetic stand Brake disc runout Service limit 0 30 mm 0 012 in 3 Remount the front brake caliper Refer to Front Brake Caliper Removal and ...

Page 466: ...18 1 8 13 0 Page 4B 3 Brake caliper mounting bolt 26 2 6 19 0 Page 4B 3 Front brake hose union bolt 23 2 3 16 5 Page 4B 4 Page 4B 6 Caliper holder slide pin 23 2 3 16 5 Page 4B 5 Caliper holder pin 18 1 8 13 0 Page 4B 5 Brake disc bolt 23 2 3 16 5 Page 4B 7 Material SUZUKI recommended product or Specification Note Brake fluid DOT 4 Page 4B 5 Page 4B 5 Grease SUZUKI SILICONE GREASE or equivalent P ...

Page 467: ...a 17 b 18 15 14 FWD FWD 3 6 I831G1430001 06 1 Friction plate 9 Ball 17 Rear brake cam lever nut 2 Separator plate 10 Rear brake case 18 Rear brake case mounting bolt 3 Side plate 11 Bearing 11 N m 1 1 kgf m 8 0 lb ft 4 Side plate pin 12 Snap ring 26 N m 2 6 kgf m 19 0 lb ft 5 Side plate spring 13 Oil seal Apply water resistance grease 6 Side plate stopper 14 Rear brake cam shaft Apply thread lock ...

Page 468: ... the rear brake cam lever 1 2 Remove the brake lining indicator 2 and rear brake cam lever return spring 3 3 Remove the rear brake case 4 Installation Fit the rear brake case gasket 1 CAUTION Replace the gasket 1 with a new one Install the rear brake case Apply a small quantity thread lock to the rear brake case bolts 2 Tighten the bolts diagonally to the specified torque Tightening torque Rear br...

Page 469: ...ke cam lever nut b 11 N m 1 1 kgf m 8 0 lb ft Install the final gear assembly to the vehicle Refer to Final Gear Assembly Removal and Installation in Section 3B Page 3B 23 Rear Brake Disassembly and Assembly B831G24306005 Refer to Rear Brake Assembly Removal and Installation Page 4C 2 Disassembly 1 Remove the gasket 1 and dowel pins 2 2 Remove the rear brake steel plates 3 along with the friction ...

Page 470: ...dary bevel gear holder 7 Remove the rear drive gear shaft 9 with plastic mallet 8 Remove the oil seal 10 with the special tool Special tool B 09913 50121 Oil seal remover 9 Remove the oil seal 11 10 Remove the snap ring 12 with the special tool Special tool 09900 06108 Snap ring pliers 6 I831G1430013 01 I831G1430014 01 7 8 A I831G1430015 01 9 I831G1430016 01 10 11 B I831G1430017 01 12 I831G1430018...

Page 471: ...assembly Pay attention to the following points Assemble the rear brake plates as shown in the figure CAUTION Replace the remove side plate stopper 4 with a new one Apply final gear oil to the bearing 5 before installing it Install the bearing with the special tool Special tool A 09913 70210 Bearing installer set NOTE The stamped mark of bearing faces outside Install the snap ring 6 C I831G1430019 ...

Page 472: ...ft 10 Apply grease to the rear brake cam shaft Grease 99000 25160 Water resistance grease Install the rear propeller shaft coupling 11 Install the washer 12 and rear drive gear shaft nut 13 CAUTION The removed nut 13 must be replaced with a new one Tighten the rear drive gear shaft nut 13 to the specified torque with the special tool Special tool B 09924 52420 Secondary bevel gear holder Tightenin...

Page 473: ... and gasket 16 CAUTION The removed gasket must be replaced with a new one Rear Brake Parts Inspection B831G24306006 Refer to Rear Brake Disassembly and Assembly Page 4C 3 Rear Brake Cam Lever Inspect the rear brake cam lever for wear or damage If any wear or damage is found replace it with a new one Inspect the rear brake cam lever return spring for wear or damage If any wear or damage is found re...

Page 474: ...damage If any defects are found replace rear drive gear shaft with a new one Rear Brake Side Plate Rear Brake Friction Plate Steel Plate Inspect the rear brake side plates 1 rear brake friction plates 2 and separator plates 3 for wear or damage If any defects are found replace them as a set Measure the outer distance a between the side plates as shown in the figure If the distance a is less than t...

Page 475: ...htening Torque Specifications B831G24307002 NOTE The specified tightening torque is also described in the following Rear Brake Components Page 4C 1 Reference For the tightening torque of fastener not specified in this section refer to Tightening Torque List in Section 0C Page 0C 7 a I831G1430041 02 I831G1430042 01 Item Standard Limit Rear brake pedal free travel 20 30 0 8 1 2 Rear brake lever play...

Page 476: ...ecommended product or Specification Note Grease Water resistance grease P No 99000 25160 Page 4C 6 Page 4C 6 Thread lock cement THREAD LOCK CEMENT SUPER 1360 or equivalent P No 99000 32130 Page 4C 2 09900 06108 09913 50121 Snap ring pliers Oil seal remover Page 4C 4 Page 4C 4 09913 70210 09921 20240 Bearing installer set Bearing remover set Page 4C 5 Page 4C 6 Page 4C 5 09924 52420 Secondary bevel...

Page 477: ...ing Rear Brake Cable Routing Diagram B831G24402001 1 2 4 3 1 B 4 3 A 1 1 I831G1440001 02 1 Parking brake cable 4 Wiring harness 2 Parking brake cable guide A Pass the parking brake cable under the wiring harness 3 Frame B Pass the parking brake cable over the wiring harness ...

Page 478: ... 3 7 8 6 C 6 1 I831G1440002 03 1 Parking brake cable 6 Clamp 2 Parking brake cable guide 7 Parking brake cable adjust nut 3 Frame 8 Rear brake assembly 4 Wiring harness C Fix the rubber of parking brake cable with clamp 5 Rear fender ...

Page 479: ...moval and Installation in Section 1D Page 1D 5 4 Remove the clamps 3 and parking brake cable from the cable guide 2 5 Remove the parking brake cable adjuster nut 4 and parking brake cable 5 6 Remove the parking brake cable 5 from the cable guide 6 7 Disconnect the parking brake cable 5 8 Remove the parking brake cable from vehicle Installation 1 Install the parking brake cable as shown in the park...

Page 480: ...ion 6B Page 6B 3 Parking Rear Brake Light Switch Inspection B831G24406005 Refer to Parking Rear Brake Light Switch Inspection in Section 4A Page 4A 5 Parking Rear Brake Relay Inspection B831G24406006 Refer to Parking Brake Relay Inspection in Section 1I Page 1I 9 2 1 3 a 4 a 5 7 6 FWD FWD I831G1440007 01 1 Brake lever lock 4 Brake lever pivot bolt 7 Lock nut 2 Brake lever cover 5 Brake lever pivot...

Page 481: ...ing Rear Brake Lever Components Page 4D 4 Reference For the tightening torque of fastener not specified in this section refer to Tightening Torque List in Section 0C Page 0C 7 Special Tools and Equipment Recommended Service Material B831G24408001 NOTE Required service material is also described in the following Parking Rear Brake Lever Components Page 4D 4 ...

Page 482: ...4D 6 Parking Brake ...

Page 483: ... Drive Face Disassembly and Assembly 5A 9 Movable Driven Face Disassembly and Assembly 5A 11 Drive V belt Inspection 5A 14 Movable Fixed Drive Face Parts Inspection 5A 15 Movable Fixed Driven Face Parts Inspection 5A 15 Clutch Shoe Removal and Installation 5A 16 Clutch Housing Case Disassembly and Assembly 5A 19 Clutch Parts Inspection 5A 20 Movable Drive Face Cover Disassembly and Assembly 5A 22 ...

Page 484: ...5 1 Precautions Transmission Transaxle Precautions Precautions Precautions for Transmission Transaxle B831G25000001 Refer to General Precautions in Section 00 Page 00 1 ...

Page 485: ...001 1 3 2 8 9 6 7 12 13 11 10 4 A 5 I831G1510001 04 1 Crankshaft 6 Fixed driven face 11 High driven gear 2 Movable drive face 7 Transfer input shaft 12 Transfer output drive gear 3 Fixed drive face 8 Clutch shoe 13 Transfer output driven gear shaft 4 V belt 9 Clutch housing A Drive train route 5 Movable driven face 10 Low driven gear ...

Page 486: ...ssive engine noise Gear worn or abnormal contact Replace Spline worn Replace Bearing worn or burned Replace V belt slipping V belt slipping Replace Pulley face worn Replace Clutch slipping Clutch shoe worn Replace Centrifugal weight operation failure Repair or replace V belt worn Replace Clutch dragging Clutch shoe spring fatigued Replace Movable driven face distorted Replace ...

Page 487: ...e bolt 21 Spring 2 Movable drive plate 12 Clutch housing 22 Spring plate 3 Damper 13 One way clutch 23 Movable driven face ring nut 4 Spacer 14 Clutch shoe assembly 24 Clutch shoe nut 5 Roller 15 Oil seal 110 N m 11 0 kgf m 79 5 lb ft 6 Oil seal 16 Movable driven face 150 N m 15 0 kgf m 108 5 lb ft 7 Movable drive face 17 Pin Apply grease 8 Drive V belt 18 Spacer Do not reuse 9 Fixed drive face 19...

Page 488: ...106002 2 5 3 2 2 9 4 2 6 7 8 8 1 I831G1510003 06 1 Heat shield 3 Belt cooling inlet duct No 1 5 Belt cooling inlet duct connector 7 Belt cooling outlet duct No 2 2 Clamp 4 Belt cooling inlet duct No 2 6 Belt cooling outlet duct No 1 8 Belt cooling outlet duct connector ...

Page 489: ...e removed parts Clutch Engagement and Lock up Speed Inspection B831G25106004 Refer to Automatic Clutch Inspection in Section 0B Page 0B 26 V belt Type Continuously Variable Automatic Transmission Removal and Installation B831G25106005 Removal V belt outer cover 1 Remove the seat Refer to Seat Removal and Installation in Section 9D Page 9D 11 2 Remove the right cover Refer to Front Side Exterior Pa...

Page 490: ...ve the movable drive face cover 1 and collar 2 4 Remove the dowel pins 3 5 Remove the movable drive face 4 Movable driven face 1 Remove the movable driven face bolt 1 with the special tool 2 Remove the movable driven face assembly 2 and drive belt 3 Special tool A 09930 40113 Rotor holder 1 I831G1510008 01 1 I831G1510009 01 A I831G1510010 01 1 2 I831G1510011 01 3 4 I831G1510012 01 A 1 2 3 I831G151...

Page 491: ...w as possible between the movable driven face and fixed driven face by tapping with a plastic mallet CAUTION The drive belt should be installed so that the arrows on the drive belt periphery point in the normal turning direction The drive belt contact surface of the driven face should be thoroughly cleaned Apply grease in the groove of fixed driven face Grease 99000 25010 SUZUKI SUPER GREASE A or ...

Page 492: ...faces completely dry Install the collar 2 and movable drive face bolt 3 NOTE The deep concave of the collar 2 faces outside Install the dowel pins 4 Install the movable drive face cover 5 Tighten the movable drive face bolt 6 to the specified torque with the special tool Tightening torque Movable drive face bolt a 110 N m 11 0 kgf m 79 5 lb ft Special tool A 09930 40113 Rotor holder NOTE Turn the ...

Page 493: ...y and Assembly B831G25106006 Refer to Automatic Transmission Components Page 5A 3 and V belt Type Continuously Variable Automatic Transmission Removal and Installation Page 5A 5 Disassembly 1 Remove the spacer 1 2 Remove the movable drive plate 2 and rollers 3 3 Remove the dampers 4 4 Remove the oil seals 5 and 6 NOTE If there are no abnormal conditions the oil seals removal are not necessary 1 2 ...

Page 494: ...GREASE A or equivalent CAUTION Wipe off any excess grease thoroughly Take care not to apply grease to the contact surface of the drive belt 3 Assemble the rollers 1 to the movable drive face 2 4 Assemble the four dampers 3 to the movable drive plate 4 5 Assemble the movable plate 4 to the movable drive face 3 6 Apply grease to the inside groove of the spacer 5 Grease 99000 25010 SUZUKI SUPER GREAS...

Page 495: ...ompressor Special tool A 09917 23711 Ring nut wrench B 09924 52450 Fixed driven face holder 2 Set the special tool to the movable driven face assembly 1 and compress the movable driven face assembly by turning in the special tool handle NOTE Make sure to insert the spring end A into the slot B of the special tool as shown in the figure Special tool c 09922 31430 Clutch spring compressor 3 Remove t...

Page 496: ...movable driven face NOTE If there are no abnormal conditions the oil seals removal are not necessary Assembly Assemble the movable driven face in the reverse order of disassembly Pay attention to the following points Install the oil seals with the special tool Special tool A 09913 70210 Bearing installer set CAUTION The removed oil seals must be replaced with new ones 3 4 I831G1510037 01 6 6 5 I83...

Page 497: ...t Install the movable driven face 2 to the fixed driven face 3 Apply grease to the pin grooves of the movable driven face Grease 99000 25010 SUZUKI SUPER GREASE A or equivalent CAUTION To prevent damaging the oil seal lip from during installation slide the lip using a 0 1 mm steel sheet as a guide Install the rollers 4 and pins 5 Install the spring seat 6 aligning the hole A with the hole B Instal...

Page 498: ...17 23711 Ring nut wrench D 09924 52450 Fixed driven face holder Drive V belt Inspection B831G25106008 Inspect that the drive belt is free from any greasy substance Inspect the contact surface of the drive belt for cracks or damage and measure the width of the drive belt with the vernier calipers If any defects are found or measurement exceeds the service limit replace the drive belt with a new one...

Page 499: ...d replace the dampers with new ones Oil Seal Inspect the lip of the oil seal for wear or damage If any damages are found replace the oil seal with a new one Refer to Movable Driven Face Disassembly and Assembly Page 5A 11 Movable Fixed Driven Face Parts Inspection B831G25106010 Movable Fixed Driven Face Inspect the driven face for any abnormal conditions such as stepped wear or discoloration cause...

Page 500: ...tion Page 5A 5 Removal 1 Drain the engine oil Refer to Engine Oil and Filter Replacement in Section 0B Page 0B 10 2 Remove the outlet cooling duct connector 1 from the V belt inner cover 2 3 Remove the V belt inner cover 2 4 Remove the inlet cooling duct connector 3 from the clutch housing case 4 5 Remove the clutch housing case 4 along with the clutch housing 5 6 Remove the dowel pins 6 and gaske...

Page 501: ... quantity of thread lock to the clutch shoe nut 3 Thread lock cement 99000 32030 THREAD LOCK CEMENT SUPER 1303 or equivalent Install the clutch shoe nut 3 NOTE The clutch shoe nut 3 has left hand threads Tighten the clutch shoe nut 3 to the specified torque with the special tools Tightening torque Clutch shoe nut a 150 N m 15 0 kgf m 108 5 lb ft Special tool A 09930 40113 Rotor holder B 09930 4013...

Page 502: ...sing case 7 and inlet belt cooling duct connector 8 and tighten the bolts diagonally Install the V belt inner cover 9 CAUTION If there are wear or damage replace the gaskets 10 with new ones CAUTION Tighten the clutch inner cover bolts A first and then other ones diagonally Tightening torque V belt inner cover bolt 9 N m 0 9 kgf m 6 5 lb ft Install the outlet belt cooling duct connector 11 4 A I83...

Page 503: ... 09913 50121 Oil seal remover Remove the retainers 4 Remove the bearing 5 with the special tool Special tool B 09921 20240 Bearing remover set NOTE If there is no abnormal noise the bearing removal is not necessary Assembly Install the bearing 1 with the special tool Special tool A 09913 70210 Bearing installer set CAUTION The removed bearing must be replaced with a new one 1 I831G1510074 01 2 I83...

Page 504: ... with a new one Special tool A 09913 70210 Bearing installer set Apply grease to the rip of the oil seal 4 Grease 99000 25010 SUZUKI SUPER GREASE A or equivalent Install the collar 5 CAUTION Replace a O ring 6 with a new one Apply grease to the O ring 6 Grease 99000 25010 SUZUKI SUPER GREASE A or equivalent Install the clutch housing 7 After installed the clutch housing check if the clutch housing...

Page 505: ...e limit 140 5 mm 5 53 in Left Clutch Housing Bearing Rotate the inner race by finger to inspect for abnormal play noise and smooth rotation If there is anything unusual replace the bearing with a new one One Way Clutch Install the one way clutch 1 onto the proper direction as shown NOTE When Installing the one way clutch 1 onto the clutch housing 2 make sure that the OUTSIDE mark A in the one way ...

Page 506: ...moval is not necessary Special tool A 09913 70210 Bearing installer set Assembly Press the bearing 1 with the special tool Special tool A 09913 70210 Bearing installer set CAUTION The sealed cover of the bearing must face outside Apply grease to the bearing Grease 99000 25010 SUZUKI SUPER GREASE A or equivalent Install the snap ring 2 CAUTION The removed snap ring must be replaced with a new one A...

Page 507: ... Rotate the inner race by finger to inspect for abnormal play noise and smooth rotation If there is anything unusual replace the bearing with a new one Oil Seal Inspect the oil seal lip for wear or damage If any defects are found replace the oil seal with a new one Shift Lever Assembly Components B831G25106016 A 3 I831G1510100 01 I831G1510099 01 1 Transfer gear shift lever assembly 2 Gear shift kn...

Page 508: ...Installation B831G25106018 Removal 1 Keep the vehicle on a level ground 2 Remove the front fender Refer to Front Side Exterior Parts Removal and Installation in Section 9D Page 9D 6 3 Keep the gear shift arm 1 in the neutral position 4 Loosen the bolt 2 and remove the gear shift arm 1 5 Remove the transfer gear shift lever mounting bolts 3 6 Remove the shift lever assembly a 30 b 33 1 2 I831G15101...

Page 509: ...Lever Disassembly and Assembly B831G25106019 1 Removed the shift lever assembly Refer to Shift Lever Assembly Removal and Installation Page 5A 24 2 Disassemble the shift lever assembly as shown in the shift lever components Refer to Shift Lever Assembly Components Page 5A 23 Assembly 1 Assemble the shift lever as shown in the shift lever components Refer to Shift Lever Assembly Components Page 5A ...

Page 510: ... I D 140 0 140 2 5 512 5 520 140 5 5 53 Clutch shoe No groove at any part Clutch engagement r min 1 500 2 000 r min Clutch lock up r min 3 500 4 000 r min Item Standard Limit Primary reduction ratio Automatic drive Variable change 2 763 0 780 Secondary reduction ratio 2 158 40 21 x 17 15 Final reduction ratio Front 3 600 36 10 Rear 3 600 36 10 Transfer gear ratio Low 2 562 41 16 High 1 240 31 25 R...

Page 511: ... 5A 23 Fastening part Tightening torque Note N m kgf m lb ft Movable driven face bolt 110 11 0 79 5 Page 5A 8 Movable drive face bolt 110 11 0 79 5 Page 5A 8 V belt outer cover bolt 8 0 8 6 0 Page 5A 9 Movable driven face ring nut 110 11 0 79 5 Page 5A 14 Clutch shoe nut 150 15 0 108 5 Page 5A 17 V belt inner cover bolt 9 0 9 6 5 Page 5A 18 Material SUZUKI recommended product or Specification Note...

Page 512: ...A 20 Page 5A 22 Page 5A 22 Page 5A 23 Page 5A 11 Page 5A 14 09920 33540 09921 20240 Clutch shoe remover Bearing remover set Page 5A 17 Page 5A 19 09922 31430 09924 52450 Clutch spring compressor Fixed driven face holder Page 5A 11 Page 5A 14 Page 5A 11 Page 5A 14 09930 30104 09930 40113 Rotor remover slide shaft Rotor holder Page 5A 17 Page 5A 6 Page 5A 6 Page 5A 8 Page 5A 8 Page 5A 16 Page 5A 17 ...

Page 513: ...uctions 6B 1 Steering Handlebars Components 6B 1 Steering Handlebars Assembly Construction 6B 2 Handlebars Removal and Installation 6B 3 Handlebars Inspection 6B 5 Steering Shaft Removal and Installation 6B 6 Tie rod Tie rod End Removal and Installation 6B 9 Steering Parts Inspection 6B 10 Specifications 6B 11 Service Data 6B 11 Tightening Torque Specifications 6B 12 Special Tools and Equipment 6B...

Page 514: ...6 1 Precautions Steering Precautions Precautions Precautions for Steering B831G26000001 Refer to General Precautions in Section 00 Page 00 1 ...

Page 515: ... alignment Adjust Insufficiently lubricated Lubricate Not enough pressure in tires Adjust Worn or incorrect tire or wrong tire pressure Adjust or replace Wobbly Handlebars Distorted front steering shaft Replace Crooked tire Replace Worn or incorrect tire or wrong tire pressure Adjust or replace Worn bearing race in steering stem Replace Worn steering shaft holder bushing Replace Worn steering knuc...

Page 516: ...andlebar Steering Steering Handlebar Repair Instructions Steering Handlebars Components B831G26206001 21 21 1 15 16 2 a 3 4 b 8 12 10 9 FWD FWD 7 c 13 11 6 6 19 FWD FWD A A A A 14 e 17 17 18 d 5 20 14 I831G1620001 17 ...

Page 517: ...ft holder dust seal 17 Tie rod end 29 N m 2 9 kgf m 21 0 lb ft 8 Steering shaft holder bolt 18 Tie rod Apply thread lock to the thread part 9 Steering shaft bushing 19 Throttle case assembly Apply water resistance grease 10 Dust seal 20 Handlebar left switch assembly Do not reuse a b 1 c 2 5 6 d 3 e 4 c 2 I831G1620002 06 1 Handlebar holder nut 5 Washer The conical side of washer faces outside 29 N...

Page 518: ...e following parts from left handlebar a Left grip 1 b Left switch box 2 3 Disconnect the parking brake cable 3 from parking brake lever 4 Remove the clamp 5 Remove the parking brake lever from the handlebar by removing mounting bolt 6 Remove the clamp 7 Disconnect the brake hose from the hose guide 1 2 I831G1620003 03 3 I831G1620004 02 I831G1620005 02 I831G1620006 05 I831G1620007 02 I831G1620008 0...

Page 519: ...n Page 6B 2 Set the handlebars so that its punch mark A aligns with the mating surface of the left handlebar holder Tighten the handlebar holder bolts 3 to the specified torque NOTE First tighten the handlebar holder bolts 3 front ones to the specified torque Tightening torque Handlebar clamp bolt a 26 N m 2 6 kgf m 19 0 lb ft Align the punch mark A on the handlebars with the mating surface B of r...

Page 520: ... Section 4A Page 4A 9 Align the punch mark D on the handlebars with the mating surface E of the throttle lever case Tighten the throttle lever case bolts 6 to the specified torque Tightening torque Throttle lever case bolt c 5 N m 0 5 kgf m 3 5 lb ft Handlebars Inspection B831G26206004 Refer to Handlebars Removal and Installation Page 6B 3 Inspect the handlebars for distortion or damage If any def...

Page 521: ...Section 9B Page 9B 3 5 Remove the handlebar holder 1 6 Disconnect the tie rod ends Refer to Front Wheel Hub Steering Knuckle Removal and Installation in Section 2B Page 2B 4 7 Remove the steering lower arm plate 2 by removing cotter pin nut and washer 8 Remove the center cover 9 Disconnect the brake hose 3 from the hose guide 10 Remove the read wire clamps 11 Remove the steering shaft plate 4 12 R...

Page 522: ...er set B 09913 70210 Bearing installer set Apply grease to the steering shaft lower bushing 1 and dust seal 2 Grease 99000 25160 Water resistance grease Apply grease to the dust seal 3 and O ring 4 CAUTION The removed O ring must be replaced with a new one Grease 99000 25160 Water resistance grease Apply grease to the spline of steering shaft Grease 99000 25160 Water resistance grease Install the ...

Page 523: ...wiring harness cables and brake hose routing are properly Refer to Wiring Harness Routing Diagram in Section 9A Page 9A 4 When installing the steering arm plate align the wide spline B of steering shaft 7 with slit C of steering arm plate 8 Apply a small quality thread lock to the thread part of steering shaft Thread lock cement 99000 32030 THREAD LOCK CEMENT SUPER 1303 or equivalent Tighten the s...

Page 524: ... 2D Page 2D 2 After installing these parts adjust the toe Refer to Toe Adjustment in Section 0B Page 0B 22 Tie rod Tie rod End Removal and Installation B831G26206006 Removal 1 Remove the tie rod end steering knuckle side Refer to Front Wheel Hub Steering Knuckle Removal and Installation in Section 2B Page 2B 4 2 Remove the cotter pins tie rod end nut and spring washer 3 Remove the steering arm pla...

Page 525: ...he removed cotter pins must be replaced with new ones Install the tie rod ends steering knuckle side Refer to Front Wheel Hub Steering Knuckle Removal and Installation in Section 2B Page 2B 4 After installed wheels inspect the toe out If the toe out is out of specification bring it into the specified range Refer to Steering System Inspection in Section 0B Page 0B 21 and Toe Adjustment in Section 0...

Page 526: ... new one Steering Shaft Holder Inspect the steering shaft holders for wear or damage If any defects are found replace the steering shaft holders with new ones Steering Shaft Bushing and Dust Seal Inspect the steering shaft bushing 1 and dust seal 2 for wear or damage If any defects are found replace them with new ones Specifications Service Data B831G26207001 Wheel Unit mm I831G1620044 01 I831G162...

Page 527: ... m kgf m lb ft Handlebar clamp bolt 26 2 6 19 0 Page 6B 4 Rear brake lever holder clamp bolt 11 1 1 8 0 Page 6B 4 Throttle lever case bolt 5 0 5 3 5 Page 6B 5 Steering shaft holder bolt 23 2 3 16 5 Page 6B 8 Steering shaft lower nut 162 16 2 117 0 Page 6B 8 Handlebar holder nut 60 6 0 43 5 Page 6B 9 Tie rod lock nut 45 4 5 32 5 Page 6B 10 Tie rod end nut 29 2 9 21 0 Page 6B 10 Material SUZUKI reco...

Page 528: ...6B 13 Steering Handlebar ...

Page 529: ...3 Combination Meter Disassembly and Assembly 9C 3 Combination Meter Inspection 9C 4 Engine Coolant Temperature Indicator Light Inspection 9C 4 Engine Coolant Temperature Removal and Installation 9C 4 Fuel Level Indicator Inspection 9C 5 Fuel Level Gauge Inspection 9C 6 Speedometer Inspection 9C 6 Speed Sensor Removal and Installation 9C 6 Speed Sensor Inspection 9C 7 Ignition Switch Inspection 9C ...

Page 530: ...of Contents Trailer Towing Construction 9E 7 Trailer Towing Removal and Instruction 9E 7 Specifications 9E 8 Tightening Torque Specifications 9E 8 Special Tools and Equipment 9E 8 Recommended Service Material 9E 8 ...

Page 531: ...ectrical System B831G29000001 Refer to General Precautions in Section 00 Page 00 1 and Precautions for Electrical Circuit Service in Section 00 Page 00 2 Component Location Electrical Components Location B831G29003001 Refer to Electrical Components Location in Section 0A Page 0A 7 ...

Page 532: ...9A 1 Wiring Systems Body and Accessories Wiring Systems Schematic and Routing Diagram Wiring Diagram B831G29102001 Refer to Wire Color Symbols in Section 0A Page 0A 5 ...

Page 533: ...Br Bl B W R B Y W Bl P W O Y Bl R Bl R Gr B W W B Gr B W B W B W W B Gr B W W B Gr B W R B R R R B W B W R Gr R B W Y R Y R B W W B B B Gr W Y Y G B W B W O G O G P B O B G G B W B B G Y B W W Y B W W B R B W B R B Bl R R Gr Bl W B R Bl R B W Bl Br B G B Y B W W Br Br R G B W Bl B Bl R W R W G B W W Bl W Gr W Y R R B P W G R B W Bl B Bl B Br B Br B Br G B R R W Y W Y W Y Gr Gr Gr Y P P B Br B R B ...

Page 534: ...Bl Y R Y R Y B Y B Gr R Gr R B G B G B Br B Br Br Br Bl B Bl B W R W R Dg Dg B Y B Y W Bl W Bl P W P W O W O W W R W R Gr R Gr R B W B W Y R Y R Y R Y R B W B W Y B Y B Y B B B W B W B B B Gr Gr W Y O O W O W Y G Y G B W B W Bl B Bl B Bl B B W B W P B B G B W B W B B G B G B R B R O R O R O R B W B W B R B R B Bl Bl R R O O O Bl O Bl Gr Gr Bl W Bl W O Y O Y O Y B R B R Bl R Bl R O O B W Bl W Bl Br...

Page 535: ... switch Clamp Speed sensor Clamp Actuator Clamp Clamp Clamp Clamp Actuator Foot brake switch Actuator Foot brake switch IAP sensor IAP sensor IAP sensor To rear fender top Speed sensor Clamp Wiring harness TP sensor Injector coupler ECT sensor coupler ISC valve Ignition coil To power source Clamp Wiring harness Wiring harness Wiring harness Actuator Gear position switch Generator Hose Cooling fan ...

Page 536: ...ing harness as shown Pass the writing harness behind the upper Clamp 4WD Diff lock switch Front brake switch Clamp Emergency switch P 17 Handle switch Parking brake switch Horn button P 17 24 Starter relay Fuel dump relay Emergency switch P 17 10 㧙 15 mm 0 3 㧙 0 6 in Horn P 17 Horn P 24 VIEW A Clamp Emergency switch P 17 4WD Diff lock switch Combination meter Horn button P 17 24 Front brake switch...

Page 537: ... mm a 1 5 4 7 7 2 3 6 I831G1910905 05 1 Starter motor 3 Generator stator 5 Starter motor lead wire 7 Clamp 2 Gear position switch 4 Ground wire 6 Grommet a 30 Item Specification Note Fuse size Headlight HI 10 A LO 10 A Fuel 10 A Ignition 15 A Power source 10 A Fan 15 A Main 30 A ...

Page 538: ...002 Removal 1 Remove the front grill upper cover Refer to Front Side Exterior Parts Removal and Installation in Section 9D Page 9D 6 2 Disconnect the headlight coupler 1 3 Remove the headlight assembly 2 by removing screw 3 fastener 4 and bolts 5 FWD FWD 1 I831G1920002 03 1 Headlight bulb 12 V 35 35 W 1 I831G1920003 01 5 4 3 I831G1920004 02 5 2 I831G1920005 03 ...

Page 539: ... bulb failure Do not use bulb other than those with predetermined wattage Remove the bulb when it gets cool since it may be heated to an extremely high temperature when the headlight is turned ON 1 Remove the headlight housing cover 1 and bulb socket rubber cap 2 2 Disconnect the headlight coupler 3 3 Replace the headlight bulb 4 by unhooking the bulb holder spring 5 4 Reinstall the removed parts ...

Page 540: ...ry Headlight Removal and Installation B831G29206006 Removal 1 Remove the screws 1 2 Remove the auxiliary headlight cover 2 by removing the fasteners 3 FWD FWD 1 I831G1920009 05 1 Auxiliary headlight bulb 12 V 35 35 W 1 I831G1920010 01 3 I831G1920011 01 3 3 2 2 I831G1920012 01 ...

Page 541: ...oapy water to prevent premature bulb failure Do not use bulb other than those with predetermined wattage Remove the bulb when it gets cool since it may be heated to an extremely high temperature when the headlight is turned ON 1 Remove the combination meter mounting bolt Refer to Combination Meter Removal and Installation in Section 9C Page 9C 3 2 Disconnect the auxiliary headlight coupler 1 and r...

Page 542: ...xiliary Headlight Beam Adjustment B831G29206008 Loosen the auxiliary headlight mounting bolt 1 Adjust the auxiliary headlight beam Tighten the auxiliary headlight mounting bolt 1 Rear Combination Light components B831G29206009 A I831G1920018 02 1 I831G1920029 01 1 I831G1920030 01 1 FWD FWD I831G1920019 04 1 Brake light Taillight bulb 12 V 21 5 W ...

Page 543: ...ht Bulb Replacement B831G29206011 CAUTION If you touch the bulb with your bare hands clean the bulb with a cloth moistened with alcohol or soapy water to prevent premature bulb failure Do not use bulb other than those with predetermined wattage 1 Remove the rear combination light 2 Remove the bulb socket by turning it counterclockwise 3 Push in on the bulb turn it counterclockwise and pull it out ...

Page 544: ...Inspection B831G29206014 Inspect the dimmer switch in the following procedures 1 Remove the left inner fender Refer to Front Side Exterior Parts Removal and Installation in Section 9D Page 9D 6 2 Disconnect the handlebar switch coupler 1 3 Inspect the dimmer switch for continuity with a tester If any abnormality is found replace the handlebar switch assembly with a new one Refer to Handlebars Remo...

Page 545: ... Wattage Unit W Special Tools and Equipment Special Tool B831G29208001 Item Specification P 24 28 33 P 17 Headlight HI 35 x 2 LO 35 x 2 Auxiliary headlight 35 35 Brake light Taillight 21 5 Revercing light 21 09900 25008 Multi circuit tester set Page 9B 7 Page 9B 7 ...

Page 546: ...ch indicator light LED is maintenance free LED is less power consuming and more resistant to vibration resistance compared to the bulb 1 2 3 5 11 12 13 6 8 9 15 4 7 14 10 16 I831G1930001 03 1 Select button Odo Trip A Trip B 7 Select button Clock Hour FI DTC 13 LCD FI indicator 2 LED Diff lock indicator light 8 LCD Diff lock indicator 14 LCD Fuel level indicator 3 LED Reverse indicator light 9 LCD ...

Page 547: ...Combination Meter Fuel Meter Horn 9C 2 Repair Instructions Combination Meter Components B831G29306001 1 2 3 FWD FWD I831G1930002 04 1 Upper case 2 Combination meter 3 Lower case ...

Page 548: ...nstall the combination meter in the reverse order of removal Pay attention to the following points Make sure that speedometer coupler boot is positioned properly Combination Meter Disassembly and Assembly B831G29306003 Refer to Combination Meter Removal and Installation Page 9C 3 CAUTION Do not attempt to disassemble the combination meter unit Disassembly Disassemble the combination meter as shown...

Page 549: ...g procedures 1 Remove the seat Refer to Seat Removal and Installation in Section 9D Page 9D 11 2 Remove the left side cover Refer to Front Side Exterior Parts Removal and Installation in Section 9D Page 9D 6 3 Disconnect the ECT sensor coupler 1 4 Connect the variable resistor 2 between the terminals 5 Turn the ignition switch ON 6 Check the LCD and LED operations when the resistance is adjusted t...

Page 550: ...rness 4 Turn the ignition switch ON 5 Check the display of fuel level indicator LCD as shown in the figure If any abnormality is found replace the combination meter with a new one Refer to Combination Meter Removal and Installation Page 9C 3 NOTE It takes approx 13 seconds that the fuel level indicator indicates the detected fuel level 6 Connect the fuel level gauge coupler and reinstall the remov...

Page 551: ...ections If the speed sensor and coupler connections are OK replace the combination meter unit with a new one Refer to Combination Meter Removal and Installation Page 9C 3 Speed Sensor Removal and Installation B831G29306010 Removal 1 Remove the engine side cover Refer to Rear Side Exterior Parts Removal and Installation in Section 9D Page 9D 9 2 Disconnect the speed sensor coupler 1 3 Remove the sp...

Page 552: ...uld be the same as the battery voltage 12 V Ignition Switch Inspection B831G29306012 Inspect the ignition switch in the following procedures 1 Remove the left inner fender Refer to Front Side Exterior Parts Removal and Installation in Section 9D Page 9D 6 2 Disconnect the ignition switch coupler 1 3 Inspect the ignition switch for continuity with a tester If any abnormality is found replace the ig...

Page 553: ...nd terminal If the sound is not heard from the horn replace the horn with a new one 3 Connect the horn couplers Horn Removal and Installation For P 17 24 B831G29306015 Removal Disconnect the horn couplers and remove the horn by removing the mounting nut as shown in the wiring harness routing diagram Refer to Wiring Harness Routing Diagram in Section 9A Page 9A 4 Installation Install the horn in th...

Page 554: ...nt Recommended Service Material B831G29308001 Special Tool B831G29308002 Material SUZUKI recommended product or Specification Note Grease Water resistance grease P No 99000 25160 Page 9C 6 09900 25008 Multi circuit tester set Page 9C 6 Page 9C 7 Page 9C 7 Page 9C 8 ...

Page 555: ...Exterior Parts 9D 1 Body and Accessories Exterior Parts Repair Instructions Exterior Parts Construction B831G29406001 ...

Page 556: ...9D 2 Exterior Parts Front Side 1 2 3 4 7 5 6 I831G1940001 08 1 Front fender 3 Air cleaner box cover 5 Front grill cover 7 Right inner fender 2 Front box 4 Side cover 6 Left inner fender ...

Page 557: ...Exterior Parts 9D 3 Rear Side 1 2 4 5 3 I831G1940002 02 1 Rear fender 2 Right mud guard 3 Left mud guard 4 Engine side cover 5 Rear box ...

Page 558: ...9D 4 Exterior Parts Rear Fender Heat Shield Construction B831G29406002 2 a b a 1 2 2 c d I831G1940003 07 1 Rear fender a 1 3 mm 0 04 0 12 in c 67 mm 2 64 in 2 Heat shield b 5 mm 0 2 in d 8 mm 0 3 in ...

Page 559: ...Exterior Parts 9D 5 Fuel Tank Lower Cover Heat Shield Installation B831G29406003 1 2 4 a 3 2 4 1 I831G1940045 02 1 Heat shield 2 Cushion 3 Fuel tank lower cover a Max 5 mm 0 2 in ...

Page 560: ...vent the pawl A from damage insert the fastener all the way into the installation hole 3 Push in the head of center piece until it becomes flush with the fastener outside face Front Side Exterior Parts Removal and Installation B831G29406005 Front Grill Cover Removal Remove the front grill cover 1 by removing the fasteners 2 Installation Install the front grill cover in the reverse order of removal...

Page 561: ...the front box mounting screw 4 Turn the front box 3 counterclockwise and remove it 5 Remove the front box holder 4 and cushions 5 Installation Install the front box in the reverse order of removal Pay attention to the following points When installing the cushion fit the convex parts A of the cushion onto the concave parts B of the front box When installing the cushion to the front box align the cu...

Page 562: ... the side cover in the reverse order of removal Front Fender Removal 1 Remove the front carrier Refer to Front Carrier Removal and Installation in Section 9E Page 9E 4 2 Remove the seat Refer to Seat Removal and Installation Page 9D 11 3 Remove the air cleaner box cover front box inner fenders and side covers Refer to Front Side Exterior Parts Removal and Installation Page 9D 6 4 Disconnect the po...

Page 563: ...Parts Removal and Installation B831G29406006 Engine Side Cover Removal Remove the engine side cover 1 Installation Install the engine side cover in the reverse order of removal Rear Box Removal Remove the rear box 1 Installation Install the rear box in the reverse order of removal 3 I831G1940018 01 4 3 3 4 I831G1940019 01 4 2 I831G1940020 01 1 I831G1940021 01 1 I831G1940022 01 ...

Page 564: ... fuel tank outer cover in the reverse order of removal Rear Fender Removal 1 Remove the rear carrier Refer to Rear Carrier Removal and Installation in Section 9E Page 9E 5 2 Remove the seat Refer to Seat Removal and Installation Page 9D 11 3 Remove the side covers left and right Refer to Front Side Exterior Parts Removal and Installation Page 9D 6 4 Remove the engine side cover Refer to Rear Side ...

Page 565: ...brake cable 5 from the cable guide 10 Remove the fuel tank cap 6 CAUTION To prevent the fuel tank from contamination with foreign particles install the fuel tank cap after removing the rear fender 11 Remove the rear fender 7 Installation Install the rear fender in the reverse order of removal Seat Removal and Installation B831G29406007 Removal Pull the seat lock lever 1 upward and remove the seat ...

Page 566: ...Remove the front under cover 1 by removing the bolts 2 and fasteners 3 Installation 1 Fix the front under cover B to the groove A of engine under cover 2 Install the front under cover 1 2 3 FWD FWD I831G1940034 02 1 Front under cover 2 Engine under cover 3 Rear under cover 3 1 2 I831G1940035 02 3 1 2 I831G1940036 01 A B I831G1940037 02 ...

Page 567: ...e front under cover 2 and rear under cover 3 2 Install the engine under cover Rear Under Cover Removal Remove the rear under cover 1 Installation Install the rear under cover in the reverse order of removal I831G1940038 01 1 I831G1940039 01 1 I831G1940040 01 2 1 I831G1940041 01 1 3 I831G1940042 01 I831G1940043 01 1 I831G1940044 01 ...

Page 568: ... Construction B831G29506001 Footrest Construction B831G29506002 2 1 FWD FWD I831G1950005 06 1 Frame 2 Battery plate 3 1 2 b 3 FWD FWD a I831G1950001 04 1 Footrest R 3 Footrest plate 55 N m 5 5 kgf m 40 0 lb ft 2 Footrest L 26 N m 2 6 kgf m 19 0 lb ft Apply thread lock to the thread part ...

Page 569: ... Installation Install the footrest in the reverse order of removal Pay attention to the following point Apply thread lock to the footrest mounting bolts and tighten them to the special torque Thread lock cement 99000 32110 THREAD LOCK CEMENT SUPER 1322 or equivalent Tightening torque Footrest mounting bolt M8 a 26 N m 2 6 kgf m 19 0 lb ft Footrest mounting bolt M10 b 55 N m 5 5 kgf m 40 0 lb ft 1 ...

Page 570: ...9E 3 Body Structure Carrier Construction B831G29506004 FWD FWD 1 2 I831G1950006 06 1 Front carrier 2 Rear carrier Apply thread lock to the thread part ...

Page 571: ...9D Page 9D 6 2 Remove the front carrier 1 by removing the bolts 2 Installation Install the front carrier in the reverse order of removal Pay attention to the following point Apply thread lock to the front carrier mounting bolts Thread lock cement 99000 32110 THREAD LOCK CEMENT SUPER 1322 or equivalent 2 I831G1950007 01 2 I831G1950008 02 2 1 I831G1950009 01 I831G1950010 01 I831G1950011 01 ...

Page 572: ...lts 2 and screw 3 Installation Install the rear carrier in the reverse order of removal Pay attention to the following point Apply thread lock to the rear carrier mounting bolts Thread lock cement 99000 32110 THREAD LOCK CEMENT SUPER 1322 or equivalent 2 2 I831G1950012 01 2 2 I831G1950013 01 3 1 I831G1950014 01 I831G1950015 01 ...

Page 573: ...emoval and Installation in Section 9D Page 9D 6 3 Remove the front grip bar 1 by removing the bolt 2 Installation Install the front grip bar in the reverse order of removal Pay attention to the following point Apply thread lock to the front grip bar mounting bolts Thread lock cement 99000 32110 THREAD LOCK CEMENT SUPER 1322 or equivalent FWD FWD 1 I831G1950016 01 1 Front grip bar Apply thread lock...

Page 574: ...owing with the trailer towing mounting bolts and then tighten them to the specified torque Tightening torque Trailer towing mounting bolt a 60 N m 6 0 kgf m 43 5 lb ft FWD FWD a b 1 3 2 FWD a I831G1950020 04 1 Trailer towing warning label P 17 28 60 N m 6 0 kgf m 43 5 lb ft 2 Trailer towing warning label a 5 mm 0 2 in 3 Trailer towing b 30 mm 1 2 in 1 I831G1950021 01 a I831G1950022 01 ...

Page 575: ...ecommended Service Material B831G29508001 NOTE Required service material is also described in the following Footrest Construction Page 9E 1 Carrier Construction Page 9E 3 Front Grip Bar Construction Page 9E 6 Fastening part Tightening torque Note N m kgf m lb ft Footrest mounting bolt M8 26 2 6 19 0 Page 9E 2 Footrest mounting bolt M10 55 5 5 40 0 Page 9E 2 Trailer towing mounting bolt 60 6 0 43 5...

Page 576: ... 4 43 0 30 4 3 NOTE Asterisk mark indicates the New K9 model specification The service data is the same as the K8 model LT A750XK9 09 MODEL 10 LT A750XK9 09 MODEL 10 1 ...

Page 577: ...IGH 2EVERSE RIVE SYSTEM 3HAFT DRIVE 33 3 RONT SUSPENSION NDEPENDENT DOUBLE WISHBONE COIL SPRING OIL DAMPED 2EAR SUSPENSION NDEPENDENT DOUBLE WISHBONE COIL SPRING OIL DAMPED RONT WHEEL TRAVEL MM IN 2EAR WHEEL TRAVEL MM IN ASTER 4RAIL MM IN 4OE OUT MM IN AMBER 3TEERING ANGEL RIGHT LEFT 4URNING RADIUS M FT RONT BRAKE ISC BRAKE TWIN 2EAR BRAKE 3EALED OIL BATHED MULTI DISC RONT TIRE 4 X TUBELESS 2EAR T...

Page 578: ...LT A750XPK9 09 MODEL 11 This chapter describes service data service specifications and servicing procedures which differ from those of the LT A750X ZK9 LT A750XPK9 09 MODEL ...

Page 579: ...e your customers of fast and reliable ser vice COPYRIGHT SUZUKI MOTOR CORPORATION 2009 Manual Name Manual No LT A750X ZK9 SERVICE MANUAL 99500 47021 03E This manual has been prepared on the basis of the latest specifications at the time of publication If modifi cations have been made since then differences may exist between the content of this manual and the actual vehicle Illustrations in this ma...

Page 580: ...2D Driveline Axle 3 i Precautions 3 Drive Chain Drive Train Drive Shaft 3A 1 Differential 3B Transfer 3C Propeller Shafts 3D Brake 4 i Precautions 4 Brake Control System and Diagnosis 4A 1 Front Brakes 4B Rear Brakes 4C Parking Brake 4D Transmission Transaxle 5 Precautions 5 Automatic Transmission 5A Steering 6 i Precautions 6 1 Steering General Diagnosis 6A 1 Steering Handlebar 6B 1 Power Assiste...

Page 581: ......
Page 582: ...ons 00 1 Warning Caution Note 00 General Precautions 00 Precautions for Electrical Circuit Service 00 Precautions for EPS LT A750XP ZK9 00 1 NOTE For the items with asterisk in the CONTENTS below refer to the same section of the service manual mentioned in the FOREWORD of this manual ...

Page 583: ...are not properly connected the EPS may not operate correctly For connector and coupler precautions Refer to Precautions for Electrical Circuit Service in related manual EPS Control Unit EPS Body Assembly Never allow dust or water to contact the EPS control unit and EPS body assembly Since each component is a high precision part great care should be taken not to apply any service impacts during rem...

Page 584: ...park Plug Inspection and Cleaning 0B Spark Arrester Cleaning 0B Fuel Line Inspection 0B Engine Oil and Filter Replacement 0B Front Differential Gear Oil Inspection 0B Front Differential Gear Oil Replacement 0B Final Gear Oil Inspection 0B Final Gear Oil Replacement 0B Throttle Cable Play Inspection and Adjustment 0B Throttle Body Inspection 0B Cooling System Inspection 0B Drive V belt Inspection a...

Page 585: ...ce between illustration and actual motorcycles may exist depending on the markets SUZUKI LT A750XP 2009 model Right Side Left Side Country and Area Codes LT A750XP ZK9 B931G40101014 The following codes stand for the applicable country ies and area s I931G3010001 01 I931G3010002 01 Code Country or Area Effective Frame No LT A750XPK9 P 17 Sweden 5SAAR41P97100001 LT A750XPK9 P 24 Australia LT A750XPK...

Page 586: ...abel English French For P 28 6 Tire air pressure label and warning no passenger label French For P 28 20 Compliance label English For P 28 7 General warning AGE 16 label English For P 17 24 28 33 21 I D plate English For P 17 8 General warning label French For P 28 22 Cooling fan label English For P 24 33 9 Warning no passenger label English For P 17 24 28 33 23 Cooling fan label English French Fo...

Page 587: ...Item Specification Remark Type 4 stroke liquid cooled DOHC Number of cylinders 1 Bore 104 0 mm 4 094 in Stroke 85 0 mm 3 346 in Displacement 722 cm3 44 1 cu in Compression ratio 10 0 1 Fuel system Fuel injection Air cleaner Paper element Starter system Electric starter Lubrication system Wet sump Idle speed 1 300 r 100 r min Item Specification Remark Clutch Wet shoe automatic centrifugal type Tran...

Page 588: ...7q B T D C at 1 300 r min Spark plug NGK CR6E or DENSO U20ESR N Battery 12 V 64 8 kC 18 Ah 10 HR Generator Three phase A C generator Main fuse 30 A Fuse 10 10 10 10 15 15 A EPS fuse 40 A Headlight 12 V 35 35 W x 2 Auxiliary light 12 V 35 35 W Brake light Taillight 12 V 21 5 W Reversing light 12 V 21 W P 17 Speedometer light LED Neutral indicator light LED High beam indicator light LED P 17 Coolant...

Page 589: ...ulti circuit tester set 09900 25009 Needle point probe set 09904 41010 SUZUKI Diagnostic system set 09924 84521 Bearing installer set 09930 30721 Rotor remover 09930 44530 Rotor holder 09930 82710 Mode select switch 09930 82720 Mode selection switch 09942 72410 Tie rod end remover 09942 83110 Clip remover 09944 36011 Steering wheel remover 99565 01010 020 CD ROM Ver 20 ...

Page 590: ...ethane from element 3 Fill a wash pan of a proper size with a non flammable cleaning solvent Immerse the air cleaner element in the cleaning solvent and wash it 4 Press the air cleaner element between the palms of both hands to remove the excess solvent do not twist or wring the element or it will tear 5 Immerse the element in motor oil and then squeeze out the excess oil leaving the element sligh...

Page 591: ...ng and tightening the lock nuts hold the tie rod end with a open end wrench NOTE Hold the concave part a of tie rod with a wrench 2 Temporarily tighten the four lock nuts 3 Check that the distances C and D are equal as shown If the distances are not equal adjust the tie rod to the right or left until the toe out is within specification Check the toe out again by measuring distances A and B 4 If th...

Page 592: ...t Upper 26 N m 2 6 kgf m 19 0 lbf ft 2 EPS body assembly mounting nut Lower 28 N m 2 8 kgf m 20 0 lbf ft 3 Steering shaft bolt 26 N m 2 6 kgf m 19 0 lbf ft a 1 I931G3020001 01 b 2 I931G3020002 01 a 3 I931G3020003 01 4 Steering shaft upper nut 120 N m 12 0 kgf m 87 0 lbf ft 5 Tie rod lock nut 29 N m 2 9 kgf m 21 0 lbf ft 6 Rear stabilizer joint nut 60 N m 6 0 kgf m 43 5 lbf ft 7 Rear brake pedal sc...

Page 593: ...ue is described in the following Chassis Bolt and Nut Inspection LT A750XP ZK9 Page 0B 3 Reference For the tightening torque of fastener not specified in this section refer to Tightening Torque List LT A750XP ZK9 in Section 0C Page 0C 7 Fastening part Tightening torque Note N m kgf m lbf ft Tie rod lock nut 29 2 9 21 0 Page 0B 2 ...

Page 594: ... 35 0 014 Valve stem runout IN EX 0 05 0 002 Valve head thickness IN EX 0 5 0 02 Valve seat width IN EX 0 9 1 1 0 035 0 043 Valve head radial runout IN EX 0 03 0 001 Valve spring free length IN EX 46 1 1 81 Valve spring tension IN EX 182 210 N 18 6 21 4 kgf 41 0 47 2 lbs at length 36 35 mm 1 43 in Item Standard Limit Cam height IN 36 330 36 380 1 4303 1 4323 36 030 1 4185 EX 35 300 35 350 1 3898 1...

Page 595: ...059 Piston ring groove width 1st 0 83 0 85 0 0327 0 0335 1 30 1 32 0 0512 0 0520 2nd 1 01 1 03 0 0398 0 0406 Oil 2 01 2 03 0 0791 0 0799 Piston ring thickness 1st 0 76 0 81 0 0299 0 0319 1 08 1 10 0 0425 0 0433 2nd 0 97 0 99 0 0382 0 0390 Piston pin bore I D 23 002 23 008 0 9056 0 9058 23 030 0 9067 Piston pin O D 22 992 23 000 0 9052 0 9055 22 980 0 9047 Item Standard Limit Conrod small end I D 2...

Page 596: ...ash 0 05 0 10 0 002 0 004 Rear drive final gear backlash Without gear cover specification 0 02 0 06 0 0008 0 0024 Gear cover assembled specification 0 08 0 15 0 0031 0 0059 Front differential gear oil type Hypoid gear oil SAE 90 API grade GL 5 Rear drive gear oil type Mobil 424 or equivalent gear oil Front differential gear oil capacity 500 ml 16 9 17 6 US lmp oz Final gear oil capacity 770 ml 26 ...

Page 597: ...P sensor output voltage Closed Approx 1 1 V Opened Approx 4 3 V ECT sensor input voltage 4 5 5 5 V ECT sensor output voltage 0 15 4 85 V ECT sensor resistance Approx 2 45 k at 20 qC 68 qF IAT sensor input voltage 4 5 5 5 V IAT sensor output voltage 0 15 4 85 V IAT sensor resistance Approx 1 60 k at 20 qC 68 qF TO sensor resistance 19 20 k TO sensor voltage Normal 0 4 1 4 V Leaning 3 7 4 4 V When l...

Page 598: ...ted voltage 13 5 15 5 V at 5 000 r min Starter motor brush length Standard 12 0 0 47 Limit 6 5 0 26 Starter torque limiter slip torque Standard 41 2 62 8 N m 4 2 6 4 kgf m 14 5 32 5 lbf ft Starter relay resistance 3 5 Battery Type designation YTX20CH BS Capacity 12 V 64 8 kC 18 Ah 10 HR Fuse size Headlight HI 10 A LO 10 A Power source 10 A Ignition 15 A Fuel 10 A Fan 15 A Main 30 A EPS 40 A Item S...

Page 599: ... riding Front 35 kPa 0 35 kgf cm2 5 1 psi Rear 30 kPa 0 30 kgf cm2 4 4 psi Tire size Front AT25 x 8 12 tubeless Rear AT25 x 10 12 tubeless Tire tread depth Front 4 0 0 16 Rear 4 0 0 16 Item Standard Limit Front shock absorber spring adjustor 2 5 position Rear shock absorber spring adjustor 2 5 position Item Specification Note Fuel type Use only unleaded gasoline of at least 87 pump octane R 2 M 2 ...

Page 600: ...e driven face ring nut 110 11 0 79 5 V belt outer cover bolt 8 0 8 6 0 V belt inner cover bolt 9 0 9 6 5 Generator rotor nut 160 16 0 115 5 Generator stator set bolt 11 1 1 8 0 Speed sensor bolt 10 1 0 7 0 Starter clutch bolt 26 2 6 19 0 Exhaust pipe nut 23 2 3 16 5 Muffler connecting bolt 23 2 3 16 5 Muffler mounting bolt 23 2 3 16 5 Engine oil drain plug 21 2 1 15 0 Engine coolant drain plug 13 ...

Page 601: ...shaft boot clamp screw 2 0 2 1 5 Final gear oil drain plug 23 2 3 16 5 Rear propeller shaft coupling nut 100 10 0 72 5 Front output shaft bolt 10 1 0 7 0 Rear output shaft nut 100 10 0 72 5 Rear output shaft drive bevel gear nut 100 10 0 72 5 Rear output shaft driven gear nut 100 10 0 72 5 Front propeller shaft boot clamp screw 1 3 0 13 1 0 Rear propeller shaft boot clamp screw 2 0 2 1 5 Item N m ...

Page 602: ...t Front and Rear 60 6 0 43 5 Front brake hose union bolt 23 2 3 16 5 Front brake air bleeder valve 6 0 6 4 5 Front brake pad mounting pin 17 1 7 12 5 Front brake caliper mounting bolt 26 2 6 19 0 Caliper holder pin 18 1 8 13 0 Caliper holder slide pin 23 2 3 16 5 Brake pipe flare nut 16 1 6 11 5 Front brake disc mounting bolt 23 2 3 16 5 Brake master cylinder mounting bolt 10 1 0 7 0 Footrest moun...

Page 603: ...rked bolt N m kgf m lbf ft N m kgf m lbf ft 4 1 5 0 15 1 0 2 3 0 23 1 5 5 3 0 3 2 0 4 5 0 45 3 0 6 5 5 0 55 4 0 10 1 0 7 0 8 13 1 3 9 5 23 2 3 16 5 10 29 2 9 21 0 50 5 0 36 0 12 45 4 5 32 5 85 8 5 61 5 14 65 6 5 47 0 135 13 5 97 5 16 105 10 5 76 0 210 21 0 152 0 18 160 16 0 115 5 240 24 0 173 5 3 2 1 a a a I649G1030001 04 1 Conventional bolt 2 4 marked bolt 3 7 marked bolt ...

Page 604: ...C C40 P05057 ISC Valve Circuit Malfunction 1A DTC C41 P230 H L FP Relay Circuit Malfunction 1A Specifications 1A Service Data 1A Special Tools and Equipment 1A Special Tool 1A Emission Control Devices 1B Precautions 1B Precautions for Emission Control Devices 1B Repair Instructions 1B Crankcase Breather PCV Hose Inspection 1B Crankcase Breather PCV Hose Removal and Installation 1B Engine Electrica...

Page 605: ... 1D Crankshaft Oil Seal Inspection 1D Bearing Inspection 1D Bearing Removal and Installation 1D Specifications 1D Service Data 1D Tightening Torque Specifications 1D Special Tools and Equipment 1D Recommended Service Material 1D Special Tool 1D Engine Lubrication System 1E Precautions 1E Precautions for Engine Oil 1E Schematic and Routing Diagram 1E Engine Lubrication System Chart Diagram 1E Diagn...

Page 606: ... Instructions 1H Spark Plug Cap and Spark Plug Removal and Installation 1H Spark Plug Inspection and Cleaning 1H Ignition Coil and Plug Cap Inspection 1H CKP Sensor Inspection 1H CKP Sensor Removal and Installation 1H Engine Stop Switch Inspection 1H Ignition Switch Inspection 1H Ignition Switch Removal and Installation 1H Override Switch Inspection 1H Specifications 1H Service Data 1H Tightening ...

Page 607: ...J Regulated Voltage Inspection 1J Generator Inspection 1J Generator Removal and Installation 1J Regulator Rectifier Inspection 1J Battery Components 1J Battery Charging 1J Battery Removal and Installation 1J Battery Visual Inspection 1J Generator Removal and Installation LT A750XP ZK9 1J 1 Battery Removal and Installation LT A750XP ZK9 1J 2 Specifications 1J 3 Service Data 1J Tightening Torque Spe...

Page 608: ... 7 a b c d FWD FWD I931G3190012 03 1 O ring 6 Starter motor case 5 N m 0 5 kgf m 3 5 lbf ft 2 Housing end Inside 7 Housing end Outside Apply grease to sliding surface 3 O ring 6 N m 0 6 kgf m 4 5 lbf ft Apply moly paste to sliding surface 4 Armature 11 N m 1 1 kgf m 8 0 lbf ft Do not reuse 5 Square ring 10 N m 1 0 kgf m 7 0 lbf ft ...

Page 609: ...tery lead wire 2 and starter motor lead wire mounting nut 3 to the specified torque Refer to Wiring Harness Routing Diagram LT A750XP ZK9 in Section 9A Page 9A 4 Tightening torque Starter motor mounting bolt a 10 N m 1 0 kgf m 7 0 lbf ft Starter motor lead wire mounting nut b 6 N m 0 6 kgf m 4 5 lbf ft Starter Motor Disassembly and Assembly LT A750XP ZK9 B931G41906024 Refer to Starter Motor Remova...

Page 610: ...othness in the brush holder If either carbon brush is defective replace the brush holder set with a new one Measure the length a of the carbon brushes using a vernier calipers If the measurement is less than the service limit replace the housing end assembly with a new one Brush length a Service limit 6 5 mm 0 26 in Special tool 09900 20102 Vernier calipers 200 mm Commutator Inspect the commutator...

Page 611: ...ontinuity between the segments and shaft replace the armature with a new one Special tool A 09900 25008 Multi circuit tester set Tester knob indication Continuity set Bearing Check the bearing of housing end for damage If any damage is found replace the housing end Oil Seal Check the seal lip for damage If any damage is found replace the housing end Inside A I931G3190009 02 I931G3190010 02 I931G31...

Page 612: ...LT A750XP ZK9 Page 1I 1 Special Tool B931G41908002 Item Specification Note Starter motor brush length Standard 12 0 0 47 Limit 6 5 0 26 Starter torque limiter slip torque Standard 41 2 62 8 N m 4 2 6 4 kgf m 14 5 32 5 lbf ft Starter relay resistance 3 5 Fastening part Tightening torque Note N m kgf m lbf ft Starter motor mounting bolt 10 1 0 7 0 Page 1I 2 Starter motor lead wire mounting nut 6 0 6...

Page 613: ...in related manual 7 Disconnect the gearshift lever arm 2 and speed sensor coupler 3 8 Remove the recoil cover 4 9 Disconnect the CKP sensor coupler 5 and generator coupler 6 and remove the clamp 7 10 Hold the left crankshaft spacer 8 with the special tool Special tool A 09930 44530 Rotor holder 11 Remove the left crankshaft spacer nut 9 and spacer 8 12 Remove the generator cover Refer to Generator...

Page 614: ... Disconnect the battery lead wire 3 NOTE Be sure to disconnect the battery lead wire 2 first then disconnect the battery lead wire 3 5 Remove the battery 4 Installation Install the battery in the reverse order of removal Pay attention to following point CAUTION Never use anything except the specified battery Tighten the battery mounting bolts securely NOTE Fit the EPS fuse bracket 2 to the mountin...

Page 615: ...d Equipment Recommended Service Material B931G41A08001 Special Tool B931G41A08002 Fastening part Tightening torque Note N m kgf m lbf ft Left crankshaft spacer nut 38 3 8 27 5 Page 1J 2 Material SUZUKI recommended product or Specification Note Grease SUZUKI SUPER GREASE A or equivalent P No 99000 25010 Page 1J 1 Thread lock cement THREAD LOCK CEMENT SUPER 1322 or equivalent P No 99000 32110 Page 1...

Page 616: ... Oil Level Inspection 3B Front Drive Differential Gear Oil Replacement 3B Front Drive Differential Assembly Removal and Installation 3B Front Drive Differential Assembly Disassembly and Assembly 3B Front Drive Differential Related Parts Inspection 3B Breather Rubber Case Inspection 3B Front Drive Differential Gear Shim Inspection and Selection 3B 2WD 4WD Diff lock System Inspection 3B Rear Drive B...

Page 617: ...nstallation 3D Front Output Shaft Disassembly and Assembly 3D Front Output Shaft Related Parts Inspection 3D Rear Output Shaft Components 3D Rear Output Shaft Removal and Installation 3D Rear Output Shaft Disassembly and Assembly 3D Rear Output Shaft Related Parts Inspection 3D Rear Output Shaft Drive Bevel Gear Shim Inspection and Adjustment 3D Front Propeller Shaft Components 3D Front Propeller ...

Page 618: ...ve Shaft Components LT A750XP ZK9 B931G43106009 FWD FWD 1 2 3 7 6 5 4 8 9 10 I931H1310012 03 1 Circlip 6 Inner boot band Small Apply grease 2 Snap ring 7 Drive shaft Apply water resistance grease 3 Stopper ring 8 Outer boot band Small Do not reuse 4 Inner boot band Large 9 Outer boot 5 Inner boot 10 Outer boot band Large ...

Page 619: ...Remove the boot band of the differential side joint 2 Slide the boot toward the center of the front drive shaft and remove the stopper ring from the outer race 3 Remove the outer race from the front drive shaft 4 Wipe off any grease and remove the snap ring Special tool A 09900 06107 Snap ring remover Open type 5 Remove the cage from the front drive shaft 6 Remove the boot band of the small diamet...

Page 620: ...with a new one 2 Install the cage 1 on the shaft CAUTION Install the cage with the large diameter side A facing the shaft end 3 Install the new snap ring to the cage CAUTION Replace the snap ring with a new one Special tool A 09900 06107 Snap ring remover Open type 4 Apply grease to the entire surface of the cage and the inside of the outer race NOTE The tube of joint grease is included in the whe...

Page 621: ...e removed circlip must be replaced with a new one 9 Inspect the axle play by using a push and pull motion given to the axle shaft and wheel spindle Front Drive Shaft Inspection LT A750XP ZK9 B931G43106011 Inspect the front drive shaft in the following procedures 1 Remove the front drive shaft assembly Refer to Front Drive Shaft Assembly Removal and Installation in related manual 2 Check the drive ...

Page 622: ...r boot bond Rear Drive Shaft Inspection LT A750XP ZK9 B931G43106014 Refer to Rear Drive Shaft Assembly Removal and Installation in related manual Rear drive shaft inspection as the same manner of front drive shaft FWD FWD 1 4 5 6 8 9 2 7 3 10 I931H1310013 04 1 Circlip 6 Inner boot band Small Apply grease 2 Snap ring 7 Drive shaft Apply water resistance grease 3 Stopper ring 8 Outer boot band Small...

Page 623: ...vice Material B931G43108001 NOTE Required service material is also described in the following Front Drive Shaft Components LT A750XP ZK9 Page 3A 1 Rear Drive Shaft Components LT A750XP ZK9 Page 3A 5 Special Tool B931G43108002 09900 06107 Snap ring remover Open type Page 3A 2 Page 3A 3 ...

Page 624: ... ZK9 4A 2 Rear Brake Pedal Construction LT A750XP ZK9 4A 3 Rear Brake Pedal Removal and Installation LT A750XP ZK9 4A 3 Specifications 4A 5 Service Data 4A Tightening Torque Specifications 4A 5 Special Tools and Equipment 4A 5 Special Tool 4A Recommended Service Material 4A 5 Front Brakes 4B Precautions 4B Precautions for Front Brakes 4B Repair Instructions 4B Front Brake Components 4B Front Brake...

Page 625: ...king Rear Brake Cable Removal and Installation 4D Parking Rear Brake Lever Components 4D Parking Rear Brake Lever Removal and Installation 4D Parking Rear Brake Light Switch Inspection 4D Parking Rear Brake Relay Inspection 4D Specifications 4D Tightening Torque Specifications 4D Special Tools and Equipment 4D Recommended Service Material 4D ...

Page 626: ...se No 2 B After the brake hose union has contacted the reservoir bottom 5 Front brake caliper C Pass the brake hose behind the throttle cable 6 Frame D Fix the brake hose to the it guide firmly 7 Steering shaft E Pass the brake hose No 2 between the radiator lower hose and frame 8 Union bolt F Pass the brake hose inside of the suspension arm 9 Stopper After the brake hose union has contacted the s...

Page 627: ...diagram Refer to Front Brake Hose Routing Diagram LT A750XP ZK9 Page 4A 1 Installation CAUTION The seal washers should be replaced with the new ones to prevent fluid leakage 1 Install the front brake hose as shown in the front brake hose routing diagram Refer to Front Brake Hose Routing Diagram in related manual 2 Tighten the brake flare nut 1 to the specified torque Tightening torque Brake pipe f...

Page 628: ...ection 9D in related manual 3 Remove the rear brake light switch spring 1 4 Disconnect the rear brake cable 2 Refer to Rear Brake Cable Removal and Installation in related manual a A b c B 3 a 5 4 2 4 1 B A b 6 I931G3410002 01 1 Rear brake pedal 6 Rear brake pedal screw B Anchoring point Pedal side 2 Rear brake light switch a 12 5 22 5 mm 0 49 0 89 in 60 N m 6 0 kgf m 43 5 lbf ft 3 Washer b 83 2 m...

Page 629: ...s 7 Installation Install the rear brake pedal in the reverse order of removal Pay attention to the following points Apply grease to the lip of dust seals and washers CAUTION Never reuse the removed dust seals with new ones Grease 99000 25160 Water resistance grease or equivalent Apply grease to the rear brake pedal shaft 1 Grease 99000 25160 Water resistance grease or equivalent 4 3 5 I931G3410010...

Page 630: ...Brake Hose Routing Diagram LT A750XP ZK9 Page 4A 1 Rear Brake Pedal Construction LT A750XP ZK9 Page 4A 3 Reference For the tightening torque of fastener not specified in this section refer to Tightening Torque List LT A750XP ZK9 in Section 0C Page 0C 7 Special Tools and Equipment Recommended Service Material B931G44108003 NOTE Required service material is also described in the following Rear Brake...

Page 631: ...4A 6 Brake Control System and Diagnosis ...

Page 632: ... 1 Precautions in Diagnosing Troubles LT A750XP ZK9 6C 1 General Description 6C 2 P S System Description LT A750XP ZK9 6C 2 EPS Diagnosis General Description LT A750XP ZK9 6C 5 Self Diagnostic System Description LT A750XP ZK9 6C 5 Fail safe Function Description LT A750XP ZK9 6C 5 Schematic and Routing Diagram 6C 6 EPS Wiring Diagram LT A750XP ZK9 6C 6 EPS Control Unit Diagram LT A750XP ZK9 6C 7 EP...

Page 633: ...Control Unit Construction LT A750XP ZK9 6C 48 EPS Control Unit Removal and Installation LT A750XP ZK9 6C 48 EPS Body Assembly Components LT A750XP ZK9 6C 50 EPS Body Assembly Removal and Installation LT A750XP ZK9 6C 50 EPS Motor Inspection LT A750XP ZK9 6C 53 Specifications 6C 54 Tightening Torque Specifications 6C 54 Special Tools and Equipment 6C 54 Recommended Service Material 6C 54 Special To...

Page 634: ... 6 1 Steering Precautions Precautions Precautions for Steering LT A750XP ZK9 B931G46000002 Refer to General Precautions in Section 00 in related manual and Precautions for EPS LT A750XP ZK9 in Section 00 Page 00 1 ...

Page 635: ...Insufficiently lubricated Lubricate Not enough pressure in tires Adjust Worn or incorrect tire or wrong tire pressure Adjust or replace Malfunctioning EPS if equipped Inspect EPS system Wobbly Handlebars Distorted front steering shaft Replace Crooked tire Replace Worn or incorrect tire or wrong tire pressure Adjust or replace Worn bearing race in steering stem Replace Worn steering shaft holder bu...

Page 636: ...andlebar left switch assembly 2 Handlebar upper clamp 11 Steering arm plate 20 Handle grip 3 Handlebar holder 12 Cotter pin A Apply grip bond 4 Steering shaft plate 13 Tie rod 4 N m 0 4 kgf m 3 0 lbf ft 5 EPS body assembly 14 Tie rod end Apply thread lock to the thread part 6 Steering shaft 15 Cable guide Apply water resistance grease 7 Steering shaft bushing 16 Throttle cable Do not reuse 8 Dust ...

Page 637: ...N m 6 0 kgf m 43 5 lbf ft 2 Tie rod end nut 29 N m 2 9 kgf m 21 0 lbf ft 3 Steering shaft lower nut 162 N m 16 2 kgf m 117 0 lbf ft 4 Tie rod nut 120 N m 12 0 kgf m 87 0 lbf ft 5 Washer The conical side of washer faces outside 28 N m 2 8 kgf m 20 0 lbf ft 6 Steering shaft upper nut Apply thread lock to the thread part B Red mark Apply water resistance grease 26 N m 2 6 kgf m 19 0 lbf ft ...

Page 638: ...t the brake hose from the hose guide 5 Remove the following parts from the handlebars right side a Right grip 1 b Front brake master cylinder Front brake lever 2 CAUTION Do not turn the front brake master cylinder upside down c Throttle lever case 3 6 Remove the following parts from left handlebars left side a Left grip 4 b Left switch box 5 c Horn button For P 17 24 d Emergency switch For P 17 7 ...

Page 639: ...rque Rear brake lever holder clamp bolt a 11 N m 1 1 kgf m 8 0 lbf ft Install the washers 3 and bolts 4 as shown in the steering handlebars construction Refer to Steering Handlebars Assembly Construction LT A750XP ZK9 Page 6B 2 Set the handlebars so that its punch mark B aligns with the mating surface of the left handlebar holder Tighten the handlebar clamp bolts 4 to the specified torque NOTE Fir...

Page 640: ...t Brake Master Cylinder Assembly Removal and Installation in Section 4A in related manual Align the punch mark E on the handlebars with the mating surface F of the throttle lever case Tighten the throttle lever case bolts 7 to the specified torque Tightening torque Throttle lever case bolt c 4 N m 0 4 kgf m 3 0 lbf ft Handlebars Inspection LT A750XP ZK9 B931G46206011 Refer to Handlebars Inspection...

Page 641: ...WARNING When using the tie rod end remover keep clear of the tie rod end because it may come loose with some force and could strike you CAUTION Make sure that the vehicle is supported securely Special tool A 09942 72410 Tie rod end remover 4 Remove the cotter pin 1 nut 2 and washer 3 5 Remove the steering arm plate 4 and steering shaft 5 6 Remove the lower dust seal 6 and O ring 7 7 Remove the ste...

Page 642: ...ase 99000 25160 Water resistance grease or equivalent Apply grease to the steering shaft Grease 99000 25160 Water resistance grease or equivalent Install the steering shaft When installing the steering arm plate 5 align the wide spline A of steering shaft 6 with the wide spline B of steering arm plate 5 Apply a small quality thread lock to the thread part of steering shaft Thread lock cement 99000...

Page 643: ...heel Removal and Installation in Section 2D in related manual After installing these parts adjust the toe Refer to Toe Adjustment LT A750XP ZK9 in Section 0B Page 0B 2 Tie rod Tie rod End Removal and Installation LT A750XP ZK9 B931G46206013 WARNING When using the tie rod end remover keep clear of the tie rod end because it may come loose with some force and could strike you Removal 1 Remove the ti...

Page 644: ...ue Tightening torque Tie rod end nut b 29 N m 2 9 kgf m 21 0 lbf ft Install the cotter pins 4 CAUTION The removed cotter pins 4 must be replaced with new ones Install the tie rod ends steering knuckle side Refer to Front Wheel Hub Steering Knuckle Removal and Installation in Section 2B in related manual After installed wheels inspect the toe out If the toe out is out of specification bring it into...

Page 645: ...or bend If any defects are found replace the steering shaft with a new one Steering Shaft Bushing and Dust Seal Inspect the steering shaft bushing 1 dust seal 2 and lower dust seal 3 for wear or damage If any defects are found replace them with new ones Specifications Service Data LT A750XP ZK9 B931G46207002 Wheel I931G3620025 01 I931H1620034 01 3 2 1 I931H1620035 01 Item Standard Limit Steering a...

Page 646: ...ion LT A750XP ZK9 Page 6B 2 Special Tool B931G46208002 Fastening part Tightening torque Note N m kgf m lbf ft Rear brake lever holder clamp bolt 11 1 1 8 0 Page 6B 4 Handlebar clamp bolt 26 2 6 19 0 Page 6B 4 Throttle lever case bolt 4 0 4 3 0 Page 6B 5 Steering shaft lower nut 162 16 2 117 0 Page 6B 7 Tie rod lock nut 29 2 9 21 0 Page 6B 9 Tie rod end nut 29 2 9 21 0 Page 6B 9 Material SUZUKI rec...

Page 647: ...se a replacement part of lesser quality or substitute design Torque values must be used as specified during reassembly to assure proper retention of these parts Precautions in Diagnosing Troubles LT A750XP ZK9 B931G46300003 Take a note of DTC indicated on the SDS tool or EPS indicator light Before inspection be sure to read Precautions for Electrical Circuit Service in Section 00 in related manual...

Page 648: ... the vehicle speed signal from speed sensor 9 The EPS control unit runs the motor so as to assist the operation of the handlebars 1 Take a note of DTC indicated on the EPS indicator light The EPS diagnoses troubles which may occur in the area including the following components when the ignition switch is ON and the engine is running When the EPS control unit detects any malfunction it stops the mo...

Page 649: ... wheel each torque sensor main and sub output is 2 5 V and in this state the EPS control unit determines the steering torque as 0 During operating the handlebars the EPS control unit processes the main torque sensor input signal to determine the steering torque required for the current condition The relation between the steering direction of the EPS control unit and the output voltage is as follow...

Page 650: ... the speed sensor This is the fundamental control necessary for the P S system Convergence control This control prevents convergence from deteriorating at a high speed by making current compensating current flow in the direction to keep the steering from turning thereby improving vehicle maneuvering stability Maximum current control If the steering input is sustained at a standstill the motor cont...

Page 651: ...ss of the condition of the P S control system This is only to check if the EPS warning light is operated properly If the areas monitored by the EPS control unit is free from any trouble after the engine start while engine is running the EPS warning light turns OFF When the EPS control unit detects a trouble which has occurred in the monitored areas the EPS warning light comes ON while the engine i...

Page 652: ...RCE 10 A 10 A 10 A 15 A 15 A 10 A STARTER MOTOR STARTER RELAY 1 MAIN 30 A BATTERY SPEEDOMETER ECM EPS UNIT EPS MOTOR TORQUE SENSOR O O O Y O Y O R R R O Y O O O Bl B Bl B Bl B Y Y Gr R Gr R W R W R W R W R Gr R Gr R B W B W Bl B Bl B Bl B Gr R W R W R Gr R B W B W B W B W B W B W B W Bl B Bl B Bl B Y Y Gr R Gr R Gr R W R W R W R R B R B R B B W B W O Y O Y O Y B W B W B W R R R R W W W W R B R B R...

Page 653: ...rcuit EPS countrol unit SDS Mode selsct switch Torque sensor 4 5 1 31 6 3 7 9 10 8 2 12 11 14 13 Y W Bl B R G W B O Y R B B R B W Gr R W R I931G3630071 01 10 9 8 7 1 2 3 4 5 6 11 12 13 14 I931H1630092 01 1 Engine speed signal 8 Power source 2 Ignition signal for EPS control unit 9 Motor output 3 Mode select switch 10 Motor output 4 EPS warning light 11 Torque sensor signal Main 5 Vehicle speed sig...

Page 654: ...ram LT A750XP ZK9 B931G46302003 Refer to Wiring Harness Routing Diagram LT A750XP ZK9 in Section 9A Page 9A 4 Component Location EPS Components Location LT A750XP ZK9 B931G46303001 1 2 3 4 I931G3630002 02 1 EPS control unit 3 Fuse EPS 2 EPS body assembly 4 Mode select coupler ...

Page 655: ...efer to EPS System Check LT A750XP ZK9 Page 6C 12 4 Output the DTCs stored in the EPS control unit Refer to DTC Diagnostic Trouble Code Output LT A750XP ZK9 Page 6C 19 5 Perform appropriate troubleshooting procedures according to the DTCs output Refer to DTC Table LT A750XP ZK9 Page 6C 25 If troubleshooting procedures cannot be performed try to determine the cause of the malfunction according to t...

Page 656: ...steering system should be inspected prior to performing any electrical checks These inspections may find problems that the EPS could not detect thus shortening repair time Tire Tire type Tire type Front DUNLOP KT411 Rear DUNLOP KT415 Tire pressure Refer to Tire Inspection in Section 0B in related manual CAUTION The standard tire fitted on this vehicle is AT25 x 8 12 for front and AT25 x 10 12 for ...

Page 657: ... circuit tester set Tester knob indication Voltage Battery voltage 12 0 V and more 4 Reinstall the seat EPS control unit ground wire inspection 1 Turn the ignition switch OFF 2 Remove the seat Refer to Seat Removal and Installation in Section 9D in related manual 3 Disconnect the battery lead wire 4 Remove the front fender Refer to Front Side Exterior Parts Removal and Installation in Section 9D i...

Page 658: ...warning lamp when turning the ignition switch ON 2 If OK start engine run it idle and check EPS warning lamp remains ON continuously Is EPS warning lamp remains ON continuously Go to Step 3 Go to Step 4 DTC output Refer to DTC Diagnostic Trouble Code Output LT A750XP ZK9 Page 6C 19 3 The EPS indicator light lights up 1 Start the engine Does the EPS indicator light go off Normal No DTC exists DTC o...

Page 659: ...isconnected measure the voltage between terminal A and terminal B at the coupler Special tool A 09900 25008 Multi circuit tester set Tester knob indication Voltage Normal value A B Battery voltage 12 0 V and more EPS control unit coupler Vehicle harness end Is the voltage between A and B normal Go to Step 5 Inspect the wire harness Faulty ignition or ground wire Step Action Yes No 1 2 I931G3630008...

Page 660: ... the voltage between A and B normal Go to Step 6 Inspect the wire harness Faulty indicator light wire Indicator light is blown 6 1 Turn the ignition switch OFF 2 Check for continuity between terminal A at the coupler and body ground Special tool A 09900 25008 Multi circuit tester set Tester knob indication Continuity EPS control unit coupler Vehicle harness end Are there continuity between A and b...

Page 661: ...emoval and Installation in Section 9D in related manual 2 Open the fuse box and inspect the ignition fuse 1 CAUTION If a fuse is blown find the cause of the problem and correct it before replacing the fuse EPS fuse 40 A Is the ignition fuse OK Go to Step 8 Replace the EPS fuse Step Action Yes No 1 I931H1630016 01 ...

Page 662: ...he voltage between terminal A and terminal B at the coupler Special tool A 09900 25008 Multi circuit tester set Tester knob indication Voltage Normal value A B Battery voltage 12 0 V and more EPS control unit coupler Vehicle harness end Is the voltage between A and B normal Go to Step 9 Inspect the wire harness Faulty ignition or ground wire Step Action Yes No 1 2 I931G3630008 01 A A ޓ B A I931G36...

Page 663: ...rminal A and terminal B at the coupler Special tool A 09900 25008 Multi circuit tester set Tester knob indication Voltage Normal value A B 1 0 V and more EPS control unit coupler Vehicle harness end Is the voltage between A and B normal Go to Step 10 Inspect the wire harness Faulty indicator light wire Step Action Yes No A A ޓ B A I931G3630012 01 ...

Page 664: ...Check for continuity between terminal A and terminal B at the coupler Special tool A 09900 25008 Multi circuit tester set Tester knob indication Continuity EPS control unit coupler Vehicle harness end Is there continuity between A and B Replace the EPS control unit Inspect the wire harness Faulty mode select switch wire Step Action Yes No A A I931G3630013 01 A A ޓ B A I931G3630014 01 ...

Page 665: ...OFF 2 Remove the seat Refer to Seat Removal and Installation in Section 9D in related manual 3 Connect the special tool to the mode select coupler 1 Special tool A 09930 82710 Mode select switch 4 Switch the special tool to ON 5 Turn the ignition switch ON The EPS indicator light starts flashing to indicate the DTC Refer to DTC Table LT A750XP ZK9 Page 6C 25 NOTE If there is a DTC the EPS indicato...

Page 666: ...gine or main fuse before confirming the malfunction code self diagnostic trouble code stored in memory Such disconnection may erase the memorized information in EPS control unit memory DTC stored in EPS control unit memory can be checked by the SDS 1 Remove the seat Refer to Seat Removal and Installation in Section 9D in related manual 2 Set up the SDS tool Refer to the SDS operation manual for fu...

Page 667: ...manual for further details When DTC is checked DTC C1122 is displayed with ignition switch turned ON However if the engine is started and the display disappears it is not a trouble 4 Close the SDS tool and turn the ignition switch OFF DTC Diagnostic Trouble Code Deleting LT A750XP ZK9 B931G46304005 Use of Mode Select Switch 1 Remove the seat Refer to Seat Removal and Installation in Section 9D in ...

Page 668: ...EPS activates correctly 7 Disconnect the mode select switch and reinstall the seat Use of SDS 1 Remove the seat Refer to Seat Removal and Installation in Section 9D in related manual 2 After repairing the trouble turn OFF the ignition switch 3 Set up the SDS tool Refer to the SDS operation manual for further details Special tool 09904 41010 SUZUKI Diagnostic system set 99565 01010 020 CD ROM Ver 2...

Page 669: ...PS control unit also when the wire coupler of any sensor is disconnected Therefore when a wire coupler has been disconnected at the time of diagnosis erase the stored malfunction history code using SDS 9 Follow the displayed instructions 10 Check that both Current DTC 4 and Past DTC 5 are deleted NIL 11 Close the SDS tool and turn the ignition switch OFF 12 Disconnect the SDS tool and install the ...

Page 670: ...re taking the sample of data check and clear the Past DTC Refer to DTC Diagnostic Trouble Code Deleting LT A750XP ZK9 Page 6C 21 A number of different data under a fixed condition as shown should be saved or filed as sample Special tool 09904 41010 SUZUKI Diagnostic system set 99565 01010 020 CD ROM Ver 20 DATA sampled from EPS system Handlebars is Handlebars is center position center position Che...

Page 671: ...21 Vehicle speed signal not input OFF Refer to DTC C1121 Vehicle Speed Signal Circuit Malfunction LT A750XP ZK9 Page 6C 38 C1122 Engine speed signal circuit failure 1 ON Refer to DTC C1122 Engine Speed Signal Circuit Malfunction LT A750XP ZK9 Page 6C 41 C1141 EPS motor circuit voltage abnormal ON Refer to DTC C1141 C1142 C1143 C1145 EPS Motor Circuit Malfunction LT A750XP ZK9 Page 6C 44 C1142 EPS ...

Page 672: ...accident and damage NOTE After repairing the trouble clear the DTC using a SDS tool or mode coupler switch Refer to DTC Diagnostic Trouble Code Deleting LT A750XP ZK9 Page 6C 21 DTC C1111 and C1113 are indicated at the same time due to the malfunction of the same torque sensor circuit Possible Cause Faulty torque sensor signal circuit Faulty torque sensor Faulty EPS control unit ...

Page 673: ...and ground If OK then measure the voltage at the R wire A and B wire B Special tool A 09900 25008 Multi circuit tester set Tester knob indication Voltage Torque sensor input voltage 5 0 V Is voltage OK Go to Step 2 Loose or poor contacts on the torque sensor Power supply circuit R wire or ground circuit B wire open If check result is not satisfactory replace the EPS control unit with a new one Ref...

Page 674: ...b indication Voltage Torque sensor main voltage Handlebars is left turn Approx 3 0 V Handlebars is right turn Approx 2 0 V Is voltage OK Replace the EPS control unit with a known good one and inspect it again Refer to EPS Control Unit Removal and Installation LT A750XP ZK9 Page 6C 48 R wire terminal or G wire terminal circuit open torque sensor side If check result is not satisfactory replace the ...

Page 675: ...prevent accident and damage NOTE After repairing the trouble clear the DTC using a SDS tool or mode coupler switch Refer to DTC Diagnostic Trouble Code Deleting LT A750XP ZK9 Page 6C 21 DTC C1113 and C1115 are indicated at the same time due to the malfunction of the same torque sensor circuit Possible Cause Faulty torque sensor signal circuit Faulty torque sensor Faulty EPS control unit ...

Page 676: ... at the R wire A and B wire B Special tool A 09900 25008 Multi circuit tester set Tester knob indication Voltage Torque sensor input voltage 5 0 V Go to Step 2 Loose or poor contacts on the torque sensor Power supply circuit R wire open Power source or power supply circuit shorted to torque sensor main or sub circuit Torque sensor main or sub circuit open If check result is not satisfactory replac...

Page 677: ...nob indication Voltage Measuring voltage 0 V Is voltage OK Go to Step 2 Loose or poor contacts on the torque sensor Power supply circuit R wire open Power source or power supply circuit shorted to torque sensor main or sub circuit Torque sensor main or sub circuit open If check result is not satisfactory replace the EPS control unit with a new one Refer to EPS Control Unit Removal and Installation...

Page 678: ...bars left turn Main Approx 3 0 V Handlebars left turn Sub Approx 2 0 V Handlebars right turn Main Approx 2 0 V Handlebars right turn Sub Approx 3 0 V Is voltage OK G W and B wire open or shorted to ground or poor torque sensor coupler connection If wire and connection are OK intermittent trouble or faulty EPS control unit Replace the EPS control unit with a known good one and inspect it again Refe...

Page 679: ...hooting CAUTION Never remove the torque sensor to prevent accident and damage NOTE After repairing the trouble clear the DTC using a SDS tool or mode coupler switch Refer to DTC Diagnostic Trouble Code Deleting LT A750XP ZK9 Page 6C 21 Possible Cause Faulty torque sensor signal circuit Faulty torque sensor Faulty EPS control unit ...

Page 680: ...cial tool A 09900 25008 Multi circuit tester set Tester knob indication Voltage Torque sensor input voltage 5 0 V Is voltage OK If wire and connection are OK intermittent trouble or faulty EPS body assembly Replace the EPS body assembly with a known good one and inspect it again Refer to EPS Body Assembly Removal and Installation LT A750XP ZK9 Page 6C 50 Power supply circuit R wire shorted to grou...

Page 681: ...ing CAUTION Never remove the torque sensor to prevent accident and damage NOTE After repairing the trouble clear the DTC using a SDS tool or mode coupler switch Refer to DTC Diagnostic Trouble Code Deleting LT A750XP ZK9 Page 6C 21 Possible Cause Faulty torque sensor signal circuit Faulty torque sensor Faulty EPS control unit ...

Page 682: ...asure the input voltage between R wire A and B wire B Special tool A 09900 25008 Multi circuit tester set B 09900 25009 Needle point probe set Tester knob indication Voltage Torque sensor input voltage 5 0 V Is voltage OK Go to step 2 Loose or poor contacts on the torque sensor Power supply circuit R wire or ground circuit B wire open If check result is not satisfactory replace the EPS control uni...

Page 683: ...dication Voltage Torque sensor Sub voltage Handlebars is left turn Approx 2 0 V Handlebars is right turn Approx 3 0 V Is voltage OK Replace the EPS control unit with a known good one and inspect it again Refer to EPS Control Unit Removal and Installation LT A750XP ZK9 Page 6C 48 R wire terminal or W wire terminal circuit open torque sensor side If check result is not satisfactory replace the torqu...

Page 684: ... coupler switch Refer to DTC Diagnostic Trouble Code Deleting LT A750XP ZK9 Page 6C 21 Possible Cause Faulty vehicle speed signal circuit Faulty speed sensor Faulty EPS control unit Step Action Yes No 1 1 Turn the ignition switch OFF 2 Check the EPS control unit connector for loose or poor contact If OK then check the vehicle speed signal lead wire continuity Go to step 2 Bl B wire open I931G36300...

Page 685: ...ection 9C in related manual 4 Check the continuity between the Bl B wire of EPS control unit coupler B and Bl B wire of speed sensor C Also check the continuity between the Bl B wire of EPS control unit coupler B and Bl B wire of combination meter A Special tool A 09900 25008 Multi circuit tester set B 09900 25009 Needle point probe set Tester knob indication Continuity Is continuity OK Go to step...

Page 686: ...tep 3 Bl B wire shorted to ground 3 1 Remove the engine side cover Refer to Rear Side Exterior Parts Removal and Installation in Section 9D in related manual 2 Inspect the speed sensor Refer to Speed Sensor Inspection in Section 9C in related manual Is speed sensor OK Replace the EPS control unit Refer to EPS Control Unit Removal and Installation LT A750XP ZK9 Page 6C 48 Replace the speed sensor R...

Page 687: ... Diagnosing Troubles LT A750XP ZK9 Page 6C 1 Possible Cause Faulty engine speed signal circuit Faulty ECM Faulty EPS control unit Step Action Yes No 1 1 Setup the SDS tool Refer to the SDS operation manual for further details or connect the mode select switch 2 Click Engine and check the DTC code Is not DTC C12 P0335 displayed Go to step 2 Inspect the CKP sensor Refer to DTC C12 P0335 CKP Sensor C...

Page 688: ...signal lead wire continuity 3 Disconnect the EPS control unit coupler and ECM coupler 4 Check the continuity between the W wire A and terminal 31 Special tool A 09900 25008 Multi circuit tester set B 09900 25009 Needle point probe set Tester knob indication Continuity Is continuity OK Go to step 3 W wire open Step Action Yes No I931G3630031 01 B A 31 B I931H1630052 02 ...

Page 689: ... tester set Tester knob indication Voltage Engine speed signal voltage It changes between 0 12 V Is voltage OK Replace the EPS control unit with a new one Refer to EPS Control Unit Removal and Installation LT A750XP ZK9 Page 6C 48 Replace the ECM with a new one Refer to EPS Control Unit Removal and Installation LT A750XP ZK9 Page 6C 48 Step Action Yes No A A I931G3630035 01 ...

Page 690: ...ler for loose or poor contact If OK measure the EPS motor voltage 3 Insert the needle point probes to lead wire coupler 4 Start the engine and turn the handlebars left turn 5 Measure the voltage between R wire A and B wire B Special tool A 09900 25008 Multi circuit tester set B 09900 25009 Needle point probe set Tester knob indication Voltage EPS motor voltage Approx 7 0 V Is voltage OK Go to step...

Page 691: ...Inspection LT A750XP ZK9 Page 6C 53 Is continuity OK Replace the EPS control unit with a known good one and inspect it again Refer to EPS Control Unit Removal and Installation LT A750XP ZK9 Page 6C 48 Replace the EPS motor EPS body assembly with a new one Refer to EPS Body Assembly Removal and Installation LT A750XP ZK9 Page 6C 50 Step Action Yes No I931G3630038 01 ...

Page 692: ...ti circuit tester Special tool A 09900 25008 Multi circuit tester set Tester knob indication Voltage Battery voltage 12 0 V and more Is the voltage over 12 V Go to Step 2 Charge or replace the battery 2 1 Start the engine at 5 000 r min with the dimmer switch set to HI 2 Measure the voltage between the and battery terminals Special tool 09900 25008 Multi circuit tester set Tester knob indication V...

Page 693: ... control unit coupler 3 Start the engine at 5 000 r min with the dimmer switch set to HI 4 Measure the voltage between terminal A and terminal B at the coupler Special tool A 09900 25008 Multi circuit tester set Tester knob indication Voltage Is the voltage same as Step 2 Replace the EPS control unit Inspect the wire harness Faulty ignition or ground wire Step Action Yes No A B A A ޓ I931G3630040 ...

Page 694: ...tallation LT A750XP ZK9 in Section 1J Page 1J 2 2 Remove the front fender Refer to Front Side Exterior Parts Removal and Installation in Section 9D in related manual 3 Disconnect the EPS control unit couplers 1 2 3 3 B 4 A a FWD FWD I931H1630056 02 1 EPS control unit 4 Torque sensor coupler 2 EPS control unit plate 12 N m 1 2 kgf m 8 5 lbf ft 3 Cushion B Install the clip of the torque sensor coupl...

Page 695: ...PS control unit 6 from the EPS control unit plate 7 as shown in the EPS control unit construction Refer to EPS Control Unit Construction LT A750XP ZK9 Page 6C 48 Installation Install the EPS control unit in the reverse order of removal Pay attention to the following points Tighten the EPS control unit mounting nut 1 to the specified torque Tightening torque EPS control unit mounting nut a 12 N m 1...

Page 696: ...2 Removal 1 Remove the handlebars Refer to Handlebars Removal and Installation LT A750XP ZK9 in Section 6B Page 6B 3 2 Remove the combination meter Refer to Combination Meter Removal and Installation in Section 9C in related manual 3 Remove the front fender Refer to Front Side Exterior Parts Removal and Installation in Section 9D in related manual 4 Remove the auxiliary headlight 1 Refer to Auxili...

Page 697: ...tion Refer to Steering Handlebars Assembly Construction LT A750XP ZK9 in Section 6B Page 6B 2 Install the EPS body assembly in the reverse order of removal Pay attention to the following points Apply grease to the spline of the EPS body assembly Grease 99000 25160 Water resistance grease or equivalent When installing the EPS body assembly align the marking A of the EPS output shaft and slide B of ...

Page 698: ...equivalent Tightening torque Steering shaft bolt c 26 N m 2 6 kgf m 19 0 lbf ft Install the front brake hose union 5 and throttle cable 6 to the cable guide Apply grease to the spline of the EPS body assembly Grease 99000 25160 Water resistance grease or equivalent Install the steering shaft plate 7 and tighten the steering shaft upper nut to the specified torque CAUTION Never use an impact wrench...

Page 699: ...n LT A750XP ZK9 B931G46306005 1 Disconnect the EPS motor coupler 2 First check for insulation with the tester between terminals A and B If continuity does not exist replace the EPS body assembly with a new one Special tool A 09900 25008 Multi circuit tester set Tester knob indication Continuity 3 Next check for insulation with the tester between terminal A and body ground C and terminal B and body...

Page 700: ...vice Material B931G46308001 Fastening part Tightening torque Note N m kgf m lbf ft EPS control unit mounting nut 12 1 2 8 5 Page 6C 49 EPS body assembly mounting bolt 26 2 6 19 0 Page 6C 52 EPS body assembly mounting nut 28 2 8 20 0 Page 6C 52 Steering shaft bolt 26 2 6 19 0 Page 6C 52 Steering shaft upper nut 120 12 0 87 0 Page 6C 52 Handlebar holder nut 60 6 0 43 5 Page 6C 53 Material SUZUKI rec...

Page 701: ...C 37 Page 6C 39 Page 6C 40 Page 6C 42 Page 6C 43 Page 6C 44 Page 6C 46 Page 6C 46 Page 6C 47 Page 6C 53 Page 6C 53 Page 6C 28 Page 6C 32 Page 6C 36 Page 6C 37 Page 6C 39 Page 6C 42 Page 6C 44 09904 41010 09930 82710 SUZUKI Diagnostic system set Mode select switch Page 6C 20 Page 6C 22 Page 6C 24 Page 6C 18 Page 6C 19 09930 82720 09942 83110 Mode selection switch Clip remover Page 6C 21 Page 6C 49 ...

Page 702: ...bination Meter Components 9C Combination Meter Removal and Installation 9C Combination Meter Disassembly and Assembly 9C Combination Meter Inspection 9C Engine Coolant Temperature Indicator Light Inspection 9C Engine Coolant Temperature Removal and Installation 9C Fuel Level Indicator Inspection 9C Fuel Level Gauge Inspection 9C Speedometer Inspection 9C Speed Sensor Removal and Installation 9C Sp...

Page 703: ...ront Grip Bar Construction 9E Front Grip Bar Removal and Installation 9E Trailer Towing Construction 9E Trailer Towing Removal and Instruction 9E Body Frame Construction LT A750XP ZK9 9E 1 Specifications 9E Tightening Torque Specifications 9E Special Tools and Equipment 9E 1 Recommended Service Material 9E 1 ...

Page 704: ...Wiring Systems 9A 1 Body and Accessories Wiring Systems Schematic and Routing Diagram Wiring Diagram LT A750XP ZK9 B931G49102003 Refer to Wire Color Symbols in Section 0A in related manual ...

Page 705: ...W B W R Br W Br W B Br B Br R B R B Bl B Bl B B W B W Y R Y R B W B W B W R Br W B Br R B Bl B B W Y B Y B Y B B B Y R B W O Y O Y W B W B O Y O Y W B W B B W B W B W B W W B W B W B W B B W B W W B O Y O Y O B O B O B B Y B W B W O Y O Y Bl Bl Bl R Bl R B B W Bl R Y Bl O Y O W B W B B B W B B B O Y Bl Y Bl O W O W O W R B R B W B W B Gr W Gr W O W O W R B R B B R B R R B W B W W Y W Y Bl G Bl G B...

Page 706: ...R Y R B W B W B W R Br W B Br R B Bl B B W Y B Y B Y B B B Y R B W O Y O Y W B W B O Y O Y W B W B B W B W B W B W W B W B W B W B B W B W W B O Y O Y O B O B O B B Y B W B W O Y O Y Bl Bl Bl R Bl R B B W Bl R Y Bl O Y O W B W B B B W B B B O Y Bl Y Bl O W O W O W R B R B W B W B Gr W Gr W O W O W R B R B B R B R R B W B W W Y W Y Bl G Bl G Br W Br W B Bl B Bl B G B G B Y R G R G G B Lg B Lg B Y B...

Page 707: ...ess and cooling fan lead wire over the radiator hose 3 Clamp Bind the wiring harness and cooling fan thermo switch with the clamp C To power source 4 Clamp Bind the wiring harness and back up relay For P 17 with the clamp D Pass the wiring harness under of the throttle cable 5 Clamp Bind the EPS motor lead wire and EPS control unit lead wires a 60 80 mm 2 4 3 2 in 6 EPS control unit b 20 30 mm 0 8...

Page 708: ... the clamp 18 Horn For P 17 24 6 Clamp Bind the diff lock actuator lead wire and rear brake switch lead wire with the clamp 19 IAP sensor 7 Clamp Bind the rear brake switch lead wire with the clamp B To rear fender top 8 Clamp Bind the wiring harness generator lead wire and gear position switch lead wire C Slack the read wire 9 Speed sensor lead wire D Pass the horn lead wire inside of the stay 10...

Page 709: ...emergency switch lead wire For P 17 with the clamp Cut the tip of clamp after clamping 11 Fuse box 3 Clamp Bind the front brake switch lead wire and 2WD 4WD diff lock switch lead wire with the clamp Cut the tip of clamp after clamping 12 Fuse EPS 4 Clamp Bind the combination meter lead wire 2WD 4WD diff lock lead wire and front brake switch lead wire with the clamp 13 Combination meter lead wire 5...

Page 710: ...following Wiring Harness Routing Diagram LT A750XP ZK9 Page 9A 4 Reference For the tightening torque of fastener not specified in this section refer to Tightening Torque List LT A750XP ZK9 in Section 0C Page 0C 7 1 2 3 a 4 5 6 6 I931G3910904 01 1 Starter motor 3 Generator stator 5 Grommet a 90q 2 Gear position switch 4 Ground wire 6 Clamp ...

Page 711: ...9 B931G49506011 Special Tools and Equipment Recommended Service Material B931G49508001 NOTE Required service material is also described in the following Body Frame Construction LT A750XP ZK9 Page 9E 1 FWD FWD 3 2 4 4 1 I931G3950001 04 1 Frame 3 Washer Apply thread lock to the thread part 2 Battery plate 4 Spacer ...

Reviews: