12
PROPELLER INSTALLATION
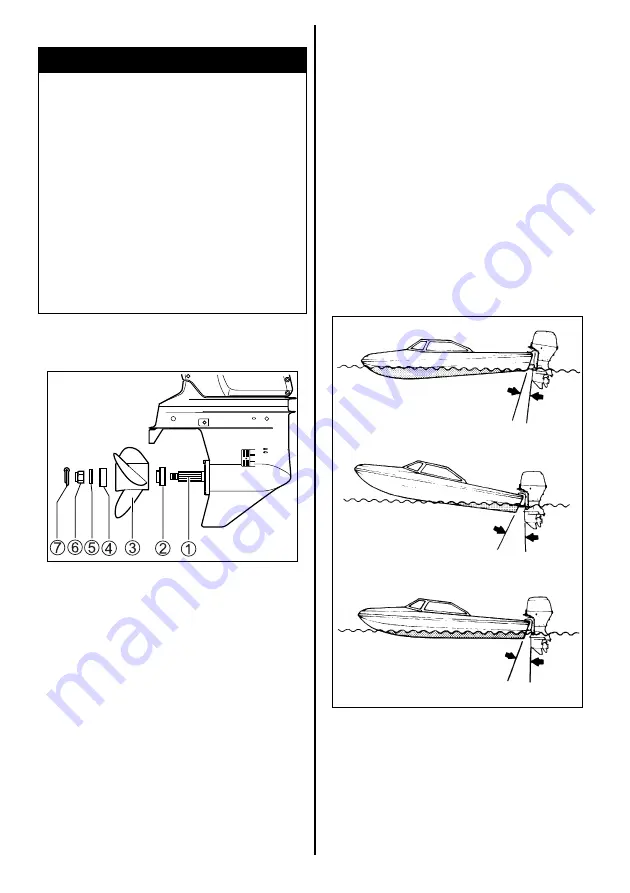
To install a propeller on your outboard motor,
use the following procedure:
1. Coat the propeller shaft splines
1
liberally
with Suzuki water resistant grease to help
prevent corrosion.
2. Place the stopper
2
on the shaft.
3. Align the propeller
3
with the propeller shaft
splines and slide the propeller onto the shaft.
4. Place the spacer
4
and washer
5
on the
shaft.
5. Install the propeller nut
6
and tighten it with
a torque wrench to 50 – 60 N·m (5.0 – 6.0
kg-m/36.0 – 43.5 lb-ft).
6. Align the grooves in the propeller nut with
the hole in the shaft, then insert the cotter
pin
7
and bend the pin ends over to lock it in
place.
To remove the propeller, reverse the above pro-
cedure.
WARNING
Failure to take proper precautions when
installing or removing the propeller can
result in severe personal injury.
When installing or removing the propeller:
• Always shift into “Neutral” and remove
the emergency stop switch lock plate
so that the motor cannot be started
accidentally.
• Wear gloves to protect hands, and
“lock” the propeller by placing a block
of wood between the blades and the
anti-cavitation plate.
ADJUSTMENTS
TRIM ANGLE ADJUSTMENT
To help maintain steering stability and good
performance, always maintain the proper trim
angle as shown in the illustration. The appropri-
ate trim angle varies depending on the combi-
nation of the boat, engine, and propeller, as well
as operating conditions.
Make a test run in the boat to determine if the
trim angle needs to be adjusted. Adjust the trim
angle using the Power Trim and Tilt system.
Refer to the POWER TRIM AND TILT section.
If you still cannot achieve good performance,
there may be a problem with engine mounting
height. Consult your dealer for assistance.
• Trim angle too small (Boat tends to “plow”)
• Trim angle too large (Boat tends to “porpoise”)
• Proper trim angle
Summary of Contents for DF150
Page 1: ...1 ENGLISH DF150 DF175 OWNER S MANUAL EN ...
Page 9: ...7 ...


