CA U T I O N :
Cut the m i n i m u m a m o u nt necessa ry from the
seat to prevent the possi b i l ity of the valve
stem becom i n g too c lose to the rocker arm
for correct va l ve contact angle.
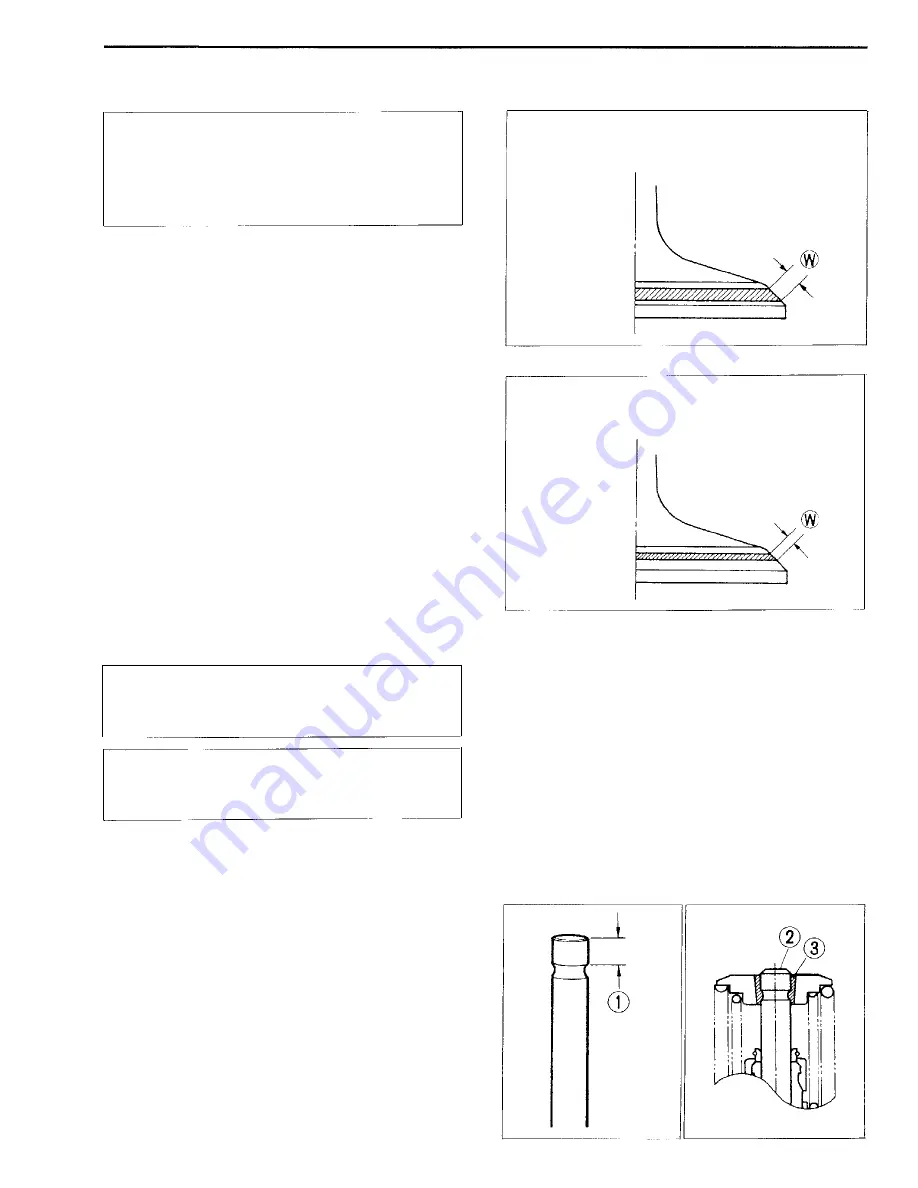
If the contact a rea is too l ow or too narrow, use
the 45° c utte r to ra ise and widen the contact a rea .
I f the contact a rea is too h i gh o r too wide, use the
1 5° cutte r to l owe r a n d na rrow the contact a rea.
4. Afte r the desi red seat position a n d width is
ach i eved, use the 45° cutte r ve ry l i g h t l y to
c l ea n u p a n y b u rrs caused by the previ ous
cutt i n g operati ons. D O N OT use l a p p i n g com
pou n d after the f i n a l cut is made. The f i n ished
va l ve seat shou l d h ave a ve l vety smooth fi n ish
and n ot a h i g h l y pol ished or sh i ny f i n i s h . This
wi l l p rovide a soft su rface for the f i n a l seati n g
o f the va lve wh ich wi l l occu r d u ri n g t h e fi rst
few seconds of engi ne operat i o n .
5. Clean and asse m b l e the head a n d va lve com po
nents. F i l l the i nta ke and exhaust po rts with
gaso l i ne to check for l ea ks. If any l ea ks occu r,
i nspect the va l ve seat a n d face for b u rrs o r
othe r thi ngs t h a t cou l d prevent the va l ve from
sea l i n g .
WA R N I N G :
A lways use extreme caut ion when hand l i n g
gaso l i ne.
N OT E :
Be s u re to adj u st the val ve c l ea ra nce after
reassem b l ing the engi ne.
VALVE STE M END CON DITION
I nspect the va l ve stem end face for pitt i n g a n d
wea r. I f pitt i n g or wea r of the stem end fa ce a re
present, the va lve ste m end may be resu rfaced,
provid i n g that the l e n gth CD wi l l n ot be red u ced to
less tha n 2.7 m m (0. 1 1 i n ) . If t h i s l e ngth becomes
l ess than 2 .7 mm (0. 1 1 i n ) , the va l ve m ust be
re p l aced . After i nsta l l i ng a va l ve wh ose ste m end
has been gro u n d off as above, check to ensu re
that the face ® of the va l ve ste m e n d is above
the cotte rs
@ .
C o n tact area too h ig h
a n d t o o w i d e o n face o f
va l ve
Contact area too l ow
a n d too n a r row o n face
of v a l v e
E N G I N E
3-36
Summary of Contents for LT-4WD 1990
Page 3: ...VI EW O F SUZU KI LT 4WDH 87 MODEL R IGHT SI D E L E FT SI D E ...
Page 5: ......
Page 33: ...2 1 9 P ER I O D I C M A I N T E N AN C E AN D TU N E U P P R O C E DU R ES ...
Page 35: ......
Page 117: ......
Page 119: ...4 1 S H A FT D R I V E A N D D I F F E R E N T I A L D R IVE L I N E ...
Page 177: ...5 1 9 F U E L A N D L U B R I CAT I O N SYST E M LUBRICATION SYSTEM ...
Page 195: ......
Page 197: ...l l C H ASS I S F RONT CAR R I E R A N D F RON T F E N D E R ...
Page 276: ... S E RV I C I N G I N F O R M AT I O N 8 20 000 0 _5 t ...
Page 277: ...8 2 1 S E R V I C I N G I N F O R MATI O N c ...
Page 289: ......
Page 296: ... CONTENTS flf f iJL l flf fl J l f f 1 ...
Page 355: ......
Page 401: ......
Page 433: ...15 31 LT F4WDXM 91 MODEL R EAR BRAKE R EAR WH E E L AN D B ...
Page 440: ...S t a rter r e l a y V I EW B Battery To starter motor I starter relay C l a m p V I EW A ...
Page 487: ......
Page 505: ......
Page 506: ......
Page 508: ...SUZUKI MOTOR CORPORATION ...


