9-8 ELECTRICAL SYSTEM
Step 5
1) Measure the generator no-load performance. (
!
9-10)
Is the generator no-load performance OK?
Step 6
1) Inspect the regulator/rectifier. (
!
9-10)
Is the regulator/rectifier OK?
Step 7
1) Inspect wirings.
Is the wirings OK?
Battery overcharges
• Faulty regulator/rectifier.
• Faulty battery.
• Poor contact of generator lead wire coupler.
INSPECTION
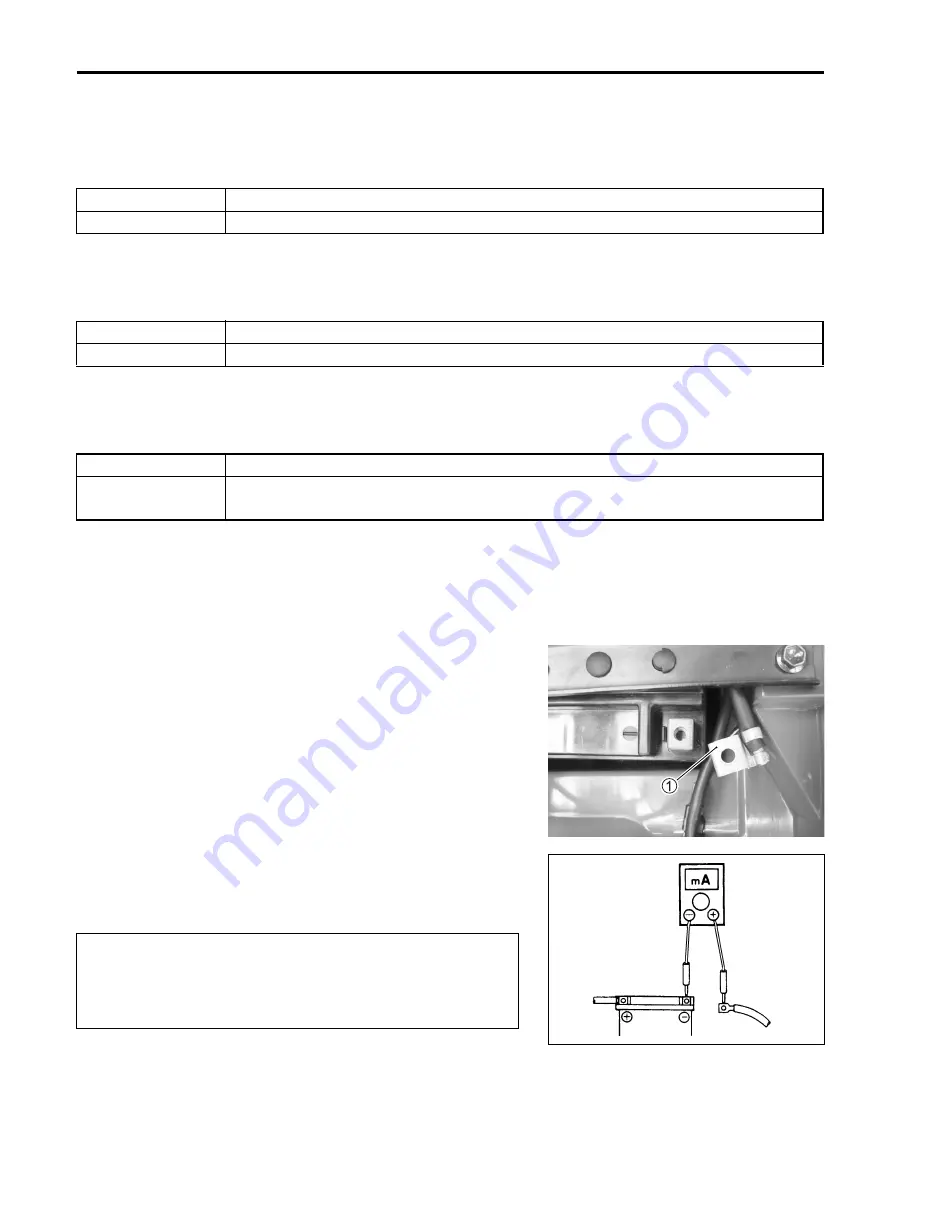
BATTERY CURRENT LEAKAGE
• Remove the seat. (
!
8-4)
• Turn the ignition switch to the OFF position.
• Disconnect the battery
-
lead wire
1
.
Measure the current between
-
battery terminal and the
-
bat-
tery lead wire with the multi-circuit tester. If the reading exceeds
the specified value, leakage is evident.
"
09900-25008: Multi-circuit tester set
$
Tester knob indication: Current (
%
, 20 mA)
&
Battery current (leak): Under 2.6 mA
#
When checking for excessive current leakage, remove the cou-
plers and connectors, one by one, so as to locate the position of
trouble.
YES
Go to Step 6.
NO
Faulty generator.
YES
Go to Step 7.
NO
Faulty regulator/rectifier.
YES
Faulty battery.
NO
• Short circuit of wire harness.
• Poor contact of couplers.
* Because the current leak might be large, turn the
tester to high range first to avoid tester damage.
* Do not turn the ignition switch to the “ON” position
when measuring current.
Summary of Contents for LT-A700X 2004
Page 25: ...2 8 PERIODIC MAINTENANCE INTAKE SIDE ...
Page 26: ...PERIODIC MAINTENANCE 2 9 EXHAUST SIDE ...
Page 46: ...PERIODIC MAINTENANCE 2 29 ...
Page 59: ...3 8 ENGINE Remove the engine from the right side ...
Page 133: ...3 82 ENGINE Pull the rope and check that the ratchet is pushed out ...
Page 155: ......
Page 263: ......
Page 301: ...7 20 COOLING AND LUBRICATION SYSTEM EXHAUST SIDE INTAKE SIDE ...
Page 302: ......
Page 312: ...CHASSIS 8 9 REAR CARRIER Remove the rear carrier 1 ...
Page 386: ......
Page 420: ...ELECTRICAL SYSTEM 9 33 HEADLIGHT INSTALLATION Head light coupler Head light R Adjusting point ...
Page 453: ...10 26 SERVICING INFORMATION Rear box Rear fender Right mud guard Left mud guard ...
Page 477: ......
Page 480: ...Prepared by September 2004 Part No 99500 46060 01E Printed in U S A 472 ...


