5-15
Removing the Element
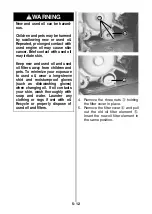
1. Remove the seat.
2. Remove the screws
1
and take
off the air cleaner case cover
2
.
3. Remove the element holder
3
,
then remove the element assem-
bly
4
.
4. Separate the polyurethane foam
element from the element frame.
Washing the Element
Wash the element as follows:
1. Fill a wash pan larger than the ele-
ment with a non-flammable clean-
ing solvent
A
. Dip the element in
the solvent and wash it.
2. Squeeze the element by pressing
it between the palms of both
hands to remove excess solvent.
Do not twist or wring the element,
or it will develop cracks.
3. Dry the element.
4. Put the element in a plastic bag.
Pour in some air filter oil
B
and
work the oil into the element.
5. Squeeze the element to remove
excess oil.
6. Clean any dirt or debris from
inside the air cleaner case. Be
sure no dirt enters the carburetor.
CAUTION
A torn air filter can damage your
ATV.
Dirt and dust may get inside the
engine if the element is torn.
Carefully examine the element for
tears before and after cleaning it.
Replace the element with a new
one if it is torn.
Summary of Contents for LT-F160 2006
Page 7: ......
Page 9: ......
Page 10: ...1 1 1 FUEL AND OIL RECOMMENDATIONS FUEL 1 2 ENGINE OIL 1 3...
Page 13: ......
Page 52: ...4 1 4 ACCESSORY USE AND VEHICLE LOADING ACCESSORY USE AND VEHICLE LOADING 4 2...
Page 55: ......
Page 89: ......
Page 90: ...6 1 6 TROUBLESHOOTING FUEL SYSTEM CHECK 6 2 IGNITION SYSTEM CHECK 6 3...
Page 93: ......
Page 94: ...7 1 7 PREPARATION FOR WINTER RIDING ENGINE OIL CHANGE 7 2 CHECKING CHOKE LIMITER POSITION 7 2...
Page 96: ...8 1 8 TRANSPORTING STARTING THE LT F160 AFTER TRANSPORT 8 3...
Page 99: ......
Page 105: ......
Page 106: ...10 10 1 CONSUMER INFORMATION SERIAL NUMBER LOCATION 10 2 LOCATION OF LABELS 10 2...
Page 109: ...10 4 6 7 8 9 0...
Page 110: ......
Page 115: ......


