25
①
②
③
(A)
(B)
(B)
(C)
Safety cap
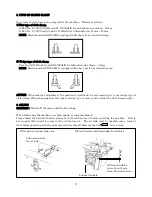
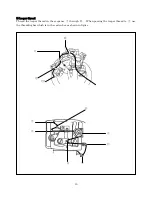
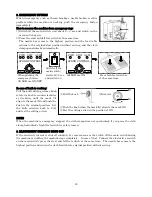
3. SETTING FOR CUTTING PRESSURE
CAUTION: Switch off the main switch before setting.
a) Loosen the nut
①
and pressure adjustment screw
②
.
b) Pull the knife driving release knob
③
, rotate its knob clockwise until the mark(B) align to the
mark(C).
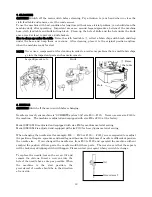
c) Tighten the screw
②
with your hand until the pressure can be felt and tighten the nut
①
with
spanner. Never tighten the screw
②
too strong/high pressure. The cutting block pressure should
adjust as low as possible to prevent any damage for the surface of cutting block or knife.
CAUTION: If the knife pressure is too strong/high pressure, surface of knife and cutting block is
damaged or the safety cap will be broken to prevent the cutting block arm broken. In
case of that, re-adjust the knife pressure in accordance with above a) ~ c).
d) After adjusting c), rotate the knob
③
until the cutting block arm comes to original position.
NOTE: If you cannot achieve perfect cutting even the knife pressure is properly, file/dress up a surface of
cutting block carefully. See page 24 for dressing the cutting block.
b)-1
Pull the knob
③
to the
left and keep it.
b)-2
Rotate the knob
③
clockwise until the mark
(B) align to the mark (C).
c)
When the mark (B) and (C)
is align, tighten the screw
②
with hand for knife
pressure adjustment. After
adjusting, tighten the nut
①
and rotate the knob
③
until the mark (B) and (A)
is align (original position).
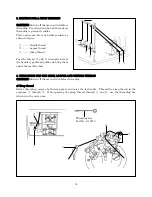
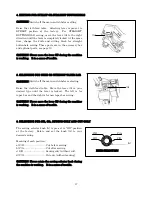
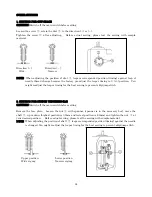
4. CUTTING BLOCK ARM SAFETY CAP
CAUTION: Switch off the main switch before
replacement.
If the knife/cutting block arm pressure is too strong
or the machine is using for long time, safety cap will
be broken to prevent a trouble of the cutting block
arm or due to worn out of safety cap.
Push down the cutting block arm with your hand
and replace a new cap. Five (5) pcs. of safety cap
(part No. S1-2524) are in the accessory box.
CAUTION: Never use other parts. If you use
non-approved part, the cutting block arm will be
broken.

