background image

MPEG-4 Embedded DVR

User Manual

Model #: CVDVR900

www.svat.com

now you can see

Summary of Contents for ClearVu CVDVR900

Page 1: ...MPEG 4 Embedded DVR User Manual Model CVDVR900 www svat com now you can see ...

Page 2: ...transfer and ventilation purposes locate the DVR at least 15cm from another object such as awall while installing the device vii Avoid placing the DVR near any chemical product Accidental contact may harm the device viii Avoid placing the device in areas that are dusty and unkept Dust may damage the unit ix Use correct grounding for the DVR device while operating B Other notices i Do not operate t...

Page 3: ...deo signal loss or disturbance Available with manual time setting alert playing this will make the unit more effectively and hard space efficient The motion detect function is available with a setting for 16x12 detect region area with adjustable senitivity detect level Pre setting record function and extended alert function in order to ensure alert information capture with user requirement Has fas...

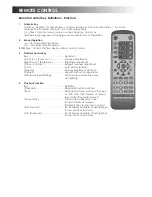
Page 4: ... OR Time display while in monitor mode 3 Playback function Key Definition Playback Playback function activate Slow Playback with slow motion with speed at 1 2x 1 4x 1 8x resume at normal speed with Playback pressed Pause Play Pause video while press once frame to frame at re press Playback Key for resume to normal Fast Forward 2x 4x Speed available Playback Key for resume at reg play Fast Backward...

Page 5: ...or 4 channels monitor system Can activate 4 manual records or for single channels the monitor system can activate 1 manual record Stop Stop manual recording Setting Setting with system configuration and parameters F1 Time select while in Playback mode F2 For single channel system control menu activation while this key being pressed While left right up down key pressed adjusted with station recorde...

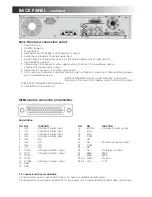
Page 6: ...creen from display output with monitor screen 10 RS 232 Standard RS 232 connection 11 Ventilation fan for main unit MPEG4 Alarm connector pin definition Pin definition PIN DEF FUNCTION PIN DEF FUNCTION 1 IN0 Channel 1 Alarm input 16 4COM Channel 2 Alarm output 2 IN1 Channel 2 Alarm input 17 4NO 3 IN2 Channel 3 Alarm input 18 4NC 4 IN3 Channel 4 Alarm input 19 COM 5 IN4 NC 20 NO 6 IN5 NC 21 NC Powe...

Page 7: ...m In Zoom Out Zooming adjustment Brightness Brightness Brightness adjustment Focus Focus Image Sharpness adjustment Auto Auto Mode activate Manual Manual Adjustment Platform Default Use with Default configuration Window Wiper Lighting Control with window rain wiper and lighting 4 Playback function Key Definition Playback Playback function activate Slow Playback with slow motion with speed at 1 2X ...

Page 8: ...inese selectable Network Network parameter setting Record For 4 channels monitor system can activate 4 manual record or for single channels monitor system can activate 1 manual record Stop Stop manual recording Setting Setting with system configuration and parameters F1 Time select while Playback mode F2 For single channel system control menu activate while this key being pressed While left right ...

Page 9: ...word 1 After the user password is keyed in correctly the message USER PASSWORD CORRECT will be shown Then the user can enter into restricted functional feature level functions with the device default password is 00000000 2 After the Administrator password is keyed in correctly a message ADMIN PASSWORD CORRECT will appear then the administrator can enter into all functional feature levels with the ...

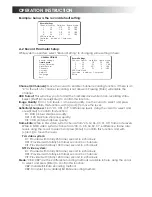
Page 10: ...First Out format When OFF is selected the recording function will stop once the HDD has filled up System Select one of two options PAL and NTSC then press Enter to confirm NTSC is the standard for North American video systems while PAL is standard for European recording systems Admin_pwd_modify Allows the you to change the administrator password press Enter to enter this function It will require y...

Page 11: ...0 15 08 04 02 01 6 difference frame rate levels Using the cursor to select and press Enter to confirm this function and with and to move the level PAL video system D1 Provided with totally 25 frame second in 4 channels HD1 Provided with totally 50 frame second in 4 channels CIF Provided with totally 100 frame second in 4 channels NTSC video system D1 Provided with totally 30 frame second in 4 chan...

Page 12: ...ound signal only record into HDD1 and HDD2 taking into HDD1 first and then using HDD2 after the HDD1 is full At the same meaning that Channel 3 and 4 video signal and sound signal only recording into HDD3 and HDD4 taking into HDD3 first and then using HDD4 after HDD3 full Return Using the cursor to select and press Enter to confirm back to main menu A 3 Timer Record Setting Highlight and select Ti...

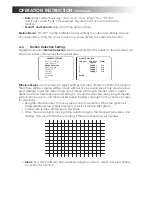
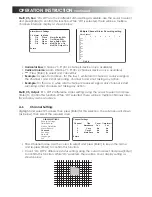
Page 13: ...et the detect area as full screen all the grid squares will turn a light green square as selected re press Setting to cancel the selected areas all grid squares will turn back to clear and there will be purple flashing cursor right in the centre of screen for selection Using the directional key to move purple cursor for selection When the grid block being selected press Enter to select the block w...

Page 14: ...to 300 seconds for alarm output default setting as 10 seconds Keep_Delay Key in the number key to setup time delay range from 0 to 300 seconds for alarm warning signal default setting as 10 seconds For example If an alarm is produced at 23 30 50 the device should start the recording from time 23 30 40 since the system per recording time was set as 10 seconds The system will release the alarm warni...

Page 15: ...e On selected there will be 4 multiple channels inter face display as shown above A 6 Channel Setting Highlight and select Channels then press Enter for this selection the sub menu will shown as below then select the required area Title Channel name Use the cursor to select and press Enter to key in the name and re press Enter to confirm this function Cover On Off 2 difference status setting Using...

Page 16: ...ghlight and select Network then press Enter for this selection the sub menu will be shown as below then select the required area IP Address Use the cursor to select and press Enter to enter the IP address Subnet mask Use the cursor to select and press Enter to enter the subnet mask at current location Default Gateway Use the cursor to select and press Enter select default gateway according to curr...

Page 17: ...for those more than 1 page recording list Title Channel name Recording Time Period for the recording time the length for each at 60 minutes Recording method R for timer record M for manual record A for alarm record Sharpness D1 HD1 and CIF to indicate the level of the recording information Frame Rate While in PAL video system 25 12 06 03 01 0 5 frame rate levels will available While in NTSC video ...

Page 18: ...g exists for a certain date No exist record will be displayed Using page up UP and down DO key for dates when more than 1 page recording list is available Press Enter to see the recording video audio signal Press F1 for time select playback press SLOW for slow motion playback at different speeds Press FF for fast forward play back and FB for fast backward playback with PAUSE key to make the frame ...

Page 19: ... status for 4 channels including total hard disk space and available space Info Menu All Record Alarm Record Alarm Log Operate Log Channel Status HDD Status Machine Info Exit Alarm Log 2003 11 28 23 30 Alarm at 1 Return Page Up Page Down First Page Info Menu All Record Alarm Record Alarm Log Operate Log Channel Status HDD Status Machine Info Exit Operate Log 2003 11 28 23 30 Parameter Change Retur...

Page 20: ...to copy the data from hard disk into the Compact Flash card please follow the following procedures 1 Insert the Compact Flash card into CF Slot before the DVR s power is on 2 Power on the device and stop all recording activity 3 Press the CF card button in remote control or front panel this will allow the copying of all required information and data into Compact Flash card 4 Re Press the CF card b...

Page 21: ...ng Highlight and select Renew setting then press Enter for this selection the sub menu will be shown as below 1 For copying 1 device setting into other devices 2 When all necessary settings are in already copied into the CF 3 Using this card and insert into device slot before power on 4 Then after the device power is on select Renew Setting with Enter button 5 When the renew is completed there wil...

Page 22: ...layback Alarm record Refer to section C 2 Playback the recent record Press the Play button to playback current channel information D 3 Playback with time select 1 Use the F1 button for current playback channel to select the time for playback 2 Use the Stop button to stop the playback D 4 Stop Playback 1 Use the Stop button to stop the playback D 5 Slow Playback 1 Use the Slow button to slow motion...

Page 23: ... 1 0 2 2V S N 30dB Recording Format Video and sound at same time Compression PCM Encoding MPEG 4 Variable encode rate Fixed encode rate Image Format CIF 352 288 pixels 1 2D1 704 288 pixels D1 704 576 pixels Video Standard ISO14496 Audio Standard PCM Video Freq 12 5K 112 5Kbyte s 25K 150Kbyte s 50K 300Kbyte s Audio Freq 8Kbyte s Audio Size Rate 28 8Mbyte hour Video Size Rate 45M 405Mbyte hour 90M 5...

Page 24: ... Also while 2 hard disks connect with IDE they must be set with different jumpers to make this functional I 2 Playback DVR Hard disk with PC The DVR file information requires the conversion program STMTOAVI EXE which comes with the product to make it as PC compatible and readable It simply convert those stm file into avi file which can play with media player from PC Here are some steps for STMTOAV...

Reviews: