background image

23

Operating  Maintenance  Installation  CLASSIC PIZZA  860005-02

ASSEMBLY

3

RXS B10x32

RXS B10x13

M6S 6x16

+ M6M 6

3

RXS 

B10x13

4

5

RXS B10x13

2a

1a

M6S 8x20

 + M6M 8

7

6

6

RXS B10x13

1

M6S 8x20

+ BRB 8.4x17

2

M6S 8x20

+ BRB 8.4x17

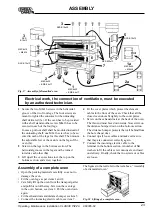
1

  Secure the two M8x16 screws in the helicoidal 

groove of the two front legs. The four screws are 

meant to tighten the consoles for the unloading 

shelf delivered (1a). If the oven has to be provided 

with a shelf stand another screw M8x16 has to be 

secured in each of the four legs. 

  In case a pull out shelf shall be mounted instead of 

the unloading shelf, one M8x16 screw has to be se-

cured in each of the legs for this shelf. Then mount 

the adjustable feet or the castors on the legs of the 

oven (1a).

2

  Screw on the legs in the bottom section. The   

  helicoidal grooves in the legs must be turned   

  towards each other (

2a

).

3

  Lift up all the oven sections incl. the top on the  

  bottom section, and screw together.

4

  Fit the cover plates which protect the element  

  cables in the front of the oven. Check that all the  

  closed oven doors fit tightly to the cover plates.

5  Screw on the exhaust ducts at the back of the oven. 

The thin end must face downwards. Now screw on 

the distance bumper down on the bottom section. 

The  distance bumper protects the wall behind from 

the hot exhaust duct.

6

  Connect up all loose cables and make extra sure  

  that they are connected correctly again.

7

  Connect the incoming electric cable to the    

  terminal in the bottom section. A number of flat  

  washers to fit the cable screw unions are enclosed  

  on delivery. Finally, check that no screws or cables  

  are loose.

Fig. 17  Assembly of dismantled oven.

Electrical work, the connection of ventilation, must be executed 

by an authorized technician.

Assembly of a complete oven

Fig. 18  Lifting of a complete oven.

The figures in the text refer to the text above, ”Assembly 

of a dismantled oven”.

•  Open the packing materials carefully so as not to 


  damage the oven.

•  Fit the oven legs as per items 1 and 2.

•  Carefully lift up the oven from the transport pallet  

  and pull this out of the way. Screw on the oven legs  

  in the oven bottom, see item 2. Put the oven down  

  again.

•  Fit the exhaust ducts and distance bumper, see item 5.

•  Connect the incoming electric cable, see item 7.

Summary of Contents for Classic Pizza DC-1P

Page 1: ...Operating Maintenance Installation Rev 5 860005 02 Typ Classic Pizza DC 1P DC 2P DC 2EP DC 3P Pizza oven ...

Page 2: ...vice of the oven the oven serial number and model desig nation must be given Note the serial number model designation and voltage so that they are readily available when contacting us Please direct all your questions comments or technical problems regarding this product to the SVEBA DAHLEN dealer or directly to SVEBA DAHLEN AB SE 513 82 Fristad Sweden Tel 46 33 151500 Fax 46 33 151599 Web www sveb...

Page 3: ...LASSIC PIZZA 860005 02 TABLE OF CONTENTS 3 TECHNICAL DATA 4 DESCRIPTION 5 D PIZZA PANEL 6 INSTRUMENT PANEL Option 14 BAKING 15 RECIPE 17 CARE AND MAINTENANCE 18 TROUBLE SHOOTING 19 UNPACKING 21 ASSEMBLY 23 INSTALLATION 24 TABLE OF CONTENTS ...

Page 4: ... L can vary from 0 to 1100 mm Standard leg length is 100 200 and 300 mm etc but other lengths are available on request Castors or feet can be fitted directly to the oven bottom Fig 1 Height of Classic Pizza in mm Fig 2 Dimensional drawing for Classic Pizza Table 1 Dimensions and outputs for Classic Pizza DC 1P 1075 635 5 4 DC 2P 1390 950 7 9 DC 2EP 1705 1265 10 4 DC 3P 2020 1580 12 9 Oven A B Conn...

Page 5: ... pull out shelf is to be mounted Design principle The deckoven is CE approved according to EMC LVD The deck oven is manufactured in detachable sections The advantage of this is that the sections can be com bined to suit special purposes or areas This makes the oven easy to install One or up to three oven sections ca be placed between the bottom and top Thelegsarethenfittedtothebottom andcanbesuppl...

Page 6: ...CLASSIC PIZZA 860005 02 General description Increase decrease button for temperature effect distribution On off button for panel Heat control buttons Alarm button Temperature actual value Temperature desired value D PIZZA PANEL 0 5 2 5 4 2 ...

Page 7: ...ZZA 860005 02 Start of oven Oven turned off Start oven by pressing ON OFF button The displays illuminate The oven light illuminates The oven section is heated to the set value 0 2 3 0 2 3 f f o The panel displays OFF and all of its functions are off ...

Page 8: ...re with 3 Set the hours until the start by holding the front heat button pressed in and change with 4 The display counts down hour by hour when H00 is reached the oven starts and heats up to the set temperature 5 The start timer can be deactivated by holding once again the ON OFF button pressed in for 10 seconds Baking 1 Enter the desired temperature baking time and steam time 2 To divide the powe...

Page 9: ...ted first in the service menu parameter P02 The settings are made with the panel in the Off position 1 Panel indicates stb 2 Change between Stb SEt and rtc by holding the front heat button pressed in and change mode with Stb Standby oven ready to be started by start timer See fig 1 SEt Setting for the start and stop times See fig 2 rtc Settings for the real time clock See fig 3 Weekly Timer ...

Page 10: ...2 Fig 3 2 0 h 3 0 1 0 5 1 Change to rtc 2 Change between day hours and minutes by holding the bottom heat bottom pressed in and change with 3 Set the weekday day 1 Monday with See fig 1 4 Set the hours with See fig 2 5 Set the minutes with See fig 3 Setting the real time clock rtc ...

Page 11: ...Et to show the start day and hour the lower display shows the stop day and hour 3 Set the start hour with 4 Set the stop hour by holding the top heat button pressed in and change with 5 Change to next day be holding the lower heat button pressed in and change with To inactivate a start stop time increase the time until is shown in the display Setting the start and stop times set ...

Page 12: ...Network fault serial interface Energy supply not energised in one of the slave panels Alarm time for service Fault in parameter memory Internal test not OK FIELD TYPE INDICATION ACTION E1 E2 E3 E4 E5 E90 E91 SEr EP Pr Inspect sensor and its connections Inspect sensor and its connections Replace panel Set the clock Inspect fuses and overheating protection Test pipelines Inspect communi cation setti...

Page 13: ... fitted with automatic turbo function If the difference between the desired and actual temperatures exceeds a value set in the service menu all temperature outputs are switched to 100 for fast heating The turbo function is deactivated when a baking program is started or if the difference between the desired and actual temperatures is less than the set value Energy saving mode The energy saving mod...

Page 14: ...the oven to the temperature which is set on the thermostat Control for front heat Regulates the heat at the front of the oven Over and under the door Turn the control to the O position when this section is not used Fig 5 Classic Pizza Control switch O Off I On Breaks the control current to all oven sections The current must be broken with the main oven switch before carrying out service work Contr...

Page 15: ...t is set in the service menu see under Setting of service parameters The power consumption is not allowed to exceed this value If one deck is disconnected because of a too high power con sumption the temperature symbol on the display flashes In the service menu you select which of the oven chambers is to be given priority when the power consumption is too high From factory the lower oven chamber h...

Page 16: ...what A recommended start value for the front heat would be 8 9 The heat radiation from the upper heating elements will heat the surface of the stone soles By longer interruptions in the baking the heat in the stone soles will be accumulated Therefore the first pizza baked after such an interruption may have a somewhat darker bot tom This darkness will diminish the next time a pizza will be placed ...

Page 17: ...ugh rest for 2 hours Part it in pieces of 250 g each Cover it with plastic foil and let it rest in a cool place at 5 7 C for another 24 hours the dough can be kept like that for about a week Form round plates of 30 35 cm in diameter Cover them with tomato sauce grated cheese and shredded ham Bake them in the Classic Pizzaoven at 320 C with upper heat 8 lower heat 2 4 and front heat 9 for 3 5 4 5 m...

Page 18: ...not rust Wipe off dough food remains and other dirt with a wet sponge or rag Dried in dirt can be carefully scraped away with a nylon brush or a plastic scraper Immediately wash and dry all surfaces A rubber scraper can be used to dry large smooth surfaces Iron objects such as wagons of steel which scrape against the surface of stainless sheet iron damage the oxide layer and cause the sheet iron t...

Page 19: ...ective element Close damper fully or partially Reset fuse overheating protection in the oven distribution box Replace defective element The top of the product is too dark Too much top heat Reduce top heat The bottom of the product is too dark Too much top heat Reduce top heat Both the top and bottom of the product are too dark Too high baking temperature Too long baking time Too much top heat Redu...

Page 20: ...ically conductive object when resetting Call technician if the protection triggers repeatedly 2 Static relay There is a static relay for every group of heater elements the upper lower and front heaters 3 Automatic fuse The 3 pole fuse protects the oven elements On the lower section there is also a 1 pole fuse This is the oven control fuse and is common to all sections in the oven During service wo...

Page 21: ...the top and the screws between the front panels and if necessary also the screws between the front panel and the bottom 4 Loosen the screws at the back of the oven along the joint between the section and the top between the sections and if necessary between the bottom section and the bottom 5 Mark up and loosen the cables in the distribution box which are drawn between the sections and shall be se...

Page 22: ... and there is a risk for deformation If the section is put down on the back piece make sure that the underlayer is flat A spot load such asadoorthresholdcaneasilycracktheback piece Observe care with protruding parts such as the damper or the connection head of the element in the distribution box Whenallpartsareliftedintopositiontheassembly of the oven can begin Fig 13 Lifting of the parts of the o...

Page 23: ...eck that all the closed oven doors fit tightly to the cover plates 5 Screw on the exhaust ducts at the back of the oven The thin end must face downwards Now screw on the distance bumper down on the bottom section The distance bumper protects the wall behind from the hot exhaust duct 6 Connect up all loose cables and make extra sure that they are connected correctly again 7 Connect the incoming ele...

Page 24: ...h is led off via the ducts has a temperature of approx 50 80 C if the installation is executed as per Fig 20 or 21 The air volume which is led off it approx 150 200 m h The ventilation duct must under no circumstances be connected directly to the oven exhaust ducts There must always be some form of draught interruption as shown in the diagrams Exhaust ducts To ensure that smoke and hot air from th...

Page 25: ...he inside of the door glass with a dry cloth or paper Make sure you don t burn yourself In small premises with poor ventilation it is possible that smoke detectors are activated during the burn out Use maximum ventilation by opening doors and windows Increase the temperature to approx 200C Let the oven stay like this for about 15 minutes after reaching the temperature Increase the temperature to 2...

Page 26: ... FRISTAD Declare under sole responsibility that the pizza oven Classic DC 1P DC 2P DC 2EP DC 3P are in conformity with following standards or other normative documents following the provisions in the COUNCIL S DIRECTIVES of December 15 2004 relating to electromagnetic compatibility 2004 108 EC and applicable supplements of December 12 2006 low voltage directive 2006 95 EC and applicable supplement...

Reviews: