C 4
C DF
1
15/
135C.
G
B 4
-10
- 02
-01.
03
3
Transportation on public roads
$
Reduce the paver finisher and the
screed to their basic widths; also remove
any attached side plates.
3.1
Preparations
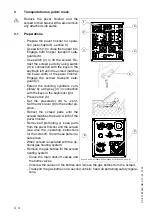
- Prepare the paver finisher for opera-
tion (see chapter D, section 3).
- Use switch (1) to close the hopper lids.
Engage both hopper transport safe-
guards (6).
- Use switch (2) to lift the screed. Re-
tract the screed parts by using switch
(3) in connection with the keys in the
keyblock left until the screed matches
the basic width of the paver finisher.
Engage the screed transport safe-
guard (7).
- Extend the levelling cylinders com-
pletely by using key (4) in connection
with the keys in the keyblock right.
- Press button (5)
- Set the preselector (8) to „zero“.
Set the drive lever (9) to the center po-
sition.
- Retract the screed parts until the
screed matches the basic width of the
paver finisher.
- Remove all protruding or loose parts
from the paver finisher and the screed
(see also the „operating instructions
for the screed“). Store these parts in a
safe place.
- When screed is operated with the op-
tional gas heating system:
- Remove the gas bottles for the screed
heating system:
- Close the main shut-off valves and
the bottle valves.
- Unscrew the valves on the bottles and remove the gas bottles from the screed.
- Transport the gas bottles on a second vehicle; heed all pertaining safety regula-
tions.
Element1_SPSC.cdr /F0076_A1.EPS/F0083_A1.TIF/Element2_SPSC.cdr
1
2
4
6
7
8
9
3
5
Summary of Contents for DF 115 C
Page 1: ...Operating instructions 02 01 03 Road Finisher 900 98 06 40 DF 115 C DF 135 C...
Page 2: ......
Page 4: ......
Page 10: ......
Page 12: ......
Page 40: ......
Page 44: ...D 4 D D_DF115_135C_GB fm 4 92 02 01 03 Element2_KC cdr 9 8 12 A 9 A 5 6 7 11 10...
Page 46: ...D 6 D D_DF115_135C_GB fm 6 92 02 01 03 Element2_KC cdr 9 8 12 A 9 A 5 6 7 11 10...
Page 132: ......
Page 178: ......


