background image

41

Detection

Detection

c

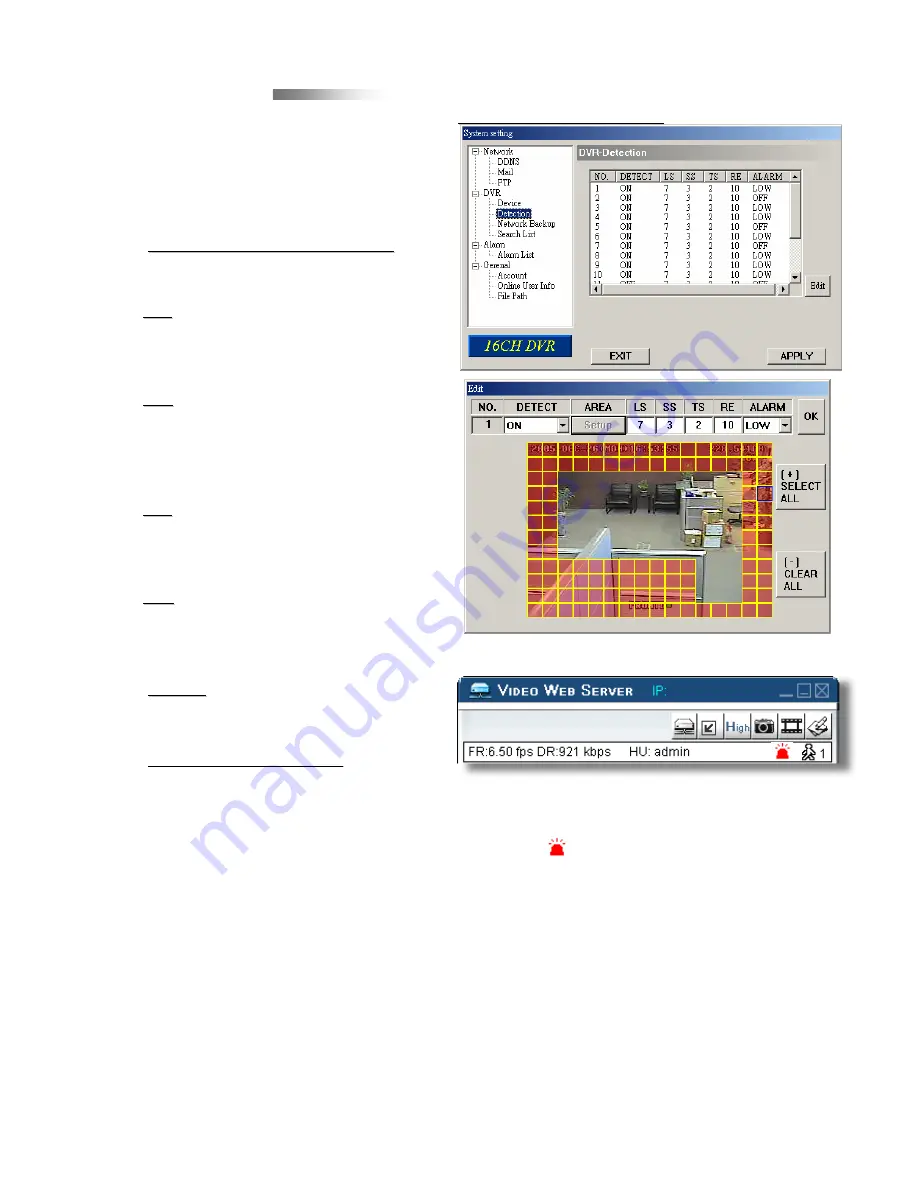
Select the desired channel, and 
press “

Edit

Edit” to enter the motion 

detection sensitivity and area setting 
box.

d

Motion Detection Sensitivity

Motion Detection Sensitivity

:

Set the detection sensitivity in 4 
different adjustable factors.

LS:

LS:

The sensitivity of comparing two 

different images. The smaller the 
value is, the higher sensitivity for 
motion detection.

SS:

SS:

The sensitivity towards the size 

of the triggered object on the screen 
(the number of motion detection 
grids). The smaller the value is, the 
higher sensitivity for motion detection.

TS:

TS:

The sensitivity towards how long 

the object gets triggered. The smaller 
the value is, the higher sensitivity for 
motion detection.

RE:

RE:

The value of RE is a reference 

for detection. The bigger the value is, 
the higher sensitivity for motion 
detection.

e

Alarm:

Alarm:

Select LOW / HIGH for the alarm 
polarity. 

f

Motion Detection Area

Motion Detection Area

:

Clicking the area by PC mouse

one can choose the motion area to 
be detected. 

The under

The under

-

-

detection 

detection 

area is in transparent picture while 

area is in transparent picture while 

the undetected area is in pink color.

the undetected area is in pink color.
*Click the “

Select All

” to clean the 

previously selected detection area. 
*Click the “

Clear All

” to activate the 

detection area as full area.

g

After setting, press “OK” and then 
press “APPLY” to confirm.

60.121.46.236

Note:  Enable the motion detection function.

When the motion is triggered,
a  “

” icon will shown on the 

screen. And software AP will start 
recording automatically.

Take 16CH as an example

Take 16CH as an example

Summary of Contents for 16CH

Page 1: ...RIES_V0 989 Please read instructions thoroughly before operation and retain it for future reference 150 16CH 8CH 4CH 16CH 8CH 4CH 4CH 4CH 16CH 8CH 4CH Built 16CH 8CH 4CH Built in DVD in DVD RW Writer or CD RW Writer or CD RW Writer RW Writer ...

Page 2: ... operating and maintenance servicing instructions in the literature accompanying the appliance CE Mark This apparatus is manufactured to comply with the radio interference requirements CAUTION CAUTION To reduce the risk of electric shock do not expose this apparatus to rain or moisture Only operate this apparatus from the type of power source indicated on the label CAUTION CAUTION RISK OF ELECTRIC...

Page 3: ...HDD INFO 4 15 ADVANCE MENU_ EVENT LOG ADDITIONAL OPERATION ADDITIONAL OPERATION 5 1 SEARCH 5 2 2X DIGITAL ZOOM 5 3 KEY LOCK 5 4 SWITCH THE N P SYSTEM 5 5 USB UPGRADE 5 6 LICENSED SOFTWARE AP AP BASIC OPERATION AP ADVANCED SETTING Network DDNS MAIL FTP DVR CAMERA SETTING DEVICE DETECTION NETWORK BACKUP PLAYBACK ALARM ALARM LIST GENERAL ACCOUNT ONLINE USER INFO FILE PATH 5 7 CONNECT TO AP VIA IE BRO...

Page 4: ... Recording With advanced motion detection function scheduled motion detection recording 4 different adjustable factors for motion detection sensitivity and convenient search function customized security environment is achieved Alarm trigger recording will send alert with images to designated e mail and FTP address Supports pre alarm recording 8MB Covert Recording Covert Recording A mask replaces t...

Page 5: ...l PTZ control Support PELCO D protocol Dwell Time Sequential Channel Switch Programmable with adjustable dwell time 2 4 8 16 sec 8 inputs 1 output 4 inputs 1 output Video Loss Detection Yes Web Interface Support licensed software AP and IE browser Web Transmitting Compression Format Motion JPEG Alarm I O 16 inputs 1 output Picture Zoom Support 2X digital zoom function Key Lock Yes Video Compressio...

Page 6: ...6mm D 432mm W 90mm H 326mm D Independent Disk Array VGA Connector IR Remote Control Camera Title Video Adjustable Date Display Format Daylight Saving Power Source Operating Temperature System Recovery Optional Peripherals Support up to 6 letters Hue Color Contrast Brightness YY MM DD DD MM YY MM DD YY and Off Yes DC 19V 10 40 50 104 System auto recovery after power reconnected Independent Disk Arr...

Page 7: ...rding 4 Press or button to change the setting in the menu to select the channel Press and buttons to open close the DVD CD WRITER 5 USB Support firmware update and files backup 6 LED LIGHT POWER Power on STANDBY Standby HDD HDD is reading or recording HDD Full HDD is full ALARM Once the alarm is triggered TIMER When timer recording is turned on REC Under recording status PLAY Under playing status ...

Page 8: ...ress SEQ to escape the call monitor mode 16 SHIFT AUDIO Press SHIFT AUDIO to select live or playback sounds of the 4 audio channels 17 SHIFT SLOW Under playback mode press SHIFT SLOW to show slow playback 18 SHIFT CH or CH Press SHIFT CH or CH change the setting in the menu to select the channel 19 SHIFT SET Press SHIFT SET to change channel display position Press to select the channel which You w...

Page 9: ...er recording is turned on PLAY Under playing status REC Under recording status 4 MENU Press MENU button to enter main menu 5 ENTER SET Press ENTER button to confirm Press SET to change channel display position Press to select the channel which you like to change Press or select the channel which You would like to show Press ENTER button to confirm 6 SEARCH Press SEARCH button to enter the search m...

Page 10: ...rn off the DVR 11 CH1 CH2 CH3 CH4 Press 1 2 3 4 buttons to select the channel 12 REC Press REC button to activate the manual recording 13 PLAY Press PLAY button to playback the recorded files 14 UP PAUSE DOWN STOP LEFT FAST REWIND RIGHT FAST FORWARD Press to move the cursor up down left right Under playback mode press button to pause playback Under playback mode press button to stop playback Under...

Page 11: ...16CH 16CH D DC 19V INPUT DISK ARRAY LOOP RS 485 INPUT IR INPUT INPUT EXTERNAL I O USB INPUT LOOP 3 LOOP LOOP LOOP INPUT D V LAN INPUT ACT LINK INPUT CALL LOOP LOOP LOOP MONITOR 3 1 2 4 15 16 17 14 1 2 3 4 5 6 7 8 10 9 11 12 13 8CH 8CH D INPUT 2 LOOP DC 19V LOOP LOOP 3 INPUT 4 INPUT ACT LAN 2 LINK CALL MONITOR IN 1 4 3 OUT INPUT D V 1 HI IMPEDANCE 4 75 1 LOOP EXTERNAL I O DISK ARRAY IR 16 6 2 1 4 7...

Page 12: ... Connect to CALL monitor Show the channel switch display When the alarm is triggered the call monitor will show the image of the triggered channel for a period of time 10 POWER Connect to provided adapter 11 FAN For ventilation 12 VIDEO INPUT CHANNEL 1 16 CHANNEL 1 8 CHANNEL 1 4 Connect to video source such as camera 13 LOOP CHANNEL 1 16 CHANNEL 1 8 CHANNEL 1 4 Video output 14 75Ω HI When using Lo...

Page 13: ... construct a surveillance 1 Install HDD The HDD must be installed before the DVR is turned on 2 Connect cameras 3 Connect monitors 4 Connect the external devices 5 Connect the AC power cord to power adapter and plug into an electrical outlet The standby LED would be on as red Press the POWER button The power LED will be on as red It takes approximately 10 to 15 seconds to boot the system Channel T...

Page 14: ...ecording is initiated by manually pressing the REC button Indicated by the sign 2 EVENT RECORDING triggered by motion and external alarm When this functions is activated the recording is triggered by motion or external alarm Indicated by the sign and 3 TIMER RECORDING scheduled time Recording is scheduled by Timer Indicated by the sign TIMER RECORD Under Recording NOTE When the HDDs are full under...

Page 15: ... change 3 STOP Press button under all circumstance it will return DVR to live monitoring mode 4 CHANNEL SHIFT Display mode Press MODE button to select display mode Full Screen Switch Press or button to show the full screen channels Channel display switch Press button Press to select the channel which You would like to change Press or select the channel which You would like show Press ENTER button ...

Page 16: ... mode Press once to get forward by frame change Press once to get rewind by frame change 3 STOP Press button under all circumstance it will return DVR to live monitoring mode 4 CHANNEL SHIFT Display mode Press MODE button to 4 channels display Full Screen Switch Press or button to show the full screen channels Channel display switch Press SET to change channel display position Press to select the ...

Page 17: ...CKUP EVENT LOG EVENT LOG HDD INFO HDD INFO TITLE DISPLAY TITLE DISPLAY DATE DISPLAY DATE DISPLAY HDD INFO HDD INFO LOSS SCREEN LOSS SCREEN PLAYBACK PLAYBACK INFO INFO DWELL DWELL DURATION DURATION SEC SEC DE DE INTERLACE INTERLACE EXT ALERT EXT ALERT INT BUZZER INT BUZZER KEY BUZZER KEY BUZZER VLOSS BUZZER VLOSS BUZZER MOTION BUZZER MOTION BUZZER ALARM BUZZER ALARM BUZZER ALARM DURATION ALARM DURA...

Page 18: ...SIC In the following 7 9 sections is for 16 channels For 8 channels divided the IPS by 2 For 4 channels divided the IPS by 4 7 MANUAL RECORD IPS Recording is activated by pressing the REC button Select the images per second of MANUAL RECORD The options are as the followings NTSC NTSC FRAME 120 60 30 15 PAL PAL FRAME 100 50 25 12 CIF 480 240 120 60 CIF 400 200 100 50 MENU RECORD RECORD TIMER DATE A...

Page 19: ...els will form a group IPS per channel RECORD IPS 4 number of channels under recording within the group Ex If you set the record IPS as 480 IPS then Channel 01 will get 30 IPS 120 4 1 30 Channel 05 and 06 each will get 15 IPS 120 4 2 15 means under recording 4 3 MAIN MENU OPTIONS___TIMER 4 3 MAIN MENU OPTIONS___TIMER Move the cursor to the TIMER and press ENTER then the screen will show the followi...

Page 20: ...to set recording timer schedule from every Sunday 23 30 to Monday 23 30 then you could set recording timer schedule as Sunday from 23 30 to 23 30 Example 2 If you plan to set the timer recording from Sunday 08 00 to Monday 15 00 then you could set the recording timer schedule as Sunday from 08 00 to 00 00 and Monday 00 00 to 15 00 2 START Select the start time for the recording 3 END Select the fi...

Page 21: ...6 110 128 128 128 NO YES 07 110 128 128 128 NO YES 08 110 128 128 128 NO YES PREV NEXT 1 TITLE Move the cursor to the title which you want to change and press ENTER to access the setting screen Assign each channel a title up to six characters letters or symbols the default title is the channel number 2 BRIG CONT SATU HUE Adjust the Brightness Contrast Saturation Hue of each channel The level is fr...

Page 22: ... TIMER 1 DETECTION SETUP a TITLE Show the title of each channel of the camera b DET Select ON to activate the motion detect function of each channel Select OFF to inactivate the motion detect function of each channel c AREA Press the ENTER button to set detection area Pink blocks represent the area that is not being detected While the transparent blocks is the area that is under detection Press EN...

Page 23: ...ou set up to motion detection area f TS The sensitivity towards how long the object gets triggered The smaller the value is the higher sensitivity for motion detection The highest sensitivity setting is 00 and the lowest sensitivity setting is 15 The default setting is 02 g RE The value of RE is a reference for detection The default value is 10 which means DVR will compare 10 continuous images at ...

Page 24: ...SCREEN Set the color of video loss screen Blue or Black 5 PLAYBACK INFO Set the position where playback information will be indicated center or normal on the button of left hand side of the screen 6 DWELL DURATION SEC Set the duration time of each channel for CALL MONITOR 2 4 8 16 sec 7 DE INTERLACE Set the DE INTERLACE function on off 8 MONITOR OUT Select video output device Main monitor VGA outp...

Page 25: ...on off when pressing the button 4 VLOSS BUZZER Set the sound on off when video loss happened 5 MOTION BUZZER Set the sound on off when motion alarm triggered 6 ALARM BUZZER Set the sound on off when internal alarm triggered 7 HDD BUZZER Set the sound on off when the HDD is full 8 HDD NEARLYFULL GB If HDD buzzer is on you could choose to have a buzzer notification when the HDD available capacity is...

Page 26: ...tle of each camera 2 DEVICE Select to control normal camera or PTZ camera for each channel 3 ID Set the ID number 0 255 as same as the ID of each device 4 PROTOCOL Select NORMAL our protocol or PELCO D protocol 5 RATE Set the baud rate of each channel 2400 4800 9600 19200 57600 PTZ Control PTZ Control 1 Device Device Our own brand PTZ Pelco D protocol PTZ 2 Connection Connection Refer to rear pane...

Page 27: ...r NO to cancel 7 CLEAR HDD Press ENTER and YES to confirm clear HDD or NO to cancel In this function you can press or to select the HDD MASTER HDD SLAVE HDD or DISK ARRAY which you plan to clear 8 UPGRADE Press ENTER and select YES to confirm upgrade or NO to cancel 9 AUTO KEYLOCK Set the auto key lock function Never 10 sec 30 sec 60 sec 10 LANGUAGE Press ENTER and select the language of the OSD 1...

Page 28: ...HCP This DHCP function need to be supported by router or cable modem network with DHCP service For detailed DHCP setting please refer to P 36 and P 37 Licensed Software AP 3 NETWORK TYPE PPPoE This PPPoE function need to have username and password from ISP supplier For detailed PPPoE setting please refer to P 36 and P 37 Licensed Software AP NOTE DHCP and PPPoE network types need to apply DDNS ser...

Page 29: ... 3 AVAILABLE SIZE The information of the USB available capacity 4 CHANNEL Choose the channel 5 HDD NUM Choose the HDD 6 BACKUP TO USB Press ENTER to start backup the chosen file to USB BACKUP BACKUP USB BACKUP Select USB BACKUP and then press Enter NOTE NOTE c The USB format must be FAT 32 d If the USB is not supported by the DVR then the USB ERROR message will be shown on the screen e It is sugge...

Page 30: ...gain to close NOTE Use DVD NOTE Use DVD R DISK only R DISK only 2 Go to DISK BACKUP menu and set the start time end time channel and HDD number 3 After setting up the backup information move the cursor to START and press ENTER While the files are backup to DISK users will see the backup completed percentage on the screen 4 After backup files to DISK DISK BURN FINISH will prompt on the screen Press...

Page 31: ...cted HDD 4 15 ADVANCE MENU ___EVENT LOG 4 15 ADVANCE MENU ___EVENT LOG You can get all the information event type time and channel of the event list including video loss list net list other lists such as power on off key unlock reset to default Select the event list you want to see and press ENTER EVENT LOG EVENT LOG VLOSS LIST NET LIST OTHERS CLEAN ALL 1 VLOSS LIST Show the information of video l...

Page 32: ...ystem will save one recording file every one hour 5 ALARM LIST List of alarm trigger recorded files 6 MOTION LIST List of motion trigger recorded files 7 EVENT SEARCH Search by specific time period YEAR MONTH DAY HOUR MIN CHANNEL Display all the motion triggered recording videos When you saw the playback of the motion triggered recording videos it would play with fast speed 8 TIME SEARCH Search by...

Page 33: ... MAY 30 MON 14 50 37 30 MON 14 50 37 01 01 DIGITAL ZOOM DIGITAL ZOOM 400 GB 400 GB 2005 2005 MAY MAY 30 MON 14 50 37 30 MON 14 50 37 01 01 DIGITAL ZOOM DIGITAL ZOOM 400 GB 400 GB 1 Press the ZOOM button again to exit the zoom picture 2 Press button to move the zoom position 3 Users could also press the Digital Zoom button on the IR remote control panel 5 3 KEY LOCK 5 3 KEY LOCK 1 1 Key Lock On Key...

Page 34: ...ibutor or refer to Section 6 7 CONNECT TO AP VIA IE BROWSER Users can use USB to upgrade Please format the USB memory device as FAT 32 format first 1 Get the upgrade files from your distributor 2 Save the upgrade files in your USB device Do not change the file name 3 Go to the MAIN MENU SYSTEM UPGRADE and press ENTER 4 Select YES and press ENTER again to confirm upgrade NOTE c The USB format must ...

Page 35: ...work Type Dynamic IP DHCP and PPPoE PPPoE Set the Network information in System Config of the licensed software AP For detailed DHCP and PPPoE setting please refer to P 36 and P 37 g After setup the network information double click to enter login page Key in Username Password IP Static IP or Host name Dynamic IP and Port And then click the green button to connect h LOGIN AP Icon Explanation Addres...

Page 36: ... DVR as an example a Image Transfer Rate Per Second b Data Transfer Rate c Connect Disconnect d Resolution NTSC 320 228 640 456 PAL 320 276 640 552 e Image Quality High Medium Low f Snapshot press this button to have a snapshot of the image which will be saved in the designated destination d 60 121 46 236 v t b i a c e f g h p p o o q q r r l j k m n u w s 33 ...

Page 37: ...would like to change Press or select the channel which You would like to show Press Enter button to confirm s Sequence press this button to enter the call monitor function and press again to exit from call monitor mode t Enter u PTZ Control On Off When the PTZ control turned on users could select the PTZ device and press OK button to enter the PTZ control AP screen Press ESC to exit from PTZ contr...

Page 38: ...om PTZ control AP screen and back to DVR control AP screen q Menu Up Down Left Right r Turbo To speed up menu selection or the control of the PTZ camera under software AP users could activate Turbo function by clicking this button Users are allowed to change the turbo steps from 1 to 10 Ex If users activate the TURBO function and set the value of the turbo step as 3 then when users press one of th...

Page 39: ...king Reduce the video mosaic phenomenon OSD Display the OSD of the AP playback window AVI convert Convert the entire recorded file to AVI format Config Setting Enter AP config setting box and set the file destination text color and text color of progress status Watermark Proof the authenticity of the backup video Open Previous File Open previous backup video Open Next File Open next backup video A...

Page 40: ...e Note PPPoE and DHCP network connection type will require to apply DDNS service DDNS service to get a Hostname Hostname to correspond to dynamic IP address Please refer to P 37 for details Note Note Some router brand may need to restart the DVR to get the IP address f f Web Port Web Port The DVR can be viewed over the network with software AP or a web browser Typically the TCP port used by HTTP i...

Page 41: ...ite which provide free DDNS services For example http www dyndns org Create an account in DynDNS After created your account users will receive an confirmation e mail within few minutes To complete registration please follow the instructions received Users must complete these steps within 48 hours to complete the registration If the confirmation e mail was not received within an hour request passwo...

Page 42: ...rd refer to e mail system supplier e Please type in the entire email address in the Mail from column to ensure emails will not be blocked by SMTP f In some cases mail server require to verify password please enter the user name and password g After setting press APPLY to confirm FTP FTP c When alarm or motion is triggered a video copy file can be captured And DVR can upload the captured images to ...

Page 43: ...hannel of the installed external device Press Edit Edit to enter the setting box d Device Type Device Type Choose either general camera or PTZ camera e ID No ID No Set the ID number 0 255 of the installed external PTZ device f Protocol Type Protocol Type Choose NORMAL NORMAL protocol for our own brand camera Choose P P D D protocol for PELCO D protocol camera g Baud Rate Baud Rate Set the baud rat...

Page 44: ...tection RE RE The value of RE is a reference for detection The bigger the value is the higher sensitivity for motion detection e Alarm Alarm Select LOW HIGH for the alarm polarity f Motion Detection Area Motion Detection Area Clicking the area by PC mouse one can choose the motion area to be detected The under The under detection detection area is in transparent picture while area is in transparen...

Page 45: ...Time Progress Bar 3 Functions Functions 1 De interlace 2 De blocking 3 OSD 4 AVI Convert 5 Config Setting 6 Watermark 7 Open Previous 8 Open Next File 4 Playback Control Buttons Playback Control Buttons Play Stop Pause Fast Rewind Fast Forward 5 Snapshot Snapshot 6 Close the Player Close the Player Note Note While backup the file users can see the While backup the file users can see the live playb...

Page 46: ... e mail contained with the MJPEG pictures 1 10 pictures to be sent to the address which is set under Mail FTP Notification MJPEG pictures will be made at your designated space set in File Path plus a FTP file contained with the MJPEG pictures 1 10 pictures to be sent to the address which is set under FTP Alarm List Alarm List c It s a database which precisely lists all alarm triggered events with ...

Page 47: ...to different authority level different accounts can stay online for different time period 1min 5min 10min 1hour 1day infinity General General c Get the information of DVR firmware version in this window d Select Select Turbo Step Turbo Step 1 1 10 10 To speed up menu selecting or the control of the PTZ camera under video web server users can activate Turbo function by clicking this button Users ar...

Page 48: ...6 236 SUPERVISOR 320 228 MIDDLE c Snapshot Path Snapshot Path Assign the route for saving the snapshot picture d Record Path Record Path Assign the route for saving the manual recording file e Alarm Audio Path Alarm Audio Path The default alarm audio sound is alarm wav Users could have their own alarm sound file by giving the file path File Path File Path ...

Page 49: ...ase install licensed software AP first This function is suitable in both Windows 2000 and Windows X This function is suitable in both Windows 2000 and Windows XP P Step 3 Step 3 After installation please type the IP address of your DVR into the URL address box and press enter Then you ll see the login page Key in the username and password Then you ll see the following page Same as the AP operation...

Page 50: ...G 4 4 8CH_MPEG 8CH_MPEG 4 4 4CH_MPEG 4CH_MPEG 4 4 4 After installation the 16CH_MPEG 16CH_MPEG 4 4 8CH_MPEG 8CH_MPEG 4 4 4CH_MPEG 4CH_MPEG 4 4 icon will shown on the desktop of the phone 5 Click the icon of the 16CH_MPEG 16CH_MPEG 4 4 8CH_MPEG 8CH_MPEG 4 4 4CH_MPEG 4CH_MPEG 4 4 video server to enter the setting frame Please type in IP address port username and password of the DVR which you like to...

Page 51: ... ENABLE is set to YES No live video Check camera video cable and connections Check monitor video cable and connections Confirm the camera is power supplied Check the setting of camera lens No recorded video Check if the HDD is installed and connected properly DVR keeps rebooting Users could align the power connector and HDD closely or change another suitable HDD Detect HDD fail Change another HDD ...

Page 52: ...Connect the HDD to power connector and IDE BUS make sure to align the HDD precisely to the pin connection 4 Close the upper cover of the DVR 3 3 8 8 1 1 2 2 9 9 14 14 16CH 8CH 16CH D 8CH D 4CH D Carefully following the steps to ensure correct installation Note If you want to install two HDDs please set one HDD to Master Mode or Single Mode and the other one to Slave Mode ...

Page 53: ...he HDD correctly refer to Picture 3 and 4 You must precisely align the hard disk to the pin connection to ensure correct installation Step 4 Step 4 Reverse the HDD and put it into DVR refer to Picture 5 and 6 Step 5 Step 5 Connect the HDD with DVR refer to Picture 7 Step 6 Step 6 Lock the cabinet by turning the key clockwise refer to Picture 8 A locked B unlocked Step 7 Step 7 Close the cap refer ...

Page 54: ...s PIN 13 EXTERNAL ALARM NO EXTERNAL ALARM NO Under normal operation COM disconnect with NO But when Alarm triggered COM connect with NO PIN 14 PIN OFF PIN OFF PIN 15 PIN 22 ALARM INPUT ALARM INPUT To connect wire from ALARM INPUT PIN 15 22 to GND PIN 1 connector DMR will start recording and buzzer will be on When Menu Camera Alarm is set up to Low When alarm input signal is Low the unit starts to ...

Page 55: ... and connect with NO PIN 8 EXTERNAL ALARM NO EXTERNAL ALARM NO Under normal operation COM disconnect with NO But when Alarm triggered COM connect with NO PIN 9 GND GND Signal GND PIN 10 RS485 RS485 B B DVR can be controlled remotely by the keyboard of PC using RS 485 serial communications signals PIN 11 RS485 RS485 A A DVR can be controlled remotely by the keyboard of PC using RS 485 serial commun...

Page 56: ...0x62 b KEY_CH5 0x35 5 KEY_16 CUT 0x63 c KEY_CH6 0x36 6 KEY_SLOW 0x53 S KEY_CH7 0x37 7 KEY_REC 0x72 r KEY_CH8 0x38 8 KEY_LEFT 0x4C L KEY_CH9 0x39 9 KEY_UP 0x55 U KEY_CH10 0x41 A KEY_PLAY 0x50 P KEY_CH11 0x42 B KEY_DOWN 0x4E N KEY_CH12 0x43 C KEY_RIGHT 0x52 R KEY_CH13 0x44 D KEY_POWER 0x57 W KEY_CH14 0x45 E KEY_KEY LOCK 0x4B K KEY_CH15 0x46 F KEY_CH16 0x47 G 1 Use PC keyboard to simulate DVR keypad ...

Page 57: ... 2 60 516 21 5 30 939 39 1 15 1517 63 2 480 130 5 4 240 229 9 5 120 417 17 4 60 673 28 0 480 184 7 6 240 323 13 4 120 587 24 5 60 949 39 5 480 242 10 1 240 424 17 7 120 773 32 2 60 1249 52 0 480 335 13 9 240 588 24 5 120 1071 44 6 60 1730 72 1 Frame Best High Normal Basic CIF Best High Normal Basic 1 Recording time varies depending on the following factors Different camera quality Different pictur...

Page 58: ...cturer Manufacturer Model Model Capacity Capacity Transcend JetFlash 110 256MB Transcend JetFlash 110 512MB Kingston DataTraveler DTI KUSBDTI 256FE 256MB Kingston DataTraveler DTI KUSBDTI 256FE 512MB PQI Cool Drive U339 256MB PQI Cool Drive U339 512MB Apacer HANDY STENO HF202 256MB Apacer HANDY STENO HF202 512MB SanDisk Cruzer Micro 128MB SanDisk Cruzer Micro 256MB SanDisk Cruzer Micro 512MB 55 ...

Page 59: ...0GB 200GB 80GB 120GB 160GB 200GB 250GB 120GB 200GB 250GB Deskstar 7K250 HDS722516VLAT20 HDS722516VLAT80 HITACHI HDS722516DLAT80 7200rpm HITACHI Deskstar 7K250 HDS722525VLAT80 7200rpm IBM Deskstar 120GXP 80GB 7200 rpm IBM Deskstar 120GXP 120GB 7200 rpm Maxtor DiamondMax 536DX 60GB 4W060H4 5400rpm Maxtor DiamondMax Plus 9 7200 rpm Maxtor DiamondMax Plus 9 Model 6Y120L 7200 rpm Maxtor DiamondMax Plus...

Page 60: ......

Reviews: