background image

3

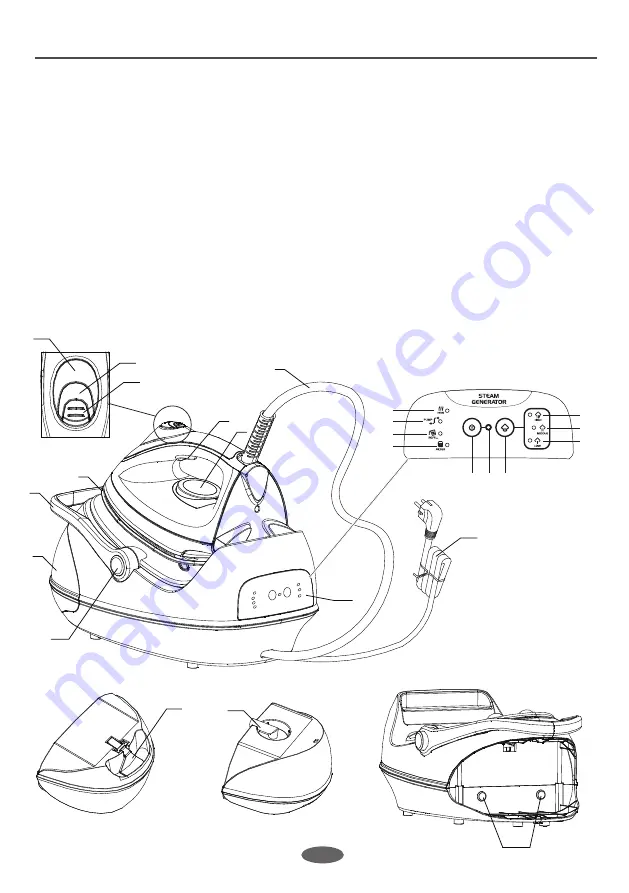
Parts and Features

1.  Water tank

2.  Handle

3.  Soleplate

4.  Heating indicator light

5.  Steam button

6.  Steam button lock

7.  Steam button

8.  Temperature control dial

9.  Power cord/Supply hose

10. Power cord

11.  Handle Button

12. Heating indicator light 

(Power base)

13. Pump working indicator light

14. Filling indicator light

15. Filter replacement indicator light

16. Power ON/OFF

17. Power indicator light

18. Steam selection switch

19. High steam setting indicator light

20. Medium steam setting indicator light

21. Low steam setting indicator light

22. Control panel

23. Water tank release

24. Filter

25. Water tank indicator light

23

24

25

4

5

6

1

2

3

7

8

9

10

11

22

12

19
20

21

13

14

15

16 17 18

Summary of Contents for Ceramic Series

Page 1: ...v1 1 ...

Page 2: ...ontal surface or ironing board and then place the iron on the power base 12 Place the iron on the power base Do not allow power cord or supply hose to touch hot surfaces 13 Burns can occur from touching hot metal parts hot water or steam Use caution when using the appliance If the iron is placed onto the iron rest plate during in use the iron rest plate may become a hot surface Do not touch the ir...

Page 3: ...ght Power base 13 Pump working indicator light 14 Filling indicator light 15 Filter replacement indicator light 16 Power ON OFF 17 Power indicator light 18 Steam selection switch 19 High steam setting indicator light 20 Medium steam setting indicator light 21 Low steam setting indicator light 22 Control panel 23 Water tank release 24 Filter 25 Water tank indicator light 23 24 25 4 5 6 1 2 3 7 8 9 ...

Page 4: ...truction Steam Selection Temperature control dial Synthetics Silk Nylon Arcrylic Acetate Wool Polyester Rayon cotton Linen Rayon cotton Linen Dry Iron on the opposite side of the fabric Use a press cloth and Steam Iron on the opposite side of the fabric Iron while fabric is still damp Steam Ironing ...

Page 5: ...rt it should be ironed for polyester and without steam 6 If you do not know what kind of fabric the article is made of iron a piece of the material which is not visible when you wear to find out the appropriate temperature for your articles 7 Pure woolen fabrics 100 wool should be ironed with the iron setting to steam ironing position It is advisable to set the temperature control button to Max po...

Page 6: ...from the base Once power on water tank indicator light will turn off while water tank is sliding out Fig 2 2 Take the filter upwards out from the water fill hole You can take the filter out of the opening for filling water into water tank or fill water into water tank directly with the filter existing in the opening Fig 3 3 Fill the water tank up to or below the MAX fill line with clean water Fig ...

Page 7: ...tank 2 Connect the appliance into a suitable socket outlet Press power switch on control panel a Beep sound and the power indicator light illuminates it shows that the unit has been connected to the power supply Water tank indicator light will also light up Heating indicator light will turn on to indicate that the steam chamber being heated up Low steam setting indicator light turns on to indicate...

Page 8: ...roning immediately since it may cause burns to your fabrics Please wait until temperature indicator light lights up steadily and then start ironing 8 Dry ironing How to use your steam generator 5 During steam ironing please adjust steam rate according to your requirement as indicated in the steam function setting 6 After use Set the temperature control dial to MIN position and place the iron back ...

Page 9: ... steam hose Vertical steam ironing Auto locking function for steam button If long time steam ironing is needed please press down steam button lock and then push it backwards steam button will automatically lock Steam will escape continuously If you want to stop steam please push steam button lock forward Note Once steam button auto locking function is activated do not leave iron unattended Water f...

Page 10: ...m base unit Fig 9 take the filter out from water tank Fig 10 and then replace with a new one Fig 11 After new filter has been installed into water tank fill water tank to Max fill level and then slide tank back into base unit Immerse filter in water for several minutes in order to gain better performance for future use 3 After power up press steam selection switch and Power ON OFF concurrently Fig...

Page 11: ...ssible or use bottled water Anti calc system Auto shut off function This appliance has a safety protection device in the base unit If the supply hose is blocked accidentally the safety valve will be opened to release steam from the safety vents under the base unit along with high pitch sounds Once this happen unplug the appliance immediately and check whether any damage is found in the supply hose...

Page 12: ... method Press two handle buttons at the same time to lay down the handle Fig 14 After use allow the appliance completely cool down Fig 15 put the iron onto power base Lift handle up There will be a click sound to indicate the handle has been locked in place and you can carry the appliance by the handle Use of the handle Emptying and storing 1 Unplug the appliance from the main supply and let the i...

Page 13: ...ir No water or not enough water in water tank Fill water to water tank as described in Fill water tank Water tank has not been installed in place Well install the water tank Un known malfunctions Take it to qualified service man or manufacturer for repair The appliance comes into auto shut off mode The set temperature has not been reached Press power ON OFF to reset it Allow sufficient time to pre...

Reviews: