background image

DVR4-2500™ Unit

Remote Control

Operating Instructions

Easy Setup Guide

Power Adapter with Cable

Software CD

Network cable

USB cable

RCA Video Cable

RCA to BNC adapters X 4

Security Stickers (4 Pack)

If you are missing any of the components above, contact Swann Communications 
for assistance.

Package Contents

4

Summary of Contents for D02C5

Page 1: ...DVR4 2500 4 Channel H 264 Digital Video Recorder Operating Instructions plug playsecurity Advanced security made easy SW342 2DV www swannsecurity com SR342 2DV 60010 230709 Operating Instructions ...

Page 2: ...eived including interference that may cause undesired operation IMPORTANT NOTE Prohibition against eavesdropping Except for the operations of law enforcement officers conducted under lawful authority no person shall use either directly or indirectly a device operated pursu ant to the provisions of this Part for the purpose of overhearing or recording the private conversations of others unless such...

Page 3: ... Search and Playback 17 Backing up Footage 19 Motion Detection 19 Password Control 21 Language 21 System Menu 22 PTZ 23 Auto Email Setup 26 Playing Backed Up Footage on a PC 27 Installing the DVR Software 28 Configuring Active X 29 Network Setup 30 D9 Viewer Software 31 About IP Addresses 38 Port Forwarding 38 Installing Changing the Hard Drive 39 Troubleshooting 40 Technical Specifications 41 Add...

Page 4: ... Easy Setup Guide Power Adapter with Cable Software CD Network cable USB cable RCA Video Cable RCA to BNC adapters X 4 Security Stickers 4 Pack If you are missing any of the components above contact Swann Communications for assistance Package Contents 4 ...

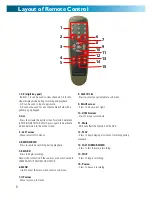
Page 5: ...o move cursor left 10 Pause Press to pause a record ing During single display mode press to activate sequence mode AUTOSEQ must be set 11 Play Press to begin playing most recent recording 12 Fast forward Press to fast forward a recording press to move cursor right 13 Stop Press to stop a recording 14 Record Press to begin record ing Note will not function if the cameras are not activated in CAMERA...

Page 6: ...IND RWD Press to rewind a recording during playback 5 RECORD Press to begin recording Note will not function if the cameras are not activated in CAMERA SETUP AND RECORD SETUP 6 MENU Used to enter the main menu or exit a sub menu 7 UP arrow Move cursor up in menus 8 SELECT SEL Press to select an option enter a sub menu 9 RIGHT arrow Press to move cursor right 10 DOWN arrow Press to move cursor down...

Page 7: ...ct the camera power supply to the other end of the power splitter 4 Connect the BNC end of the extension cables to the camera connections on the back of the DVR unit CH1 CH2 CH3 CH4 5 Connect the DVR power supply plug into the power supply socket on the back of the DVR 6 Plug in the camera power adapter and the DVR power adapter to mains power outlets 1 2 3 4 5 Cameras and accessories optional 6 ...

Page 8: ...boot Whilst booting the DVR will show this screen Once the DVR has booted up and you have a camera connected to each channel the DVR will take you straight to the QUAD view screen showing all four displays below 3 1 1 Displays showing cameras 1 and 3 2 Audio icon in this case audio in active on camera 1 3 Displays showing cameras 2 and 4 4 Date stamp year month day and Time stamp hour minutes seco...

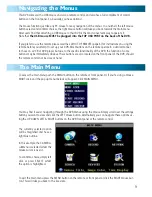
Page 9: ...f the menus In a nutshell the left mouse button selects and confirms choices the right mouse button will take you back towards the main menu Most users find that attaching a USB mouse to their DVR is the most convenient way to operate it Note that the USB mouse MUST be plugged into the TOP USB PORT on the back of the DVR If you prefer to use the remote please read the LAYOUT OF REMOTE page 6 for i...

Page 10: ...re some options that need to be configured Here s a quick rundown of what s what OVERWRITE When set to ENABLE the DVR will record over the oldest files on the hard drive This is the default setting and probably the most preferable as the DVR will always be able to record events as they happen However it does mean that you ll need to get important events off the HDD before they re overwritten If ov...

Page 11: ... ve turned DST you ll need to set the appropriate DST MODE from the additional drop down menu which will appear Select the appropriate option If you choose CUSTOM you will be asked to configure the DST MODE to suit the needs and requirements of your locality see next page for de tails It s important to set the Time Date before recording footage That way when you search for events they ll be listed...

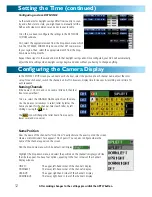
Page 12: ...the title to appear You have four options equating to the four corners of the channel s display window UPLEFT The upper left hand corner of the channel s display DOWNLEFT The lower left hand corner of the channel s display UPRIGHT The upper right hand corner of the channel s display DOWNRIGHT The lower right hand corner of the channel s display Naming Channels Name Position After making changes to...

Page 13: ...actly how long you d like each channel to be visible for Remember that channels without cameras attached will still be displayed unless you ve set them to be OFF in live viewing mode see above After making changes to the settings press click the APPLY button HUE Changes the color mix of the frame this can have very dramatic results BRIGHT Changes how light all tones in the image appear CONTRAST In...

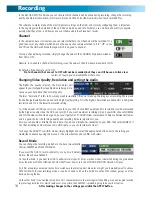
Page 14: ...ou want maximum recording time on your HDD choose NORMAL and CIF the video will not look as good but you ll get lots of it GOOD strikes somewhat of a balance between extremes and is a good choice is both image quality and recording time are important to you Also you can enable or disable the audio here If you have microphones connected to your DVR then select ENABLE If not then disabling audio wil...

Page 15: ...e schedule button to access the SCHEDULE screen After clicking the SCHEDULE button a new screen will open showing A CHANNEL drop down list which contains channels 1 through 4 A weekly timeline with each box number 0 23 each representing an hour in a day Three checkboxes one for each record mode being ALARM GENERAL NO RECORD A COPY option The DVR schedule can be set to record using three different ...

Page 16: ...p down menu Then select the day you d like to copy the schedule to from the second If you d like all days to operate on the same schedule choose ALL from the second drop down menu Then using the arrow buttons or the mouse highlight the COPY button and left click or press select The schedule for the selected day will be copied to the day s you have selected Chunk Size is a measurement of how long t...

Page 17: ...he date numeric field or highlight it using the arrow keys and press select 2 Select a digit to alter Once selected it will be highlighted red and can be edited You will see a yellow pop up keypad Scroll or move over the digits on the keypad left click or press select to input the date Note the first two digits of the year 2 0 cannot be changed 3 Highlight the button and left click or press select...

Page 18: ...ow buttons to highlight the TYPE drop down menu and left click or press select Choose from NORMAL ALARM or ALL You will see all recordings from the channel s you have chosen in that recording mode Playing back Recordings Using the mouse or the arrow buttons highlight the re cording you wish to view and left click or press select You will be taken to the playback window To exit playback and return ...

Page 19: ...ividual motion detection setting This can be set to ON OFF Whilst motion detection is set to OFF the DVR will record by default Turning motion detection ON will actually stop the DVR recording until it detects motion In addition you can also adjust the motion sensitivity level and set the motion detection area This is important as in some areas you may need a more touchy motion sensitivity than ot...

Page 20: ...tection Motion Detection continued A Note on Motion Detection The way that the DVR looks for motion is quite straight forward it s a process where it compares one frame that is a single image taken approximately a 25th 30th of a second from the previous image with the next A certain amount of difference between these two frames is interpreted as motion As a result the DVR is able to detect when th...

Page 21: ...of the functionality of the DVR Using the arrow buttons or the mouse highlight the password field that you would like to change To change the LANGUAGE setting Open the LANGUAGE submenu It is located in the SYSTEM menu Using the mouse or the arrow buttons select the drop down menu of languages Choose the language that best suits your needs Confirm your choice by pressing select or left clicking the...

Page 22: ...he AUTO REBOOT frequency Using the mouse or the arrow buttons highlight the AUTO REBOOT frequency drop down menu Choose the frequency that best suits your needs We suggest weekly or monthly rebooting as being sufficient however if your DVR s performance is unstable try increasing the reboot frequency To select the AUTO REBOOT time Depending on your AUTO REBOOT frequency setting you will be present...

Page 23: ...t is important to use the correct protocol for the PTZ system being used this will be explicitly stated somewhere in the PTZ cameras documentation The DVR4 2500 supports Pelco D and Pelco P make sure any PTZ cameras you connect to the DVR use one of these two protocols and select the most appropriate protocol for your system here Open the DATE TIME menu located in the SYSTEM menu 1 By using the mo...

Page 24: ...e required settings for the camera system Consult the camera documentation to learn these values Address As there is only one RS485 port and multiple PTZ systems can be connected to the DVR if required each one needs its own address Again this value is matched to the camera that the user wants to be controlled on that channel So usually the camera operating on channel 2 would have its PTZ address ...

Page 25: ...e field of view You may need to adjust focus when using the ZOOM function 4 FOCUS Adjusts the focal plane of the lens If an image is blurry try adjusting the focus To best set the focus move one direction until things become clear and then blurry again Move back and forth until you find sharp focus 5 IRIS Controls how much light gets into the camera If things look too bright or white lower the IRI...

Page 26: ...settings can vary dramatically from one email provider to the next Note that highlighting a field and pressing SELECT twice will make a key board appear onscreen allowing you to enter alphanumeric characters Step 4 Once you ve entered all the required information the information in the fields should look something like the example shown left We stress that this is an example only the information y...

Page 27: ...t the incompatibility is due mostly to incompatible drivers Assuming that you ve used the default installation paths you can access the playback software by selecting the desktop icon named Playback Software or finding the program group of the same name in your Start Menu The default interface of the playback software is displayed to the right Opening Files Open the File menu and choose Open Local...

Page 28: ... D9 VIEWER DBG ENG EXE file 3 In the setup window click NEXT For the best results when using a PC to access the DVR use the included software which came on the mini CD included with your DVR This software is compatible with Windows based computers only and will not run under operating systems such as Mac OS or Linux Also the software will not operate correctly on 64 bit Windows systems 64 bit arch...

Page 29: ...ET OPTIONS click on the SECURITY tab at the top 4 Select the INTERNET zone option 5 Click on the CUSTOM LEVEL button 6 Find the the following three options and SET them to PROMPT Download signed ActiveX controls Download unsigned ActiveX controls Initialize and script ActiveX controls not marked as safe for scripting Set the next two options to ENABLE Run ActiveX controls and plug ins Script Activ...

Page 30: ...sary First access the NETWORK SETUP menu from the MAIN MENU What is an IP ADDRESS An IP ADDRESS is something like the address of your house Whilst the address of you house allows traveller s to find your house on the road network an IP ADDRESS allows devices to find one an other over an electronic network There are two types of IP ADRRESS PUBLIC IP ADDRESSES and PRIVATE IP ADDRESSES See page 38 fo...

Page 31: ...u will need to access this site from a computer which is on the same network as your DVR Input the IP address you get from the WHATISMYIP website in the HOST NAME field when logging into the DxClient or in the address bar when accessing the using Internet Explorer Consult page 37 for more information regarding PRIVATE IP ADDRESSES and PUBLIC IP ADDRESSES Starting D9 Viewer 00085 192 168 1 100 Open...

Page 32: ...e D9 Viewer 9 PTZ Control Pan Tilt Zoom controls 10 Open Window Capture Record 11 Single Quad View Buttons Click to change between single and quad viewing mode 12 Volume Bar LEFT click and drag mouse from left to right to increase the DVR volume 13 Mute Click mute sound 2 1 3 4 5 6 7 9 8 10 11 12 13 Click to OPEN and CLOSE live view Click to view single camera view Click to to view quad view Click...

Page 33: ...the most recent files lower on the list 4 LEFT click highlight the file you would like to playback 5 LEFT click the button The file you selected will now playback on the playback screen You will see a icon beside the file that is playing Use the playback controls at the bottom of the playback screen to STOP fast forward F F reduce the speed SLOW and play the next frame NEXT FRAME of the file You c...

Page 34: ...over LEFT click the boxes to set the hours to the record mode you chose RED ALARM GREEN NORMAL WHITE NO RECORD 2 Resolution Quality Scroll over LEFT click to highlight a button to set the QUALITY BEST FINE or NORMAL vii Scroll over then LEFT click beside the COPY viii You will see a dropdown list with SUN MON TUE WED THU FRI SAT ix Scroll over the day you want to copy the schedule FROM x LEFT clic...

Page 35: ... Space HDD Loss i Scroll over the dropdown list and LEFT click ii Select ON to switch the function ON for that channel Selecting OFF will turn the function OFF for that channel iii LEFT click Video Loss Setting this to ON will activate the buzzer when a camera has been disconnected VIDEO LOSS will also be displayed on the display If it is set to OFF you will only see the VIDEO LOSS displayed but t...

Page 36: ...e one for USER password one for ADMIN password and the other two for verifying the passwords you input 1 Scroll over LEFT click the button 2 Select the location where you want to store saved files 3 LEFT click OK 1 Scroll over the drop down list and left click 2 Select ON to set up a password for the DVR 3 Left click 1 LEFT click on the USER PASSWORD text field 2 Type in your password Note be sure...

Page 37: ...ight savings time This can be set to DEFAULT DVR determines DST or to CUS TOM you enter the date DST takes place Host Info In the HOST INFO screen you will see certain information regarding the DVR such as available hard drive space firm ware version and MAC address The next dropdown list below will become active Here you can choose to set DST or leave it on default an allow the DVR to determine D...

Page 38: ... 0085 if you followed our instructions in the NETWORK SETUP section to the PRIVATE IP ADDRESS of the DVR This has to be done in your router s PORT FORWARDING settings not in the DVR or your computer Routers are third party hardware and there are literally hundreds of different models out there thus unfortunately we cannot give you a step by step guide to how to configure yours However we have some...

Page 39: ... the cable from the hard drive Unplug the power cable 2 BLACK 1 YELLOW and 1 RED cable from the back of the Hard Drive Power Cable SATA Cable Note the following instructions are for installing or changing the hard drive If your DVR already has a hard drive pre installed disregard these steps 1 Ensure the DVR is unplugged and removed from mains power 2 Locate and remove the 3 screws on the rear of ...

Page 40: ... then the DVR maybe faulty We suggest you return the DVR to the retailer Problem I am not getting picture on any of my displays Solution Make sure the cameras are connected properly to the DVR and the power supply 12V 1A Check that the cables are not faulty by connecting the cameras directly to the DVR or to a TV if you have the proper adapters Problem One of the displays is not showing on my scre...

Page 41: ... PAL D1 704 x 576 HD1 704 x 288 CIF 352 x 288 Recording Frame Rate NTSC 30fps D1 60fps HD1 120fps CIF PAL 25fps D1 50fps Hd1 100fps CIF Recording Modes Manual Motion Schedule Sensor Multiplex Operation Triplex HDD Interface SATA Hard Drive Support Up to 1TB Network LAN Connection Yes Network Interface RJ45 Network Protocol s TCP IP DDNS Remote Operation Yes General Operating Power DC12V Dimensions...

Page 42: ...obile device from your computer Remember to use the 5 Safely Remove Hardware option if applicable Using your mobile device execute the 6 AMPLAYERSETUP EXE file Follow the prompts to complete the installation Once installation is complete open the Start Menu 7 Run the program called 8 QQeye Near the top of the main interface there is a button labelled 9 Setting Click this button Here you ll need to...

Page 43: ...ental or consequential damages arising from the use of or the inability to use this product Any costs associated with the fitting or removal of this product by a tradesman or other person or any other costs associated with its use are the responsibility of the end user This warranty applies to the original purchaser of the product only and is not transferable to any third party Unauthorized end us...

Page 44: ...tion on time zones and the current time in Melbourne Australia compared to your local time USA toll free 1 800 627 2799 Su 2pm 10pm US PT M Th 6am 10pm US PT F 6am 2pm US PT USA Exchange Repairs 1 800 627 2799 Option 1 M F 9am 5pm US PT AUSTRALIA toll free 1300 138 324 M 9am 5pm AUS ET Tu F 1am 5pm AUS ET Sa 1am 9am AUS ET NEW ZEALAND toll free 0800 479 266 INTERNATIONAL 61 3 8412 4610 ...

Reviews: