background image

7

Convention used in this 

This manual is a setup and maintenance guide that can be used for refer-
ence when setting up the unit and for troubleshooting when a problem 
occurs. Only authorized personnel should attempt to repair this unit.

This manual explains about 16 channels DVR.
It differs as several functions and screen comparing with 8 channels DVR.
For example, the number of screen, button and sequence etc.

Manufactory reserves the right to make changes to the product repre-
sented by this manual without notice.

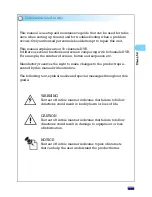
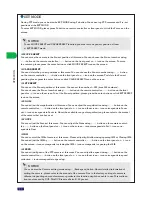
The following text, symbol marks and special messages throughout this 
guide:

WARNING

Text set off in this manner indicates that failure to follow 
directions could result in bodily harm or loss of life.

CAUTION

Text set off in this manner indicates that failure to follow 
directions could result in damage to equipment or loss 
of information.

NOTICE

Text set off in this manner indicates topics of interests 
that can help the user understand the product better.

Summary of Contents for dvr 16-8500ai

Page 1: ...QUICK START GUIDE We ve included this convenient Quick start guide to show you basic functions and techniques that will help you quickly master DVR ...

Page 2: ...QUIPMENT HAS BEEN TESTED AND FOUND TO COMPLY WITH THE LIMITS FOR A CLASS A DIGITAL DEVICE PURSUANT TO PART 15 OF THE FCC RULES THESE LIMITS ARE DESIGNED TO PROVIDE REASONABLE PROTECTION AGAINST HARMFUL INTER FERENCE WHEN THE EQUIPMENT IS OPERATED IN A COMMERCIAL ENVIRONMENT THIS EQUIPMENT GENERATES USES AND CAN RADIATE RADIO FREQUENCY ENERGY AND IF NOT INSTALLED AND USED IN ACCORDANCE WITH THE INS...

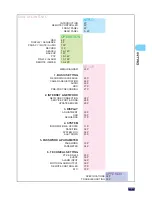
Page 3: ...MUTE AUDIO RECORD SEARCH BACKUP PTZ RS 232 ALARM REMOTE VIEWER 38P 39P SPECIFICATIONS TROUBLESHOOTING MENU DIAGRAM 1 BASIC SETTING RECORDING SCHEDULE CAMERA REGISTRATION AUDIO HDD PRE POST RECORDING 2 INTERNET NETWORK NETWORK CONNECTION SERVICE PORT DDNS UPDATE SERVER 3 DISPLAY ADJUSTMENT OSD SEQUENCE 4 SYSTEM INFORMATION UPDATE DATE TIME SYSTEM LOG SHUTDOWN 5 PASSWORD PARAMETER PASSWORD PARAMETER...

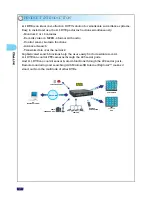
Page 4: ...s data over the network Sophisticated search functions help the user easily find a desirable record A I DVR can control PTZ cameras through the 485 serial ports And A I DVR can control sensor alarm functions through the 232 serial ports Remote monitoring and searching with Microsoft Internet Explorer makes it stand out from the multitude of other DVRs A I DV PRODUCT INTRODUCTION 2 REMOTE CONTROLLE...

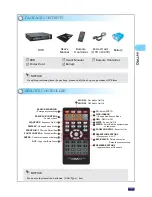
Page 5: ... Off MUTE Sound On Off FUNCTION PTZ mode Enter Exit MENU Enter Exit the system menu or sub menu FOCUS CONTROL Focus Near Far ZOOM CONTROL Zoom In Out ENTER Confirm selection or Setting NUMBER BUTTONS Input numbers or Channels DOT Input dot Auto Focus BACKSPACE Delete character Enter the camera setup NOTICE Make sure that insert the batteries AAA Type 2ea NOTICE If anything is missing from the pack...

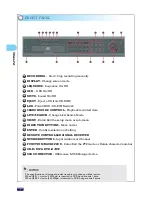
Page 6: ...enu or sub menu DIRECTION BUTTONS Move cursor ENTER Confirm selection or Setting REMOTE CONTROLLER SIGNAL RECEIVER NUMBER BUTTONS Input numbers or Channel FUNCTION BACKSPACE Enter Exit the PTZ mode or Delete character number CD R RW DVD R RW USB CONNECTOR USB mouse USB Storage device NOTICE The specification or design of product is subject to change without notice When USB 1 1 device 12 Mbps is in...

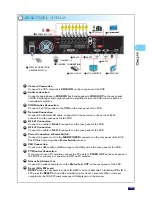
Page 7: ...ar panel of the DVR Connect the Normal LAN cable connected to the network to the network RJ 45 connector on the rear panel of the DVR Connect the cable to RS 232 connector on the rear panel of the DVR RS 485 Connection Connect the cable to RS 485 connector on the rear panel of the DVR Power Connection Power Switch USB Connection Connect the power cord to the MAIN POWER connector on the rear panel ...

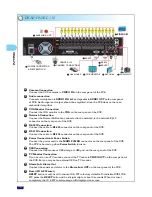
Page 8: ...e to RS 232 connector on the rear panel of the DVR RS 485 Connection Connect the cable to RS 485 connector on the rear panel of the DVR Power Connection Power Switch USB Connection Connect the power cord to the MAIN POWER connector on the rear panel of the DVR The DVR is booted up when Power Switch turns on Reset ID PW reset Alarm In Alarm Out RESET button is only used to restore ID PW to factory ...

Page 9: ... button and sequence etc Manufactory reserves the right to make changes to the product repre sented by this manual without notice The following text symbol marks and special messages throughout this guide WARNING Text set off in this manner indicates that failure to follow directions could result in bodily harm or loss of life CAUTION Text set off in this manner indicates that failure to follow di...

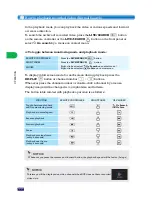
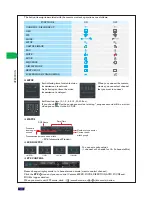
Page 10: ...ecording Off Audio On Recording Off Audio Off Recording On Audio On Recording On Date Time Mute Change screen mode Move the Next Group at 1 4 9Ch screen mode Go to the Statistics search menu Go to the Smart search menu Go to the Event search menu Go to the beginning of recorded data Go to the end of recorded data Go to the Backup menu Go to Live mode This context menu will be appeared when you pre...

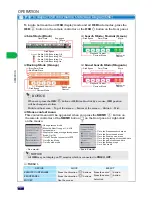
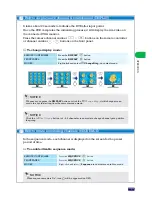
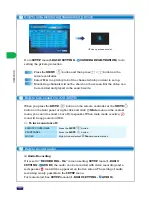
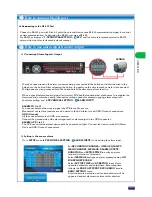
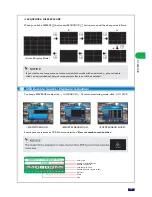
Page 11: ...9 channel screen mode to change channel group within the group How to rotate monitoring channels SEQUENCE To change display mode To enable disable sequence mode It takes about 20 seconds to initialize the DVR after input power Once the DVR completes the initializing process it will display the live video on the connected VGA monitor Press the camera channel number buttons on the remote controller ...

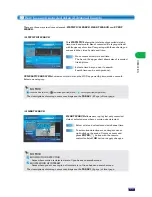
Page 12: ...ick and click Mute menu on the context menu you can turn sound on or off via speaker When mute mode is active icon will be appeared on OSD Privacy screen mode Go to SETUP menu 1 BASIC SETTING CAMERA REGISTRATION to do setting the private protection Press the MENU button and then press button on the remote controller Select On in a privacy tab of the channel which you want to set up Monitoring chan...

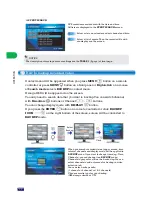
Page 13: ...PUT You can select that the recording channel day time image quality REC mode and number of frame for recording For more detail See SETUP manual 1 BASIC SETTING RECORDING SCHEDULE Set recording mode to MOTION on SETUP menu 1 BASIC SETTING RECORDING SCHEDULE Select MOTION AREA on SETUP menu 1 BASIC SETTING CAMERA REGISTRATION Recording will be started when the motion occurs at set area For more det...

Page 14: ... menu NOTICE Whenever you press the reverse and forward button the playback speed will be faster 3 steps The button table related with playback operation is as follows Go Search Go Live Playback at normal speed Reverse playback Forward playback Pause Playback previous frame every 4 seconds Playback next frame every 4 seconds Toggle between playback and live monitoring mode REMOTE CONTROLLER FUNCTI...

Page 15: ...T SEARCH The descriptions of moving cursor or settings see the TABLE 1 8 Page of front page CUMULATIVE ANALYSIS shows size of total data on the HDD by period by time week or month Select one category SMART SEARCH allows user to play fast only recorded data of selected area where a motion was detected Select a date on calendar and set channel time To set motion detection areas drag mouse or right c...

Page 16: ...ckup recorded video When you search recorded data at upper screen time interval channels and display mode will be applied to BACKUP menu If you want to change items eg Time Channels you can change it on BACKUP menu Channels in gray color will not be backed up You can select channels to add or remove for backup in video selection tab You can also backup audio 1 channel or 2 channel or 1 2 channels ...

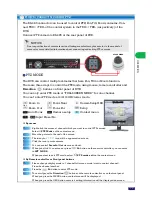
Page 17: ...ontrol PTZ camera Select PTZ Mode on the context menu Move the pointer to the end of the screen The triangle icon will be appeared on screen Click the icon to move camera You can control Zoom In Out via mouse wheel When you click Fn on screen or press Fn button on the remote controller you can enter to SET MODE When you want to exit PTZ mode select PTZ mode exit on the context menu Zoom In Zoom Ou...

Page 18: ...lick CLEAR PRESET icon on the screen CLEAR PRESET You can set the Pre set position at this menu You can set the number 1 255 max 255 numbers You can choose the Pre set number using button on the remote controller button on the front panel or icon on the screen To set the Pre set position please press the enter button or click SET PRESET icon on the screen SET PRESET You can adjust the magnificatio...

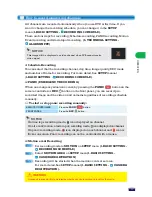
Page 19: ...are common Connect the ground side of the alarm input and or alarm output to the GND connector ALARM OUT 1 to 16 The DVR can activate external devices such as buzzers or lights Connect the device to the AO Alarm Out and GND Ground connectors Go to SETUP menu 6 TECHNICAL SETTING ALARM INPUT to do setting the alarm input Connect to RS 232 port with D sub 9 pin if the external device uses RS 232 comm...

Page 20: ...ally keeps ON state and converts to OFF when sensor is detected Alarm output method can be set by High Low or Low High in each channel High Low method converts output circuit from ON state to OFF Low High method converts output circuit from OFF state to ON For more information related to RS 232 setting see its manufacture s manual When motion is detected in each camera channel during active time a...

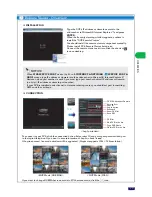
Page 21: ...xe Connect the remote viewer next time click the shortcut icon on desktop NOTICE When WEB SERVICE PORT was set by 80 in 2 INTERNET NETWORK SERVICE PORT DDNS menus type IP address or domain into the address bar in Microsoft Internet Explorer However when port number is not 80 you must type port number behind IP address or domain ex http IP address or domain port number If your DVR is installed unde...

Page 22: ... 2 channel or 1 2 channels Mix AUDIO SETUP PTZ CONTROL Please change display mode to 1 channel screen mode want to control channel Click the PTZ icon and you can control Camera SPEED FOCUS DIRECTION AUTO FOCUS and ZOOM at upper window When you want to exit PTZ mode click search mode or live mode button When you connect the remote viewer you can select channel that you want to connect Set buffering...

Page 23: ...hannel Large screen and small screen will be switched DVR Remote Viewer Playback Backup Search process is same as DVR For more detail see How to search recorded video STATISTICS MODE SMART SEARCH MODE EVENT SEARCH MODE To change PLAYBACK mode click GO SEARCH To return monitoring mode click GO LIVE Default Display Mode Date Time Current Operation Mode Rewind 1min 5min Forward 1min 5min Play Pause R...

Page 24: ...K PLAYER HOW TO BACKUP This context menu will be appeared when you right click the mouse PC Requirement for Remote Software Recommended BACKUP ICON Click button Searching for backup interval Enter Backup setting mode Pentium 4 2 0G or higher 512M or higher 128M or higher 1024 768 or higher 100MB BASE Ethernet or higher Microsoft Windows 2000 XP 2003 Microsoft Internet Explorer 6 0 or higher CPU ME...

Page 25: ...DING SCHEDULE CAMERA REGISTRATION AUDIO HDD PRE POST RECORDING NETWORK TYPE IP ADDRESS SUBNET MASK GATEWAY PRIMARY DNS SECONDARY DNS NETWORK CONNECTION SERVICE PORT DDNS INTERNET NETWORK WEB SERVICE PORT USE DDNS DDNS ID CHECK ID BRIGHT COLOR CONTRAST DISPLAY ADJUSTMENT OSD SEQUENCE CH INFO DATE TIME DISK SPACE RECORDING MODE DURATION USE THE SEQUENCE MODE AT STARTUP SETUP Menu Diagram EVENT SERVE...

Page 26: ...s given all authorities to search the archive backup the video and setup Guest1 3 are given partial authority to search the archive backup and network connection Select one of users and type the password to login If the Administrator s Password is null some any users can control DVR without login NOTICE Move mouse cursor on the screen where you want to set and click to select Left Key To ENTER or ...

Page 27: ...ss one more time to exit Adjustment OSD Sequence z INTERNET NETWORK z PASSWORD PARAMETER z SYSTEM z DISPLAY z BASIC SETTING Recording schedule Camera registration Audio HDD Pre post recording Network connection Service port DDNS Update server Password Parameter z TECHNICAL SETTING PTZ RS 485 Event Alarm input Motion alarm output Remote controller Etc Information Update Date Time System LOG Shutdow...

Page 28: ...r on live mode If the RECORDING is On the audio will be recorded with the video together You can set the motion detection area for motion recording mode in this menu If you select the motion area it converts into the left screen Click or drag the area you want to detect or press enter on the remote controller You can SELECT CLEAR ALL in context menu And the area chosen will mark with blue color It...

Page 29: ...HDD INFORMATION z DISK SPACE z OVERWRITING z BEEP Displays a warning message when the DVR runs out of free space on the HDD for recording Message will be flickered on the live screen when low disk space less than 1 5G about 2 second Recording stop message will be flickered on the live screen when HDD remains less under 1G HDD Hard Disk Drive CAUTION Press buttons on remote controller to select PRE...

Page 30: ...Type the web service port number Port No 1 65534 z SUBNET MASK Type the Subnet Mask when you select STATIC IP z GATEWAY Type the Gateway when you select STATIC IP z PRIMARY DNS Primary DNS is used to refer the DVR s IP address to a preferred domain name z SECONDARY DNS Secondary DNS is used to refer the DVR s IP address for backup domain name 2 INTERNET NETWORK NETWORK CONNECTION SERVICE PORT DDNS...

Page 31: ...Press buttons on remote controller to select UPDATE SERVER in SETUP menu z UPDATE SERVER Type the Update server address z DEFAULT Recover all the settings to the original settings by a manufacturer UPDATE SERVER ...

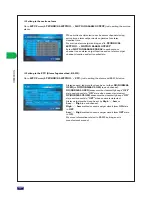
Page 32: ...nt date time on the display monitor z DISK SPACE Show or hide the disk space bar z RECORDING MODE Show or hide the recording mode icon on the display monitor Adjust BRIGHTNESS COLOR and CONTRAST of each channel If you select one camera channel it converts into this screen You can see and change the BRIGHTNESS COLOR and CONTRAST on the adjustment bar 3 DISPLAY Press buttons on remote controller to ...

Page 33: ...s z DISK SPACE Show the used Disk Space for recording z MAC ADDRESS Show the MAC Address z NETWORK If you click the UPDATE button the firmware will be updated via network z USB Update from a USB storage device Connect a USB storage device with new firmware And press or click the UPDATE button z FIRMWARE Show the Firmware Version Press buttons on remote controller to select SEQUENCE in SETUP menu 4...

Page 34: ...IME SERVER Select the TIMESERVER time windows com time nist gov z TIME ZONE You can select TIME ZONE from a down list menu z UPDATE If you click UPDATE button time will be renewed automatically by timeserver and GMT via internet The system log records all DVR events with the date and time it occurred system start and shutdown system reboot recording start and end setup changes etc The events are l...

Page 35: ...2 and guest3 Guest 1 can search backup and connect via network Guest 2 can search and connect via network Guest 3 can only connect via network NOTICE If you forget your password please press RESET button on the rear panel with a straight clip for about 3 seconds You can not change guest authorities PASSWORD 5 PASSWORD PARAMETER Press buttons on remote controller to select SHUTDOWN in SETUP menu SH...

Page 36: ...m folder on the USB storage to load parameter z LOAD PARAMETER Load parameter saved on the USB storage z SAVE PARAMETER Save the current parameter on the USB storage Configuration file DVRParm dat will be saved in the Parm folder on the USB storage z SET FACTORY DEFAULT Recover all the settings to the original settings by a manufacturer PARAMETER ...

Page 37: ...DDRESS 6 TECHNICAL SETTING NOTICE All of settings must be the same as the PTZ camera s settings The settings is different from the camera s models See the PTZ camera s manual for setting of RS 485 PTZ RS 485 EVENT Press buttons on remote controller to select EVENT in SETUP menu Type the EVENT SERVER domain or IP address Type the domain or IP address of the computer which used for operating CMS Cen...

Page 38: ...ive time window will be appeared Press buttons on remote controller to select ALARM INPUT in SETUP menu ALARM INPUT Press buttons on remote controller to select MOTION ALARM OUTPUT in SETUP menu MOTION ALARM OUTPUT 36 SETUP z BUTTON BEEP Select whether to make a beep when you press the button on the remote controller z DVR ID Enable ID CONTROL function to control the selected one by using DVR ID w...

Page 39: ...115200 Baud rate means the speed of between the devices Select 5 8 the DATA BIT Default is 8 Data bit means the number of data bit Select 1 or 2 the STOP BIT Default is 1 Stop bit means the number of stop bit between data transfer Select the PARITY Default is No Parity No Parity Odd Parity Even Parity Parity means the error check bit while the data is transferring Press ID and current DVR ID numbe...

Page 40: ...ck 4 Steps sensitivity Built in Remote Management Monitor Search Backup Program Dimensions W x H x D Weight Operating Temperature Operating Humidity Power Source 430mm x 90mm x 415mm Approx 7 3 Kg included with HDD 5 C 50 C 20 80 RH AC 110 220V Compression Input Output G 726 ADPCM 8KHz sampling 32 Kbps 2CH Line In 1CH Line Out Sensor Input Alarm Output 8CH DVR 8 Programmable 16CH DVR 16 Programmab...

Page 41: ... SCHEDULE RECORDING MODE SETUP menu Press the PANIC button on the remote controller or REC button on the front panel What does that Event mean That means Motion Log in Video loss event activity DVR is not record Check BASIC SETTING HDD OVERWRITING Yes and check BASIC SETTING RECORDING SCHEDULE in SETUP menu I can not hear AUDIO Press Mute button with the remote controller Check connection with aud...

Page 42: ...NETWORK DVR MEMO ...

Page 43: ......

Page 44: ......

Reviews: