background image

Before You Begin

Table of Contents

3

Before You Begin 
Table of Contents
Package Contents
Read Before Installation 

Overview

Important Information
Layout of the Front Panel
Layout of the Rear Panel 
Layout of the Remote Control
Connecting Cameras
Navigating the Menus
Starting the DVR 

The Main Menu

The Camera (Display Setup) Menu
The Record Setup Menu
The Recording Schedule
The Network Configuration Menu
The Video Search Menu 
The File List & USB Backup 
The Playback Interface
Playing Backed Up Footage on a PC
The Device Management Menu
The HDD (Hard Drive) Management Screen
The PTZ (Pan, Tilt, Zoom) Setup Menu
The Alarm Menu 
Auto Email Setup
The Mobile Devices Menu
The Motion Detection Menu
Motion Detection Configuration
The System Setup Menu
The Time Setup Menu 
The Password Setup Menu
The Video Setup Menu
The Language and Info Menus 
The System Maintenance Menu
PTZ Controls
Requirements for Remote Access

Setting Up Remote Access 

Remote Access via Internet Explorer
Remote Access from a Mobile Device 
Port Forwarding
Installing/Changing the HDD
Troubleshooting
Technical Specifications
Technical Support & Warranty Information
 

2
3
4
5

6

7
8
9

10
11

12 - 13

14

15

16 - 17
18 - 19
20 - 21
22 - 23

24
25

26 - 27
28 - 29

30
31
32
33

34 - 35

36
37

38 - 39

40
41
42
43
44
45

46 - 47
48 - 49

50 - 51

52 - 53
54 - 55

56

57
58
59

Rear Cover

_________________________________________________________________
_________________________________________________________________
_________________________________________________________________
_________________________________________________________________
_________________________________________________________________
_________________________________________________________________
_________________________________________________________________
_________________________________________________________________
_________________________________________________________________
_________________________________________________________________
_________________________________________________________________
_________________________________________________________________
_________________________________________________________________
_________________________________________________________________
_________________________________________________________________
_________________________________________________________________
_________________________________________________________________
_________________________________________________________________
_________________________________________________________________
_________________________________________________________________
_________________________________________________________________
_________________________________________________________________
_________________________________________________________________
_________________________________________________________________
_________________________________________________________________
_________________________________________________________________
_________________________________________________________________
_________________________________________________________________
_________________________________________________________________

________________________________________________________________

_________________________________________________________________
_________________________________________________________________
_________________________________________________________________
_________________________________________________________________
_________________________________________________________________
_________________________________________________________________
_________________________________________________________________
_________________________________________________________________
_________________________________________________________________
_________________________________________________________________
_________________________________________________________________
_________________________________________________________________
_________________________________________________________________
_________________________________________________________________
_________________________________________________________________

Summary of Contents for DVR4-1200

Page 1: ...DVR4 1200 4 Channel H 264 Digital Video Recorder Advanced Series M41200H200111E ...

Page 2: ...TV technician for help These devices comply with part 15 of the FCC Rules Operation is subject to the following two conditions 1 These devices may not cause harmful interference and 2 These devices must accept any interference received including interference that may cause undesired operation IMPORTANT NOTE Prohibition against eavesdropping Except for the operations of law enforcement officers con...

Page 3: ..._________________________________________________ _________________________________________________________________ _________________________________________________________________ _________________________________________________________________ _________________________________________________________________ _________________________________________________________________ ____________________...
Page 4: ...nstructions Easy Setup Guide Power Adapter with Cable Software CD Network cable USB Mouse BNC to RCA Video Cable Security Stickers 4 Pack If you are missing any of these components contact Swann Communications for assistance Package Contents 4 ...

Page 5: ...the hard drive inside There are no user serviceable parts inside Never open the case whilst the DVR is plugged in and never turn the DVR on whilst the case is open Use only the supplied power adaptor Other adaptors may cause damage to the DVR or cause a fire Do not cut or modify any cable for any reason Doing so will void your warranty as well as pose a great risk of fire or electrical shock Don t...

Page 6: ...more footage on the DVR s hard drive and that the quality of that footage can be significantly higher than many older video formats H 264 has been engineered to provide the highest level of data compression possible saving space on your hard drive whilst maintaining a high image quality Powerful Networking and Remote Access Features The DVR4 1200 features an Ethernet port which can be used to conn...

Page 7: ... in stall the DVR There are several considerations to make and some of them conflict with one another Your DVR needs to be located in a central location to allow you maximum options when placing your cameras This is true whether your cameras are connected via cables or wirelessly one way you ll have to physically install cabling and wireless systems still have a limited range On the other hand you...

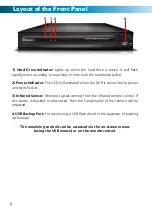
Page 8: ...ed when the DVR is connected to power and switched on 3 Infrared Sensor Monitors signals coming from the infrared remote control If this sensor is blocked or obstructed then the functionality of the remote will be impaired 4 USB Backup Port For connecting a USB flash drive for the purposes of backing up footage The remaining controls can be accessed via the on screen menus using the USB mouse or o...

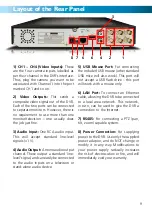
Page 9: ...a standard line level signal and can easily be connected to the audio inputs on a television or stand alone audio device 5 USB Mouse Port For connecting the included USB mouse other standard USB mice will also work This port will not accept a USB flash drive this port will work with a mouse only 6 LAN Port To connect an Ethernet cable allowing the DVR to be connected to a local area network This n...

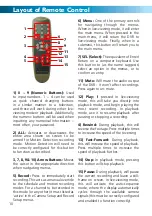
Page 10: ... viewing mode Finally when in a submenu this button will return you to the main menu 7 SEL Select The equivalent of Enter Return on a computer keyboard Use this button to as the name suggests select an option in the menus or to confirm an entry 11 Mute Will mute the audio output of the DVR it won t affect recordings Press again to un mute 12 Play If pressed in live viewing mode this will take you ...

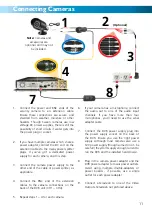
Page 11: ...onnections on the back of the DVR unit CH1 CH4 5 Repeat steps 1 4 for each camera 6 If your camera has a microphone connect the audio out to one of the audio input channels If you have more than four microphones you ll need to use the serial adapter cable 7 Connect the DVR power supply plug into the power supply socket on the back of the DVR Ensure you use the right power supply Although most came...

Page 12: ... menu if you want to save the changes that you have made There are two reasons why the Apply button needs to expressly selected For one it helps prevent accidental modification of the DVR s settings while you re navigating other menus or similar Secondly the DVR only checks and loads the settings you ve modified when the apply button is pressed This is important to prevent the DVR operating errati...

Page 13: ...nd out now than once everything is screwed in place Then once the DVR is on and working the first thing to do is to set your password see page 42 for details on how to do it Set the Date and Time page 41 for details to ensure that once you start recording you are able to index and search the recorded footage easily Also if using the DVR s footage in any legal proceedings then having an accurate da...

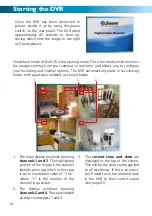
Page 14: ...all recordings If this is incorrect you ll need to set the time and date in the DVR to their correct values see page 41 2 1 3 Starting the DVR Once the DVR has been connected to power switch it on by using the power switch on the rear panel The DVR takes approximately 45 seconds to boot up during which time the image to the right will be displayed The default mode of the DVR is live viewing mode T...

Page 15: ...networking methods and protocols Search Where you look for footage of a specific event You only need to know the date and time that the incident that you are looking for occurred You need not know exactly you can specify a range of times and or dates The DVR will list all recordings made in between the start and end points you specify Devices Here you can find the setup and configurable options fo...

Page 16: ...e title of the channel is displayed on screen You can choose any of the four corners of the display UPLEFT being the top left hand corner and DOWNRIGHT being the lower right hand corner AUTOSEQ Auto Sequence The Camera Display Setup Menu When AUTOSEQ automatic sequencing mode is engaged the DVR will automatically cycle through all available channels displaying each in turn expanded to fill the ent...

Page 17: ...olor is displayed in the image The higher the saturation the more bright and vivid colors will appear to be Again setting this too high can degrade image quality LIVE Viewing Enabling and Disabling Channels Monitoring something that you d rather keep private secret unknown to the ca sual observer No problems You can alter which channels appear when in live viewing mode and which ones appear later ...

Page 18: ...ode that is a channel can be seen but not recorded or vice versa Resolution and Quality The term Resolution refers to how many pixels the individual little dots which together make up an image will be recorded in your image The highest setting D1 will use a resolution approximately equal to that of a DVD whereas CIF will use one quarter this many pixels HD1 offers a middle ground between these set...

Page 19: ...or motion detection turning the recording on or off The right settings for you depend on a number of factors Larger Chunk Sizes use slightly less space on the HDD and keep related events together Also larger Chunk Sizes make navigating through the File List a bit easier see page 24 Smaller Chunk Sizes are more resistant to file corruption and make backing up slightly quicker If you don t want to w...

Page 20: ...already set for individual channels The DVR schedule can be set to record using three different record modes ALARM Will record only when the alarm function has been triggered Typically this will mean it will record when motion is detected or when another event occurs such as video loss on one channel To alter what is and what is not an alarm event see page 33 GENERAL The DVR will constantly record...

Page 21: ...asic schedule and then fine tune channels one at a time Changing the ALL schedule will overwrite any schedule already set for individual channels Copying and Pasting Schedules from day to day Rather then enter the same schedule information multiple times for each day you wish you can use the COPY function To copy the schedule settings from day to day select the day you d like to copy from on the f...

Page 22: ...n IP addresses to devices connected to the network STATIC networks require all connected devices their IP addresses manually defined as there is no device dedicated to automatically assigning addresses PPPoE Point to Point Protocol Over Ethernet is an advanced protocol which allows the DVR to be connected directly to a DSL line without the need for a router or gateway This is recommended for advan...

Page 23: ...mputers and other devices need addresses called IP ADDRESSES to identify their position on the electronic network The DVR uses IPv4 addressing which consists of four groups of numbers between 0 and 255 separated by periods For example a typical IP address might be 192 168 1 24 or something similar The most important things are that the first three numbers in the above example 192 168 1 xxx match t...

Page 24: ... normal recording To execute a Video Search Scroll over then left click the date numeric field or highlight it using the arrow keys and press select Select a digit to alter Once selected it will be highlighted red and can be edited You will see a yellow pop up keypad Scroll or move over the digits on the keypad left click or press select to input the date Note that the first two digits of the year...

Page 25: ...not an instant process Copying the may be a time consuming process and can take up to as long as the half the time of the recordings you wish to backup typically about 1 6th the time For example if you wanted to backup one hour s footage from two cameras allow up to an hour for the backup procedure to be executed The backed up footage is stored on the flash drive in the same format as it is stored...

Page 26: ...ur channels simultaneously in quad view Channels 1 3 and 4 were actively recording Channel 2 was not recording at this time hence the display appears blank The image content has been intentionally blurred The playback controls are displayed across the bottom of the screen They are as follows Rewind Pause Fast Forward Play Slow Mute Close Playback Volume Bar Volume Level ...

Page 27: ...yback Pressing once will reduce the playback speed to speed pressing it again will slow the speed to and pressing it a third time will reduce the speed to Play Will play footage if paused Pause Will pause playback retaining still images on the screen Fast Forward Increases the speed of playback Pressing the button multiple times will increase the rate of playback up to 8x Mute Checking this box wi...

Page 28: ...ayback software locate the file on the included CD named PlaybackSetup_2 3 0 4 exe Note that the numbers on the end may change particularly if you ve downloaded an updated version as we are constantly making updates and improvements to our software Run this setup file Follow the installation prompts you ll be asked where you d like to install the software and the shortcuts to access it We suggest ...

Page 29: ... and select the folder on that drive called RecordFile Playback Controls The playback controls are located in the menu named Play The Play Pause and Stop options work as their counterparts would on a DVD player Decrease Rate and Increase Rate work like fast forward and slow motion functions Use the Backward Frame and Forward Frame for precise control they will move back or forward the smallest amo...

Page 30: ...drive here You can format flash drives from this screen as well Alarm For configuring the DVR s alarm and auto email settings PTZ The setup window for configuring the DVR to act as a PTZ Pan Tilt Zoom controller Recommended for advanced users Mobile For configuring the DVR to interface with mobile devices such as an iPhone or mobile devices running Microsoft Windows Mobile version 6 1 or higher An...

Page 31: ...ion but when the hard drive fills up the DVR will not be able to record any more footage The other two options are BY DAY which will overwrite footage one day at a time or AUTO which will make the DVR delete the oldest events on the hard drive as necessary When OVERWRITE is enabled you ll need to get important events off the HDD before they re over written HDD FORMAT Formatting the HDD will erase ...

Page 32: ...evel with your PTZ system DATA BIT STOP BIT The amount of data sent in an individual packet data bits and the number of bits indicating the end of one packet and the beginning of another stop bits Again this should be matched to the requirements of your PTZ system PARITY An error checking method This should be set in accordance with your PTZ system s requirements CRUISE Refers to a mode of operati...

Page 33: ...event occurs HDD Loss Will trigger an alarm buzzer if the hard drive stops functioning HDD Space Will trigger an alarm buzzer when the hard drive is out of space Video Loss Will trigger an alarm buzzer when a camera stops supplying images Alarm Management Here you can configure how the DVR will alert you in the case of an alarm event You can select whether the DVR attempts to sound an internal buz...

Page 34: ...atically from one email provider to the next Note that highlighting a field and pressing SELECT twice will make a keyboard appear onscreen allowing you to enter alphanumeric characters You can configure the DVR to automatically send you email alerts when it detects an alarm event Please note that this function is not compatible with all email servers as the email the DVR sends is procedurally gene...

Page 35: ...e Saved Successfully as shown below Choose EXIT to return to the live viewing screen Tips and Tricks We strongly suggest testing the email setup once it is configured After you select APPLY to save your settings select the TEST button If properly configured you should receive the auto email almost immediately Some online email servers particularly ones which only support an online browser based in...

Page 36: ...es 51 55 for more information about selecting and configuring ports Requirements To access the DVR via a mobile device the following conditions must be met A high speed Internet connection with an upload speed in excess of 256kbps ideally above 512kbps The DVR attached to this high speed Internet connection Your home network correctly configured to allow the DVR s SERVER PORT unrestricted access t...

Page 37: ...VITY There are four levels of motion detection sensitivity 1 being the least sensitive and 4 being the most sensitive To find the right value for you we suggest setting it and then testing the chosen setting by getting an able volunteer to move through the camera s view and testing whether or not the motion detection is triggered MD AREA Click the applicable SETUP button to setup the motion detect...

Page 38: ...menu use the mouse or the arrow buttons to highlight the SETUP button for the channel you wish to setup the MOTION DETECTION AREA for and confirm by pressing select or left clicking You will see a grid 15 x 12 of red boxes The red boxes mark the area that is sensitive to motion Use the arrow buttons or the mouse to move the cursor around the screen By pressing select or left clicking an area in th...

Page 39: ...take up too much space or pose a problem with scanning through footage This method of motion detection can however become problematic when using wireless cameras As wireless technology is susceptible to interference the static and image distortion common to wireless systems is often enough to trigger the motion detection inadvertently As a result we strongly advise against using analog wireless ca...

Page 40: ...ling password control to access the DVR and choosing what this password is This password will not necessarily be the same as the one you use for remote access see the section on Remote Access pages 50 55 for more details VIDEO For changing your video standard between PAL or NTSC See page 43 for more about PAL and NTSC LANGUAGE For changing the language of the on screen display INFO Displays inform...

Page 41: ...GMT 10 00 whilst the Eastern Time zone in the USA and Canada is GMT 05 00 GMT stands for Greenwich Mean Time it s the baseline that keeps all the different time zones in sync IMPORTANT If you change your Time Zone setting click APPLY before you click UPDATE Configuring Custom DST MODE As the standards for daylight savings differ from country to country and often state to state you might need to ma...

Page 42: ...emember It ll save grief later To set your PASSWORD Open the PASSWORD submenu Using the mouse or the arrow buttons highlight the PASSWORD ENABLE drop down menu and change the value to ON Two new options will pop up USER PASSWORD and ADMIN PASSWORD The USER PASSWORD will grant access to the DVR and the footage stored on it The ADMIN PASSWORD is required to change settings the record modes and sched...

Page 43: ... Western Europe and Australia NTSC is used in the US Canada and Japan If the DVR s picture is black and white flickering or similar then this is probably caused by the video system being set incorrectly Do not change this setting unless directed to do so by Swann Technical Support or you really know what you re doing Your television may not be able to display the other signal standard at all meani...

Page 44: ...from this setting Having the menus in a foreign language can make it difficult to get back to the menu to put the setting back to the right one Having said that if you do change it by mistake or the DVR is in a foreign language when you get it in the main menu select the icon in the bottom right then in the SYSTEM menu LANGUAGES is the icon in the bottom left That will bring you to the drop down m...

Page 45: ...o use this setting unless directed to do so by Swann Technical Support LOAD DEFAULT Returns the DVR to it s initial factory settings Can be useful if for some unknown reason the DVR is behaving erratically REBOOT Turns off and restarts the DVR immediately About the AUTO REBOOT time If you choose weekly rebooting you ll need to select the day of the week from MON through SUN and the time that you d...

Page 46: ...cted direction and the centre button toggles Auto Scan ON and OFF 3 ZOOM If you are using a variable zoom PTZ camera you can zoom in or out here Zooming in will increase the size of objects in view at the expense of reducing the field of view You may need to adjust focus when using the ZOOM function 4 FOCUS Adjusts the focal plane of the lens If an image is blurry try adjusting the focus To best s...

Page 47: ... to a predefined point The CLEAN button will remove all your defined points When you ve set your points select SAVE then EXIT To start cruise mode select START CRUISE from the pop up menu To stop cruise mode select STOP CRUISE form the same menu Cruise Mode To setup CRUISE MODE you ll need to define POINTS for each channel with a PTZ camera you want to cruise A POINT is one place that the camera n...

Page 48: ...rt both allocation methods In such cases we suggest using a STATIC configuration as it will let you exercise more control over the functionality of your network and reduce the need for maintenance In a DHCP configuration you do not need to enter the IP address subnet mask or default gateway values into the DVR Rather the DVR will automatically request this information from your networks Dynamic Ho...

Page 49: ... difficult stages of configuring your network Enabling UPnP UPnP is a setting which can be enabled on certain routers You ll have to see your router s documentation for instructions on how to enable UPnP if your router supports it Enabling UPnP will have a minor effect on your network security If your network is free from malware such as viruses spyware adware and so on then UPnP will improve the ...

Page 50: ...To differentiate devices on your network your network has its own IP address range and this is what is referred to as your private IP address The private IP address is used to configure your DVR and router for remote access through a process known as Port Forwarding How do I find these addresses and what should I do with them If you ve configured your network using STATIC IP addressing then you ll...

Page 51: ...your ISP does not offer static IP addresses then you can use a dynamic referencing service like www dyndns com They offer a free service which will give you a text address such as www exampleipaddress example which will take you directly to your public IP address For this service to work correctly you ll need to set up the DVR to work with DDNS Server The DDNS server you are using At the time of w...

Page 52: ...his dialog box blank 4 You should now have access to the DVR http 210 9 10 115 85 The easiest way to access your DVR remotely is via an Internet browser These instructions will detail how to access the DVR via Microsoft Internet Explorer This section assumes that you ve already configured the DVR and your network to operate properly Remotely accessing the DVR via Internet Explorer IE is a great wa...

Page 53: ...ow or similar depending on the version of IE you are running 7 Set Download signed ActiveX controls to Prompt 8 Set Download unsigned ActiveX controls to Prompt 9 Set Initialize and script ActiveX controls not marked as safe for scripting to Prompt 10 Set Run ActiveX controls and plug ins to Enabled 11 Set Script ActiveX controls marked safe for scripting to Enabled 12 After you have made these ch...

Page 54: ...igured to allow the DVR s SERVER PORT unrestricted access to the Internet Typically this requires that you setup your router gateway for port forwarding A compatible mobile device with a supported platform see below The correct application s installed on your mobile device See page 54 for more details on how to use a mobile device to remotely access the DVR A sufficient signal to your mobile devic...

Page 55: ...bile device such as a cellphone tablet PDA or similar on a 3G network running Microsoft Windows Mobile version 6 x Android version 2 1 or higher Symbian S60 3rd or 5th edition iPhone OS BlackBerry OS version 5 not all handsets supported Some devices may require access to a local area network with Internet access to function correctly whilst others are able to use mobile Internet such as HSDPA or s...

Page 56: ...hen it presents a security risk Opening a few carefully selected ports and assigning them to specific devices strikes the most useful balance between these two extremes Media Port The default value is 9000 Web Port The default value is 80 we strongly suggest changing this as 80 is a port frequently used by various programs in fact it s the default HTTP port Generally 85 or 3100 are better choices ...

Page 57: ... holding the hard drive in place Remove these screws and remove the HDD from the DVR 5 Push the metal clip on the SATA cable single red or orange cable to unplug the cable from the hard drive Unplug the power cable 2 black 1 yellow and 1 red cable from the back of the hard drive 6 If replacing the hard drive put the new hard drive into the chassis 7 Screw in the hard drive to chassis as in step 5 ...

Page 58: ...We suggest calling Swann Technical Support the contact information is on the rear cover of this booklet Problem I am not getting a picture on any of my displays Solution Make sure the cameras are connected properly to the DVR and the power supply 12V Check that the cables are not faulty by connecting the cameras directly to the DVR or to a TV if you have the proper adapters Problem One of the disp...

Page 59: ...TSC D1 704x480 HD1 704x240 CIF 352x240 PAL D1 704 x 576 HD1 704 x 288 CIF 352 x 288 Recording Frame Rate NTSC 30fps D1 60fps HD1 120fps CIF PAL 25fps D1 50fps HD1 100fps CIF Recording Modes Manual Motion Schedule Multiplex Operation Triplex HDD Interface SATA Hard Drive Support Up to 1TB Network LAN Connection Yes Network Interface Cat5 8P8C Network Protocol s TCP IP DDNS Remote Operation Yes Gene...

Page 60: ...he end user is responsible for all freight charges incurred to send the product to Swann s repair centres The end user is responsible for all shipping costs incurred when shipping from and to any country other than the country of origin The warranty does not cover any incidental accidental or consequential damages arising from the use of or the inability to use this product Any costs associated wi...

Reviews: