The Record Setup Menu
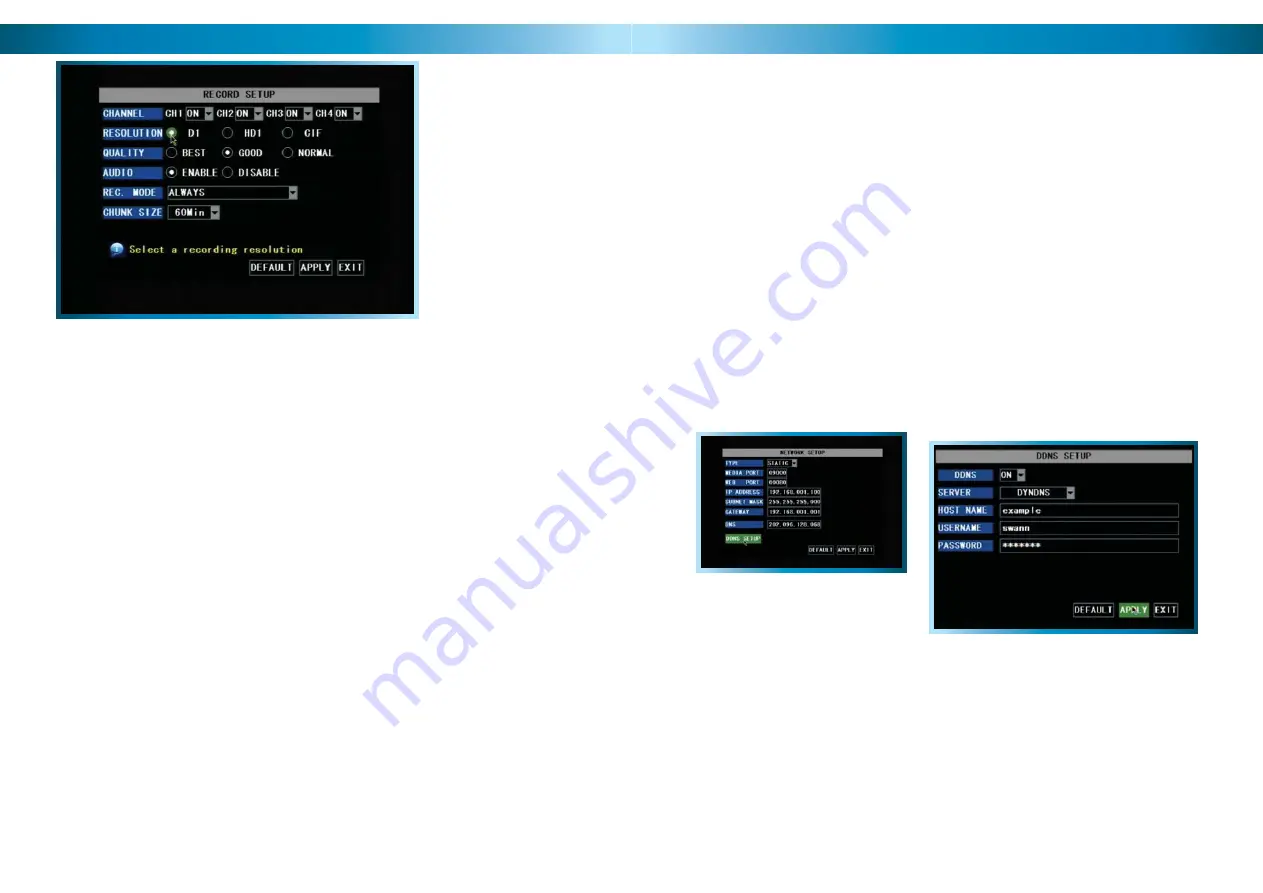
The RECORD SETUP
MENU of the DVR. In this
picture, the mouse cursor
is currently highlighting the
D1 resolution button.
In the RECORD SETUP submenu you can choose which channels will be active during
recording, change the recording quality, enable & disable audio, select record more
and Chunk Size (the maximum size of each recorded fi le). This menu contains
many of the most important settings on the DVR, and correctly confi guring them
is important to the ongoing smooth operation of the unit.
Turning Channels ON or OFF
Using the drop-down menus in the CHANNEL line, you can turn the recording
functions for a channel ON or OFF. Turning a channel OFF in this way means that
it will
never be recorded
until turned ON again. This can be set independently of
the channel being enabled/disabled in live-viewing mode (that is, a channel can be
seen but not recorded or vice-versa).
Resolution and Quality
The term “Resolution” refers to how many pixels (the individual little dots which
together make up an image) will be recorded in your image. The highest setting
D1 will use a resolution approximately equal to that of a DVD, whereas CIF will use
one quarter this many pixels. HD1 offers a middle-ground between these settings.
Higher resolutions give sharper images, but each frame of video takes up more
space on your hard drive. Thus, the DVR will record fewer images per second
(frames) at high (D1) resolution. Lower resolutions, particularly CIF, do not have
nearly as much detail, but will record many more images per second.
The higher the quality selected, the more detail will appear in your footage. Best
quality video takes up more space on your hard drive than normal quality. Good
quality offers a compromise between the size of and amount of detail in your
footage.
Remember: After making changes to the settings press/click the APPLY button.
18
Static and Dynamic IP Addresses
In much the same way as your home network can use static or dynamic IP addresses,
many Internet providers don’t issue (or charge more for) a static IP address for users.
The easiest way to fi nd out is to contact your Internet service provider. Alternately,
you can access the
www.whatismyip.com
service, make a note of your IP, then
reboot your router/gateway. This should refresh your Internet connection. If your
IP address stays the same, you’ve probably got a static IP address. If it changes, you
have a dynamic IP address.
How do I deal with a dynamic IP address?
One option is to contact your ISP and request a static IP address. They’ll usually
charge a small fee for doing this. It’s worth noting that not all ISPs offer static IP
addresses.
If your ISP does not offer static IP addresses then you can use a dynamic referencing
service, like
www.dyndns.com
. They offer a free service which will give you a text
address (such as
www.exampleipaddress.example
) which will take you directly to
your public IP address. For this service to work correctly, you’ll need to set up the
DVR to work with DDNS.
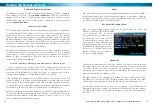
Server:
Choose the server that you’re using. There are two options, DYNDNS
(
www.dyndns.com
) and 3322 (
www.3322.org
). We suggest DYNDNS, unless you
are fl uent at reading Chinese.
Host Name:
Enter the host name that you set up in your DDNS service. This is the
address you use to access your network.
Username and Password:
Here, enter the username and password you setup
with your DDNS server. These do not have to match your username/password
combination in either your DVR or router (for the sake of security, we suggest
making them different).
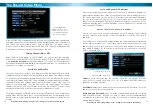
Above:
The
DDNS Setup
button, located in
the
Network Setup
menu.
Right:
The
DDNS Setup
menu.
Remember: After making changes to the settings press/click the APPLY button.
51


