English
4
Introduction
Basic DVR Operation
Congratuations
on your purchase of this Swann DVR. You’ve
made a
fi
ne choice for keeping a watchful eye over your home
or business. Let’s take a moment to talk about some of the
features this DVR o
ff
ers, and how to get the most out of them.
Multi-Channel Recording Solution
The DVR records 4 or 8 channels (depending on your model)
at “D1” resolution.
What’s this “D1”?
D1 is a (slightly inaccurate) term for a certain resolution of
video which is now
often called “broadcast quality”. We like to
think about it as being about the quality of a DVD movie.
Some savvy nerds will know where the term came from and
why it’s not quite correct, but it’s become a standard term in
the CCTV industry, so we use it here.
Fast and Easy Networking
Now supporting UPnP, networking your DVR has never been
easier. For the majority of networks, it’s almost plug-and-play.
Users with more complex network con
fi
gurations might
have to adjust some settings (see “Network: General” on page
19 for more about networking) to get everything running
smoothly.
Easy Setup using your PC
(Recommended)
The remote access and con
fi
guration features of the included
MyDVR
software are so powerful that (technically speaking)
you don’t even have to touch the DVR to operate it (except for
plugging things in, of course).
If you connect the DVR to your network and install the
MyDVR
software to a compatible PC on the same network, you can
complete the DVR setup procedure there, as well as stream
images from the DVR straight to your PC monitor.
Requirements:
A compatible computer connected to the same network
as the DVR. The network must support DHCP and UPnP.
t
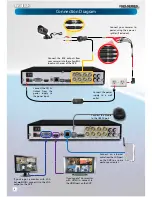
Connect your DVR to your cameras, power and a network
as shown on page 6.
t
Ensure that your network uses DHCP addressing, and
supports UPnP (
Universal Plug and Play
- see page 19).
t
Install the
MyDVR
software on a computer connected to
the same network as the DVR (see page 35).
t
Login to your DVR, view images and con
fi
gure settings
(see page 36 onwards for more details).
The USB Mouse (Recommended)
The easiest way to operate the DVR is to use the included USB
optical mouse - we put together the look and feel of the menu
system speci
fi
cally for mouse-friendly navigation.
The controls are pretty easy to remember - heck, there are only
two buttons. It couldn’t be simpler.
Left click:
t
Selects an item or con
fi
rms a choice.
Right click:
t
Opens the menu bar from the live viewing screen.
t
Returns one “step” from a submenu.
t
Opens a context menu in some settings screens.
The Scroll Wheel:
t
Can be used to adjust the values of sliders and scales
when highlighted by the moust.
Of course, you don’t
have
to use the mouse.
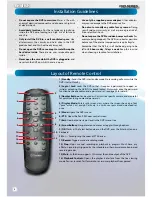
The Front Panel
The buttons on the front panel are adequate for operating the
DVR, but they’re hardly ideal for ongoing use.
Between Menu, Select and the D-pad (directional pad) you can
navigate through all the DVR’s menus and con
fi
gure almost
any setting. It’s a little clunkier than the mouse and it’s not as
quick and easy, but it does save a little space - and you don’t
need to
fi
nd the remote!
The Remote Control
The remote control has all the buttons that the front panel
does, plus some others. It operates like a remote control for
a DVD player or similar - it’s hardly a high-tech gadget these
days but it does get the job done!
A full rundown of the remote control and its various functions
can be found on page 8.
Summary of Contents for PRO-series
Page 1: ...English 1 4 8 Channel D1 Realtime H 264 DVR M4 8 3000 4000 230412E English ...
Page 5: ...English 5 ...
Page 44: ...English 44 ...
Page 45: ...English 45 ...


