background image

Feather - WiFi Client Configuration

Customer Support 

support@swarm.space

1. Serial Connection

Physically connect the 

Feather

 to your 

computer with a USB to Micro-USB cable. 

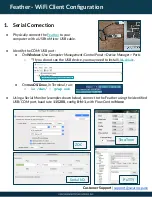
Identify the COM/USB port:

On Windows: Use Computer Management/Control Panel > Device Manager > Ports 

**If you do not see the USB device, you may need to install 

this driver

.

On macOS/Linux, in Terminal, run:  

ls /dev/ | grep usb

Using a Serial Monitor (examples shown below), connect to the Feather using the identified 
USB/COM port, baud rate 115200,  config 8-N-1, with Flow Control None

ZOC

Serial I/O

Tera-Term

PuTTY

Summary of Contents for Eval Kit 01

Page 1: ...Eval Kit Model 01 Quickstart Guide 2021 SWARM TECHNOLOGIES INC Updated April 20 2021 What s in the Box Eval Kit 01 with Feather Customer Support support swarm space ...

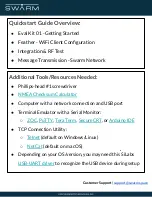
Page 2: ...h a Serial Monitor ZOC PuTTY Tera Term SecureCRT or Arduino IDE TCP Connection Utility Telnet default on Windows Linux NetCat default on macOS Depending on your OS version you may need this SiLabs USB UART driver to recognize the USB device during setup Quickstart Guide Overview Eval Kit 01 Getting Started Feather WiFi Client Configuration Integration RF Test Message Transmission Swarm Network ...

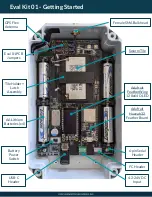
Page 3: ...emale SMA Bulkhead Swarm Tile Eval 01 PCB Jumpers Tile Holder Latch Assembly USB C Header Battery Power Switch Adafruit Huzzah 32 Feather Board Adafruit FeatherWing 128x64 OLED 4 2 24V DC Input 6 pin Serial Header I C Header AA Lithium Batteries x4 ...

Page 4: ...rt support swarm space Remove the plastic cover from the enclosure with a phillips head screwdriver Ensure the Battery Power switch is off prior to making any changes to the Eval Kit Remove the Adafruit Huzzah 32 Feather board from the Eval Kit ...

Page 5: ... COM USB port On Windows Use Computer Management Control Panel Device Manager Ports If you do not see the USB device you may need to install this driver On macOS Linux in Terminal run ls dev grep usb Using a Serial Monitor examples shown below connect to the Feather using the identified USB COM port baud rate 115200 config 8 N 1 with Flow Control None ZOC Serial I O Tera Term PuTTY ...

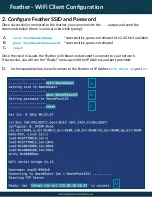
Page 6: ...d YourNetworkName case sensitive spaces not allowed Use 2 4 GHz if available B pass YourNetworkPassword case sensitive spaces not allowed C reset Once the reset is issued the Feather will reboot and attempt to connect to your network If successful you will see the Ready message with the IP Address and port provided D In the example below we will connect to the Feather at IP Address 172 20 10 10 po...

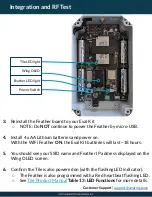
Page 7: ...on With the WiFi Feather ON the Eval Kit batteries will last 18 hours 5 You should see your SSID name and Feather IP address displayed on the Wing OLED screen 6 Confirm the Tile is also powered on with the flashing LED indicator The Feather is also programmed with a Red heartbeat flashing LED See Tile Product Manual Table 13 LED Functions for more details Tile LED light Feather LED light Power Switch...

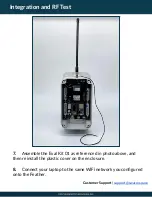
Page 8: ... Customer Support support swarm space 7 Assemble the Eval Kit 01 as referenced in photo above and then reinstall the plastic cover on the enclosure 8 Connect your laptop to the same WiFi network you configured onto the Feather ...

Page 9: ... with a telnet enabled tool telnet IPaddress 23 Windows Linux or nc v IPaddress 23 Mac Once connected you can test for successful TCP communication by checking the Tile firmware version with the command FV 10 The command must be issued exactly as shown above including the 10 checksum Note All Tile commands require a checksum value To determine the correct value for your Tile command consult the NME...

Page 10: ... cancel Adjust your hardware configuration and location until the RSSI value is consistently between 93 and 117 dBm RT 10 27 RT OK 23 RT RSSI 109 RT RSSI 111 RT RSSI 108 RT RSSI 110 RT RSSI 111 Place the Eval Kit outdoors but within range of your WiFi Network with a clear view of the sky You may mount the Eval Kit to provide a better field of view ensuring that the VHF antenna does not make contact ...

Page 11: ...smission and stored in the Tile memory If the message is not sent it will remain on the Tile for 48 hours by default You can increase this expiration time if desired See section 6 of the Tile Product Manual for more details TD Hello World 31 TD OK 5354468575916 2c TD SENT 5354468575916 24 14 Using the Swarm Satellite Pass Checker Tool enter your location to see the next available satellite passes ...

Page 12: ... could take up to 1 hour To access and interact with your data in the Swarm Hive see our REST API integration guide You can also access our Swagger UI documentation page from your Hive Help API Documentation Feel free to also utilize the sample Python script on our Developer Tools Page to pull your Hive data curl location request GET https bumblebee hive swarm space hive api v1 devices count heade...

Page 13: ...ssions to avoid de tuning the antenna With the antenna attached measure the RSSI BACKGROUND noise values The RSSI BACKGROUND should be lower than 93 e g 97 for communicating reliably with the Swarm satellites see part 6 2 of Swarm Tile Product Manual RSSI BACKGROUND 90 dBm Bad not likely to work RSSI BACKGROUND 93 dBm Marginal RSSI BACKGROUND 97 dBm OK RSSI BACKGROUND 100 dBm Good RSSI BACKGROUND ...

Page 14: ...s with part 15 of the FCC Rules Operation is subject to the following two conditions 1 This device may not cause harmful interference and 2 This device must accept any interference received including interference that may cause undesired operation This Class B digital apparatus complies with Canadian ICES 003 Cet appareil numérique de la classe B est conforme à la norme NMB 003 Canada ...

Reviews: