background image

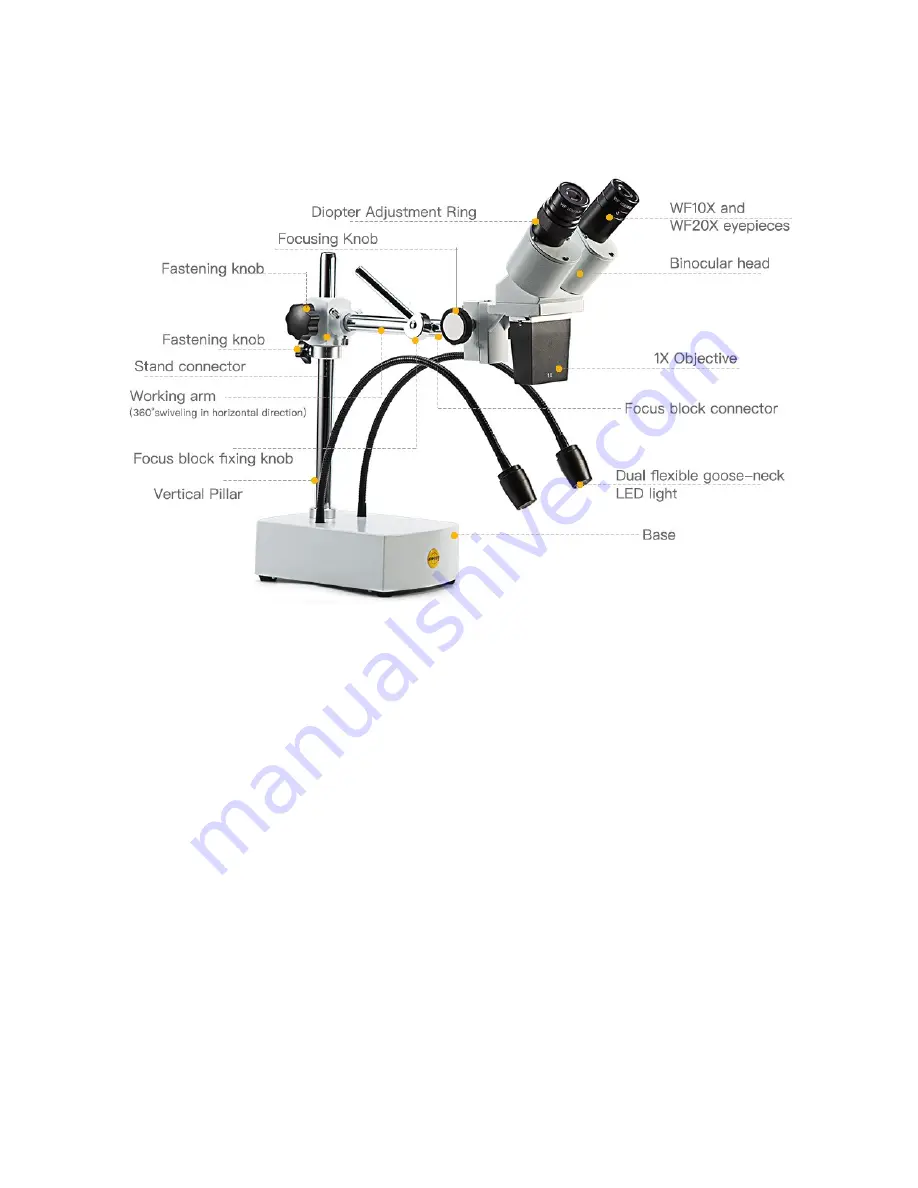
II. Parts of the microscope


III. Assembling the microscope


The components for the S41-20 microscope are shipped detached for protection. Open 
the styrofoam packing with care and do not leave any components attached to the 
packing being removed. Do not discard any of the packing materials until all of the 
components have been identified. Remove the plastic covers from the microscope's 
head and the two gooseneck LED lights. 
 
Assemble the stand connector and its supporting pillar on the vertical pillar, tightening 
the fastening knobs. Attach the working arm to the stand connector, the focus block 
connector to the microscope head, and then connect the working arm and focus block 
connector via the focus block fixing knob. 
  
Locate the power cord, attach it to the microscope, and then plug it in. Turn on the 
power switch found on the back of the microscope stand. 
 

Summary of Contents for S41-20

Page 1: ...User Guide the Swift S41 20 Stereo Microscope...

Page 2: ...help you begin using it For more information about our microscopes software downloads product manuals or customer service requests please visit www swiftoptical com Table of Contents I Specifications...

Page 3: ...eces WF10X WF20X Objective 1X Total magnifications 10x 20x Working distance 230mm Focusing Focus travel range 41mm Max specimen thickness 67mm Stand Single arm stand 18mm vertical pillar vertical pill...

Page 4: ...entified Remove the plastic covers from the microscope s head and the two gooseneck LED lights Assemble the stand connector and its supporting pillar on the vertical pillar tightening the fastening kn...

Page 5: ...hin the travel range of the S303 S304 pole arm and stand adjust the microscope head height along the vertical pillar to a working distance of 230mm from the sample Remember to tighten the locking scre...

Page 6: ...cover the microscope with the dust cover provided and store it in a dry and clean place free from moisture to prevent rust Remove the eyepieces when not in use and place covers on the eyepiece holder...

Page 7: ...yepiece Clean the surfaces Image is blurry Objective surfaces are dirty Clean the objective Diopter adjustment is not correct Readjust the diopter Focus is incorrect Readjust the focus The focusing kn...

Page 8: ...rom our warehouse for warranty services The warranty does not cover damages resulting from normal wear and tear abuse or unauthorized repairs For customers living outside the United States Swift Optic...

Page 9: ...improvements occasionally involve small modifications to the mechanical structure and optical design of our microscopes Therefore some descriptions illustrations and specifications in this instructio...

Reviews: