16
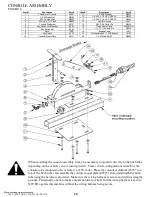
CONSOLE ASSEMBLY
FIGURE 8
Item #
Description
Part #
1
T Handle for Console
4463*
2
1/4-20 Nyloc Nut
NB180
3
5/16-18 Nyloc Nut
NB181
4
5/16-18 X 1 1/2 Bolt
NB505
5
Console Weldment
4575*
6
Key Switch Lock Washer
9088
7
Key Switch Nut
9087
8
Keys
KSK
9
Key Switch
3623
10
Console Mount Plate
4852*
When mounting the console assembly it may be necessary to mount it directly to the hitch tube
depending on the vehicle you are towing it with. Some vehicle configurations will allow the
console to be mounted to the vehicle (i.e. ATV rack). Place the console weldment (4575*) on
top of the hitch tube and assemble the console mount plate (4852*) from underneath the hitch
tube using the hardware provided. Make sure the wiring harness is secure and will not drag the
ground. Periodically check to make sure all hardware is tight and the wiring harness is secure.
NEVER operate this machine without the wiring harness being secure.
Item #
Description
Part #
11
1/4 SAE Washer
NB274
12
1/4-20 X 2 1/2 HCC GR2 ZP
NB163
13
1/4-20 X 1 1/4 HCC GR5 ZP
NB560
14
Link for Console
4461*
15
5/64 X 3/4 Cotter Pin
NB519
16
Clutch Cable Clevis
9023MOD
17
1/4 X 1 1/2 Clevis Pin
NB518
18
Engage Cable
18817
19
Wiring Harness, 11.5HP Engine
19193
20
1/4-20 Wing Nut ZP
NB608
When ordering replacement parts
* = USE PAINT CODE: TC=RED TK=BLACK
Summary of Contents for RC11544CL
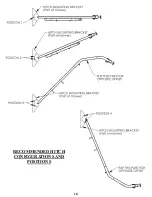
Page 18: ...RECOMMENDED HITCH CONFIGURATIONS AND POSITIONS 18...
Page 19: ...19...

