background image

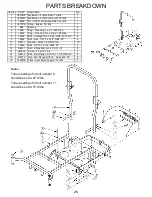
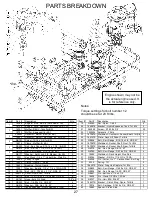
Item #

Part #

Description

Qty.

1

18742

Seat - High Back; w/ Seat Slide, Armrest

1

2

18679TK Base - Seat; Txt Blk

1

3

NB513

Bolt - HCC, 5/16-18 x 4; GR5, Zy

2

4

NB275

Washer - SAE Flat, 5/16; ZY

6

5

NB170

Nut - Serr Flange, 5/16-18; Case Hard, ZY

15

6

NB207

Nut - Jam, Nyloc 3/8-16 ZY 

2

7

NB181

Nut - Nyloc, 5/16-18; ZY

5

8

18582

Gas Tank - 4 Gallon, ZT

2

9

18686TK Strap - Tank Hold Down; Txt Blk

2

10

NB110

Bolt - Carriage, 5/16-18 x 2 1/4; GR2, ZY

2

11

18713TK Weldment - Tank & Seat Mount; Txt Blk

1

12

NB515

Bolt - Serr Flange 5/16-18 x 1 3/4; GR5, ZY

8

13

18931TK Weldment - Brake Arm, Txt Blk

1

14

26X249

Screw - 5/16-18 x 3/4

22

15

18951TK Weldment - Bypass Arm, Txt Blk

1

16

18936TK Weldment - Brake Mount Bracket

1

17

18945

Switch - 2 Pole, NC/NO

1

18

18933TK Plate - Swivel lock, Txt Blk

2

19

NB503

Bolt - HCC, 5/16-18 x 1 3/4; GR5, ZP

1

20

14029

Bushing

2

21

NB180

Nut - Nyloc, 1/4-20

3

22

17465

Spring - Extension, Hydro Release, ZT

2

23

NB264

Linkage - Ball, Left; Moridge # 265616

2

24

NB265

Nut - Jam, 5/16-24; Left-Hand Thrd; GR2, ZY

2

25

18627

Linkage - 5/16-24 x 1; LHT & RHT

2

26

NB190

Nut - Jam, 5/16-24; GR2, ZY

2

27

NB263

Linkage - Ball, Right; Moridge # 265615

2

28

18723

Damper - AVM, ZT

2

29

NB159

Washer - Split Lock, 5/16; Medium Duty, ZY

4

30

NB215

Nut - Hex, 5/16-24; GR2, ZY

4

31

18710TK Weldment - Handle Mount, Right; Txt Blk

1

32

3609

Spring - Tapered

3

33

18685TK Bracket - Damper Mount, Right; Txt Blk (Hidden)

1

34

18687TK Bracket - Damper Mount, Left; Txt Blk (Hidden)

1

35

NB583

Bolt - Carriage, 1/4-20 x 1 1/2; GR2, ZY

1

36

18680TK Bracket - Seat Swivel; Txt Blk

1

37

18937

Washer - Wave, 1/2 ID x 1 OD x .087

2

38

10548

Bolt - Serr Flange, 5/16-18 x 1; GR5, ZY

1

39

009X58

Bolt - Shoulder, 3/8-16

2

40

NB177

Washer - Mach, 1/2 x 14 GA; NR

2

41

18711TK Weldment - Handle Mount, Left; Txt Blk

1

42

18712TK Weldment - Handle; Txt Blk

2

43

MWB

Bearing - Wheel, 1 ⅛" OD x 1/2" ID

4

44

18852

Plug - Plastic, 7/8 OD x 11 GA Tube; Blk

2

45

18807

Grip - Hand Conforming, Right

1

46

18808

Grip - Hand Conforming, Left

1

47

NB688

Nut - Nyloc Jam, 1/2-13; ZY

2

48

NB574

Bolt - 1/4-20 x 3; GR2, ZP

1

49

2077

Pivot - Handle Grip

2

50

18942

Cable - Brake w/ Junction Box (Not Shown)

1

51

18943

Cable - Bypass w/ Junction Box (Not Shown)

1

PARTS BREAKDOWN

29

29

Summary of Contents for SCOLA

Page 1: ...E 660 747 8183 FAX 660 747 8650 TOLL FREE 1 800 222 8183 Manufacturing quality lawn care equipment since 1945 Celebrating over 65 years of innovation 18870 REV 12 302 ZTR2760BS ZTR2760BS CA ZTR2460BS...

Page 2: ...d and operated in accordance with the instructions contained within this manual This warranty does not apply to any product of Swisher that has been subject to alteration misuse abuse improper assembl...

Page 3: ...ht 18 Slope Operation 8 Parking Brakes 18 ROPS Seat Belt Use 8 Deck Belt Replacement 19 General use Safety Rules 9 Belt Replacement 20 CUSTOMER Seat Adjustment 21 RESPONSIBILITY 10 PTO Clutch Adjustme...

Page 4: ...lly followed This machine must only be operated maintained and repaired by persons that are familiar with the machine s special characteristics and who are well versed in safety instructions Accident...

Page 5: ...STRUCTION DECAL ON FLOOR PAN OR GO TO PAGE 16 Carefully push the mower off the crate to a safe and level area Check engine oil All engines are filled with oil and tested at the factory Verify oil leve...

Page 6: ...t Alter Wiring Decal OD74 Operator must be Seated Decal OD73 Flying Debris Decal OD43 No Step Decal OD11 18795 Warning Decal 6 6 Brake Bypass Decal 18944 Before Exiting Decal 18797 Serial ID Tag EPA C...

Page 7: ...her well lit conditions Keep the machine a safe distance from holes or other irregularities in the ground Never use the machine if you are tired if you have consumed alcohol or if you are taking other...

Page 8: ...ing or stopping on a slope If the tires begin to slip shut down the blades and drive slowly down the slope Always drive evenly and slowly on slopes Make no sudden changes in speed or direction Avoid u...

Page 9: ...s to be parked stored or left unattended lower the deck unless a positive mechanical lock is used Training All drivers should seek and obtain professional and practical instruction Such instruction sh...

Page 10: ...e Maintenance For best results mower blades must be kept sharp Replace bent or damage blades Engage brakes safely raise front of mower SEE WARNING Hold or block blade from turning Loosen blade nut and...

Page 11: ...are low but battery is not accessible remove battery from service The maximum charge rate in amperes should be no more than 1 3 of the battery s reserve capacity minute rating If the terminal voltage...

Page 12: ...ays use approved fastening equipment and ensure that the machine is well anchored to the towing vehicle The cutting deck should also be lowered to the lowest position and the parking brake engaged dur...

Page 13: ...Engine Oil X Check Belts X X Clean Battery Terminals X X Check Battery X3 Sharpen Replace Mower Blades X X X Check for Loose Fasteners X Parking Brake X X X X Before Each Use Before Storage 8 Hours 25...

Page 14: ...e cutting deck 6 Control Lever Sets the speed of the mower in both the forward and reverse directions and also turns the mower 7 Hydro Bypass Engages transmissions for normal operation and disengages...

Page 15: ...ructions are also included on the right side control panel decal Before starting the vehicle be sure all people are clear of the area Operator must be sitting in the seat Control handles must be in th...

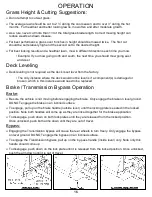
Page 16: ...mponent s is damaged or broken which in this instance would need to be replaced Brake Transmission Bypass Operation Brake Be sure the vehicle is not moving before engaging the brake Only engage the br...

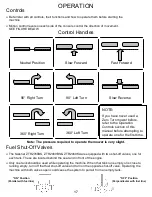
Page 17: ...ore refer to the Operation Controls section of this manual before attempting to operate one for the first time 17 17 Fuel Shut Off Valves The Swisher ZTR2760BS ZTR2460BS ZTR2460KA are equipped with tw...

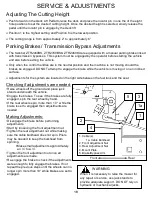
Page 18: ...nd the seat Checking if adjustments are needed Raise wheels off the ground and place jack stands underneath the vehicle Engage the brakes To see if the brakes are fully engaged spin the rear wheel by...

Page 19: ...Engine to Deck belt will need to be removed first Replacement Install new belt by placing it around the deck pulleys Refer to routing diagram below The belt will be loose at this time Tightly secure...

Page 20: ...tall new belt by placing it around the hydro pulleys first then around the idler pulleys and engine pulley Refer to routing diagram below The belt will be loose at this time Tightly secure the belt te...

Page 21: ...tanks to allow for oil expansion during regular use These are located directly behind the seat and in front of the engine Oil levels in both expansion tanks when oil is cold or at ambient temperature...

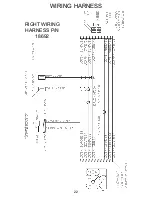
Page 22: ...WIRING HARNESS 22 22 RIGHT WIRING HARNESS P N 18692...

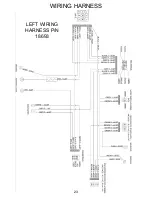
Page 23: ...23 23 WIRING HARNESS LEFT WIRING HARNESS P N 18693...

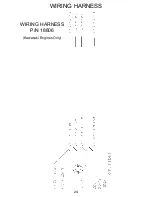
Page 24: ...24 24 WIRING HARNESS WIRING HARNESS P N 18806 Kawasaki Engines Only...

Page 25: ...5 16 18 x 6 GR5 Full Thrd 4 9 18589 Bolt Hex 1 2 13 x 6 1 4 GR8 ZP 4 10 NB177 Washer Mach 1 2 NR 14 GA 16 11 12669 Bolt 1 2 13 x 3 1 4 GR8 ZY 4 12 NB121 Nut 2 Way Jam Lock 1 2 13 ZY 8 13 26X249 Screw...

Page 26: ...lange 3 8 16 ZY 4 32 NB221 Bolt HCC 3 8 16 x 2 1 2 GR5 ZY 2 12 NB524 Nut Serr Flange 1 4 20 GR5 ZY 2 33 NB107 Bolt HCC 3 8 16 x 1 1 2 GR5 ZY 1 13 18811 Belt Hydro 1 2 x 80 1 4 1 34 26X263 Screw Hex 25...

Page 27: ...8 Medium for KA 4 30 18592 Weldment Deck Height Stop Rod 1 7 9031 Key Stock 1 4 x 1 Under Size Plain Fin 1 31 NB184 Washer 3 4ID x 1 1 4 OD x 10 GA 2 8 18585 Pulley Engine 1 32 NB126 Pin Cotter x 1 C...

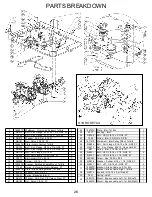
Page 28: ...PARTS BREAKDOWN 28 28 HANDLE DETAIL Notes Item number 23 two places attaches to item number 8 from Page 26 using item numbers 29 30 BRAKE DETAIL...

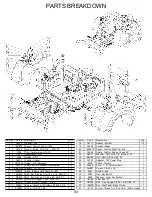
Page 29: ...Hand Thrd GR2 ZY 2 25 18627 Linkage 5 16 24 x 1 LHT RHT 2 26 NB190 Nut Jam 5 16 24 GR2 ZY 2 27 NB263 Linkage Ball Right Moridge 265615 2 28 18723 Damper AVM ZT 2 29 NB159 Washer Split Lock 5 16 Mediu...

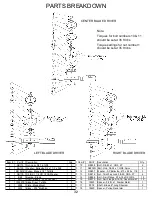
Page 30: ...INSDIE IDLER DETAIL OUTSDIE IDLER DETAIL Notes Item number 37 four places attaches to item number 26 27 from Page 27 Item number 3 attaches to item number 2 from Page 25 using item numbers 34 35 36 fr...

Page 31: ...1 4 GR5 ZY 7 24 18702TK Weldment Grass Chute Txt Blk 1 25 18654TK Bracket Grass Chute Mount Txt Blk 1 26 26X249 Screw 5 16 18 x 3 4 2 27 18595 Rod Deck Grass Chute ZP 1 28 166X34 Spring Torsion 1 29 N...

Page 32: ...ZY 6 5 B98 Bearing Blade 6 14 NB596 Bolt Serr Flange 5 16 18 x 3 4 GR5 12 6 9077 Shaft Blade 5 Long Shoulder 1 15 NB170 Nut Serr Flange 5 16 18 Case Hard ZY 12 7 10539TK Blade Driver Txt Blk 3 16 128...

Page 33: ...lder GA Beverage 1 25 4226 Cable Throttle 1 9 18221 Cap Fuel 2 5 Gallon Carb Sealed 2 26 4226K Knob T for Throttle Cable 1 10 EBAT230 Battery 12V 8U1L 1 27 26X263 Screw 1 4 20 x 1 2 2 11 18698TK Strap...

Page 34: ...0 2 5 14430 Bolt HCC 5 8 11 x 8 GR8 ZY 2 11 094618 Cap Hub 2 6 NB595 Nut 2 way Jam Lock 5 8 11 GR A 2 Notes Torque specs for lug nuts number 2 should be set at 40 ft lbs Nut number 10 should not be fa...

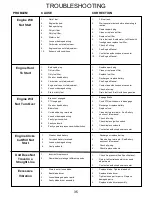
Page 35: ...ver 1 Brake not engaged 2 PTO engaged 3 Weak or dead battery 4 Blown fuse 5 Corroded battery terminals 6 Loose or damaged wiring 7 Faulty ignition switch 8 Faulty solenoid 9 Faulty operator presence s...

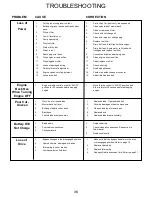
Page 36: ...ontact an authorized service center 15 Adjust idler replace belt Engine Backfires When Turning Engine OFF 1 Engine throttle control not set at SLOW position for 30 seconds before stopping engine 1 Mov...

Page 37: ...R2460KA CA ZTR2460BS ZTR2460BS CA SERIAL NUMBER _______________ ENGINE MODEL NUMBER _______________ TYPE _______________ PART NUMBER WITH PAINT CODE__________________ PART DESCRIPTION_________________...

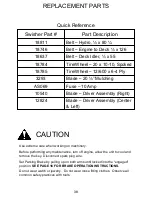
Page 38: ...ngaged position SEE PAGE 16 FOR BRAKE OPERATION INSTRUCTIONS Do not wear watch or jewelry Do not wear loose fitting clothes Observe all common safety practices with tools 38 38 Blade Driver Assembly C...

Page 39: ...39 39 NOTES...

Page 40: ...do his dirty work for him Neighbors noticed his new invention and began asking him to make more Today over 65 years later Swisher is still producing innovative lawn and garden and ATV UTV equipment d...

Reviews: