background image

16

5.

Check the tension of the drive belt by compressing it in the middle. The drive belt has the correct tension 

when it can be compressed by about 5 mm. If the belt is too slack, it may creep on the wheels and may be 
destroyed. If the belt is too tight it will overload the motor and put excessive stress on all bearings. After that, 
reattach the drive cover.

Lubricating sleeve bearings

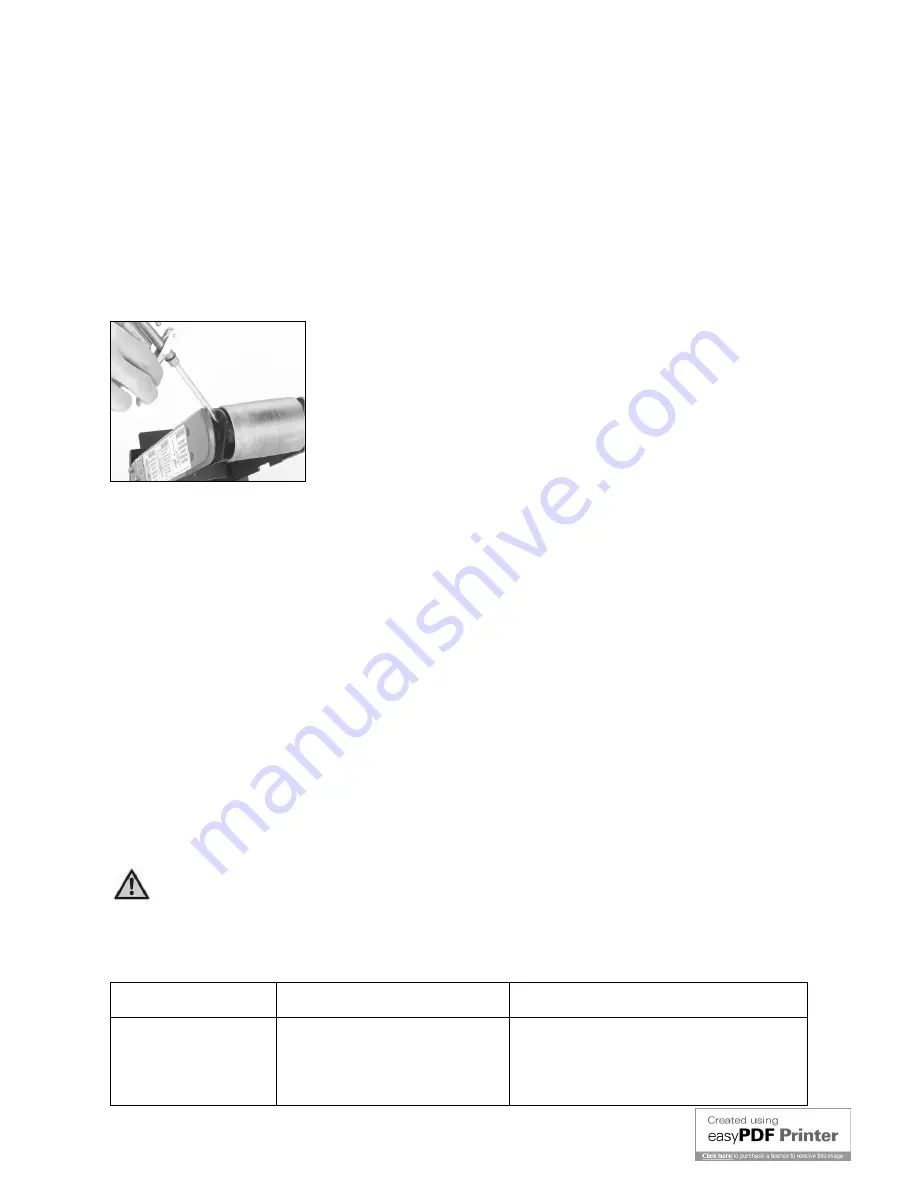
Lubricate the sleeve bearing with 30 WT oil every 10 hours of operation. No other lubrication is necessary for this 
machine.

Disconnect the machine from the power source!
1.

Remove the sanding belt.

2.

Apply two or three drops of oil in the hole at the end of the idler pulley.

Note

DO NOT apply extra oil. Too much oil can cause the belt to slip.

Following maintenance schedule ensures that your machine is safe and performs accurately.

Check the following items before you use the disc sander:

Loose mounting bolts.

Worn loose, or damaged sanding disc.

Worn or damaged wires.

-

Any other condition that could hamper the safe operation of this machine.

Perform the following tasks at the scheduled time intervals:
After Each Use

Wipe off the sawdust build-up from the table surface.

Regularly clean the dust extraction openings with a stiff brush.

Use a maybe slightly moistened cloth to clean the machine. Carefully dry the machine before the next 
use. Do not use solvents, abrasives or aggressive chemicals.

Do not allow liquids of any kind to enter the machine and do not immerse any part of the machine in 
liquids.

Weekly

Wipe a lubricant onto the disc table.

TROUBLE SHOOTING

DANGER!

Many accidents happen particularly in connection with problems and malfunctions. Therefore 

please note:

Always unplug before servicing.

Check that all safety devices are operational again after each fault service.

Trouble

Possible cause

Suggested corrective action

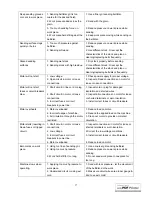
Grains easily rub off the 
belt or disc.

1. Sanding belt/disc has been 
stored in an incorrect environment.
2. Sanding belt/disc has been 
smashed or folded.

1. Store sanding belt/disc away from 
extremely hot or dry temperatures.
2. Store sanding belt/disc flat not bent or 
folded.

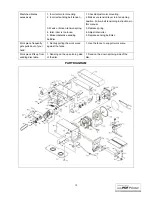
Summary of Contents for ST-150 BDS

Page 1: ...1 Operator s Manual ST 150 BDS 150 MM BELT DISC SANDER DKSH Hong Kong Limited 23 F Tower A Southmark 11 Yip Hing Street Wong Chuk Hang Hong Kong www dksh com ...

Page 2: ... illuminated Do not use the machine near gas or inflammable substances 3 Connect the dust collection device If the machine is provided with a dust collection device make sure that this system is connected and correctly used 4 Keep unknown persons and children away from the machine All unknown persons and children must keep a safe distance from the work area 5 Protect yourself from electric shock A...

Page 3: ...person This electric tool is in compliance with local safety regulations The machine must be repaired only by qualified people who use original spare parts otherwise risks may arise for the operator SPECIFIC SAFETY INSTRUCTIONS FOR BELT DISC SANDER 1 Sander must be bolted down to a stand or workbench for stability 2 Make sure there are no nails or foreign objects in the part of the work piece to b...

Page 4: ...nder To avoid injury from accidental starting unplug the sander before changing the setup sanding disc or belt or adjusting anything Check damaged parts Check for Alignment of moving parts Binding or moving parts Broken parts Work parts that cause a gap larger than 1 5mm between work support and sanding surface Worn or damaged electric cords Stable mounting Any other conditions that may affect the...

Page 5: ...ts normal wear and tear repairs or modifications made by us or in case of lack of maintenance The warranty granted by the DKSH Group is limited to the period referred to above The warranty period is for an 8 hour daily operation If you exceed this time frame the warranty period is reduced in proportion to the operating surplus in each case up to a maximum of 3 months For the warranty to apply you ...

Page 6: ... reuse and or recycling of the materials that compose the appliance WARNING In accordance with the relative legislation in force in the country of use sanctions will be imposed on the user if the appliance is disposed of illegally SYMBOLS Read and understand the instruction manual before use Risk of electric shock Risk of personal injury by electric shock Danger Indicate risk of personal injury or...

Page 7: ... Gross Net 18 kg 17 kg The specifications in this manual are given as general information and are not binding We reserve the right to effect at any time and without prior notice changes or alterations to parts fitting and accessory equipment deemed necessary for any reason whatsoever REMOVAL OF PACKAGE AND CLEANING The machine is delivered into a carton packaging Take out the machine and all the c...

Page 8: ...nder to workbench If belt and disc sander is to be used in a permanent location it should be fastened securely to a firm supporting surface such as workbench If mounting to a workbench holes should be drilled through supporting surface of the workbench 1 The unit should be bolted securely using M8 screws and hex nuts not included Screw length should be 50mm plus the thickness of bench top 2 Locate...

Page 9: ...y attached to the disc Note DO NOT turn the disc sander ON at this point 2 Locate disc guard and two pan head screws from hardware bag 3 Using Phillips type screwdriver fasten the pan head screw securely applying slight pressure to thread the holes Mounting the fence The fence can be used to precisely guide the work piece on the belt sander 1 Mount it with the hex screw spring washer and washer 2 ...

Page 10: ...aintain a gap of approximately 1 5mm between the table edge and disc If adjustment is necessary loosen the three hex bolts and adjust the table angle until there is no gap between the disc face and the square 3 Tighten the lock knob while holding the table perpendicular Then adjust the pointer to zero mark on the scale plate 4 Use a 1 5mm drill bit as a spacer Place the drill bit between the disc ...

Page 11: ...screw 2 Raise the sanding belt to the desired angle and tighten the cap screw To install the sanding belt 1 Loosen the belt tension by pulling out the tensioning lever 2 Slide the belt onto the drive drums and release the belt tensioning lever Note Make sure that the arrow on the inside of the sanding belt points the same direction as the belt rotation arrow on the machine Adjusting Sanding Belt T...

Page 12: ...r immediately Disconnect the machine from the power source and find the source of the problem before operating further If you cannot locate the source of an unusual noise or vibration feel free to contact our service department for help Dust Extraction During sanding hazardous dust may be formed Therefore it is strongly advised to connect the machine to a vacuum cleaner or a dust extraction system...

Page 13: ... of the sanding disc Note For sanding curves or irregular shapes remove the miter gauge from the disc table Always keep the work piece on the side of the wheel that is rotating down toward the table This will keep the work piece from flying out of your hands from the rotational forces The most efficient way to get a perfect miter is to cut the work piece slightly long and sand it to the desired di...

Page 14: ...l speed 2 Place the work piece against the surface of the sanding belt Hold the work piece firmly with both hands but keep fingers away from the sanding surface 3 Move the work piece across the surface of the belt for even belt wear 4 Use the fence to prevent the work piece from being thrown off by the rotation of the sanding belt Warning Hold the work piece firmly when the fence is removed to pre...

Page 15: ...chine To prevent electrical shocks and fire always use spare parts with the same characteristics Used cut or damaged cables have to be immediately replaced To replace and tension the drive belt Disconnect the machine from the power source 1 Remove the drive belt cover plate 2 Loosen the three tensioning screws of the drive belt and slide the drive belt housing down and remove the old belt 3 Place ...

Page 16: ...ed wires Any other condition that could hamper the safe operation of this machine Perform the following tasks at the scheduled time intervals After Each Use Wipe off the sawdust build up from the table surface Regularly clean the dust extraction openings with a stiff brush Use a maybe slightly moistened cloth to clean the machine Carefully dry the machine before the next use Do not use solvents ab...

Page 17: ...it in motor or loose connections 3 Incorrect fuses or circuit breakers in power line 1 Inspect cord or plug for damaged insulation and shorted wires 2 Inspect all connections on motor for loose or shorted terminals or worn insulation 3 Install correct fuses or circuit breakers Motor overheats 1 Motor overloaded 2 Incorrect usage of machine 3 Air circulation through the motor restricted 1 Reduce lo...

Page 18: ...n lever is in tensioning position Follow belt tensioning instructions in this manual 3 Replace spring 4 Adjust idler roller 5 Replace sanding belt disc Work piece frequently gets pulled out of your hand 1 Not supporting the work piece against the fence 1 Use the fence to support work piece Work piece lifts up from sanding disc table 1 Sanding on the up spinning side of the disc 1 Sand on the down ...

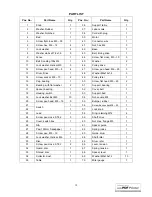
Page 19: ...bearing 1 50 Screw flat head M5 25 2 16 Bearing with flat washer 2 51 Support bearing 1 17 Spacer bearing 1 52 Cover belt 1 18 Housing switch 1 53 Support bed 1 19 Lock washer Ext M5 10 54 Nut square M8 1 20 Screw pan head M8 16 5 55 Bumper rubber 1 21 1 56 Screw hex socket M8 25 1 22 Switch 1 57 Lock knob 1 23 Lead 1 58 Ring retaining M12 4 24 Screw pan cross ST4 2 3 59 Shaft drive 1 25 Cover swi...

Page 20: ...Year of production 2011 is in conformity with all the relevant provisions of Directives 2006 42 EC Machinery directive 2004 108 EC EMC 2002 95 EC RoHS directive 2002 96 EC WEEE directive and tested in accordance with below standards EN 61029 1 2009 EN 55014 1 2006 EN 55014 2 1997 A1 A2 EN 61000 3 2 2006 A1 A2 EN 61000 3 3 2008 EN 60204 1 2005 A1 2008 Hong Kong 15 07 2011 Managing Director Authoriz...

Reviews: