background image

_____________________________________________________________________________________ 

SWS 

 7695 Blackburn Parkway, Niagara Falls, ON Canada 

Tel:  1-877-357-0222 | Fax: 905-357-9122 | sales@swssafety.com 

300138 Rev. 8 

Page 

3

 of 

7


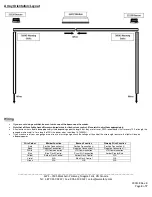
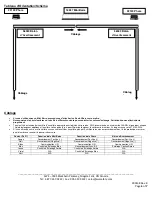
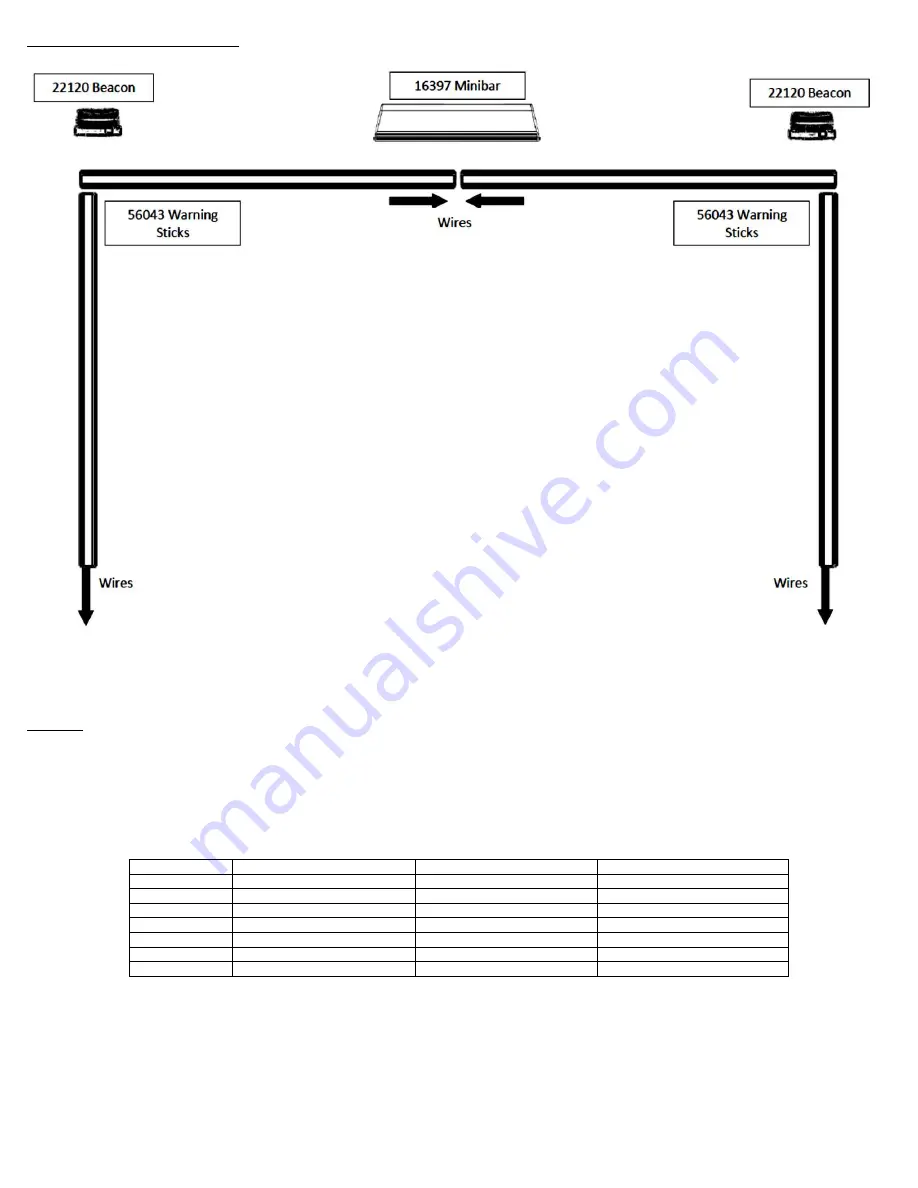
Array Orientation/Layout 
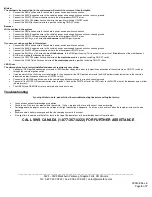


Wiring 


If you are not using a minibar, be sure to wire one of the beacons as the master. 


Note that all three lights have different coloured wires for flash colour control.  Be careful to wire them appropriately. 


All extension wires need to be appropriately sized depending upon the length that they are to travel.  SWS recommends that for every 10ft. of length, the 

gauge be increased (i.e. for a length of 20ft, the power wires should be 14-16AWG).  


If you are unsure of your wire gauge or want to use a lesser gauge, check the voltage at the end of the wire length to ensure the light will receive 

adequate power. 


Wire Colour 

Minibar Function 

Beacon Function 

Warning Stick Function 

Red 

Positive Connection (+) 

Positive Connection (+) 

Positive Connection (+) 

Black 

Negative Connection (-) 

Negative Connection (-) 

Negative Connection (-) 

White 

LIN Communication 

LIN Communication 

LIN Communication 

Blue 

Blue Flash Control 

Sync./Alt. Connection 

Amber Steady Burn 

Yellow 

Amber Flash Control 

Amber Flash Control 

N/A 

Violet 

N/A 

Blue Flash Control 

N/A 

Green 

N/A 

N/A 

N/A 


Summary of Contents for 75028

Page 1: ...uctions pour 75028 Matrice de Chasse Neige Ce qui suit est une liste d usances recommandées pour l installation et l opération de votre lumière LE NON RESPECT DE CES PRÉCAUTIONS ET CES INSTRUCTIONS PEUT RÉSULTER EN DOMMAGE AU PRODUIT OU AU VÉHICULE ET OU BLESSURES SÉRIEUSE ET OU MORTALITÉ POUR VOUS ET OU POUR VOS PASSAGERS Pour une installation correcte l installeur doit avoir une bonne connaissan...

Page 2: ...ll allow the light to function unobstructed Be sure that the light is mounted vertically as any other orientation will decrease the effectiveness of the light 2 If you are not using an SWS mounting bracket you will have to drill three 3 holes into the surface using a 7 32 drill bit Use the foam pad as a template Be sure to drill a hole in the center for the wires 3 Set the foam pad down on the sur...

Page 3: ... they are to travel SWS recommends that for every 10ft of length the gauge be increased i e for a length of 20ft the power wires should be 14 16AWG If you are unsure of your wire gauge or want to use a lesser gauge check the voltage at the end of the wire length to ensure the light will receive adequate power Wire Colour Minibar Function Beacon Function Warning Stick Function Red Positive Connecti...

Page 4: ...er beacon s BLUE wire making that beacon the master Connect the YELLOW amber flash control wire of the master beacon to a positive switching ON OFF switch Connect the VIOLET blue flash control wire of the master beacon to a positive switching ON OFF switch LED Sticks The dimming function is factory installed and does not require any user wiring Connect all RED positive connection wires and all BLU...

Page 5: ...obstruction Assurez vous que la lumière et monté verticalement car n importe qu elle autre orientation réduira l efficacité 2 Si vous n utilisez pas des équerres de montage de SWS vous avez besoin de percer trois 3 trous dans la surface avec un foret de 7 32 Utilisez le coussin de mousse comme un gabarit Soyez certain de percer un trou au centre pour les fils 3 Placez le coussin de mousse sur la s...

Page 6: ... ex pour 20pier de longueur le calibre minimum des fils de puissance serait 14 16AWG Si vous n êtes pas sûr de votre calibre ou vous voulez utiliser un calibre plus petit vérifiez la tension au raccordement des fils du produit pour assurer que la lumière va recevoir le pouvoir nécessaire Couleur De Fil Fonction de la Mini Barre Fonction de la Phare Bâton d Avertissement Rouge Raccordement Positive...

Page 7: ... Connectez les fils syn alt BLEUS de un des deux phares aux fils positifs ROUGES Ne connectez pas le fil BLEU de l autre phare ce qui le fait le maître Connectez le fil JAUNE du Maître qui contrôle l éclairage ambre à un commutateur positive ON OFF Connectez le fil VIOLET du Maître qui contrôle l éclairage bleu à un commutateur positive ON OFF Fonction des Bâtons d Avertissements La fonction de gr...

Reviews: