background image

- 9 -

EN

9I03

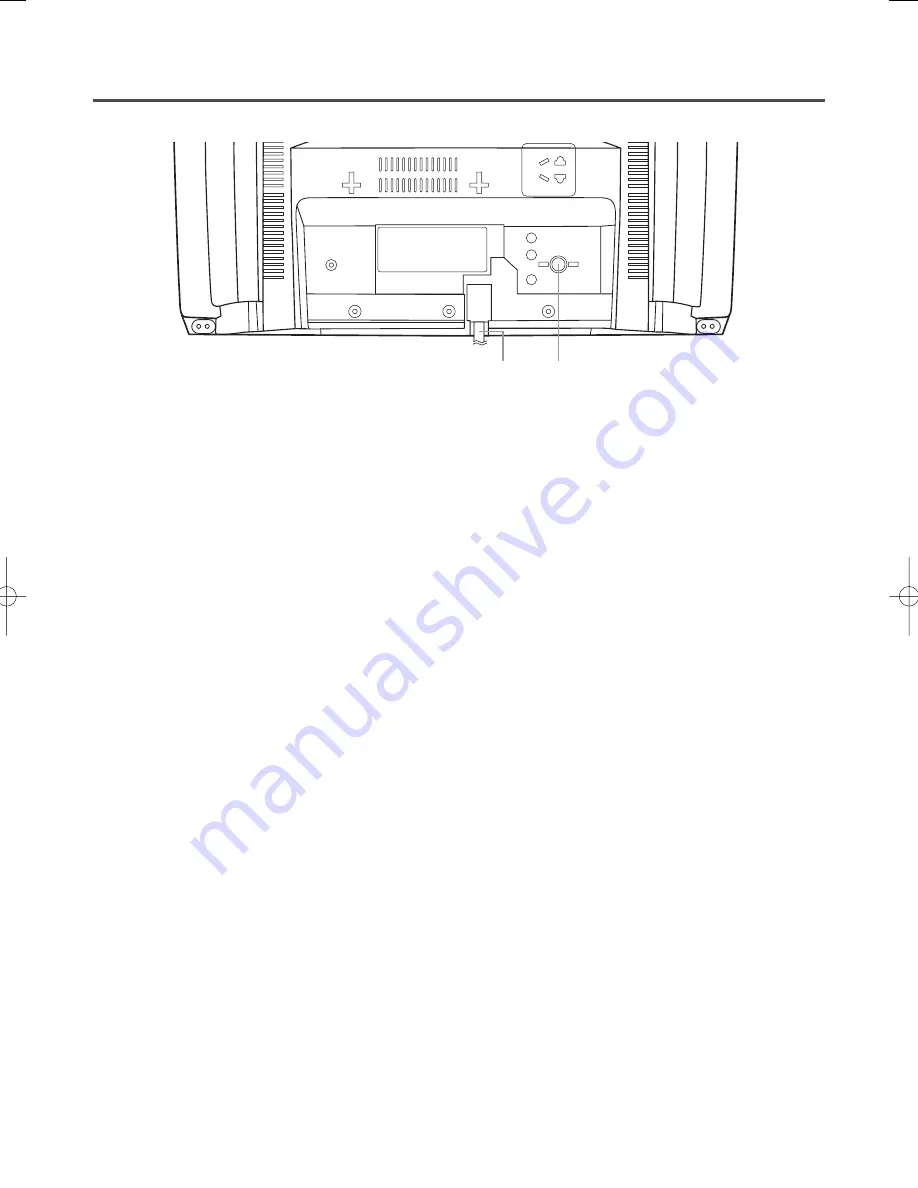
- REAR VIEW -

ANT.

27

26

8

REW button–

Press to rewind the tape, or to view

the picture rapidly in reverse during playback
mode. (Rewind Search)

s

button–

Press to select a mode from a particular menu.
(for example: LANGUAGE or USER’S SET UP)

9

PLAY button–

Press to begin playback.

K

button–

Press to select setting modes from the on screen
menu.

Press to enter digits when setting program.
(for example: setting clock or timer program)

10

F.FWD button–

Press to rapidly advance the tape,

or to view the picture rapidly in forward during
playback mode. (Forward Search)

B

button–

When setting program (for example: setting clock
or timer program), press to determine your selec-
tion and proceed to the next step you want to
input.

Press to determine setting modes from on screen
menu.

Press to select a mode from a particular menu.
(for example: LANGUAGE or USER’S SET UP)

11

REC button–

Press for manual recording.

OTR button–

Activates One Touch Recording.

(only on the TV/VCR)

12

RECORD indicator–

Flashes during recording.

Lights up in the Stand-by mode for Timer
Recording.

13

EARPHONE jack–

Connects to earphones (not

supplied) for personal listening. The size of jack is
1/8” monaural (3.5mm).

14

Cassette compartment

15

Number buttons–

Press to select desired channels

for viewing or recording. To select channels from
1 to 9, first press the 0 button and then 1 to 9.

+100 button–

When selecting cable channels

which are higher than 99, press this button first,
then press the last two digits. (To select channel
125, first press the “+100” button then press “2”
and “5”).

16

MENU button–

Press to display the main menu on

the TV screen.

17

DISPLAY button–

Display the counter or the cur-

rent channel number and current time on the TV
screen. (See page 16.)

18

SPEED button–

Press to choose the desired

recording speed:SP/SLP.

19

T-PROG. CLEAR button–

Press to cancel a setting

of timer program. (See page 27.)

COUNTER RESET button–

Press to reset counter

to 0:00:00.

20

GAME button–

Sets the game mode and external

input mode at the same time. (See page 17.)

21

TIME SEARCH button–

Press to activate Time

Search mode.

22

PAUSE/STILL button–

Press to temporarily stop

the tape during the recording or to view a still pic-
ture during playback.

23

MUTE button–

Mutes the  sound. Press it again to

resume sound.

24

CHANNEL RETURN button–

Press to go back to

the previously viewed channel. For example,
pressing this button once will change channel dis-
play from 3 (present channel) to 10 (previously
viewed channel), and pressing it a second time
will return from 10 to 3.

25

WAKE-UP/SLEEP button–

Sets the Wake up or

Sleep Timer. (See page 28 and 29.)

26

Power cord–

Connect to a standard AC outlet

(120V/60Hz).

27

ANT. terminal–

Connect to an antenna or cable

system.

Summary of Contents for 6313CCC

Page 1: ...t this product meets the ENERGY STAR guidelines for energy efficiency ENERGY STAR is a U S registered mark If you need additional assistance for set up or operating after reading owner s manual please...

Page 2: ...m overheat ing and these openings must not be blocked or covered The openings should never be blocked by placing the TV VCR on a bed sofa rug or other similar surface This TV VCR should never be place...

Page 3: ...overs may expose you to danger ous voltage or other hazards Refer all servicing to quali fied service personnel 19 Damage Requiring Service Unplug this TV VCR from the wall outlet and refer servicing...

Page 4: ...into the TV VCR cassette holder Do not place anything directly on top of the unit WARNING Moisture condensation may occur inside the unit when it is moved from a cold place to a warm place or after h...

Page 5: ...THE LANGUAGE 13 DAYLIGHT SAVING TIME 13 CLOCK SET UP AUTO MANUAL 14 C ON SCREEN DISPLAY 16 C SPECIAL FEATURES 16 DEGAUSSING 16 REAL TIME TAPE COUNTER 16 AUTO REWIND EJECT 16 C TV OPERATION 17 WATCHING...

Page 6: ...e tracking for each tape you play Rental play mode Improves playback picture quality from worn tapes such as rental tapes Auto repeat Allows you to repeat the playing of a tape indefinitely without pr...

Page 7: ...humidity and magnetic fields Do not tamper with the cassette mechanism Do not touch the tape with your fingers INSERTING A CASSETTE Insert the cassette in the direction as shown Push in gently but con...

Page 8: ...y the main menu on the TV screen by pressing repeatedly this button on the TV VCR TRACKING function Press to minimize video noise lines or dots on screen during playback mode See page 21 6 Remote Sens...

Page 9: ...s for viewing or recording To select channels from 1 to 9 first press the 0 button and then 1 to 9 100 button When selecting cable channels which are higher than 99 press this button first then press...

Page 10: ...tenna terminal CABLE WITHOUT CONVERTER DESCRAMBLER BOX Use this connection if your cable system connects directly to your TV VCR without a converter box By using this connection you can 1 Use the TV V...

Page 11: ...ox or Cable Box Not supplied TO RECORD A SCRAMBLED UNSCRAMBLED CHANNEL 1 Set the TV VCR channel selector to the output channel of the Cable Converter Box or Satellite Box Ex CH3 2 Select the channel t...

Page 12: ...est memorized channel If you want to recall the selected channels you can select the desired channel directly with the remote control number buttons or CHANNEL K or L button DELETING OR ADDING CHANNEL...

Page 13: ...tober When Daylight Saving Time is ON the clock will change automatically as follows First Sunday of April At 2 AM the clock imme diately changes to 3 AM Any timer programming you have set to occur be...

Page 14: ...on on the remote control Press the PLAY K or STOP L but ton to point to SETTING CLOCK Then press the F FWD B button 2 Set AUTO CLOCK to ON Press the F FWD B or REW s button repeatedly until ON appears...

Page 15: ...hough seconds are not displayed they begin counting from 00 when you press the MENU button on the remote control Use this feature to synchronize the clock with the correct time NOTE When unplugging th...

Page 16: ...ens move this unit away from the appli ance If the color is still not correct disconnect power cord from AC outlet then reconnect it after 30 minutes REAL TIME TAPE COUNTER This shows the elapsed reco...

Page 17: ...ly TO CANCEL THE GAME MODE Press the GAME button or CHANNEL K or L but ton on the remote control PICTURE CONTROL The TV VCR s picture controls BRIGHT CON TRAST COLOR TINT and SHARPNESS are preset to f...

Page 18: ...s a black box on the TV screen this means that the TV VCR is set to the TEXT mode To clear screen select CAP TION1 CAPTION2 or OFF Make sure TV VCR power must be turned on 1 Select CAPTION Press the M...

Page 19: ...Y Appropriate for all children TV Y7 Appropriate for children seven and older TV G General Audience TV PG Parental Guidance suggested TV 14 Unsuitable for children under 14 TV MA Mature audience only...

Page 20: ...g will turn BLOCK automatically Also the lower rating will turn VIEW automatically When you turn G to VIEW the all ratings will turn to VIEW automatically 4 Exit the V Chip setting mode Press the MENU...

Page 21: ...on to return to normal speed STILL PICTURE You can view a still picture on the TV screen during playback the Still mode Press the PAUSE STILL button during playback Only tapes recorded in the SLP mode...

Page 22: ...yback from the begin ning to a blank part which is blank for more than 10 seconds 1 Select USER S SET UP Press the MENU button on the remote control Press the PLAY K or STOP L but ton to point to USER...

Page 23: ...ing mode This function is not operative when a cassette tape is not inserted in the TV VCR In the example below To watch a program after 2 hour 50 minutes from the present position in either direction...

Page 24: ...the TV VCR must be on CH3 or CH4 then the channel to be recorded must be selected on the cable box or satellite box 2 Select the tape speed Press the SPEED button to select the desired tape speed SP...

Page 25: ...Select the tape speed Press the SPEED button to select the desired tape speed SP SLP 3 Begin OTR Press the REC OTR button on the TV VCR as many times as needed The recording length will be deter mined...

Page 26: ...11 00AM Program 2 9 00AM 10 00AM Program 3 9 30AM 12 00PM 11 00AM Recording Sequence Recording period is SHADED And press the F FWD B button If you have not yet set the clock MANUAL CLOCK SET appears...

Page 27: ...Press the MENU button on the remote control to return to TV mode While recording is in progress 1 Press POWER button 2 Press the STOP EJECT button on the TV VCR 5 Set beginning hour Press the PLAY K...

Page 28: ...s Then press the MENU button on the remote control to return to TV mode 3 Auto Return will begin When all the timer recordings are completed the TV VCR will rewind to the beginning of the recorded pro...

Page 29: ...function turns off the TV VCR without using the POWER button after a desired period of time NOTE This function does not operate during Recording mode 1 Select SLEEP TIMER Press the WAKE UP SLEEP butto...

Page 30: ...g a copy of a video tape copy guard protection CLOSED CAPTION PROBLEM POSSIBLE REMEDY My TV VCR is showing captions You are watching a live broadcast and spelling errors made by the that are misspelle...

Page 31: ...IONS If you subscribe to cable TV the channels are displayed as 1 125 Cable companies often designate channels with letters or letter number combinations Please check with your local cable company The...

Page 32: ...ted to cabinet cabinet parts batteries connecting cables tapes This warranty shall in addition not apply to cleaning video audio heads pinch rollers tape transport system damages due to handling trans...

Reviews: