background image

- 6 -

EN

0C28

TABLE OF CONTENTS

C

IMPORTANT SAFEGUARDS  . . . . . . . . . . . . .2

C

PRECAUTIONS  . . . . . . . . . . . . . . . . . . . . . . . .4

LOCATION  . . . . . . . . . . . . . . . . . . . . . . . . . . . .5

AVOID THE HAZARDS OF ELECTRICAL
SHOCK AND FIRE  . . . . . . . . . . . . . . . . . . . . . .5

WARNING  . . . . . . . . . . . . . . . . . . . . . . . . . . . .5

C

FEATURES  . . . . . . . . . . . . . . . . . . . . . . . . . . . .7

C

SUPPLIED ACCESSORIES  . . . . . . . . . . . . . . .7

C

OPERATING CONTROLS AND FUNCTIONS 8

C

PREPARATION FOR USE  . . . . . . . . . . . . . . .10

ANTENNA/CABLE CONNECTIONS . . . . . . .10

INSTALLING THE BATTERIES . . . . . . . . . . .12

CONNECTING TO EXTERNAL INPUT JACKS  .12

CONNECTING TO A STEREO SYSTEM (for DVD)  .13

CONNECTING TO AN AMPLIFIER
EQUIPPED WITH DIGITAL INPUT JACKS,
MD DECK OR DAT DECK (for DVD)  . . . . . .13

CONNECTING TO A DOLBY DIGITAL
DECODER OR DTS DECODER (for DVD)  . .14

TV SECTION

C

SET UP FOR USE  . . . . . . . . . . . . . . . . . . . . .15

LANGUAGE SELECTION  . . . . . . . . . . . . . . .15

CHANNEL PRESETTING  . . . . . . . . . . . . . . .15

C

OPERATIONS . . . . . . . . . . . . . . . . . . . . . . . . .16

WATCHING A TV PROGRAM  . . . . . . . . . . . .16

SELECTING THE SLEEP TIMER  . . . . . . . . .16

CLOSED CAPTION  . . . . . . . . . . . . . . . . . . . .16

PICTURE ADJUSTMENT . . . . . . . . . . . . . . . .17

V-CHIP SET UP . . . . . . . . . . . . . . . . . . . . . . . .18

DVD SECTION

C

ABOUT THE DISCS  . . . . . . . . . . . . . . . . . . . .20

PLAYABLE DISCS  . . . . . . . . . . . . . . . . . . . . .20

DISC TYPES  . . . . . . . . . . . . . . . . . . . . . . . . . .20

SYMBOLS USED IN THIS MANUAL  . . . . . .20

C

PLAYING A DISC  . . . . . . . . . . . . . . . . . . . . . .21

PLAYING A DVD VIDEO OR AN AUDIO CD  .21

USING THE DVD MENUS . . . . . . . . . . . . . . .21

USING THE TITLE MENU . . . . . . . . . . . . . . .22

PAUSING PLAYBACK OR DISPLAYING
A STILL PICTURE  . . . . . . . . . . . . . . . . . . . . .22

RESUMING PLAYBACK FROM THE
POINT WHERE PLAYBACK STOPPED  . . . .22

STEPPING THROUGH FRAMES . . . . . . . . . .22

FAST FORWARD/REVERSE  . . . . . . . . . . . . .23

SLOW MOTION  . . . . . . . . . . . . . . . . . . . . . . .23

STARTING FROM A DESIRED TRACK  . . . .23

STARTING FROM A DESIRED TIME COUNT  .23

PLAYING FROM A DESIRED TITLE OR
CHAPTER  . . . . . . . . . . . . . . . . . . . . . . . . . . . .24

RANDOM (Audio CD)  . . . . . . . . . . . . . . . . . .24

REPEAT  . . . . . . . . . . . . . . . . . . . . . . . . . . . . .24

A-B REPEAT  . . . . . . . . . . . . . . . . . . . . . . . . . .25

PROGRAM (Audio CD)  . . . . . . . . . . . . . . . . .25

C

SETTINGS  . . . . . . . . . . . . . . . . . . . . . . . . . . .26

CHANGING THE AUDIO LANGUAGE OR
SOUND MODE  . . . . . . . . . . . . . . . . . . . . . . . .26

CHANGING THE SUBTITLE LANGUAGE . .27

CHANGING THE CAMERA ANGLE
(Multi-Angle Pictures)  . . . . . . . . . . . . . . . . . . .27

CHANGING THE ON-SCREEN DISPLAY . . .28

C

CHANGING THE SETUP ITEMS  . . . . . . . . .29

LANGUAGE SETTINGS  . . . . . . . . . . . . . . . .29

VIDEO SETTINGS  . . . . . . . . . . . . . . . . . . . . .30

AUDIO SETTINGS  . . . . . . . . . . . . . . . . . . . . .30

PARENTAL LOCK  . . . . . . . . . . . . . . . . . . . . .31

OTHER SETTINGS . . . . . . . . . . . . . . . . . . . . .32

C

LANGUAGE CODE LIST . . . . . . . . . . . . . . . .33

C

TROUBLESHOOTING GUIDE  . . . . . . . . . . .34

C

MAINTENANCE . . . . . . . . . . . . . . . . . . . . . . .37

DISC HANDLING . . . . . . . . . . . . . . . . . . . . . .37

C

SPECIFICATIONS  . . . . . . . . . . . . . . . . . . . . .38

C

WARRANTY  . . . . . . . . . . . . . . . . . . .Back Cover

TD200(1st).QX33  00.6.1 4:18 PM  Page 6

Summary of Contents for 6519DA

Page 1: ...6519DA OWNER S MANUAL If you need additional assistance for set up or operating after reading owner s manual please call TOLL FREE 1 800 968 3429 Please read before using this equipment INSTRUCCIONES EN ESPAÑOL INCLUIDAS TM ...

Page 2: ...ions du fabriquant et l on devra utiliser les accessoires d installation recommandés par le fabriquant L ensemble combiné de l appareil avec une table roulante devra être déplacé avec précaution Des arrêts brusques une force excessive et des surfaces inégales peuvent provo quer le renversement de l ensemble combiné de l appareil table roulante 9 Ventilation Slots and openings in the cabinet and th...

Page 3: ... might be fatal 16 Overloading Do not overload wall outlets and extension cords as this can result in a risk of fire or electric shock 17 Object and Liquid Entry Never push objects of any kind into this TV DVD through openings as they may touch dan gerous voltage points or short out parts that could result in a fire or electric shock Never spill liquid of any kind on the TV DVD 18 Servicing Do not...

Page 4: ... FCC WARNING This equipment may gener ate or use radio frequency energy Changes or modifications to this equipment may cause harmful interference unless the modifications are expressly approved in the instruction man ual The user could lose the authority to oper ate this equipment if an unauthorized change or modification is made PRECAUTIONS IMPORTANT COPYRIGHT INFORMATION Unauthorized copying bro...

Page 5: ...not put your fingers or objects into the TV DVD disc loading tray Do not place anything directly on top of the unit WARNING Moisture condensation may occur inside the unit when it is moved from a cold place to a warm place or after heating a cold room or under conditions of high humidity If a DVD is played in a TV DVD which has moisture it may damage the DVD and TV DVD Therefore when the condensat...

Page 6: ...HE DISCS 20 PLAYABLE DISCS 20 DISC TYPES 20 SYMBOLS USED IN THIS MANUAL 20 C PLAYING A DISC 21 PLAYING A DVD VIDEO OR AN AUDIO CD 21 USING THE DVD MENUS 21 USING THE TITLE MENU 22 PAUSING PLAYBACK OR DISPLAYING A STILL PICTURE 22 RESUMING PLAYBACK FROM THE POINT WHERE PLAYBACK STOPPED 22 STEPPING THROUGH FRAMES 22 FAST FORWARD REVERSE 23 SLOW MOTION 23 STARTING FROM A DESIRED TRACK 23 STARTING FRO...

Page 7: ...enus in a desired language You can dis play DVD menus in a desired language if avail able on a DVD Screen saver and auto power off functions Screen saver is automatically activated when there is no input from the player or the remote control for one minute in stop mode The power is auto matically turned off when there is no input for 31 minutes in still or stop mode Subtitles in a desired language...

Page 8: ...ions 16 NUMBER button TV Mode Press two digits to directly access the desired channel Remember to press a 0 before a single digit channel 100 button Press to select cable channels which are equal or greater than number 100 DVD Mode Press to enter the desired number 10 button Press to enter the desired numbers which are equal or greater than number 10 REMOTE CONTROL Fig 2 L AUDIO R VIDEO POWER VOLU...

Page 9: ...L R output jack Connect to the other amplifier or decoder 40 ANT in jack Connect to an antenna cable sys tem or satellite system 17 SLEEP button Press the SLEEP button to dis play the sleep timer and start the function The shut off time can be determined by the number of times you press the button 0 10 20 30 90 0 minutes 18 SKIP buttons Skip chapters or tracks to a desired point 19 MODE button Act...

Page 10: ...d touching the top section when adjusting NOTE Before plugging the Rod antenna into antenna terminal check that the pin is not bent If it is bent straighten the pin as illustrated then plug the pin into antenna terminal VHF UHF SEPARATE ANTENNAS In some areas it will be necessary to use an outdoor antenna ANT Bent pin Cable Plug Needs to be straightened Straight pin ANT NOTE The connection of an i...

Page 11: ...E WITHOUT CONVERTER DESCRAMBLER BOX Use this connection if your cable system connects directly to your TV DVD without a converter box Note to CATV system installer This reminder is provided to call the CATV system installer s attention to Article 820 40 of the NEC that provides guidelines for proper grounding and in particular specifies that the cable ground shall be connect ed to the grounding sy...

Page 12: ... the audio video input jacks on the front of the TV DVD Connect the audio video output jacks of another source to the AUDIO L R and VIDEO jacks of this TV DVD Then press the SELECT button until VIDEO appears on the screen NOTE When you connect a monaural VCR another source to this TV DVD connect the Audio output jack of the monaural VCR another source to the AUDIO L jack of this TV DVD The audio w...

Page 13: ...igital surround format cannot be recorded as digital sound by an MD or DAT deck Be sure to turn off the power to all components in the system before connecting another component Refer to the Owner s Manuals for the components to be connected to the TV DVD Set DOLBY DIGITAL and DTS to OFF for audio output in the setup mode Playing a TV DVD using incorrect settings may generate noise distortion and ...

Page 14: ... If connected to a DTS decoder set DTS to ON for audio output in the setup mode Unless connected to a Dolby Digital decoder or a DTS decoder set DOLBY DIGITAL and DTS to OFF for audio output in the setup mode Playing a TV DVD using incorrect settings may generate noise distortion and may also damage the speakers When DOLBY DIGITAL is set to OFF and VIRTUAL 3D to ON for audio output in the setup mo...

Page 15: ...e TV channels to be CATV channels by the receiving conditions In this case try AUTO MEMO action again in the fine receiv ing conditions ADD DELETE FUNCTION 1 Press the MENU button so that the menu display appears on the TV screen 2 Press the Arrow K or L button to point to CHAN NEL SET Then press the Arrow B button 3 Press the Arrow B button so that ADD DELETE is selected 4 Use the Arrow K or L bu...

Page 16: ...s TV can receive C1 and C2 of Caption and Text CAPTION MODE 1 Characters can be displayed on the TV screen when the received broadcast signal contains the Caption Signals 2 Paint on mode Displays input characters on the screen immediately Pop on mode Once characters are stored in mem ory it is displayed all at once Roll up mode Displays the characters continuous ly by scrolling max 4 lines NOTE If...

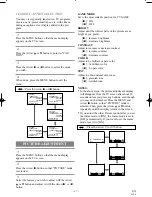
Page 17: ... the whitest parts of the picture are as bright as you prefer B increase brightness s decrease brightness CONTRAST Adjust to increase or decrease contrast B increase contrast s decrease contrast COLOR Adjust to be brilliant or pale color B be brilliant color s be pale color TINT Adjust to obtain natural skin tones B greenish tone s reddish tone NOTES In the above steps the picture adjustment displ...

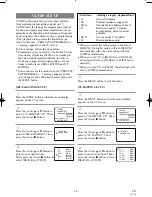
Page 18: ...ired item Then press the Arrow B button to select BLOCK or VIEW PICTURE CHANNEL SET LANGUAGE ENGLISH ESPAÑOL FRANÇAIS V CHIP SET UP CAPTION OFF G VIEW PG VIEW PG 13 VIEW R BLOCK NC 17 BLOCK X BLOCK TV RATING MPAA RATING When you select the rating category and turn it BLOCK the higher rating will turn BLOCK automatically Also the lower rating will turn VIEW automatically When you turn G to BLOCK or...

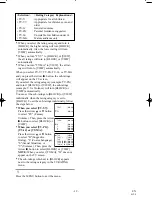
Page 19: ...ollow the steps below When you select TV Y7 Press the Arrow K or L button to select FV Fantasy Violence Then press the Arrow B button to select BLOCK or VIEW When you select TV PG TV 14 or TV MA Press the Arrow K or L button to select D Suggestive Dialog L Coarse Language S Sexual Situation or V Violence Then press the Arrow B button to select BLOCK or VIEW NOTE When you select TV MA D does not ap...

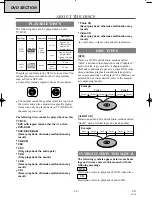
Page 20: ... indications DVD Video 12 cm 12 cm Approx 4 h single sided Approx 8 h double sided Approx 80 min single sided Approx 160 min double sided 20 min 8 cm 8 cm singles Logo Maximum Playback Time Contents Disc Type Sound and Pictures Audio CD Disc Size Sound 74 min DISC TYPES DVD Data on a DVD is divided into sections called titles and then into subsections called chapters each of which is given a title...

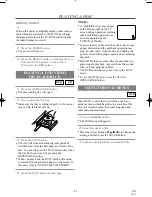
Page 21: ...ion may stop In such cases clean the disc and unplug the power cord and then plug it again before resuming playback With DVDs that use some titles for playback pro gram signals playback may start from the second title or it may skip these titles The DVD functions are active only in the DVD mode To run the DVD player press the PLAY or OPEN CLOSE button DVD CD USING THE DVD MENUS DVD Some DVDs conta...

Page 22: ...the PAUSE button during playback Playback will pause with sound muted 2 Press the PLAY button to resume playback PAUSE PLAY RESUMING PLAYBACK FROM THE POINT WHERE PLAYBACK STOPPED DVD 1 Press the STOP button during playback Playback will stop and STOP will appear at the top right of the screen and then MEMO ON at the top left 2 Press the PLAY button Playback will start from the point where the pre...

Page 23: ...o be displayed in square brackets SEARCH TRACK TOTAL TRACKS 07 TRACK 6 Start Exit _ TRICKS WITH THE SKIP BUTTONS H G If the SKIP button G is pressed during playback or while playback is paused the current track is skipped and the next track is played When the SKIP button H is pressed once the top of the cur rent track is located for replaying When the SKIP button H is pressed again while playback ...

Page 24: ...r DVDs A single title or chapter is played back repeatedly Pressing the REPEAT button cycles the display on the screen as follows If normal playback is performed after REPEAT CHAPTER has been selected without any chapter number entered the first chapter is played back repeatedly If the chapter number is changed using the number buttons or the SKIP buttons H G during playback the newly selected cha...

Page 25: ...ect the settings The total playback time for the selected tracks will appear on the TOTAL line 3 Press the PLAY button Playback will start in the programmed order The contents of the program are retained after the program playback ends NOTES Addition or confirmation of programs is not possi ble during program playback You must stop the current playback before such operations can be car ried out Pr...

Page 26: ...language setting on the disc menu Operation varies between discs so refer to the manual accompanying the disc If a desired language is not shown after pressing the K L buttons several times the disc does not have an audio source in that language The audio language resets to the one which has been selected in the setup mode every time the power is turned on or discs are replaced If that lan guage i...

Page 27: ...ted in the setup mode every time the power is turned on or discs are replaced If that language is not available on a disc a language defined by the disc is selected It may take time to display the subtitles in the selected language The screen display will disappear after about 15 seconds CHANGING THE SUBTITLE LANGUAGE DVD Subtitle 1 No subtitles Subtitle 2 SUBTITLE 1 E N G 8 SUBTITLE 2 F R E 8 SUB...

Page 28: ...s AUDIO 1 ENGLISH DOLBY DIGITAL 6CH SUBTITLE 2 FRENCH ANGLE 8 8 VIRTUAL 3D Current title number total number of titles Elapsed time of the current title Remaining time of the current title Current chapter number total number of chapters in the current title Elapsed time of the current chapter Remaining time of the current chapter Current language for the sound Current audio format Current language...

Page 29: ...y language must be selected each for the TV mode and DVD mode LANGUAGE SETTINGS SETUP 1 LANGUAGE 2 VIDEO 3 AUDIO 4 LOCK 5 OTHERS Enter Exit SETUP LANGUAGE 1 AUDIO ENG 2 SUBTITLE AUTO 3 DISC MENU ENG 4 PLAYER MENU ENG Enter Back Exit SETUP LANGUAGE AUDIO 1 ORIGINAL 2 ENGLISH 3 SPANISH 4 FRENCH 5 OTHER The original language of each disc will be selected Voice is played back in English Voice is playe...

Page 30: ...O and then press the ENTER button 3 Press the K K L L or number buttons to select an item and then press the ENTER button 4 Press the K K L L or number buttons to select the desired item and then press the ENTER button If PCM DOLBY DIGITAL or DTS is selected on the DIGITAL OUT setting screen press the K L or number buttons again to select a further item and then press the ENTER button AUDIO SETTIN...

Page 31: ...rd from the second time onward By entering the password you can then change the control level and password settings 4 Press the K K L L or number buttons to select an item and then press the ENTER button When LEVEL is selected Press the K L buttons to select an item from LEVEL 1 to LEVEL 8 or NONE and then press the ENTER button When CHANGE PASSWORD is selected The password entry screen will be di...

Page 32: ... select an item and then press the ENTER button 4 Press the K K L L or number buttons to select a desired item and then press the ENTER but ton 5 Press the SETUP button The setup mode will be canceled and the ordinary screen will appear NOTE If the number buttons are used in steps 2 to 4 the settings are immediately selected You do not need to press the ENTER button OTHER SETTINGS SETUP 1 LANGUAGE...

Page 33: ... 7 7 1 65 Latin 5 8 4 7 66 Lingala 5 8 6 0 67 Laothian 5 8 6 1 68 Lithuanian 5 8 6 6 No Language Country code 69 Latvian Lettish 5 8 6 8 70 Malagasy 5 9 5 3 71 Maori 5 9 5 5 72 Macedonian 5 9 5 7 73 Malayalam 5 9 5 8 74 Mongolian 5 9 6 0 75 Moldavian 5 9 6 1 76 Marathi 5 9 6 4 77 Malay 5 9 6 5 78 Maltese 5 9 6 6 79 Burmese 5 9 7 1 80 Nauru 6 0 4 7 81 Nepali 6 0 5 1 82 Dutch DUT 6 0 5 8 83 Norwegia...

Page 34: ...ust COLOR control Poor Reception on Some Channels Try a new channel if OK then possible station trouble Ghosts in Picture Is antenna connected to terminal on the back of the set If outside antenna is being used check for broken wire Check for local interference Weak Picture Try a new channel if OK then possible station trouble Is antenna connected to terminal on the back of the set If outside ante...

Page 35: ... a dialogue to a maximum of 220 words per minute If a dialogue exceeds that rate selective editing is used to insure that the captions remain up to date with the current TV screen dialogue My captions are scrambled with Interference caused by building power lines thunderstorms etc white boxes on the TV screen may cause scrambled or incomplete captions to appear My program guide listed a TV show Br...

Page 36: ...ect the audio cables firmly The power of the connected Turn the power of the audio component on audio component is off Wrong audio output settings Correct the audio output settings Wrong input settings on the Correct the input settings on the audio connected audio component component Distorted picture Immediately after playing There are some cases where pictures may be press fast forward or in rev...

Page 37: ...CKUP UNIT IS DIRTY If the player still does not perform properly when it is operated while referring to the relevant sections and to TROUBLESHOOTING GUIDE in this Owner s Manual the laser optical pickup unit may be dirty Consult your dealer or an Authorized Service Center for inspection and cleaning of the laser optical pickup unit Use discs which have the following logos on them Optical audio dig...

Page 38: ...ent limitation 0 001 W PEAK EIAJ Designs and specifications are subject to change without notice and without our legal obligation If there is a discrepancy between languages the default language will be English TV DVD GENERAL SPECIFICATIONS ELECTRICAL SPECIFICATIONS Sound output 2 speakers 1W 8 ohm OTHER SPECIFICATIONS Terminals Antenna input VHF UHF CATV 75 ohm unbalanced F type Video input RCA c...

Page 39: ...o para seleccionar un idioma de subtítulos deseado 27 Botón de repetición REPEAT Repita la reproducción del disco título capítulo o pista actual 28 Botón de ángulo ANGLE Púlselo para cambiar el ángulo de la cámara y ver la escena reproduciéndose desde un ángulo diferente 29 Botón de repetición A B A B REPEAT Repite la reproduc ción de una sección seleccionada 30 Botón de retorno RETURN Se utiliza ...

Page 40: ...l de 5 1 canales no puede grabarse como sonido digital por una platina MD o DAT Asegúrese de desconectar la alimentación de todos los compo nentes del sistema antes de hacer conexiones a otro compo nente Consulte también los manuales de los componentes que vayan a ser conectados al televisor reproductor DVD En el modo de preparación ponga DOLBY DIGITAL y DTS en APDO para la salida de audio Hacer l...

Page 41: ...el botón de flecha B 3 Pulse el botón de flecha B para seleccionar AGREGAR BOR RAR 4 Utilice el botón de flecha K o L para seleccionar el canal que desee memorizar o borrar de la memoria NOTA La visualización volverá a la pantalla en unos 10 segundos Realice la función de AGREGAR BORRAR mien tras aparece la visualización en la pantalla Pulse el botón de flecha B o s para encender el número del can...

Page 42: ... UTILIZACIÓN DEL MENÚ DE TÍTULOS Con un DVD que tenga un menú de títulos usted podrá selec cionar los títulos deseados en el menú 1 Pulse el botón TITLE El menú de títulos aparecerá 2 Seleccione el título deseado Pulse los botones de las flechas K L B s para cambiar el ajuste y luego pulse el botón ENTER RECUPERACIÓN DE UNA PANTALLA DE MENÚS DURANTE LA REPRODUCCIÓN Para DVDs Pulse el botón MENU pa...

Page 43: ... 43 ES 0C28 MEMO ...

Page 44: ... OR AGENTS SHALL IN NO EVENT BE LIABLE FOR ANY GENERAL INDIRECT OR CONSEQUENTIAL DAMAGES ARISING OUT OF OR OCCASIONED BY THE USE OF OR THE INABILITY TO USE THIS PRODUCT THIS WARRANTY IS MADE IN LIEU OF ALL OTHER WARRANTIES EXPRESS OR IMPLIED AND OF ALL OTHER LIABILITIES ON THE PART OF FUNAI ALL OTHER WARRANTIES INCLUDING THE WARRANTY OF MER CHANTABILITY AND FITNESS FOR A PARTICULAR PURPOSE ARE HER...

Reviews: