background image

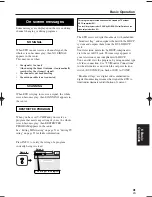
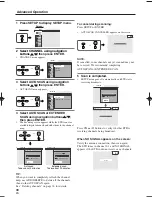
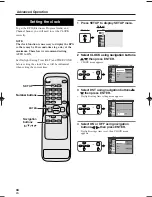
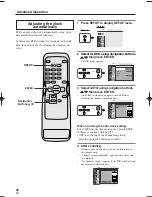
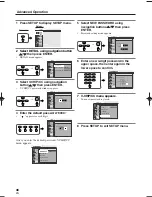
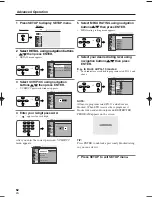
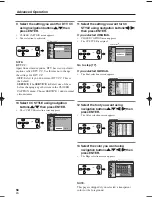
5 Select TIME ZONE using navigation

buttons 

o

o

p

p

, then press ENTER.

TIME ZONE setting menu appears.

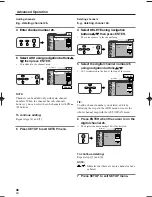
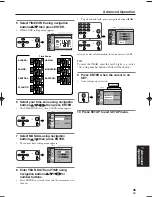
6 Select your time zone using navigation

buttons 

o

o

p

p

s

s

B

B

, then press ENTER.

The TIME ZONE is set, then CLOCK menu appears.

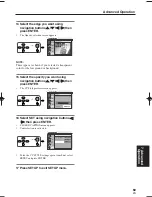
7 Select MANUAL using navigation

buttons 

o

o

p

p

, then press ENTER.

The current time setting menu appears.

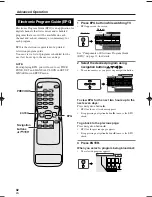
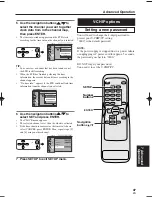
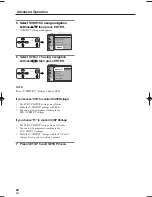
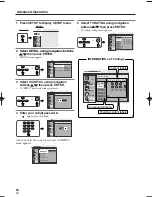
8 Enter YEAR, DATE and TIME using

navigation buttons 

o

o

p

p

s

s

B

B

or

number buttons.

Press ENTER to set each value and the cursor moves to
the next.

To go back and forth, press navigation buttons 

s

B

.

After you enter all information, the cursor moves to SET.

TIP:

To enter the YEAR, enter the last 2 digits (e.g., enter
“04” using number buttons; 2004 will be shown.)

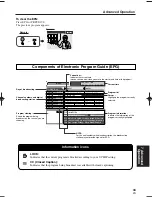
9 Press ENTER when the cursor is on

SET.

Your settings are activated.

10 Press SETUP to exit SETUP menu.

CLOCK

QUIT

CHANNEL

DISPLAY

CLOCK

DETAIL

DST

ON

TIME ZONE

CENTRAL

MANUAL

AUTO

OFF

Wed, Mar 31, 2004   1 52PM

Activated

CLOCK

QUIT

CHANNEL

DISPLAY

CLOCK

DETAIL

Enter current time.

TIME

52

PM

1

DATE

31

3

Wed

YEAR

2004

SET

or

CLOCK

QUIT

CHANNEL

DISPLAY

CLOCK

DETAIL

Enter current time.

TIME

50

PM

DATE

31

2

1

Sat

YEAR

2004

SET

CLOCK

QUIT

CHANNEL

DISPLAY

CLOCK

DETAIL

DST

ON

TIME ZONE

CENTRAL

MANUAL

AUTO

OFF

Sat, Jan 31, 2004   2 50PM

ALASKA

ALASKA:

HAWAII

HAWAII:

PACIFIC

PACIFIC:

CENTRAL

CENTRAL:

EASTERN

EASTERN:

ATLANTIC

ATLANTIC:

MOUNTAIN

MOUNTAIN:

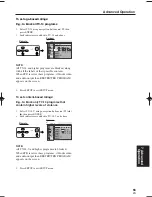
Time Zones

CLOCK

QUIT

CHANNEL

DISPLAY

CLOCK

DETAIL

Select your time zone.

CENTRAL

45

EN

1A23

Advanced Operation

7 Ad

v

anced

Operation

 ST300UA.qxd  04.8.3  1:12 PM  Page 45

Summary of Contents for 6900DTE

Page 1: ...t meets the ENERGY STAR guidelines for energy efficiency ENERGY STAR is a U S registered mark OWNER S MANUAL If you need additional assistance for set up or operating after reading owner s manual plea...

Page 2: ...nd Video device VCR DVD recorder etc 21 5 Initial Setups Setup Wizard 22 Initial setup 22 6 Basic Operation 25 Watching TV 25 Channel banner 27 Choosing audio and language 29 Picture Still 30 On scree...

Page 3: ...l ensemble et de le renverser 9 Ventilation Slots and openings in the cabinet and the back or bottom are provided for ventilation and to ensure reliable operation of this product and to protect it fro...

Page 4: ...ge Requiring Service Unplug this product from the wall outlet and refer servicing to qualified service person nel under the following conditions a When the power supply cord or plug is damaged or fray...

Page 5: ...e ventila tion holes Install unit in a horizontal position Avoid locations subject to strong vibration Do not place this product near strong magnetic fields Avoid moving this product to locations wher...

Page 6: ...erience in the home Digital broadcasting overcomes problems experienced with analog television such as ghosting snowy pictures and interference Digital television has a dramatic effect on these proble...

Page 7: ...ows broadcasters to transmit multiple programs per channel Dolby Digital Dolby Digital can provide 6 independent soundtrack channels through the DIGITAL AUDIO OUT OPT or COAX jack Connect to an extern...

Page 8: ...SETUP menu 7 AUDIO button Selects alternative audio languages if available 8 PREVIOUS button Returns to the previous screen in SETUP menu or exits from the menu 9 INFO button Displays information on...

Page 9: ...t to a receiver with Dolby Digital for Dolby Digital 5 1 playback 8 COMP OUT jacks Y Pb Pr Use this connection or the DVI D HDCP OUT jack to enjoy HDTV Connect your TV with component video cables Y gr...

Page 10: ...rning chemical wastes Check the following accessories when unpacking the STB 1 Unsnap the battery cover from the back of the remote control 2 Install two AA batteries making sure the polarity is corre...

Page 11: ...AUDIO OUT Rear panel of STB NOTE Antenna cable is not included Control box Smart Antenna Refer to your Smart Antenna s manual for details Connecting the Smart Antenna CAUTION The charactoristics of th...

Page 12: ...nnected to the AC outlet 1 Connect the Smart Antenna or a different one if you wish Signal is best when using Smart Antenna 2 Connect the incoming cable to the antenna input jack on the cable box 3 Co...

Page 13: ...OUT ANT CTL D AUDIO OUT DVI COMP DVI D HDCP OUT OPT S VIDEO OUT RESOLUTION SELECT 1080i 720p 480p ANT IN AUDIO OUT e g Connection to VCR When you connect the antenna cable to another device be sure to...

Page 14: ...anel of STB DVI video cable To the DVI input jack NOTE DVI video cable is not included RESOLUTION SELECT switch 1080i 720p 480p See your television s manual for details on the resolutions it can handl...

Page 15: ...igned for PC applications using the DVI D jack may not work with this connection Refer to your television s manual for details 3 Switch the Output selection switch DVI COMP to DVI 4 Switch the RESOLUT...

Page 16: ...can show 720p resolution video Select 480p if your television can show 480p resolution video 1080i 720p 480p TV resolution Output selection switch DVI COMP See your television s manual for details on...

Page 17: ...selection switch DVI COMP to COMP 4 Switch the RESOLUTION SELECT switch 1080i 720p 480p to suit your television Refer to your television s manual for details 5 Plug the AC power cord of the televisio...

Page 18: ...n to that corresponding to the jack you connected to Refer to your television s manual for details 5 Plug the AC power cord of the STB into the AC outlet and turn it on NOTE When using either of these...

Page 19: ...an Optical or Coaxial digital audio input jack on the digital decoder 4 Plug the AC power cord of the decoder into an AC outlet then turn the decoder on 5 Set the decoder to the input mode Refer to yo...

Page 20: ...he AC outlet then turn the stereo on 5 Set the stereo to the input mode to which you connected the audio from the STB Refer to your stereo s manual for details 6 Plug the AC power cord of STB into the...

Page 21: ...o input jacks L R on the VCR NOTE If your VCR is monaural MONO and has only one audio jack use a standard audio cable white to connect the AUDIO OUT jack white on STB to the audio input jack white on...

Page 22: ...ears 4 Select the language using navigation buttons o o p p then press ENTER The selected language is activated SETUP WIZARD 2 8 appears 5 STB starts scanning channels Wait until scanning is completed...

Page 23: ...els with clock data are listed and turn black in the channel map Channel search completed appears when the search is completed No channels found appears if the STB could not find any channels with clo...

Page 24: ...ng navigation buttons o o p p then press ENTER SETUP WIZARD 8 8 appears See Selecting screen formats on page 41 for details 14 Select the desired display mode using navigation buttons o p then press E...

Page 25: ...on to tune a lower channel number Complete AUTOSCAN limited digital channels in SETUP WIZARD or EXTENDED SCAN in the SETUP menu so that STB receives all available digital channels When using number bu...

Page 26: ...ng About sub channel broadcasting There may be different programs being broadcast on sub channels through a single channel You can watch each sub channel program by selecting one of the sub channels N...

Page 27: ...n the channel banner Screen Remote 2 Press INFO to clear 26 1 Puffy the Vampire Slayer WWOR TV Y 2 00PM 3 00PM Doublement Palace Puffy takes a new job at a fast food restaurant to make ends meet Sarah...

Page 28: ...Closed Caption Indicates that the program being broadcast is available with closed captioning V CHIP CC Indicates that V CHIP CC has been set to TV Refer to Setting for V CHIP CC on page 49 for furth...

Page 29: ...sequence below repeats and the desired language can be set 1 Press AUDIO Remote The sequence repeats according to the audio map Screen NOTE OTHER is indicated when the language is not English Spanish...

Page 30: ...the lower left while the picture is displayed Screen Remote The program s audio continues 2 Press any button to quit The picture currently being broadcast appears NOTE If the TV is left on STILL for a...

Page 31: ...The STB receives digital broadcasts with embedded broadcast flag and enciphers them with the HDCP system and outputs them from the DVI D HDCP jack Your television must also be HDCP compliant to view...

Page 32: ...to the previous page Press navigation button s EPG for the previous page appears Keep pressing navigation button s to move the EPG ahead 3 Press ENTER When you select a program being broadcast The sel...

Page 33: ...ledel Edward 2 00PM 3 00PM TV Y 26 1 WWOR Buffy the Vampire Slay Gilmore Girls JAG Ster Trek Voyager Spin City The 5th 26 2 WPIX NWOC 26 3 WCBSDT 27 1 WCBR 71 1 84 1 State of the Union Frasier Cheers...

Page 34: ...DISPLAY MODE Choose the display mode you prefer includes Daylight Saving Time DST Set the Daylight Savings Time DST TIME ZONE Set the time zone MANUAL Set the clock manually AUTO Adjust the clock auto...

Page 35: ...buttons o o p p then press ENTER CHANNEL menu appears 3 Select ADD DELETE using navigation buttons o o p p then press ENTER ADD DELETE menu appears ADD DELETE QUIT CHANNEL DISPLAY CLOCK DETAIL 13 1 A...

Page 36: ...the box at the top of the screen TIP To add a channel number you deleted add it by following the steps in the ADD menu or renew the whole channel map with the AUTOSCAN menu 6 Press ENTER when the curs...

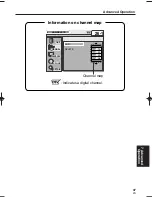
Page 37: ...ADD DELETE QUIT CHANNEL DISPLAY CLOCK DETAIL 26 1 ADD DELETE 26 23 22 13 Channel map Indicates a digital channel Information on channel map 37 EN 1A23 Advanced Operation 7 Advanced Operation...

Page 38: ...nu appears 4 Select ANTENNA using navigation buttons o o p p then press ENTER ANTENNA menu appears then STB starts receiving the signal strength of the channel ANTENNA QUIT CHANNEL DISPLAY CLOCK DETAI...

Page 39: ...r ENTER 6 Press SETUP to exit SETUP menu STB can get available digital channels automatically AUTOSCAN receives available digital channels and stores them in a channel map These channels can then be s...

Page 40: ...or EXTENDED SCAN 5 Scan is completed SETUP menu goes off automatically and STB starts receiving broadcasts Press CH o p buttons to verify whether STB is receiving channels being broadcast When NO SIG...

Page 41: ...gation buttons o o p p then press ENTER Screen ratio options appear 4 Select the desired screen ratio using navigation buttons o o p p then press ENTER The screen ratio is set 5 Press SETUP to exit SE...

Page 42: ...ou have set the STB to SCREEN RATIO 16 9 and SIDEBAR the screen may appear as shown here We recommend setting the STB s screen ratio to 4 3 and the display mode to suit your preference Alternatively s...

Page 43: ...ost but there may be a slight distortion of the picture Sidebar Displays the entire picture centering the image by applying gray bars to the left and right sides of the screen No information will be l...

Page 44: ...ess ENTER CLOCK menu appears 3 Select DST using navigation buttons o o p p then press ENTER Daylight saving time setting menu appears 4 Select ON or OFF using navigation buttons s s B B then press ENT...

Page 45: ...igits e g enter 04 using number buttons 2004 will be shown 9 Press ENTER when the cursor is on SET Your settings are activated 10 Press SETUP to exit SETUP menu CLOCK QUIT CHANNEL DISPLAY CLOCK DETAIL...

Page 46: ...with step 7 OFF is at the top of the channel map Keep pressing navigation button o to find it 4 After scanning Channels with clock data are listed and turn black in the channel map Channel search com...

Page 47: ...press ENTER Then repeat steps 5 and 6 using another channel 7 Press SETUP to exit SETUP menu You will need to change the 4 digit password to protect your V CHIP CC setting 0000 is the default password...

Page 48: ...o confirm 7 V CHIP CC menu appears Your new password is stored 8 Press SETUP to exit SETUP menu V CHIP CC QUIT CHANNEL DISPLAY CLOCK DETAIL V CHIP CC STB MPAA RATING TV RATING CLOSED CAPTION NEW PASSW...

Page 49: ...UP to display SETUP menu Screen Remote 2 Select DETAIL using navigation buttons o o p p then press ENTER DETAIL menu appears 3 Select V CHIP CC using navigation buttons o o p p then press ENTER V CHIP...

Page 50: ...according to the STB V CHIP CC settings If you choose TV to controlV CHIP Ratings The STB V CHIP CC settings are not effective You can watch programs according to the TV V CHIP CC settings Make the V...

Page 51: ...rial is explicitly sexual and is intended to be viewed by adults only PG 13 Parents Strongly Cautioned Some material may be inappropriate for children under 13 R Restricted Under 17 requires accompany...

Page 52: ...All movie programs rated PG 13 and above are blocked When STB receives these programs it blocks video and audio output and RESTRICTED PROGRAM appears on the screen TIP Press ENTER to unblock a previo...

Page 53: ...Strongly Cautioned Contains some material that many parents would find unsuitable for children under 14 years of age Possible content label D L S V TV G General Audience Most parents would find this...

Page 54: ...IT CHANNEL DISPLAY CLOCK DETAIL Set TV rating TV MA TV 14 TV PG TV G TV Y7 TV Y FV V S L D Content labels Age based category Possible content labels INFORMATION on TV ratings V CHIP CC QUIT CHANNEL DI...

Page 55: ...UP to exit SETUP menu To set content based ratings E g to block only TV 14 programs that contain higher levels of violence 1 Select TV 14 V using navigation buttons o p s B then press ENTER Lock indic...

Page 56: ...rcumstances CC STYLE ORIGINAL Closed captions are displayed using the broadcast s original setting MANUAL Closed captions are displayed using your manual setting Change the font color edge and opacity...

Page 57: ...n press ENTER The DTV CC selection screen appears CLOSED CAPTION QUIT CHANNEL DISPLAY CLOCK DETAIL CLOSED CAPTION OFF DTV CC CC STYLE ORIGINAL OFF Select service OFF SERVICE1 SERVICE2 SERVICE3 SERVICE...

Page 58: ...s original Go to step 17 If you selected MANUAL The Font selection screen appears 12 Select the font you want using navigation buttons o o p p s s B B then press ENTER The Color selection screen appea...

Page 59: ...T using navigation buttons s s B B then press ENTER CLOSED CAPTION menu appears Your selection is activated To do the CC STYLE settings again from Font select RETRY and press ENTER 17 Press SETUP to e...

Page 60: ...ct is now used for on screen displays 5 Press SETUP to exit SETUP menu SOR SORTIR TIR CHA CHA NE NE AFFICHA AFFICHAGE GE HORLOGE HORLOGE D TAIL AIL D TAIL PUCE EN V S T LANGUE DU MENU FRAN AIS ARR T E...

Page 61: ...ess ENTER to switch between ON and OFF 4 Press SETUP to exit SETUP menu NOTE Sound effects are only when using on screen menu DETAIL QUIT CHANNEL DISPLAY CLOCK DETAIL V CHIP CC MENU LANGUAGE ENGLISH O...

Page 62: ...cted to a video device TV or monitor via the DVI jack Make sure that the RESOLUTION SELECT switch 1080i 720p 480p is set to resolution suited the video device TV or monitor if the STB is connected to...

Page 63: ...in SETUP menu Use EXTENDED SCAN for better results Unplug the AC power cord and wait for approx 5 seconds then enter the default number 0000 Change the TV setting to a mode other than VIDEO Change ch...

Page 64: ...ht 4 0 lbs 1 8 Kg Designs and Specifications are subject to change without notice ATSC Advanced Television Systems Committee This group is working to establish the standards for digital television bro...

Page 65: ...t HDTV High Definition Television HDTV signal formats are 1080i interlaced scan and 720p progressive scan HDTV provides the highest resolution picture and audio in either stereo or 5 1 channel surroun...

Page 66: ...ci n dise ados para aplicaciones de ordenador utilizando la toma DVI D pueden no funcionar con esta conexi n 4 Toma DIGITAL AUDIO OUT OPT Conecte un decodificador o un amplificador con el cable ptico...

Page 67: ...e el interruptor RESOLUTION SELECT 1080i 720p 480p de acuerdo con su televisor Para m s detalles consulte el manual del televisor 5 Enchufe el cable el ctrico de CA del televisor en el tomacorriente d...

Page 68: ...ma de entrada de audio digital ptica o coaxial en el decodificador digital 4 Enchufe el cable el ctrico de CA del decodificador en un tomacorriente de CA y conecte el decodificador 5 Ajuste el decodif...

Page 69: ...Cuando se conecta el STB por primera vez despu s de enchufar el cable el ctrico de CA aparece autom ticamente ASISTENTE DE PREP SETUP WIZARD en la pantalla Puede completar los siguientes tems para lo...

Page 70: ...los botones de navegaci n o o p p para seleccionar el canal que desea para reunir los datos de reloj del mapa de canales y presione ENTER Si no desea utilizar AUTO para ajustar la hora seleccione OFF...

Page 71: ...71 ES 1A23 9 Gu a r pida en espa ol Memo...

Page 72: ...improper maintenance commercial use such as hotel rental or office use of this product or damage which results from fire flood lightning or other acts of God THIS WARRANTY DOES NOT COVER PACKING MATER...

Reviews: