background image

- 8 -

EN

1K09

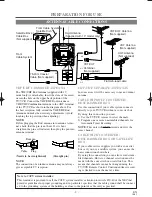
- REAR VIEW - [Fig.3]

ANT.

27

26

8

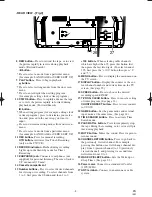
REW button–

Press to rewind the tape, or to view

the picture rapidly in reverse during playback
mode. (Rewind Search)

s

button–

Press to select a mode from a particular menu.
(for example: LANGUAGE or USER’S SET UP)

9

PLAY button–

Press to begin playback.

K

button–

Press to select setting modes from the on screen
menu.

Press to enter digits when setting program.
(for example: setting clock or timer program)

10

F.FWD button–

Press to rapidly advance the tape,

or to view the picture rapidly in forward during
playback mode. (Forward Search)

B

button–

When setting program (for example: setting clock
or timer program), press to determine your selec-
tion and proceed to the next step you want to
input.

Press to determine setting modes from on screen
menu.

Press to select a mode from a particular menu.
(for example: LANGUAGE or USER’S SET UP)

11

REC button–

Press for manual recording.

OTR button–

Activates One Touch Recording.

(only on the TV/VCR)

12

RECORD indicator–

Flashes during recording.

Lights up in the Stand-by mode for Timer
Recording.

13

EARPHONE jack–

Connects to earphones (not

supplied) for personal listening. The size of jack is
1/8” monaural (3.5mm).

14

Cassette compartment

15

Number buttons–

Press to select desired channels

for viewing or recording. To select channels from
1 to 9, first press the 0 button and then 1 to 9.

+100 button–

When selecting cable channels

which are higher than 99, press this button first,
then press the last two digits. (To select channel
125, first press the “+100” button then press “2”
and “5”).

16

MENU button–

Press to display the main menu on

the TV screen.

17

DISPLAY button–

Display the counter or the cur-

rent channel number and current time on the TV
screen. (See page 25.)

18

SPEED button–

Press to choose the desired

recording speed:SP/SLP.

19

T-PROG. CLEAR button–

Press to cancel a setting

of timer program. (See page 23.)

COUNTER RESET button–

Press to reset counter

to 0:00:00.

20

GAME button–

Set the game mode and external

input mode at the same time. (See page 14.)

21

TIME SEARCH button–

Press to activate Time

Search mode.

22

PAUSE/STILL button–

Press to temporarily stop

the tape during the recording or to view a still pic-
ture during playback.

23

MUTE button–

Mutes the  sound. Press it again to

resume sound.

24

CHANNEL RETURN button–

Press to go back to

the previously viewed channel. For example,
pressing this button once will change channel dis-
play from 3 (present channel) to 10 (previously
viewed channel), and pressing it a second time
will return from 10 to 3.

25

WAKE UP/SLEEP button–

Sets the Wake up or

Sleep Timer. (See page 23.)

26

Power cord–

Connect to a standard AC outlet

(120V/60Hz).

27

ANT. terminal–

Connect to an antenna or cable

system.

T5407UH/7408UJ.QX33  03.1.8  4:14 PM  Page 8

Summary of Contents for SRC2213B

Page 1: ...guidelines for energy efficiency ENERGY STAR is a U S registered mark If you need additional assistance for set up or operating after reading owner s manual please call TOLL FREE 1 800 968 3429 Pleas...

Page 2: ...in the cabinet and the back or bottom are provided for ventilation and to ensure reliable operation of the TV VCR and to protect it from overheat ing and these openings must not be blocked or covered...

Page 3: ...age Requiring Service Unplug this TV VCR from the wall outlet and refer servicing to qualified service per sonnel under the following conditions a When the power supply cord or plug is damaged or fray...

Page 4: ...netic fields Avoid moving TV VCR to locations where temper ature differences are extreme Do not handle the power cord with wet hands Do not pull on the power cord when disconnecting it from an AC wall...

Page 5: ...NNEL 12 SELECTING THE LANGUAGE 13 DAYLIGHT SAVING TIME 13 C TV OPERATION 14 WATCHING A TV PROGRAM 14 GAME MODE 14 DEGAUSSING 14 PICTURE CONTROL 14 CLOSED CAPTION SYSTEM 15 V CHIP SET UP 15 C PLAYBACK...

Page 6: ...the tracking for each tape you play Rental play mode Improves playback picture quality from worn tapes such as rental tapes Auto repeat Allows you to repeat the playing of a tape indefinitely without...

Page 7: ...s button on the TV VCR TRACKING function Press to minimize video noise lines or dots on screen during playback mode See page 19 6 Remote Sensor Window Receives the infrared signals from the remote con...

Page 8: ...channels for viewing or recording To select channels from 1 to 9 first press the 0 button and then 1 to 9 100 button When selecting cable channels which are higher than 99 press this button first then...

Page 9: ...an outdoor antenna NOTE The connection of an indoor antenna may not always give acceptable TV reception Note to CATV system installer This reminder is provided to call the CATV system installer s atte...

Page 10: ...HE FIRST TIME SET UP B LANGUAGE ENGLISH ESPA OL AUTO PRESET The tuner scans and memorizes all active channels in your area NOTES The TV VCR distinguishes between standard TV channels and cable channel...

Page 11: ...ess the MENU button on the remote control to start the clock PLEASE NOTE If there is no local PBS station in your area or on your cable system select AUTO CLOCK and press the F FWD B or REW s button t...

Page 12: ...D B button until AUTO CLOCK ON appears 3 Begin AUTO CLOCK CH SEARCH Press the STOP L button to select AUTO CLOCK CH SEARCH Press the F FWD B button The TV VCR is now searching for the station which co...

Page 13: ...HANNEL SET UP USER S SET UP V CHIP SET UP B LANGUAGE ENGLISH CAPTION OFF ZERO RETURN TIME SEARCH M E N U TIMER PROGRAMMING PICTURE CONTROL SETTING CLOCK B CHANNEL SET UP USER S SET UP V CHIP SET UP LA...

Page 14: ...s picture controls BRIGHT CON TRAST COLOR TINT and SHARPNESS are preset to factory specifications Although they are usually the best you may need to make some further adjustments for a natural lookin...

Page 15: ...MODE IS ON The On Screen Display will disappear after 5 seconds This is also true when the MUTE button is pressed and when the PAUSE STILL button is pressed while recording If there is a power failure...

Page 16: ...or STOP L button Then press the F FWD B button to unblock the rating 3 Press the MENU button on the remote control to exit the screen MPAA RATING SET UP 1 Select V CHIP SET UP Press the MENU button on...

Page 17: ...drawn into the TV VCR The TV VCR will automatically turn on PRECAUTIONS Avoid moisture Moisture condensation may occur on the tape if it is moved from a cold place to a warm place or visa versa Befor...

Page 18: ...e the tape to your desired position simply by entering the exact amount of playback time you want to skip 1 Stop a tape at your desired point Rewind or fast forward the tape to the beginning point at...

Page 19: ...black and white in addition to the noise bars This is normal VERTICAL HOLD CONTROL In the Pause Still mode only when the picture begins to vibrate vertically stabilize the picture by pressing the CHAN...

Page 20: ...SKIPPING UNWANTED SCENES DURING RECORDING CH 10 SP REC SP PAUSE SP OTR One Touch Recording This function enables you to set a recording length simply by pressing the REC OTR button on the TV VCR Make...

Page 21: ...the overlapping programs will begin recording in sequence The illustration below demonstrates the sequence of recordings 1 Select TIMER PROGRAMMING Press the MENU button on the remote control Confirm...

Page 22: ...pears Example SP 10 Finish setting the program Press the F FWD B or REW s button The program is now completed To set another program repeat steps 2 to 10 Press the MENU button on the remote control to...

Page 23: ...button is pressed to off If the tape runs out before the end time the TV VCR will switch to the Stop mode immediate ly and the tape will be ejected AUTO RETURN With this feature after timer recording...

Page 24: ...for sleep timer press the WAKE UP SLEEP button twice then press the MENU but ton on the remote control to exit the sleep timer set ting SLEEP TIMER 2 00 WAKE UP ON OFF ON TIMER TV TAPE TV BTIME 12 00A...

Page 25: ...1 800 488 1222 to locate an Authorized Service Center ON SCREEN DISPLAY To check the Counter Clock and Channel number on the TV screen press the DISPLAY button on the remote control Each time you pres...

Page 26: ...lor of the TV picture Move the TV VCR away from the appliances the TV VCR can repair itself automatically If you want to repair immediately unplug the TV VCR power cord then plug it in again 30 minute...

Page 27: ...ATIONS If you subscribe to cable TV the channels are displayed as 1 125 Cable companies often designate channels with letters or letter number combinations Please check with your local cable company T...

Page 28: ...etener la cinta P lselo en el modo de parada para expulsar la cinta del televisor videograbadora Control remoto Bot n de parada STOP P lselo para deten er la cinta Bot n de expulsi n EJECT P lselo par...

Page 29: ...n 0 y luego el bot n 1 a 9 Bot n 100 Cuando seleccione canales de televisi n por cable cuyo n mero sea superior al 99 pulse primero este bot n y luego pulse los dos ltimos d gitos Para seleccionar el...

Page 30: ...LITE Si su servicio de televisi n por cable le suministra un convertidor o si usted utiliza un sistema de emisiones v a sat lite usted podr utilizar las conexiones b sicas mostradas aqu Utilizando est...

Page 31: ...ador se para en el canal memorizado m s bajo Si desea recuperar canales selecciona dos usted podr seleccionar directamente el canal deseado con los botones numerados del mando a distancia o con los bo...

Page 32: ...0 827 6655 U S A 1 800 361 6665 Canada Para pedir servicio de reparaci n a domicilio y para ordenar piezas 1 888 SU HOGARSM 1 888 784 6427 Au Canada pour service en fran ais 1 800 LE FOYERMC 1 800 533...

Reviews: