1. GENERAL INFORMATION
1-3
Service Precautions
Always use with Sanyang genuine parts and
recommended oils. Using non-designed parts for
Sanyang motorcycle may damage the motorcycle.
Special tools are designed for remove and install
of components without damaging the parts being
work ed on. Using wrong tools may result in parts
damaged.
When servicing this motorcycle, use only metric
tools. Metric bolts, nuts, and screws are not
interchangeable with the English system, using
wrong tools and fasteners may damage this
vehicle.
Clean the outside of the parts or the cover
before removing it from the motorcycle.
Otherwise, dirt and deposit accumulated on the
part's surface may fall into the engine, chassis,
or brake system to cause a damage.
Wash and clean parts with high ignition point
solvent, and blow dry with compressed air. Pay
special attention to O-rings or oil seals because
most cleaning agents have an adverse effect on
them.
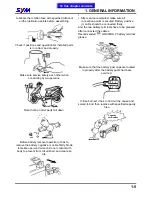
Never bend or twist a control cable to prevent
unsmooth control and premature worn out.
Rubber parts may become deteriorated when
old, and prone to be damaged by solvent and
oil. Check these parts before installation to
make sure that they are in good condition,
replace if necessary.
When loosening a component which has
different sized fasteners, operate with a
diagonal pattern and work from inside out.
Loosen the small fasteners first. If the bigger
ones are loosen first, small fasteners may
receive too much stress.
Store complex components such as transmission
parts in the proper assemble order and tie them
together with a wire for ease of installation later.
Note the reassemble position of the important
components before disassembling them to
ensure they wil l be reassembled in correct
dimensions (depth, distance or position).
Components not to be reused should be replaced
when disassembled including gaskets metal seal
rings, O-rings, oil seals, snap rings, and split pins.
To this chapter contents
Summary of Contents for Citycom.300i
Page 5: ...Serial Number Home page Contents...
Page 38: ...2 Maintenance Information 2 17 Note To this chapter contents...
Page 46: ...3 LUBRICATION SYSTEM 3 8 Notes To this chapter contents...
Page 106: ...4 Fuel Injection System 4 60 Note To this chapter contents...
Page 173: ...10 AC Generator Starting Clutch 10 10 Notes To this chapter contents...
Page 195: ...12 Cooling System 12 14 Notes To this chapter contents...
Page 223: ...14 Brake System 14 12 Note To this chapter contents...
Page 244: ...17 Electrical System 17 5 FUSE Fuse circuit diagram To this chapter contents...
Page 262: ...17 Electrical System 17 23 Note To this chapter contents...
Page 270: ...19 Electrical Diagram 19 1 Home page Contents LH30W EFi Electrical Diagram 19...


