15. ELECTRICAL EQUIPMENT
15-14
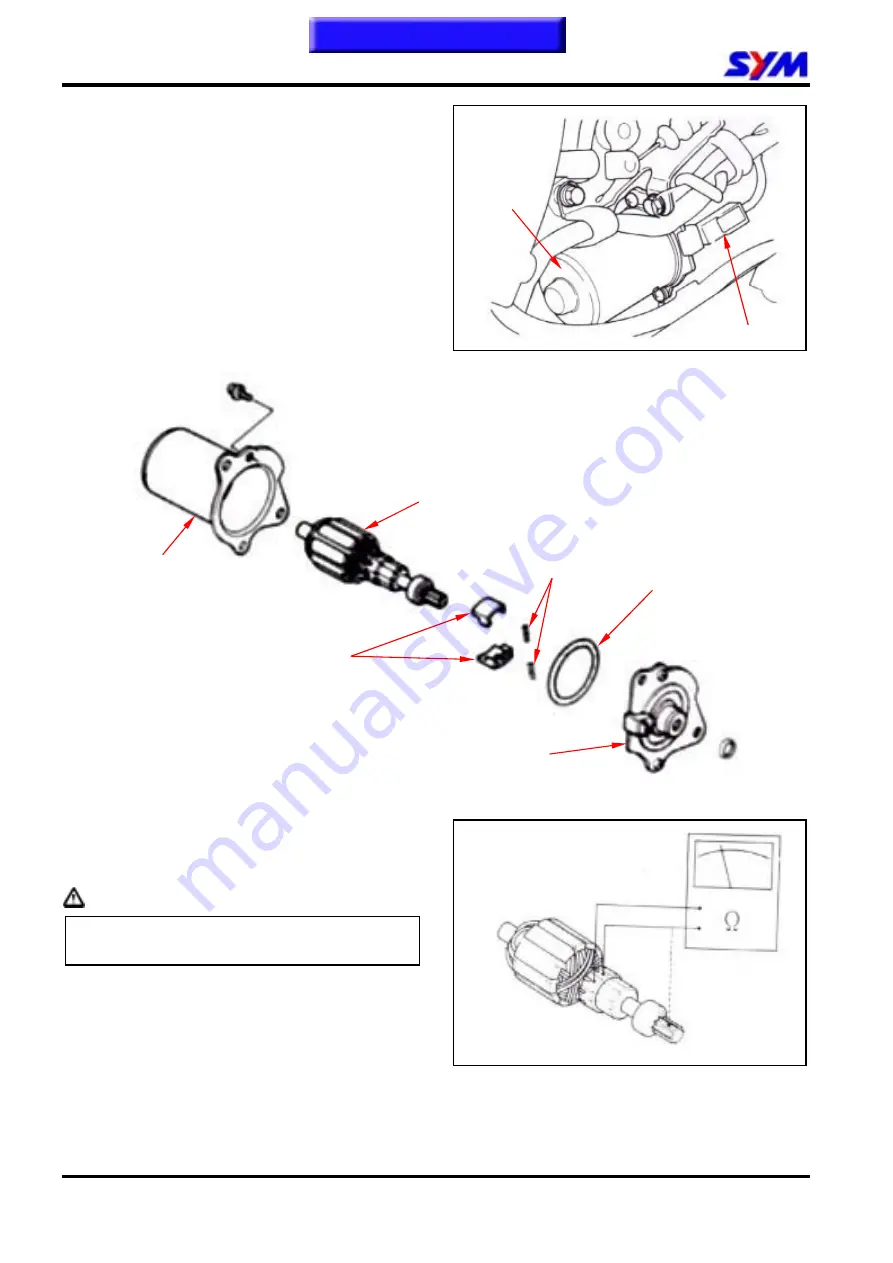
Starter Motor Removal/Disassembly
Remove body cover.
Remove bolt and oil pump control cable.
Disconnect starter motor harness connector.
Remove 2 bolts for separation starter motor and
gasket.
Remove 2 bolts for disassembly the starter
motor.
Armature Inspection
Check the armature for discoloration or other
damage. It may be short-circuit if dark surface
on the shifter found.
Caution
Do not clean the shifter surface with
sandpaper.
Check continuity 1) both the shifter surface and
shaft, 2) among the shifter surfaces. It can be
in continuity among the shifter surfaces, but both
the shifter surface and the shaft can not be in
continuity.
Starter Motor Re-Assembly/Installation
Re-assemble and install the starter motor in
reverse order of removal procedures.
O-ring
Motor housing
Armature
Carbon bracket
Spring
Front bracket
Starter motor
Connector
Summary of Contents for Euro 100
Page 1: ...SERVICE MANUAL Forward Contents How To Use This Manual Mechanism Illustrations 50 100 50 100...
Page 7: ......
Page 25: ...1 GENERAL INFORMATION 1 18 Note This chapter Contents...
Page 45: ...3 LUBRICATION SYSTEM 3 6 NOTES This chapter Contents...
Page 81: ...8 FINAL DRIVING MECHANISM 8 6 Notes This chapter Contents...
Page 97: ...10 FUEL SYSTEM 10 10 Notes This chapter Contents...
Page 109: ...11 BRAKE SYSTEM 11 12 Notes This chapter Contents...
Page 121: ...12 BODY COVER 12 12 Note This chapter Contents...
Page 157: ...15 ELECTRICAL EQUIPMENT 15 22 Notes This chapter Contents...
Page 158: ...16 ELECTRICAL DIAGRAM 16 1 JET 50 ELECTRICAL DIAGRAM 16 Home page Contents...
Page 159: ...16 ELECTRICAL DIAGRAM 16 2 JET 50 EURO ELECTRICAL DIAGRAM Home page Contents...
Page 160: ...16 ELECTRICAL DIAGRAM 16 3 JET 100 ELECTRICAL DIAGRAM Home page Contents...
Page 161: ...16 ELECTRICAL DIAGRAM 16 4 Notes Home page Contents...


