9. CRANKCASE/CRANKSHAFT
9-4
Crankshaft Inspection
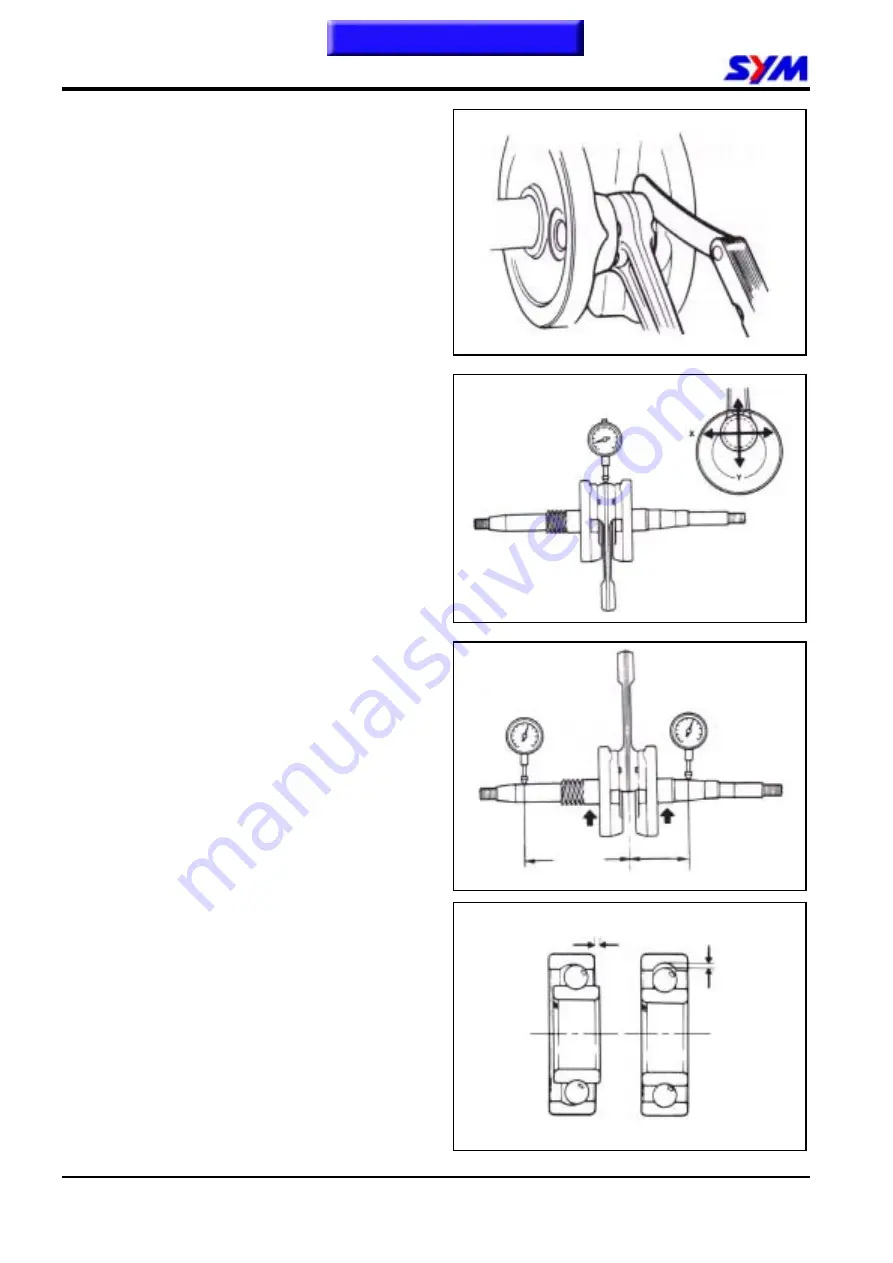
Measure the clearance of connecting rod big
end.
Service limit: 0.60 mm
Measure the radial clearance of connecting rod
big end at X-Y directions as diagram show.
Service limit: 0.04 mm
Place the crankshaft on a V-block, measure
run-out points A and B of the crankshaft with dial
gauge.
Service limit: A: 0.10 mm
B: 0.10 mm
Check the crankshaft bearing by means of
turning it with hand. If any noise and bigger
clearance are detected, replace the bearing with
new one.
Radial
37mm
Clearance
70mm
A
B
Clearance
Lateral
Summary of Contents for Euro 100
Page 1: ...SERVICE MANUAL Forward Contents How To Use This Manual Mechanism Illustrations 50 100 50 100...
Page 7: ......
Page 25: ...1 GENERAL INFORMATION 1 18 Note This chapter Contents...
Page 45: ...3 LUBRICATION SYSTEM 3 6 NOTES This chapter Contents...
Page 81: ...8 FINAL DRIVING MECHANISM 8 6 Notes This chapter Contents...
Page 97: ...10 FUEL SYSTEM 10 10 Notes This chapter Contents...
Page 109: ...11 BRAKE SYSTEM 11 12 Notes This chapter Contents...
Page 121: ...12 BODY COVER 12 12 Note This chapter Contents...
Page 157: ...15 ELECTRICAL EQUIPMENT 15 22 Notes This chapter Contents...
Page 158: ...16 ELECTRICAL DIAGRAM 16 1 JET 50 ELECTRICAL DIAGRAM 16 Home page Contents...
Page 159: ...16 ELECTRICAL DIAGRAM 16 2 JET 50 EURO ELECTRICAL DIAGRAM Home page Contents...
Page 160: ...16 ELECTRICAL DIAGRAM 16 3 JET 100 ELECTRICAL DIAGRAM Home page Contents...
Page 161: ...16 ELECTRICAL DIAGRAM 16 4 Notes Home page Contents...


