background image


22 

10. Inspection and Maintenance before Riding


  CHECKING AND CHANGING FUSES   

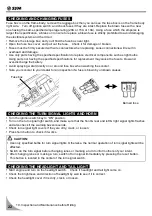
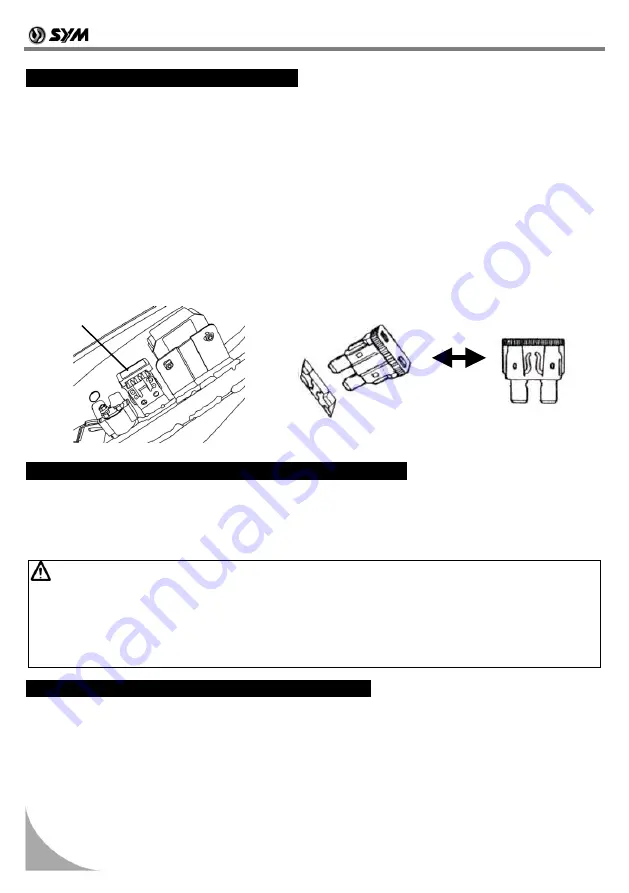
Fuse box is on the frame body, remove the luggage box then you can see the fuse box is on the frame body 
right side.    Turn off ignition switch, and check fuses if they are intact. Replace the blown fuse with a new 
one having the same specified amperage rating (20A or 15A or 10A). Using a fuse which the amperes is 
larger than specification, a brass or iron wire to replace a blown fuse is strictly prohibited to avoid damaging 
the electrical system and the circuit. 

 Remove the storage box, and you’ll find the fuse box near light. 

 Open the fuse box cover, and pull out the fuse.    Check it for damage or broken. 

 Fuses must be firmly secured with wire connectors when replacing. Loose connections will result in 

overhead and damage. 

 Use only parts having the specified specification to replace electrical components such as light bulbs. 

Using parts not having the specified specifications for replacement may cause the fuse to blow and 
over-discharge the battery. 

 Avoid spraying water directly on or around fuse box when washing the scooter. 

 Take your scooter to your dealer for an inspection if a fuse is blown by unknown causes. 


  CHECKING THE TURN SIGNAL LIGHTS AND HORN   

 Turn the ignition switch key to “ON” position. 

 Turn on the turn signal light switch, and make sure that the front & rear and left & right signal lights flashes 

and also check if the warning buzzer sounds. 

 Check turn signal light covers if they are dirty, crack, or loosen. 

 Press horn button to check if it works. 


  CAUTION: 

Ÿ

 Use only specified bulbs for turn signal lights. Otherwise, the normal operation of turn signal lights will be 

affected. 

Ÿ

 Switch on the turn signal before changing lanes or marking a turn to inform others of your intent. 

Ÿ

 After changing lanes or making a turn, switch of turn signal immediately by pressing the reset button.   

This button is located in the center of the turn signal switch.


  CHECKING THE HEADLIGHT AND TAIL LIGHT   

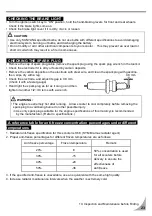
 Start engine and turn on the headlight switch.    Check if headlight and tail light come on. 

 Check the brightness and direction of headlight by wall to see if it is correct. 

 Check the headlight cover if it is dirty, crack, or loosen. 

Burned fuse 


Fuse box 

Summary of Contents for HD 200 EVO

Page 1: ...OWNER S MANUAL...

Page 2: ...low 1 Removal of or puncturing the muffler baffles header pipes or any other component which conducts exhaust gases 2 Removal or puncturing of any part of the intake system 3 Lack of proper maintenanc...

Page 3: ...TSA receives similar complaints it may open an investigation and if it finds that a safety defect exists in a group of vehicles it may order a recall and remedy campaign However NHTSA cannot become in...

Page 4: ...Valve Handle 14 Parking Method 14 10 Inspection and Maintenance before Riding 15 Routine Inspection 15 Engine Oil Inspection and Change 15 Inspection of Fuel level 16 Transmission Oil Inspection and C...

Page 5: ...tages under different temperatures 23 Cooling system inspection 24 Replenishment of coolant 24 Checking the Air Cleaner 25 11 When there is an Abnormal Condition or a Trouble 26 Diagnosis when Engine...

Page 6: ...ront brake lever Rear brake lever Side stand Main stand Light Starter switch Storage box Muffler Reserved tank cap Coolant filler cap Ignition switch C D I Battery Helmet hook Turn signal light Headli...

Page 7: ...r riding techniques Thank you very much for choosing a SANYANG scooter In order to maximize your scooter s performance a periodic inspections and regular maintenance should be performed We recommend t...

Page 8: ...feet on the foot pegs to avoid being burned by the exhaust muffler Do not touch any part of the exhaust system while it is hot Failure to follow this instruction could result in being burned After rid...

Page 9: ...njury or death Do not exceed the maximum authorized load Overloading the scooter will cause the scooter to become unstable and hard to maneuver it may cause serious damage to the tires and rims as wel...

Page 10: ...itch is turned to ON and the pointer also in E position red area Refuel immediately Water temperature gauge To indicate engine coolant temperature When the main switch turns to ON the pointer indicato...

Page 11: ...der the clock setting mode press the S button for at least two seconds to complete clock setting Engine Oil Replacement Indicator Engine oil replacement indicator light will illuminate when the vehicl...

Page 12: ...ked and the key can be removed To unlock simply turn the key from LOCK to OFF CAUTION Never turn the ignition switch key when the scooter is running Turning the key to either OFF or LOCK position will...

Page 13: ...switch ON press this button while holding the front or rear brake lever will start the engine CAUTION Release this button immediately after engine has been started and never press the button again to...

Page 14: ...ease simply return the turn signal light button to the original position Right side turn signal light flashing means you intend to make a right turn Left side turn signal light flashing means you inte...

Page 15: ...imit of fuel tank when refueling If fuel tank is overfilled fuel will flow out through a hole on the fuel tank cap This could result in a fire and or damage to the scooter Make sure the fuel tank cap...

Page 16: ...TION If the engine does not start after the starter button has been pressed for 3 5 seconds rotate the throttle 1 8 th to1 4 th open and press the starter button again To avoid damage the starter do n...

Page 17: ...vehicles behind When stopped completely 1 Press the turn signal switch back to its original position and turn the ignition switch key to OFF position to shut off the engine 2 Get off the scooter from...

Page 18: ...ave the scooter inspected and repaired by an Authorized SANYANG dealer ENGINE OIL INSPECTION AND CHANGE INSPECTION 1 Use the main parking stand to support the motorcycle on a level ground remove the d...

Page 19: ...sure fuel cap on tank is closed tightly before riding scooter Do not run engine in an enclosed space Ensure proper ventilation as exhaust fumes may be dangerous and over exposure to same may result in...

Page 20: ...operate the scooter if effective braking is questionable ADJUSTMENT Rear wheel drum type The indentation of brake adjustment nut must be aligned with the pin see below figure Turn the adjustment nut o...

Page 21: ...e disk Park the motorcycle on a level ground and check if fluid level is under the LOWER mark Recommended Brake Fluid WELL RUN BRAKE OIL DOT 3 Replenishment of brake fluid 1 Loosen the screws and remo...

Page 22: ...o the specified pressure to meet applicable standard before riding Tires pressure must be checked when the tire is cool Visual check tires for frontal and lateral side walls for crack or damage Visual...

Page 23: ...zed Dealer or Franchised Dealer for a check or adjustment if any abnormal conditions are found Figures on the right are for operation checks only REAR CUSHION HARDNESS SETTING The rear cushion is 5 st...

Page 24: ...vered with white powder clean them with warm water If there is obvious corrosion on the battery terminals disconnect the battery cables and remove the corrosion with a steel brush If the battery needs...

Page 25: ...scharge the battery Avoid spraying water directly on or around fuse box when washing the scooter Take your scooter to your dealer for an inspection if a fuse is blown by unknown causes CHECKING THE TU...

Page 26: ...th a rag Check the electrode and adjust its gap to 0 8 mm Check it with a feeler gauge Hand tight the spark plug as far as it can go and then tighten it another 1 2 3 4 turns with a wrench WARNING The...

Page 27: ...r 3 Open reserved tank cap refill coolant until reaches the upper limit If coolant level becomes too low and occurs too often it may indicate there is something wrong with the coolant system To avoid...

Page 28: ...ble CAUTION Dust deposit is one of the major causes of reducing output horsepower and increasing fuel consumption Change the air cleaner element more frequently to prolong the engine s service life if...

Page 29: ...applied when pressing starting button 5 Do you rotate the throttle valve handle while pressing starting the button 6 Turn the ignition switch key ON and press horn button down if the horn does not so...

Page 30: ...ever rotate the throttle valve handle at will to increase the engine RPM before riding off 2 Get on the scooter from the left side and sit on the seat properly keep your feet firmly on the ground to p...

Page 31: ...am Chain ignition time I I 19 Valve clearance I I 20 Shock absorbers I I 21 Front rear suspension I I 22 Main side stands I I L 23 Crankcase Blow by system PCV I I 24 Coolant I I R 25 Cooling fan line...

Page 32: ...im Rear rim MT 2 50 16 MT2 75 16 Wheel Aluminum alloy Tire pressure Front STD 1 75kg cm 2 Rear STD 2 25 kg cm 2 for 1 person 2 5 kg cm 2 for 2 person Front brake Disc type 220 mm Rear brake Disc type...

Reviews: