background image

BATTERY CHARGING

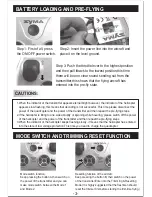
 2.Battery charging of the aircraft

Take out the USB charging wire, connect the dual-pin charging socket with the charging port of the 
aircraft, then insert the USB port of the USB charging wire to the USB port of the computer (or the 
USB port of the power adapter) and then you can charge the battery.During the time of charging, 
the red indicator of the USB will be ON.When it is fully charged, the red indicator will be OFF.

Charging time: about 80 minutes  ;Flying time: about 6.5 minutes

Caution:

1.When using the computer for 
  charging, please remember to 
  pull out the charging line before 
  shutting down the computer.
2.Please pay attention to aim 
  correctly to the correct polarity 
  when connecting the USB wire with 
  the battery.Please make sure the polarity
  should not be upside down.

CAUTIONS WHEN CHARGING 

 1.When charging,please put this product on the dried or ventilated area and keep it far away from heat source or explosive 
    product.
 2.When charging, please remove the batteries from the helicopter.All the charging process should be under the guidance of the 
    adult so as not to cause accident.
 3.When finish flying, please do not charge the battery which surface temperature is still not cooled down.Otherwise it may cause 
    swollen battery or even cause fire disaster.
 4.During the process of battery charging, falling down or striking by the outer force should be avoided.Otherwise it may cause 
    short-circuited within the battery and thus may cause danger.
 5.In order to make sure safety, please make sure that you need to use the original USB charging wire that made from our factory. 
    When the battery is used for a long time or appears aging or swollen,please replace them timely.
 6.When the batteries are fully charged, if you do not remove it from the charger for a long time, the battery may discharge 
    automatically, which may cause battery exhaustion. When the battery voltage that the charger has tested is lower than the rated 
    voltage, the charger will re-charge the battery until it is fully charged. Charging or discharging too often or repeated charging or 
    discharging may reduce the using life of the batteries.

BATTERY REPAIR & MAINTENANCE

1. Battery should be put in the dried or ventilated place with environment temperature about 182-25 

.

2.In order to enhance the using life of the battery, please avoid repeat charging or excessive discharging.
3.When the battery needs to be stored for a long time, please charge the battery first.That is to say, 
   charge the battery for about 50-60% of the volume and then well store it.
4.If you do not use it for more than 1 months, it’s highly recommended that you need to check the battery 
   voltage every month so as to make sure the voltage no less than 3V. Otherwise please do by following 
   No.(3) mentioned. 

-7-

Summary of Contents for Giros SYM0X3

Page 1: ...e e tr s desloca o diagonal Fun o Especial Drone rota o 360 inclu da Inclui fun o de luzes flash lights em voo Tempo de Carga 70 minutos USB carregador Tempo de voo at 6minutos Dist ncia de controlo 3...

Page 2: ...O produto deve ser utilizado ap s a leitura das instru es que constam neste manual 3 Espa o de V o dever utilizar o drone numa rea livre que possibilite a utiliza o do controlo remoto sem obst culos m...

Page 3: ...o foi colocada numa superficie plana no inicio do v o em parelhamento 1 Substitu a as pilhas no comando 1 Reemparelhe a liga o 2 Pressione o bot o TRIMM no co mado ver p gina n 4 2 Se for um problema...

Page 4: ...con tactar o nosso servi o de p s venda spv ajaguiar com AVISOS ATEN O Este modelo de v o R C deve ser operado com precau o Por favor certifique se de o operar longe de grupos de pessoas animais ou ob...

Page 5: ...o 360 3D Alavanca de controle direita Interrup tor de Modo Ajuste do Movimento Direito Instala o das pilhas Capa do com partimento da bateria 4 1 5V pilhas Abra a tampa na parte de tr s do comando Co...

Page 6: ...piral por favor desligue o comando e o quad copter colocando o interruptor em posi o OFF reiniciando os passos 1 2 e 3 3 Quando o indicador do quadcopter permane a a piscar lentamente signifi ca que e...

Page 7: ...ita o quadcopter voar para a esquerda e para direita Movimente a Alavanca Esquerda para a esquerda e para direita o quadcopter voar para a esquerda e para direita Opera o de Ajuste de Movimento Quando...

Page 8: ...pressione o interruptor de Evers o 360 3D localizado direita no trans missor em seguida empurre a ala vanca direita em qualquer dire o Agora poder efetuar as rota es de 360 3D de queda em qualquer di...

Page 9: ...a bateria uma queda ou choque por elementos exter nos devem ser evitados Caso contr rio pode provocar um curto circuito no interior da bateria e assim constituir uma situa o de perigo 5 Por seguran a...

Page 10: ...pe as dispon veis para aquisi o Voc pode comprar estas pe as atrav s do nosso servi o SPV spv ajaguiar com PARTES OPCIONAL X3 01 X3 02 X3 03 Fuselagem Cabine Prote o de H lices X3 04 X3 05 X3 06 Motor...

Page 11: ...ntid C d 1 1 1 4 2 4 07 08 09 10 11 12 Descri o L mina girat ria Motor Pe a de Fixa o de H lices Suporte Tubo de Fibra de Carbono Engrenagem do Motor Motor de revers o Protetor de H lices L mina de re...

Page 12: ...a abertura de um processo de repara o assist ncia 1 Antes de reportar qualquer situa o ao nosso SPV certifique se que leu devidamente o manual de instru es ex istente na embalagem do produto 2 A avari...

Page 13: ...el vuelo de interior y al aire libre Embedded con giroscopio de 6 ejes para un vuelo estable Estructura modular mantenimiento simple e ideal para el montaje Con la funci n de vuelo de rotaci n de 360...

Page 14: ...mpo de uso funcionamiento o re paraci n p ngase en contacto con la tienda donde adquiri el producto Tambi n puede ponerse en contacto con nuestro servicio de post venta spv ajaguiar com CUIDADO ATENCI...

Page 15: ...echa Interruptor de Modo Ajuste el Movimiento de Derecha Instalaci n de las bater as Tapa del com partimento de la bater a 4 1 5V bater as Abra la tapa en la parte posterior del mando Coloque correcta...

Page 16: ...el mando y helic ptero quad colocando el interruptor en la posici n OFF reiniciar los pasos 1 2 y 3 3 Indicador Cuando el helic ptero quad permanece parpadeando significa que poco a poco entr en el mo...

Page 17: ...anca de derecha a izqui erda y derecha el helic ptero quad volar a izquierda y derecha Mueva la palanca hacia la izquierda y de izquierda a derecha el helic ptero quad volar a izquierda y derecha Movi...

Page 18: ...or de eversi n 3D 360 que se encuentra justo en el transmisor y luego empuje la palanca hacia la derecha en cual quier direcci n Ahora usted puede hacer las rotaciones de 360 3D caer en cualquier dire...

Page 19: ...e la bater a una ca da o choque por elementos externos deben ser evitados De lo contrario podr a producirse un cortocircuito dentro de la bater a y por lo tanto constituyen un riesgo 5 Por razones de...

Page 20: ...rol remoto consulte la p gina n 4 2 Si se trata de un problema simple ajustarla De lo contrario consulte a un t cnico profesional en contacto con la tienda donde adquiri el producto 1 Re sincronizaci...

Page 21: ...ntid C d 1 1 1 4 2 4 07 08 09 10 11 12 Descri o Cuchilla giratoria Motor Fijaci n H lices Soporte Tubo de fibra de carbono Engrenage de Motor Motor de Inversi n Guardia H lices Cuchilla de Reversi n E...

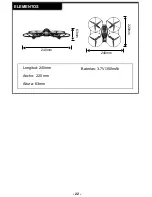
Page 22: ...22 ELEMENTOS 240mm Longitud 240mm Ancho 220 mm Altura 63mm 63mm 240mm Bater as 3 7V 350mAh 220mm...

Page 23: ...a trav s de los contactos disponibles para abrir un proceso de reparaci n asistencia The customer must request through the contacts available to open a process of repair assistance CENTRO ASSIST NCIA...

Page 24: ...sitioning in the air Modular design structure is ap plied more simple for assembly and convenient for maintenance 360 degree 3D stunt tumbling function The materials and specification mentioned in thi...

Page 25: ...e control flying 4 Once this product is sold we won t be responsible for any safety responsibility during the time the user operates or uses or controls this product 5 If there is any problem occurred...

Page 26: ...rsion Right control lever Mode switch Right Fine tuning Left Fine tuning Open the back cover at the back of the transmitter Load 4PCS AA alkaline batteries correctly into the battery compartment as pe...

Page 27: ...and then repeat the pre flying steps 2 If the helicopter is tilting to one side abruptly or spinning while hovering please switch off the power of the helicopter and the power of the transmitter and t...

Page 28: ...he trimmer upward or downward Trimming operation Push the control lever to the left or to the right the helicopter will fly to the left or to the right When the helicopter is hovering in the air howev...

Page 29: ...Pull the throttle lever to the left or to the right the helicopter will fly to the left or to the right When the helicopter is hovering in the air the helicopter will rotate to the left or to the rig...

Page 30: ...LING OPERATION 6 QUICK SLOW GEAR FUNCTION Low Speed Press the High Low speed switch for one time the buzz will send out one sound High Speed Please press High Low speed switch once again the buzz will...

Page 31: ...er 4 During the process of battery charging falling down or striking by the outer force should be avoided Otherwise it may cause short circuited within the battery and thus may cause danger 5 In order...

Page 32: ...side the transmitter 2 Re welding the antenna The aircraft can not make hovering or tilt flying to one side 1 The aircraft is not placed on the level ground when Matching freguency 2 The trimmer key o...

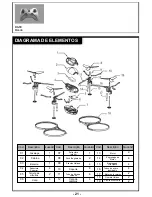
Page 33: ...motor Reversing blade 08 09 10 11 12 13 14 Rotating blade Propeller fixing part Supporting rack Carbon fiber tube Gearbox Rotating motor Motor gear 2 4 8 4 4 2 4 4 4 2 2 2 01 02 03 04 05 06 07 Battery...

Page 34: ...N PARAMETER Diameter of main rotor 92mm Length of fuselage 220mm Width of fuselage 240mm Height of fuselage 63mm Battery 3 7V 350mah Gyroscope Tail locking gyro Code of main engine 7 10 240mm 63mm 220...

Page 35: ...i n comunitaria Directive 1907 2006 EC SVHC ECHA REACH Directive 2005 84 EC Phtalates Directive 2002 95 EC RoHS Directive 1999 5 EC R TTE Address Endere o Direcci n 2 Road West Xingye Laimei Industria...

Page 36: ...26 Especifica es e cores do conte do podem variar das ilustra es Especificaciones Colores y contenidos pueden variar de las ilustraciones...

Reviews: