background image

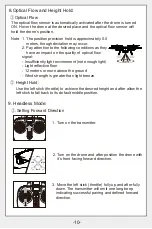
-9-

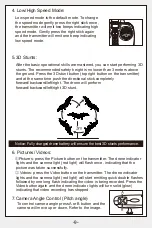
5.3D Stunts:

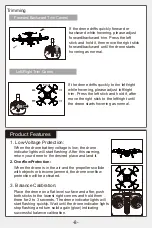
4. Low/High Speed Mode:

6. Pictures/ Videos:

7.Camera Angle Control (Pitch angle)

To control camera angle press A or B button and the 

camera will move up or down. Refer to the image.

Low speed mode is the default mode. To change 

the speed mode gently press the right stick once, 

the transmitter will emit two beeps indicating high 

speed mode. Gently press the right stick again 

and the transmitter will emit one beep indicating 

low speed mode.

After the basic operational skills are mastered, you can start performing 3D 

stunts. The recommended safety height is no lower than 3 meters above 

the ground. Press the 3D stunt button (top right button on the transmitter) 

and at the same time push the directional stick completely 

forward/backward/left/right. The drone will perform 

forward/backward/left/right 3D stunt.

Pictures: press the Picture button on the transmitter. The drone indicator 

lights and the camera light (red light) will flash once, indicating that the 

picture was taken successfully.

② 

Videos: press the Video button on the transmitter. The drone indicator 

lights and the camera light (red light) will start emitting quick double flashes 

followed by one long flash indicating the video is being recorded. Press the 

Video button again and the drone indicator lights will turn solid (glow) 

indicating that video recording has stopped.

Notice: Fully charged drone battery will ensure the best 3D stunts performance.

3m

A

B

Summary of Contents for X25W

Page 1: ...l flow sensor ensures accurate position hold Capable of doing 360 degrees stunts Headless mode for easy flying Auto take off and landing easy and safe flying HD camera enjoy aerial photography with re...

Page 2: ...uld be inserted with a correct polarity Different types of batteries new or used batteries should not be mixing 8 Turn off the drone transmitter and remove the batteries when not in use 9 The supply t...

Page 3: ...Install the camera into the drone camera s slot To fix the camera rotate it counter clockwise To remove the blades press down on the blade nut and rotate the blades marked A clockwise and the blades m...

Page 4: ...remove the mobile phone mount pull it up from the back of the transmitter 3 To adjust to phone holder to the required size use phone holder mount s clips 2 To install the mobile phone mount insert it...

Page 5: ...r Store the battery in a cool and dry environment Avoid dismantling the batteries During the charging of battery avoid leaving the charging place Rechargeable batteries should be removed from the toy...

Page 6: ...y installation open the battery cover at the back fo thhe transmitter Install 4pcs AA batteries according to the polarity indications Note batteries are not included 1 When installing the batteries en...

Page 7: ...le fully up and after fully down The drone indicator lights will turn solid glow indicating the drone is ready to fly Push both sticks at the same time left stick to the bottom right corner and the ri...

Page 8: ...will stop spinning After the drone is in stable hovering position press the B button and the drone will slowly land Motors will be automatically disarmed When the left stick throttle is moved up down...

Page 9: ...for 2 to 3 seconds The drone indicator lights will start flashing quickly Wait until the drone indicator lights stop flashing and turn solid again glow indicating successful balance calibration Trimm...

Page 10: ...s the 3D stunt button top right button on the transmitter and at the same time push the directional stick completely forward backward left right The drone will perform forward backward left right 3D s...

Page 11: ...as they have an impact on the quality of optical flow signal Insufficiently light environment not enough light Light reflective floor 12 meters or more above the ground Wind strength is greater than...

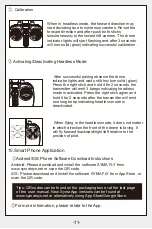
Page 12: ...to numerous crashes Re set the forward direction and after push both sticks simultaneously to the lowest left corners The drone indicator lights will start flashing and after 3 seconds will turn solid...

Page 13: ...l interference to radio or television reception which can be determined by turning the equipment off and on the user is encouraged to try to correct the interference by one or more of the following me...

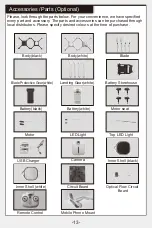
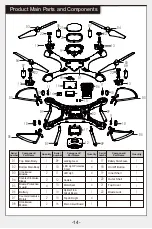
Page 14: ...ce we have specified every part and accessory The parts and accessories can be purchased through local distributors Please specify desired colours at the time of purchase Remote Control Blade Protecti...

Page 15: ...d 1 1 2 04 05 06 Landing Gear LED Light Protective Cover LED Ligh Camera Optical Flow Circuit Board 2 2 4 2 09 07 08 15 16 17 18 19 20 21 13 14 4 1 4 1 4 4 1 1 1 1 10 11 12 Battery Motor Seat Top LED...

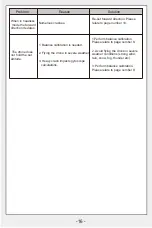
Page 16: ...nsmitter indicator light flashes 1 Recharge the drone s battery 2 Change the transmitter s battery The transmitter sticks are not sensitive 1 The transmitter battery is low 2 There is another transmit...

Page 17: ...number 10 Problem Reason Solution 1 Balance calibration is needed 2 Flying the drone in severe weather 3 Heavy crash impacts gyroscope calculations 1 Perform balance calibration Please relate to page...

Page 18: ...North Xingye Road Laimei Industrial Park Chenghai District Shantou City Guangdong Province China Postal Code 515800 Sales department 86 0754 86980668 After sales service 86 0754 86395095 Fax 86 0754 8...

Reviews: