Cloning disks
27
■
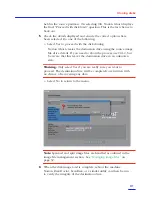
Select Yes to proceed with the disk cloning.
The system performs a quick integrity check of the file structure
on the source disk and then copies the source disk to the
destination. If you need to abort the process use Ctrl-C, but be
aware that this leaves the destination disk in an unknown state.
Warning:
Only select Yes if you are really sure you want to
proceed. The destination drive will be completely overwritten with
no chance of recovering any data.
■
Select No to return to the menu.
6
When the disk clone is complete, reboot the machine. Norton Disk
Doctor, ScanDisk, or a similar utility can then be run to verify the
integrity of the destination disk.
Cloning a disk to image file
To clone a disk to an image file:
1
From the main menu, select Disk > To Image.
The Source Drive dialog box displays.
2
Select the source drive.
The Source Drive dialog box displays the details of every disk Norton
Ghost can find on the local machine. On selection of the source
drive, the File Locator dialog box displays.
3
Select the image file. Do one of the following:
■
Type the path and filename for the disk image file.
■
Browse to locate the image file.
Summary of Contents for NORTON GHOST
Page 1: ...Norton Ghost Personal Edition User s Guide ...
Page 12: ...Chapter 1 About Norton Ghost Personal Edition 12 ...
Page 20: ...Chapter 2 Setting up Norton Ghost 20 ...
Page 46: ...Chapter 3 Using Norton Ghost 46 ...
Page 76: ...Disk Replacement Form 76 ...
Page 80: ...Index 80 ...


