17
Jupiter
6408 216th Street SW
|
Mountlake Terrace, WA 98043 USA
T
+1.425.778.7728
F
+1.425.778.7727
|
www.symetrix.co
Jupiter Software Installation
Installation
The Jupiter software provides real-time set-up and control
from a Win dows PC environment.
Use one of the following procedures to install the Jupiter
software on your computer.
From the CD-ROM:
1. Insert the CD into your computer’s CD-ROM drive.
2. Open “My Computer”. The “My Computer” icon is
typically on your desktop or in the “Start” menu.
3. Double click on your CD-ROM drive. This is typically drive
“D:\”. If your CD-ROM drive isn’t “D:\”, then substitute its
drive letter.
4. Double-click “Setup.exe”.
From the Symetrix web site
(http://www.symetrix.co):
1. Download the Jupiter software installer from the Symetrix
web site.
2. Double-click on the file you just downloaded and follow
the on screen directions to install.
The software always starts up in offline mode. Regardless,
you can explore the software, experiment to your heart’s
content, and perhaps even get useful work done. You can
save any device files that you create to your hard drive and
transfer them to hardware later.
After installing the software, browse the rest of the Help File,
or move on to Launch the Software to dive right in.
Launch the software
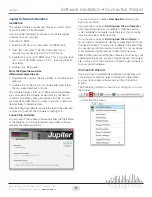
You can launch the Jupiter software via either the Start Menu
or the Desktop icon. Once launched, the Jupiter software
presents the following options:
You may choose to create a
New App File
selecting the
App of your choice.
If you choose to open an
Existing App File on Computer
,
a list of recently used files is presented. A Browse button
is also available to manually locate the file of your choosing
from a local drive or network share.
If you choose to open an
Existing App File on Device
, a
list of recently connected-to devices is presented. An “Open
Connection Wizard” choice is also available in the event that
you are unsure of which device to connect to, or your device
is not listed among the recently connected to devices.
After installing and launching the software and choosing your
operating mode above, you may browse the rest of the Help
File, or move on to the Connection Wizard to get connected
to your Jupiter hardware.
Connection Wizard
Once you have completed the Hardware Connections and
connected your network (refer to Network Configuration),
you may open Jupiter software and run the Connection
Wizard.
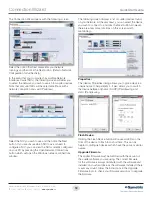
The Connection Wizard can be run by clicking on its icon in
the toolbar...
...or from the Tools menu:
Software Installation • Connection Wizard
Summary of Contents for Jupiter 12
Page 1: ...Jupiter 4 Jupiter 8 Jupiter 12 Quick Start Guide ...
Page 2: ......


