Chapter 1 Getting Started
Preparing the GPS Receiver for Use
1-8
Getting Started Guide
•
The subsection titled “Antenna Input” in Chapter 2, “Features and
Functions” of this guide.
To Connect Power
To Connect AC Power
The ac power module or jack senses incoming voltage and
automatically selects the proper setup. Just connect the Receiver to the
ac power source using the supplied power cord.
To Assemble and Connect the XLR DC Power
Connector/Cable (Option AWQ for 58503B Only)
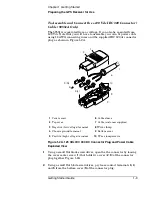
1
Note that you will have to assemble your own dc power cable using
18 AWG connecting wires and a three-pin XLR (female) connector plug
(shown in Figure 1-1).
Figure 1-1. Three-Pin XLR Plug Pinouts (Front View)
2
From the rear of the XLR plug, connect the supply-side wire of the
external power supply or battery to pin 1 of the XLR plug. Connect the
external battery’s return (ground) wire to pin 2, and the chassis ground
wire to pin 3 of the XLR plug.
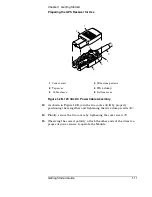
3
Observing the correct polarity, attach the other ends of the wires to a
proper dc power source to operate the Receiver.
2
1
3
4
1
2
3
1
dc supply (
+
)
3
Chassis ground
2
dc return (
−
)
4
Cable wires (customer supplies)
Summary of Contents for 58503B
Page 13: ...1 Getting Started ...
Page 37: ...2 Features and Functions ...
Page 62: ...Chapter 2 Features and Functions In Case of a Problem 2 26 Getting Started Guide ...
Page 63: ...3 Using Option 001 Front Panel Display Keypad 58503B Only ...
Page 75: ...4 58503B Specifications ...
Page 80: ...Chapter 4 58503B Specifications Specifications and Characteristics 4 6 Getting Started Guide ...
Page 81: ...5 59551A Specifications ...
Page 86: ...Chapter 5 59551A Specifications Specifications and Characteristics 5 6 Getting Started Guide ...

