Chapter 1 Getting Started
Powering Up the Receiver
1-16
Getting Started Guide
2
Apply the proper power source to the rear-panel
Power
input jack of
the Receiver.
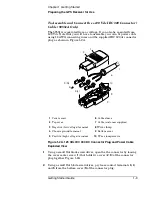
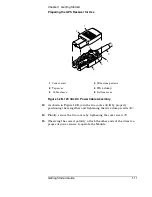
See the appropriate subsection “To Assemble and Connect the XLR DC
Power Connector/Cable (Option AWQ for 58503B Only)“ or “To
Assemble and Connect the +129 Vdc IEC 320 Connector/ Cable
(59551A Only)” on page 1-9.
The following sequence of events occurs after power is applied to the
Receiver.
a.
Only the front-panel
Power
indicator lights.
b.
After a moment, the Receiver runs through its self-test diagnostics
as indicated by the flashing front-panel indicators.
c.
After the self-test is completed, just the
Power
indicator remains
illuminated.
If the
Alarm
indicator lights, a failure may have occurred during
the self-test. See the section “Operating Status” in Chapter 5,
“Command Reference,” of the
58503B/59551A Operating and
Programming Guide
(58503-90013) for a complete description of
the Alarm capability.
d.
The Receiver begins to search the sky for all available satellites.
e.
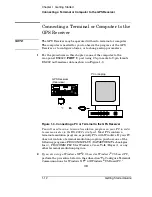
From the computer keyboard, type
:SYSTEM:STATUS?
and press Enter (or Return).
If you typed in the command wrong a
E-xxx>
prompt is displayed after
pressing Return. Try typing in the command again.
The computer displays the status screen as shown in the sample status
screen in Figure 1-4 on page 1-17.
You must re-enter the
:SYSTEM:STATUS?
command each time
you want an updated status screen.
NOTE
You have been provided a Windows program called SatStat, which
provides
continual status updates
of the GPS Receiver’s status screen.
This program will have to be run by a personal computer (PC) that has
Windows
®
, or Windows
®
95, or NT
®
4.0 installed to operate it. The
program is easy to install and operate.
See the section titled “Installing the Automated SatStat Program for
Continual Status Updates” on page 1-18 in this guide.
Summary of Contents for 58503B
Page 13: ...1 Getting Started ...
Page 37: ...2 Features and Functions ...
Page 62: ...Chapter 2 Features and Functions In Case of a Problem 2 26 Getting Started Guide ...
Page 63: ...3 Using Option 001 Front Panel Display Keypad 58503B Only ...
Page 75: ...4 58503B Specifications ...
Page 80: ...Chapter 4 58503B Specifications Specifications and Characteristics 4 6 Getting Started Guide ...
Page 81: ...5 59551A Specifications ...
Page 86: ...Chapter 5 59551A Specifications Specifications and Characteristics 5 6 Getting Started Guide ...

