background image

502 TimeProvider 5000 User’s Guide

098-00028-000 Revision F – May, 2012

Appendix F  PTP Probe Option
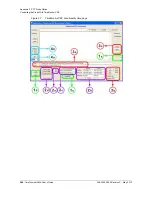
Controlling the Probe With TimeMonitor PDV

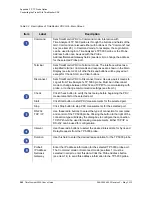
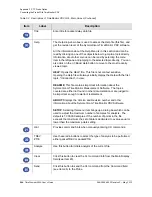
Table F-2.  Descriptions of TimeMonitor PDV GUI 

 Main Screen

Item

Label

Description

Command

Sets TimeMonitor PDV to Command mode. Interaction with 
TimeAnalyzer's TP 5000 probe is through the buttons and fields of the 
GUI. Commands are issued either with buttons or the "Command" text 
box (see item 26). In Command mode, for example, the Login button 
can be used to login to TimeAnalyzer's TP 5000 probe or the Probe 
Address button can be used with the Probe 
Address/Netmask/Gateway fields (see item 6) to change the address 
for the selected Probe port. 

Terminal

Sets TimeMonitor PDV to Terminal mode. The interface will act as a 
simplified terminal. Commands and responses are shown in the Main 
Display (see Item 29). All other fields and buttons will be grayed out, 
except for Check, Start, and Clear buttons.

Disconnect

Sets TimeMonitor PDV to Disconnect mode. Use as a quick means to 
Logout from TimeAnalyzer's TP 5000 probe. Must be in Disconnect 
mode to change between RS-232 and TCP/IP for communicating with 
probe, or to change communication settings (see Item 3).

Check

Click Check button to verify the test setup before beginning the PDV 
measurements for the selected port.

Start

Click Start button to start PDV measurements for the selected port.

Stop

Click Stop button to stop PDV measurements for the selected port.

RS-232
TCP / IP

Use these radio buttons to select the type of connection for command 
and control of the TP 5000 probe. Clicking the button to the right of the 
connection type will display the dialog box to configure the connection. 
TCP/IP should be used for making measurements. Either TCP/IP or 
RS-232 can be used for configuration.

Interval

Use these radio buttons to select the desired interval rate for Sync and 
Delay Requests from the TP 5000 probe.

Duration

Use this field to enter the desired lease duration for the TP 5000 probe

Probe's
IP Address
Netmask
Gateway

Enter the IP address information for the selected TP 5000 probe port. 
The Command mode or Disconnect mode (see Item 1) must be 
selected in order to enter this data. Click the Probe Address button 
(see Item 14) to send this address information to the TP 5000 probe.

Summary of Contents for TimeProvider 5000

Page 1: ...TimeProvider 5000 IEEE 1588 Grand Master Clock NTP Server User s Guide Revision F May 2012 Part Number 098 00028 000 ...

Page 2: ...CA 95131 1017 U S A http www symmetricom com Copyright 2012 Symmetricom Inc All rights reserved Printed in U S A All product names service marks trademarks and registered trademarks used in this document are the property of their respective owners ...

Page 3: ...es 30 Software Options 31 Security Features 32 TimeProvider 5000 Connections 33 UTI Input and Output Connections 33 Communications Connections 34 Output Connections 37 Input Connections 40 Power and Ground Connections 42 Physical Description 43 Functional Description 45 TimeProvider 5000 Expansion Shelf System 45 IMC Module LEDs 51 IOC Module LEDs 51 Expansion Shelf LEDs 51 Communication Ports 52 ...

Page 4: ... Signal Connections 68 Communications Connections 69 TP 5000 Synchronization and Timing Connections 71 TimeProvider E10 Synchronization and Timing Connections 81 TimeProvider E30 Synchronization and Timing Connections 82 Connecting the GPS GNSS Antenna 83 Setting Shelf ID on Expansion Shelves 84 Making Ground and Power Connections 84 Ground Connections 85 Power Connections 86 Testing Power Connect...

Page 5: ... User Access List 274 Logging In 275 Adding a User 275 Deleting A User 276 Displaying Current Users and User Access Levels 276 Changing a User s Password 277 Changing a User s Access Level 278 Provisioning for a RADIUS Server 279 Provisioning the TP5000 for Login Authentication 279 Configuring the RADIUS Server 279 Provisioning the Ethernet Ports 280 Provisioning IMC Ethernet Port 280 Provisioning...

Page 6: ...edicated Outputs 330 Provisioning E1 Outputs 330 Provisioning Output Generation Behavior 331 Provisioning the 10MHz 1PPS Outputs 332 Provisioning TP 5000 for Expansion Shelf 333 Verify Expansion Configuration 334 Provisioning DTI Ethernet Port on IMC Card 334 Provisioning DTI Ports on IO Card 334 Provisioning Expansion Shelf E1 1PPS TOD Outputs 336 Provisioning DTI for an Expansion Shelf 336 Provi...

Page 7: ...d Out 360 Adding And Deleting Users 360 Saving Present Configuration To Non volatile Memory 360 Restoring Default Configuration 360 Determining Status 361 Forcing Unit To Send New Time in Time Reference Mode 361 Switching Active And Standby IOC Cards 362 Manually Switching IOC Cards 362 Automatic IOC Card Switches 362 Impact of IOC Card Switches on IO Card Outputs 363 Displaying Logs 363 Displayin...

Page 8: ...pgrading the Firmware 389 TP5000 Upgrade Loss of Outputs 391 TP5000 with Redundant IOC Modules v1 2 3 No Loss of Outputs 392 TP5000 with Redundant IOC Modules v1 1 8 No Loss of Outputs 394 Upgrading an Expansion Shelf 396 TimeProvider 5000 Part Numbers 397 System and Accessory Part Numbers 397 GPS Antenna 400 Returning the TimeProvider 5000 401 Repacking the Unit 401 Equipment Return Procedure 401...

Page 9: ...s 465 Appendix C Installing the GPS Antenna Antenna Kits and Accessories 468 Selecting the Proper Gain Antenna 468 Transient Eliminators 470 GPS L1 Inline Amplifier 471 Antenna Coaxial Cables 472 Antenna Installation 472 Antenna Connection Overview 473 Planning the Installation 473 Antenna Installation Tools and Materials 476 Cutting Antenna Cables 476 Installing the Antenna 477 Connecting the Cab...

Page 10: ...ware Licenses Third Party Software 494 Appendix F PTP Probe Option Overview 495 Requirements for Measurements 498 Optional Equipment 498 Installing the Probe 499 Connecting PTP Signals to Measure 499 Controlling the Probe With TimeMonitor PDV 501 Anatomy of the GUI Main Screen 501 Functions of TimeMonitor PDV 506 Entering CLI Commands Manually with TimeMonitor PDV 508 Installing TimeMonitor 510 Pr...

Page 11: ...098 00028 000 Revision F May 2012 TimeProvider 5000 User s Guide 11 Table of Contents Probe Data 522 Saving Probe Data 524 Analyzing Probe Data 524 Index 525 ...

Page 12: ...Table of Contents 12 TimeProvider 5000 User s Guide 098 00028 000 Revision F May 2012 ...

Page 13: ... with a Single Expansion Shelf 49 1 20 Expansion Connections for TP 5000 with 5 Expansion Shelves 50 1 21 Shelf ID Selector 54 2 1 TP 5000 Location of Product Label 61 2 2 TP E10 Location of Product Label 61 2 3 TP E30 Location of Product Label 61 2 4 TP 5000 Mounting Hole Placements 63 2 5 TP 5000 Chassis Dimensions Front View 63 2 6 TP 5000 Chassis Dimensions Top View 63 2 7 Rack Mounting the Ti...

Page 14: ...erarchy 282 4 3 IOC Ethernet Ports Configured as Redundant Pair 283 4 4 Redundant IOC Cards with Redundant Ethernet Ports 284 4 5 Redundant IOC Cards with Independent Ethernet Ports 285 4 6 Set Vlan Mode Command Hierarchy 287 4 7 Fixed VLAN Set Vlan Config Commands 288 4 8 Non Fixed VLAN Set Vlan Commands 289 4 9 Set Packet Service Command Hierarchy 291 4 10 Set PTP Command Hierarchy Common 300 4 ...

Page 15: ...Relationship Between 1PPS and TOD 1 PPS Out 444 B 4 TP E30 TOD Frame Structure for 1 PPS TOD Outputs 444 C 1 Locating the GPS Antenna 473 C 2 GPS Antenna Installation 477 D 1 IOC Card Placements in TP5000 Chassis 482 D 2 Redundant IOC Cards With Independent Ethernet Ports 484 D 3 Redundant IOC Cards With Redundant Bonded Ethernet Ports 485 D 4 IOC Condition at Power Up 488 F 1 IEEE 1588 Grandmaste...

Page 16: ...List of Figures 16 TimeProvider 5000 User s Guide 098 00028 000 Revision F May 2012 ...

Page 17: ...or TOD Information Transmission 80 2 12 TP E30 1PPS TOD Port Pin Outs RJ45 Connector 82 2 13 TP E30 Default Parameters for TOD Information Transmission 83 2 14 Installation Completeness Checklist 89 2 15 Module LED Descriptions 90 2 16 Expansion Shelf LED Descriptions 91 3 1 Expansion Port Status 126 3 2 LED Descriptions for Main Shelf 166 3 3 LED Descriptions for Expansion Shelves 167 3 4 IOC Clo...

Page 18: ... Specifications 432 B 6 TimeProvider 5000 Main Shelf LAN Port Specifications 432 B 7 TimeProvider 5000 Main Shelf Input Signal Specifications 432 B 8 TP 5000 TOD Frame Field Descriptions for 1PPS TOD Input 434 B 9 TP 5000 Time Information Message Payload Contents for 1PPS Input 435 B 10 TP 5000 Time Status Message Payload Contents for 1PPS Input 437 B 11 TP 5000 TOD Message Data Type Definitions f...

Page 19: ...Parameters 464 B 44 GPS Port Alarm Parameters 465 C 1 GPS Antennas with Internal LNA 469 C 2 Specifications for GPS Antennas with Internal LNA 469 C 3 26 dB L1 GPS Antenna Accessory Kit 470 C 4 FCC 250B 90 1 5NFNF Specifications 470 C 5 GPS L1 Inline Amplifier Specifications 471 C 6 Antenna Cable Specifications 472 D 1 IOC States and Related Conditions 488 F 1 Recommended and Supported SFP Transce...

Page 20: ...List of Tables 20 TimeProvider 5000 User s Guide 098 00028 000 Revision F May 2012 ...

Page 21: ...format layout and purpose of this guide In This Preface Purpose of This Guide Who Should Read This Guide Structure of This Guide Conventions Used in This Guide Warnings Cautions Recommendations and Notes Related Documents and Information Where to Find Answers to Product and Document Questions What s New In This Guide ...

Page 22: ...ce and configuration instructions or details primarily intended for qualified maintenance personnel This User s Guide is designed for the following categories of users Systems Engineers Chapter 1 provides an introduction to the TimeProvider 5000 Cross references in this chapter direct you to detailed system information in other chapters as appropriate Installation Engineers Chapter 2 through Chapt...

Page 23: ... Chapter 5 Operating Provides basic information and procedures for proper system operation including PTP Management Chapter 6 Maintenance and Troubleshooting Contains preventive and corrective maintenance and troubleshooting procedures for the product Also contains part number and ordering information and procedures for returning the TP5000 Appendix A System Messages Lists the alarms and events an...

Page 24: ...eans TimeProvider 5000 User s Guide The title of a document CRITICAL An operating mode alarm state status or chassis label Select File Open Click the Open option on the File menu Press Enter Press A named keyboard key The key name is shown as it appears on the keyboard An explanation of the key s acronym or function immediately follows the first reference to the key if required Username Text in a ...

Page 25: ...e to equipment do not disregard ESD cautions All ESD cautions use this symbol ESD cautions are installation operation or maintenance procedures practices conditions or statements that if not strictly observed may result in possible personal injury electrostatic discharge damage to or destruction of static sensitive components of the equipment Electrical Shock Caution To avoid electrical shock and ...

Page 26: ...d default values in Appendix B Added cable and connector details to Chapter 2 and Appendix B Corrected Probe data format details in Appendix F Updated Firmware Upgrade procedures in Chapter 6 The following corrections and additions have been made to the TimeProvider 5000 User s Guide since Rev D Added description of high capacity NTP server capability with hardware timestamping in Chapter 1 and pr...

Page 27: ...How to Use This Guide What s New In This Guide Added sections in Chapter 1 describing Software Options and Security Features Added procedures for provisioning as NTP server Added Appendix F PTP Probe Option Moved Contacting Technical Support from Appendix C to Chapter 6 ...

Page 28: ...28 TimeProvider 5000 User s Guide 098 00028 000 Revision F May 2012 How to Use This Guide What s New In This Guide ...

Page 29: ...is Chapter Overview TimeProvider 5000 Features Software Options Security Features TimeProvider 5000 Connections Physical Description Functional Description Configuration Management Alarms Expansion Shelf TimeProvider 5000 Expansion Shelf System TP E10 Expansion Shelf System Outputs TP E30 Expansion Shelf System Outputs Expansion Shelf ID Switch Expansion Shelf LEDs ...

Page 30: ...1 and 1PPS TOD ports This document describes the TimeProvider 5000 system A new functionality for the TimeProvider 5000 is NTP server capability which supports up to a maximum of 120 000 NTP transactions second in unicast mode The TimeProvider 5000 can be purchased as either a dedicated NTP server or as a unit which supports both PTP and NTP TimeProvider 5000 Features TimeProvider E30 E1 1PPS TOD ...

Page 31: ...er to the replacement IMC The new IMC will need its own keys for the desired software options releases The 16 port group key for a TP E10 Ethernet expansion shelf which is based on the serial number of the expansion shelf will stay with the expansion shelf on which it is installed The user must manually enter key s with CLI commands to gain access to the licensed software options Table 1 1 TP 5000...

Page 32: ...the module will generate an alarm indicating excessive traffic is being seen This could be an indication of a malicious attack or it could also be a large number of clients requesting service from the server The system will drop packets received in excess of the limit Packets received below the limit will be handled normally If the service ports do come under attack only the module under attack wi...

Page 33: ...ated on the IMC module Small Form factor Pluggable SFP connectors are located on the IOC modules UTI E1 T1 1PPS TOD or 10 MHz 1pps and I O ports are located on the I O module The 1PPS 10MHz ports are optional Customers can order units with either two E1 I O ports and two E1 Outputs two E1 I O ports and 10MHz and 1PPS ports two T1 I O ports and 10MHz and 1PPS ports two E1 I O ports and two 1PPS TOD...

Page 34: ... twisted pair cable CAT5 or better with RJ 45 connectors and the pinouts in Table 1 3 Note The 090 50315 01 I O card has a different pin assignment and uses a standard twisted pair RJ45 CAT5 cable A custom cable should not be used with the 090 50315 01 I O card Table 1 2 UTI Connector Pin Assignments Pin Signal Comment 1 DTI DTI 2 DTI DTI 3 No connection 4 No connection 5 No connection 6 No connec...

Page 35: ...net RJ 45 cable CAT5 minimum Expansion Management Port The expansion Management port on the IMC is a standard 10 100Base T shielded RJ 45 receptacle To connect the TimeProvider 5000 to a TP E10 or TPE30 expansion shelf use a standard twisted pair Ethernet RJ 45 cable CAT5 minimum The connector pinouts for the expansion Management port and all expansion ports are listed in Table 1 4 Table 1 4 Expan...

Page 36: ...1 3 IMC Module Versions 01 through 05 EIA 232 Serial Craft Port The EIA 232 serial port connection is made through a EIA 23 female connector on the IMC This port allow you to connect to a terminal or computer using a terminal emulation software package When connecting to this port use a shielded EIA 232 direct connect cable ...

Page 37: ...tware configurable as E1 output ports with the following signal types 2 048 Mb s G 703 9 2 048 MHz G 703 13 These ports can also be software configured as E1 inputs E1 Output Connections Two of the four traditional telecom synchronization mini BNC ports Port3 and Port4 on the 090 50311 01 version of the I O module Figure 1 5 are dedicated E1 output ports with the following signal types 2 048 Mb s ...

Page 38: ...MHz output ports See Figure 1 5 Port3 and Port4 on the 090 50314 01 version of the I O module are also 1PPS and 10MHz dedicated output ports See Figure 1 6 Note The T1 ports on the 090 50314 01 version of the I O module can also be configured as E1 and 2048 kHz inputs or outputs which meet the G 703 mask for impedance of 120 ohms balanced Table 1 6 T1 Input Output Port Pin Outs RJ48C Connector Pin...

Page 39: ...eceptacles To connect the EXP ports of the I O module to an expansion shelf TP E10 or TP E30 use a standard twisted pair RJ 45 cable CAT5 minimum To connect the UTI ports UTI 1 and UTI 2 of the I O module to an expansion shelf use a custom twisted pair RJ 45 cable CAT5 minimum with the pinouts shown in Table 1 3 The RJ 45 pin assignments for the UTI EXP ports are shown in Table 2 6 and Table 2 7 F...

Page 40: ...1 Input Connections Mini BNC ports 1 and 2 on the 090 50311 01 090 50312 01 and 090 50315 01 versions of the I O module see Figure 1 5 are software configurable as traditional telecom input ports with the following signal types 2 048 Mb s G 703 9 2 048 MHz G 703 13 These ports can also be software configured as E1 outputs T1 Input Connections Two of the RJ 45 ports I O 1 and I O 2 on the 090 50314...

Page 41: ...50331 04 navigation satellites to provide a frequency and time reference see Figure 1 3 This port supports input from both GPS and Beidou satellites for the 090 50331 04 version of the IMC and input from GPS satellites for the 090 50331 05 version GPS Connection The IMC versions 090 50331 01 090 50331 02 090 50331 04 and 090 50331 05 has an SMA connector for GPS input to provide a frequency and ti...

Page 42: ...n the left side of the front panel as identified with the international Ground marking as shown in Figure 1 8 Frame ground connections on the TP E10 and TP E30 expansion shelves are made on the grounding stud located on the right side of the front panel see Figure 1 9 and Figure 1 10 Figure 1 8 TimeProvider 5000 Power and Ground Figure 1 9 TimeProvider E10 Power amd Ground Figure 1 10 TimeProvider...

Page 43: ...ectors 16 ports The shelf also has six LEDs located on the left side of the front panel The shelf features a recessed rotary switch with 10 positions that is used to set the shelf ID and a recessed reset switch The grounding lug is located on the right side of the front panel The power supply connectors are located on both sides of the chassis see Figure 1 12 The TimeProvider E30 E1 1PPS TOD expan...

Page 44: ...028 000 Revision F May 2012 Chapter 1 Overview Physical Description Figure 1 11 TimeProvider 5000 Modules and Power Connections Figure 1 12 TimeProvider E10 Expansion Shelf Connections Figure 1 13 TimeProvider E30 Expansion Shelf Connections ...

Page 45: ...nd frequency reference inputs and provide the stable time and frequency signals that are used to generate output synchronization signals The 090 50331 04 version of the IMC supports the Beidou satellite system The 090 50301 02 chassis 090 50315 01 I O module and the 090 50331 02 090 50331 04 and 090 50331 05 versions of the IMC will support 1PPS TOD inputs The 090 50331 02 090 50331 04 and 090 503...

Page 46: ...0 expansion shelf provides E1 and 1PPS TOD outputs and the TimeProvider E10 expansion shelf provides PTP and SyncE outputs More outputs can be added by adding appropriate expansion shelves Expansion Connections The TP 5000 provides time and frequency to the expansion shelves through DTI links in the expansion interface The TP5000 controls and manages the expansion shelves through Ethernet in the e...

Page 47: ...F May 2012 TimeProvider 5000 User s Guide 47 Chapter 1 Overview Functional Description Figure 1 16 Physical Interfaces of TP 5000 with Two Expansion Shelves Figure 1 17 TimeProvider E10 SyncE PTP Expansion Shelf Block Diagram ...

Page 48: ...cation with the expansion shelves Set a unique ID 0 9 for each expansion shelf using the rotary switch on its front panel Enable DTI TP 5000 IMC TP 5000 I O Expansion shelf Provision output signals for each expansion shelf Enable state s of output s The following actions must be performed to support the use of expansion shelves with the TP 5000 Enable ETH on TP 5000 IMC module s DTI ETH connector ...

Page 49: ...1 19 is a diagram of the expansion connections for a TP 5000 with one expansion shelf Figure 1 20 is a diagram of the expansion connections for a TP 5000 with 5 expansion shelves Figure 1 19 Expansion Connections for TP 5000 with a Single Expansion Shelf Note If using UTI ports from I O modue 090 50311 01 090 50312 01 or 090 50314 01 a custom cable must be used between the I O module and the expan...

Page 50: ...50 TimeProvider 5000 User s Guide 098 00028 000 Revision F May 2012 Chapter 1 Overview Functional Description Figure 1 20 Expansion Connections for TP 5000 with 5 Expansion Shelves ...

Page 51: ...has two PTP Grand Master 100 1000 Ethernet SFP ports with LEDs that indicate link and link speed The IOC module has LED status indicators and test outputs for the system The LEDs indicate Power Status Active Status Ethernet Status Alarm Status Holdover Status Expansion Shelf LEDs The TP E10 expansion shelf has sixteen 16 100 1000 Ethernet SFP ports with LEDs that indicate link and link speed The T...

Page 52: ...ss and once the IP address is set and a connection is made to a LAN you can access the TimeProvider 5000 Synchronization and Timing Inputs The TimeProvider 5000 can use either GPS Beidou E1 T1 or 1PPS TOD signals as external input references The GPS and GPS Beidou references connect to SMA connectors on the IMC card The GPS Beidou port is labeled GNSS The E1 and T1 inputs are configurable ports lo...

Page 53: ...hey can provide or receive the following signal types 1 544 Mb s G 703 1 544 MHz G 703 The 090 50315 01 version of the I O module has two RJ 45 input ports for 1PPS and TOD information transmitted at RS 422 level Dedicated Output Ports The 090 50311 01 version of the I O module Figure 1 5 also has two mini BNC ports that are dedicated E1 output ports with the following signal types 2 048 Mb s G 70...

Page 54: ...ystem Outputs E1 Output Ports The TP E30 expansion shelf features 12 dedicated E1 output ports with the following signal types 2 048 Mb s G 703 9 2 048 MHz G 703 13 1PPS TOD Output Ports The TP E30 expansion shelf features 12 1PPS TOD output ports 1PPS and TOD information is transmitted at RS 422 level Expansion Shelf ID Switch Each expansion shelf must have a unique user defined shelf ID There ca...

Page 55: ... certain conditions are deteriorating below specified levels Expansion shelf alarms are reported to the TP 5000 that controls the shelf These alarms are indicated by module status LEDs and by SNMP traps You can provision the alarm to either be enabled or disabled and the current alarm state can be obtained via the communication ports For more information see Provisioning Alarms on page 346 and App...

Page 56: ...56 TimeProvider 5000 User s Guide 098 00028 000 Revision F May 2012 Chapter 1 Overview Alarms ...

Page 57: ...nit Rack Mounting the Chassis Rack Mounting the TimeProvider 5000 Main Shelf Rack Mounting the TP E10 TP E30 Expansion Shelves Working With Modules Signal Connections Communications Connections TP 5000 Synchronization and Timing Connections TimeProvider E10 Synchronization and Timing Connections TimeProvider E30 Synchronization and Timing Connections Connecting the GPS GNSS Antenna Making Ground a...

Page 58: ... Survey Before you begin installation determine the chassis location ensure the appropriate power source is available 48 VDC and ensure that the equipment rack is properly grounded The TimeProvider 5000 is designed to mount in a 19 inch 48 cm rack occupies 1 75 in 4 5 cm 1 RU of vertical rack space and has a depth of 18 in 45 7 cm The TimeProvider E10 and TimeProvider E30 expansion shelves are als...

Page 59: ...ing or interfering with other equipment install and operate the unit according to the following guidelines Operating temperature 23 F to 113 F 5 C to 45 C for TP 5000 23 F to 131 F 5 C to 55 C for TP E10 and TP E30 Operating Humidity 90 to 100 RH maximum w condensation Use only shielded cable for all signal wiring including I O clocks and Ethernet Ground appropriately at both ends or as required b...

Page 60: ... container for signs of damage If the container appears to be damaged notify both the carrier and your Symmetricom distributor Retain the shipping container and packing material for the carrier to inspect 3 Open the container being careful to cut only the packaging tape 4 Locate and set aside the CD printed information and paperwork that is included in the container 5 Remove the unit from the cont...

Page 61: ...2 3 for the location of the label on the TP E30 Contact your Symmetricom distributor if the model or item number do not match For a complete listing of item numbers see Table 6 7 and Table 6 8 Figure 2 1 TP 5000 Location of Product Label Figure 2 2 TP E10 Location of Product Label Figure 2 3 TP E30 Location of Product Label ...

Page 62: ...removed and reattached in a different orientation if desired See Figure 2 4 for mounting hole placements See Figure 2 5 and Figure 2 6 for chassis dimensions Ensure that the mounting brackets on both sides are attached to the chassis at equal distances from the front of the unit see Figure 2 7 using 6 32 x 1 4 inch screws 2 Mount the chassis to the front of the equipment rack rails with four screw...

Page 63: ...ay 2012 TimeProvider 5000 User s Guide 63 Chapter 2 Installing Rack Mounting the Chassis Figure 2 4 TP 5000 Mounting Hole Placements Figure 2 5 TP 5000 Chassis Dimensions Front View Figure 2 6 TP 5000 Chassis Dimensions Top View ...

Page 64: ...ing hole placements See Figure 2 9 Figure 2 10 and Figure 2 11 for chassis dimensions Ensure that the mounting brackets on both sides are attached to the chassis at equal distances from the front of the unit see Figure 2 12 for the TP E10 Figure 2 13 for the TP E30 using 6 32 x 1 4 inch screws 2 Mount the chassis to the front of the equipment rack rails with four screws and associated hardware Use...

Page 65: ...eProvider 5000 User s Guide 65 Chapter 2 Installing Rack Mounting the Chassis Figure 2 8 TP E10 and TP E30 Mounting Hole Placements Side View Figure 2 9 TP E10 Chassis Dimensions Front View Figure 2 10 TP E30 Chassis Dimensions Front View ...

Page 66: ...der 5000 User s Guide 098 00028 000 Revision F May 2012 Chapter 2 Installing Rack Mounting the Chassis Figure 2 11 TP E10 and TP E30 Chassis Dimensions Top View Figure 2 12 Rack Mounting the TP E10 Expansion Shelf ...

Page 67: ... TimeProvider 5000 Handling Modules When handling any of the modules observe the following precautions 1 Use proper static control precautions when handling modules Protect the equipment against ESD electrostatic discharge by using a grounded protective wrist strap and normal equipment grounding 2 Avoid touching component leads and edge connectors 3 Avoid placing the module on an ungrounded surfac...

Page 68: ...surface Signal Connections The connectors for the GPS and GNSS input signal Ethernet management expansion connections and EIA 232 serial connection are located on the IMC module The PTP output connectors are located on the IOC module The E1 T1 1PPS TOD 10 MHz 1PPS Expansion and UTI connectors are located on different versions of the I O module Caution All modules can be removed and inserted while ...

Page 69: ... Ethernet Management port are located on the IMC as shown in Figure 2 14 See Working With Modules on page 67 for module installation instructions Figure 2 14 IMC Module Versions 01 through 05 System Management MGMT Port The System Management port is standard 10 100Base T shielded RJ 45 receptacle To connect the TimeProvider 5000 to an Ethernet network use an Ethernet RJ 45 cable See Table 2 1 for ...

Page 70: ...ard only provide DTI Figure 2 20 shows the expansion connections for a TP 5000 with a single expansion shelf with redundant DTI connections from the expansion ports on the IMC and I O cards Figure 2 21 shows the expansion connections for a TP 5000 with five expansion shelves Redundant DTI connections for the IN1 and IN2 ports on each expansion shelf are used to protect against various failure scen...

Page 71: ...Connector Pins Table 2 3 describes the EIA 232 connector pin assignments for the serial port TP 5000 Synchronization and Timing Connections The basic version TimeProvider 5000 has one GPS input on the IMC module and two redundant PTP timing outputs on each IOC module There are also four connections on the I O module two of which can be outputs or inputs and two connections that are dedicated outpu...

Page 72: ...s 10MHz and 1PPS GPS Connections To connect a GPS signal you must install a GPS antenna See Connecting the GPS GNSS Antenna on page 83 Also see Working With Modules on page 67 for module installation instructions GNSS Connections To connect a GNSS signal you must install a Beidou or GPS antenna See Connecting the GPS GNSS Antenna on page 83 Also see Working With Modules on page 67 for module insta...

Page 73: ...FP Transceiver Figure 2 18 Output Connections for E1 Versions of I O Module Table 2 4 Recommended and Supported SFP Transceivers Type Transceiver Optical 1000 Base LX Single Mode Ethernet 1310nm Symmetricom 121 20621 10 2 Avago AFCT 5701PZ Finisar FTLF1319P1BTL Optical 1000 Base SX Multi Mode Ethernet 850nm Symmetricom 121 20621 11 2 Avago AFBR 5710PZ Finisar FTLF8519P2BNL RJ45 100 1000 1GbE Base ...

Page 74: ...13 The 090 50311 01 version of the I O module Figure 2 18 also has two mini BNC male ports that are dedicated E1 output ports with the following signal types 2 048 Mb s G 703 9 2 048 MHz G 703 13 T1 Connections The 090 50314 01 version of the I O module has two RJ 45 ports that are software configurable as either T1 input or output ports see Figure 2 19 They can provide or receive the following si...

Page 75: ... shielded RJ 45 receptacles labeled UTI 1 and UTI 2 as shown in Figure 2 18 and Figure 2 19 which are also used for DTI signals The expansion shelves use the time and frequency information from the TP5000 and convert them to different synchronization signal formats To connect the expansion EXP ports on the 090 50315 01 version of the TP 5000 I O card to an expansion shelf TP E10 or TP E30 use a st...

Page 76: ...expansion shelf with redundant DTI connections from the expansion ports on the IMC and I O cards Figure 2 21 shows the expansion connections for a TP 5000 with five expansion shelves Redundant DTI connections for the IN1 and IN2 ports on each expansion shelf are used to protect against various failure scenarios The expansion port from the IMC must always be used when using expansion shelves to pro...

Page 77: ... connection 4 No connection 5 No connection 6 No connection 7 No connection 8 No connection Table 2 8 EXP Port RJ 45 Connector Pin Assignments TP E10 TP E30 Expansion Shelves Pin Signal Comment 1 RX Receive positive Ethernet 10 100Base T 2 RX Receive negative Ethernet 10 100Base T 3 TX Transmit positive Ethernet 10 100Base T 4 Reserved 5 Reserved 6 TX Transmit negative Ethernet 10 100Base T 7 DTI ...

Page 78: ...gnal Connections Figure 2 20 DTI and DTI ETH Connection for TP 5000 and One Expansion Shelf Table 2 9 Custom Cable RJ 45 Wiring Connections UTI Port to Expansion Shelf EXP Port UTI Port on I O Card Mating Connector Pins Signal EXP Port on Expansion Shelf Mating Connector Pins 1 DTI 7 2 DTI 8 ...

Page 79: ...098 00028 000 Revision F May 2012 TimeProvider 5000 User s Guide 79 Chapter 2 Installing Signal Connections Figure 2 21 DTI and DTI ETH Connection for TP 5000 and Five Expansion Shelves ...

Page 80: ... See Table 2 11 for TOD default parameters Table 2 10 1PPS TOD Port Pin Outs RJ45 Connector Pin Signal Comment 1 No Connection Default state is open high impedance 2 No Connection Default state is open high impedance 3 422_1_N 1PPS 4 GND RS422 GND 5 GND RS422 GND 6 422_1_P 1PPS 7 422_2_N TOD time information 8 422_2_P TOD time information Table 2 11 Default Parameters for TOD Information Transmiss...

Page 81: ...et the IEEE 1588 v2 specifications As with the two PTP ports on each TP 5000 IOC card these 16 ports require Ethernet SFP connectors Figure 2 22 TP E10 Output Connections for PTP SyncE Only the SFP transceivers in Table 2 4 are recommended and supported Other SFP transceivers are not supported and may cause the TP E10 expansion shelf to not comply with regulatory requirements SyncE is only availab...

Page 82: ...8 MHz G 703 13 G 704 Figure 2 24 TP E30 Output Connections for E1 Signals TP E30 1PPS TOD Connections The TP E30 expansion shelf features 12 RJ 45 connectors as shown in Figure 2 18 See Table 2 5 for pin outs for these RJ 45 connectors See Table 2 11 for TOD default parameters Figure 2 25 TP E30 Output Connections for 1PPS TOD Table 2 12 TP E30 1PPS TOD Port Pin Outs RJ45 Connector Pin Signal Comm...

Page 83: ...SS Allow at least one hour for the unit to track and lock to GPS GNSS 5 GND RS422 GND 6 422_1_P 1PPS 7 422_2_N TOD time information 8 422_2_P TOD time information Table 2 13 TP E30 Default Parameters for TOD Information Transmission Pin Default Comment Baud Rate 9600 Parity Check None Start Bit 1 low level Stop Bit 1 high level Idle Frame High level Data Bits 8 Caution The GPS and GNSS cables shou...

Page 84: ...ich are located on the right and left sides of the front panel see Figure 2 27 A separate frame ground terminal is on the left side of the front panel The TP E10 and TP E30 expansion shelves each have two 48 VDC power connectors for redundant operation which are located on the right and left sides of the front panel see Figure 2 28 and Figure 2 29 A separate frame ground terminal is provided on th...

Page 85: ...erminal Stud which is marked with the universal ground symbol as shown in Figure 2 30 This stud is located on the left side of the front panel for the TP 5000 and on the right side of the front panel for the TP E10 and TP E30 Figure 2 27 TimeProvider 5000 Power Connections Figure 2 28 TimeProvider E10 Power Connections Figure 2 29 TimeProvider E30 Power Connections Figure 2 30 Universal Ground Sym...

Page 86: ... antioxidant compound such as Kopr shield spray Connect this Ring Lug to the rack with appropriate customer supplied screws and external star lock washers 3 Using a digital voltmeter measure between the ground and chassis and verify that no voltage exists between them Power Connections Use the following procedure to make the power connections 1 Ensure the power source is turned off 2 Connect the f...

Page 87: ...as a reference for the proper polarity connection 5 Insert the connectors into the power connections in the chassis See Figure 2 31 Tighten screws in the connector Figure 2 31 TimeProvider 5000 Power Connector Figure 2 32 TP E10 and TP E30 Power Connector A Figure 2 33 TP E10 and TP E30 Power Connector B Note The 48VDC power must be connected with the proper polarity The unit will not be damaged b...

Page 88: ...ndary power connections in Figure 2 34 Leave the Return battery leads connected to the unit Figure 2 34 Power and Ground Connections on the TimeProvider 5000 4 At the chassis end of the battery leads use the multimeter to measure the voltage between the following test points Test Point Test Point Result Battery A lead Battery B lead 0 V Battery A lead Primary Return A 0 V Battery A lead Earth Grou...

Page 89: ...al Power Up Indications As the TimeProvider 5000 powers up and begins normal operation the IOC module and IMC module LEDs all turn on After the module self test is complete and the module firmware is operational the LED states may change to indicate the appropriate state or status As the TP E10 or TP E30 expansion shelves powers up and begins normal operation the LEDs all turn on After the self te...

Page 90: ...ing normally Amber IMC operational Minor Alarm s Red IMC operational Major Critical Alarm s Flashing Green Software starting up GNSS GPS Status GPS engine status indicator GNSS GPS Green GPS enabled and GPS engine interface is operating normally Amber GPS enabled and GPS engine or antenna interface has operational issues Off GPS disabled Ethernet Management Port LEDs on the Ethernet connector MGMT...

Page 91: ...t mode of operation of the LO servo HOLD Off Oscillator is operating in Locked mode Amber Oscillator is operating in Holdover or Acquire modes Flashing Amber Oscillator is operating in Warm up mode Expansion Port LEDs on the RJ48 connector EXP 1 EXP 2 Left OFF No DTI client detected Left Amber DTI client detected Left Green DTI client detected and ready Table 2 16 Expansion Shelf LED Descriptions ...

Page 92: ...as been established DTI signal valid and stable Left Flashing Green Active DTI signal stable and qualified Left Amber DTI signal detected but not stable Left Flashing Amber DTI signal detected but not selected Right OFF Link has not been established Right Green Link has been established Right Flashing Green Activity Output Ports Left OFF No DTI client detected Left Amber DTI client detected Left G...

Page 93: ...ommand conventions the prompts line editing functions and command syntax The CLI command functions and features are organized by user security access levels and are listed alphabetically This chapter also describes the SNMP option In This Appendix CLI Overview TimeProvider 5000 CLI Command Set Simple Network Management Protocol SNMP ...

Page 94: ...erview The Command Line Interface CLI also called the ASCII command set can be used to control the TimeProvider 5000 from a terminal connected to the EIA 232 serial port or the Ethernet port See Figure 3 1 below for an overview of the TP5000 command set Figure 3 1 TimeProvider 5000 CLI Command Set ...

Page 95: ...command hierarchy which are as follows The TAB key can be used at any time while typing a command including at the prompt to provide continuation options Press the TAB key to display a list of the available commands Press the TAB key at any time while typing a command TimeProvider 5000 will respond with the completion of the keyword or available completion choices based on the letters you typed Th...

Page 96: ...ect keystroke errors or to reuse parts of a previously typed command When using BACKSPACE the removed characters will still appear on the screen but they have been removed to the position shown by the cursor When you start typing the removed characters are overwritten Command Line Format The command line format is as follows Verb Command Parameter Data EOL Verb the type of action to be taken with ...

Page 97: ...vailable as follows Level 1 user class with read only rights Level 2 config user class with read write rights Level 3 administrator user class with read write rights and can also configure users and upgrade firmware TimeProvider 5000 CLI Command Set This section provides an alphabetical listing and details of all CLI commands show alarm Displays the system s standing active alarms and events Comma...

Page 98: ...g satellite 3 major 0 enable System time invalid 4 event 0 enable System time has been set by reference 5 event 0 enable System log time has been updated 6 minor 0 enable Management port link down 7 minor 0 disable Ethernet port link down 8 minor 0 enable Manual sync IOC time to IMC required 9 critical 0 enable Power out of range 10 major 0 enable GPS antenna voltage out of range 11 major 0 enable...

Page 99: ...0 enable In holdover mode for extended period 31 critical 0 enable Operational failure 32 event 0 enable Input active 33 major 0 enable IOC to IOC sync fault 34 minor 0 enable Input disqualified as system reference 35 minor 0 enable Input loss of signal 36 minor 0 enable Input phase error 37 minor 0 enable Input PLL not settled 38 minor 0 enable Input frequency error 39 minor 0 enable Input out of...

Page 100: ... failed 59 minor 0 enable Excessive traffic on Ethernet port 60 minor 0 enable Unsupported SFP on Ethernet port 61 minor 0 enable Input poor SSM 62 event 0 enable Input SSM changed 63 minor 0 enable Time input not tracking 64 minor 0 enable Internal reference data loss 65 event 0 enable Obsolete 66 event 0 enable IO module not present 67 major 0 enable Redundancy data transfer error 68 critical 0 ...

Page 101: ...ate changed to listening 88 event 0 enable PTP port state changed to disabled 89 major 0 enable DTI input port lost of signal 90 major 0 enable DTI input port invalid 91 event 0 enable DTI input port active 92 event 0 enable EXP connected 93 event 0 enable EXP disconnected 94 event 0 enable Shelf ID changed 95 minor 0 enable Exp Interface link down 96 major 0 enable EXP has duplicated shelf ID 97 ...

Page 102: ...the specified Alarm number set alarm config level alarm 0 to max alarm id all 2 3 4 5 where 2 Critical 3 Major 4 Minor 5 Event To provision the reporting delay of the specified Alarm number in seconds set alarm config delay alarm 0 to max alarm id all 0 to 500000 Range Delay 0 to 500 000 seconds Default Delay 0 seconds Example 1 To Disable alarm 35 tp5000 set alarm config state alarm 35 disable Ex...

Page 103: ...28 000 Revision F May 2012 TimeProvider 5000 User s Guide 103 Chapter 3 TimeProvider 5000 CLI Command Set Remarks The severity level and delay of transitory events cannot be changed Level Config and Admin only ...

Page 104: ...liases and the commands to which they have been assigned alias Example 1 To set the alias abc for the command show ip status ioc The command string must be contained within double quote marks tp5000 alias abc show ip status ioc Example 1a To use the alias abc to execute the command show ip status ioc tp5000 abc Response 1a ETH1 Link encap Ethernet HWaddr 00 B0 AE 01 32 49 inet addr 192 168 1 11 Bc...

Page 105: ...TICAST MTU 1500 Metric 1 RX packets 6 errors 0 dropped 0 overruns 0 frame 0 TX packets 32 errors 0 dropped 0 overruns 0 carrier 0 collisions 0 txqueuelen 1000 RX bytes 360 360 0 B TX bytes 1920 1 8 KiB Example 2 To display the aliases assigned for the TP5000 tp5000 alias Response 2 alias show ip status ioc ABC Level User Config and Admin ...

Page 106: ... how the system authenticates users If applicable displays RADIUS server IP address or hostname and key Command Syntax show authentication Example tp5000 show authentication Response Authentication Info Radius server addr 0 0 0 0 Radius server key none Radius server state disable Remarks Authentication can be local or RADIUS Level Admin only ...

Page 107: ...radius enable disable To provision the RADIUS server IP address or hostname and key set authentication radius address ip_addr key key_value Example 1 To set the RADIUS server IP address 192 168 4 53 with a key of A12F34B56 tp5000 set authentication radius address 192 168 4 53 key A12F34B56 Example 2 To provision the state for RADIUS authentication tp5000 set authentication radius enable Remarks On...

Page 108: ... passed the warm up state When auto sync is enabled IOC time will be synchronized to IMC time if they are different If auto sync is disabled and IOC time is different from IMC time an alarm will be generated The user can then use the Sync TOD Source now command to manually synchronize IOC time to IMC time Command Syntax set auto sync enable disable Example tp5000 set auto sync enable Remarks When ...

Page 109: ...e frequency reference within the specified bridging time the system transitions into holdover mode of operation Level User Config and Admin set bridge time Provisions the amount of time in seconds the system remains in bridging mode before transitioning into the holdover mode of operation Command Syntax set bridge time bridging time Range 100 to 100000 seconds Default 900 seconds Example tp5000 se...

Page 110: ...9 06 09 22 35 24 IOC time 2009 06 09 22 35 24 Leap sec 34 Leap pend 0 Response 2 When the ToD source is GPS and the system has never been locked to GPS the response will be as follows IMC time 2009 06 09 22 35 24 not validated IOC time 2009 06 09 22 35 24 not validated Leap sec 34 Leap pend 0 Level User Config and Admin set clock Provisions the user assigned Date Time and accumulated leapseconds T...

Page 111: ...000 set clock date time 2009 06 09 22 35 24 tp5000 sync tod source now Example 2 To set the accumulated leapseconds to 29 seconds tp5000 set clock leapseconds 29 Remarks The reference mode must be frequency in order to change date time or leapseconds If the reference mode is time the user is not allowed to overwrite the date time or leapseconds See Set REF command The set clock command only sets t...

Page 112: ...aves the configuration from the IMC module to both IOC modules Backup ioc to imc saves the configuration from the active IOC module to the IMC module Backup local saves the configuration to local non volatile storage immediately Backup exp 0 9 to imc saves the configuration for the specified expansion shelf to the IMC module To backup the current configuration from the IMC active IOC or expansion ...

Page 113: ...ressing Enter the system prompts for the password Password password Example 1 To set the configuration including IMC IOC and expansion shelves to default values tp5000 set configuration default Example 2 To back up the configuration for both IOC modules to the IMC module tp5000 set configuration backup ioc to imc Example 3 To back up the system configuration data to local non volatile storage tp50...

Page 114: ...uration data for an expansion shelf with ID 6 to a remote site which is an SFTP server with the IP address of 172 16 33 33 id tp5000 password backup with a file name for backup data of tp5k_exp6_backup txt tp5000 set configuration backup remote exp6 tp5k_exp6_backup txt sftp 172 16 33 33 tp5000 Enter the password at the prompt and press Enter Note For remote storage path names should be specified ...

Page 115: ... the external storage device TimeProvider 5000 will not import the revised configuration files When backing up configuration to an external storage device user name and password settings are not included in the configuration file for security reasons The user name and password are only backed up locally The following settings are unique to the unit and will not be backed up to an external storage ...

Page 116: ...g configuration files to a different TimeProvider 5000 the PTP Clock ID must be reinitialized back to its default setting To re initialize the PTP Clock ID use the following command tp5000 set ptp clockid ioc1 x ff ff ff ff ff ff ff ff enter Use SFTP when exporting or importing the IMC module and IOC module configuration files SFTP is the same mechanism used for TimeProvider 5000 firmware download...

Page 117: ...ial port s operating parameters baud rate parity word length and stop bits Command Syntax show eia 232 Example tp5000 show eia 232 Response Baud rate 57600 Stop bit 1 Parity 0 Data length 8 Flow control none Remarks The system s serial interface is fixed at 57 6K 0 8 1 there is no handshaking There is no associated Set command Level User Config and Admin ...

Page 118: ...mand Syntax To set the state for Ethernet Auto Negotiation set eth auto neg state ioc1 y exp 0 9 port 1 16 all enable disable To set the advertised speed for Ethernet Auto Negotiation set eth auto neg speed ioc1 y exp 0 9 port 1 16 all 100m 1000m all y 1 2 where y is the port number on the IOC Defaults The default for auto negotiation state is enable The default value for auto negotiation speed is...

Page 119: ...apter 3 TimeProvider 5000 CLI Command Set Exp shelf 9 id exp8 tp5000 set eth auto neg speed exp8 port 1 all Example 4 To provision the Ethernet auto negotiation state for Port 3 on Exp shelf 8 id exp7 tp5000 set eth auto neg state exp7 port 3 enable Level Config and Admin ...

Page 120: ...specified IOC module or expansion shelf Command Syntax show eth config ioc1 exp 0 9 Example 1 To display the current configuration for the Ethernet ports on the IOC modules tp5000 show eth config ioc1 Response 1 eth1 auto neg state enable eth1 auto neg speed all eth2 auto neg state enable eth2 auto neg speed all Example 2 To display the current configuration for the Ethernet ports on expansion she...

Page 121: ...098 00028 000 Revision F May 2012 TimeProvider 5000 User s Guide 121 Chapter 3 TimeProvider 5000 CLI Command Set eth configuration information in expansion shelf ID 4 Level User Config and Admin ...

Page 122: ...tax show eth status ioc exp 0 9 Example 1 To display the current speed for the Ethernet ports on the IOC modules tp5000 show eth status ioc Response 1 IOC1 eth1 current speed none IOC1 eth2 current speed 100M IOC2 eth1 current speed 100M IOC2 eth2 current speed none Example 2 To display the current speed for the Ethernet ports on expansion shelf 5 id 4 tp5000 show eth status exp4 Response 2 Eth st...

Page 123: ...d Set show event This command displays the current events Command Syntax show event Example tp5000 show event Response ID Mod Date Time Descriptions 27 ioc1 2009 06 09 21 32 16 Entered normal track mode 32 ioc1 2009 06 09 20 54 19 GPS active 32 ioc2 2009 06 09 20 53 31 GPS active Level User Config and Admin ...

Page 124: ...f config imc Response 1 To display the configurations of DTI and Ethernet on the IMC expansion port imc exp eth state enable imc exp dti state enable Example 2 To display the configurations of DTI and Ethernet on the IO expansion port tp5000 show exp if config io Response 2 io exp 1 state enable io exp 2 state enable Example 3 To display the configurations of DTI and Ethernet on expansion shelf 1 ...

Page 125: ... display the status of DTI and Ethernet on the IMC expansion port tp5000 show exp if status imc Response 1a IMC EXP DTI status up IMC EXP ETH status up Response 1b IMC EXP DTI status down IMC EXP ETH status down Example 2 To display the status of expansion ports on the IO card tp5000 show exp if status io Response 2a io exp 1 up io exp 2 disabled Response 2b io exp 1 down io exp 2 up Example 3 To ...

Page 126: ...Port Status Status Input Output Description Active Input and Output An input is qualified and also selected An output that is determined to be active standby or redundant by the downstream input Standby Input only An input is qualified but not selected If the active input is disqualified the standby input will be selected after several seconds Redundant Input only An input that could have been qua...

Page 127: ...set exp if dti imc exp io exp 1 io exp 2 exp 0 9 in1 in2 enable disable Example 1 To disable the DTI interface IN 1 port on expansion shelf ID 2 tp5000 set exp if dti exp2 in1 disable Example 2 To enable the DTI interface port on the IMC card tp5000 set exp if dti imc exp enable Example 3 To enable the DTI interface port 1 on the IO card tp5000 set exp if dti io exp 1 enable Remark The imc exp is ...

Page 128: ...port on the IMC that is used to connect to an expansion shelf This command is typically used to disable the Ethernet port when there are no expansion shelves being used with the TP5000 Command Syntax set exp if eth imc exp state enable disable Example To disable the Ethernet port on the exp if interface on the IMC tp5000 set exp if eth imc exp state enable Level Config and Admin ...

Page 129: ...nd Admin set firewall Use this command to configure the system s Ethernet port firewall The firewall can control Telnet SSH FTP SFTP ICMP and SNMP on the IMC Command Syntax set firewall imc telnet allow block set firewall imc ssh allow block set firewall imc ftp allow block set firewall imc sftp allow block set firewall imc snmp allow block set firewall imc icmp allow block Example set firewall im...

Page 130: ...ision F May 2012 Chapter 3 TimeProvider 5000 CLI Command Set generate This command generates all possible event and alarm messages This command is for testing only Command Syntax generate message Example tp5000 generate message Response Level Admin only ...

Page 131: ...e vehicles being tracked vehicle number health noise ratio satellite elevation satellite azimuth Command Syntax To show the GPS configuration on the GNSS port show gnss config To show the GPS status on the GNSS port show gnss status Example 1 tp5000 show gnss config Response 1 State enable Priority 1 Mode auto GNSS Track mode gps Mask 10 Antenna Delay 0 PQL State disable PQL Value 1 GNSS manual po...

Page 132: ...satellite status Index No SNR Health Azimuth Elevation 1 3 37 healthy 313 23 2 6 38 healthy 309 35 3 15 43 healthy 57 31 4 16 39 healthy 259 24 5 18 39 healthy 300 82 6 21 42 healthy 36 67 7 22 42 healthy 240 47 8 24 42 healthy 85 29 9 26 38 healthy 42 18 10 29 42 healthy 150 26 Beidou satellite status Index No SNR Health Azimuth Elevation 1 3 37 healthy 313 23 2 6 38 healthy 309 35 3 15 43 health...

Page 133: ...value Position can only be provisioned manually when GNSS mode is manual Where Latitude is in the format N Sddd mm ss sss for example N37 22 45 123 S48 33 67 456 Longitude is in the format E Wddd mm ss sss for example W121 55 36 123 E157 33 47 456 Height is in meters with one digit after the decimal point for example 17 5 To change GNSS track mode on the GNSS port set gnss track mode beidou gps pr...

Page 134: ...85 nanoseconds Priority 1 to 16 where 1 is highest priority and 16 is lowest PQL Value 1 to 3 Default Mask 10 degrees Cable Delay 0 nanoseconds PQL State Disable PQL Value 1 Example 1 To set GNSS to auto mode tp5000 set gnss mode auto Example 2 To manually set the GNSS to manual mode with a system position of latitude of N37 22 45 123 longitude of W121 55 36 123 and a height 17 5 meters tp5000 set...

Page 135: ...he GNSS mask to a value of 25 degrees tp5000 set gnss mask 25 Example 6 To set the GNSS cable delay to a value of 220 nanoseconds tp5000 set gnss cable delay 220 Restrictions The system must have the GNSS mode of operation provisioned as manual before you can successfully provision the position manually Level Config and Admin only ...

Page 136: ...ll satellite vehicles being tracked vehicle number health noise ratio satellite elevation satellite azimuth Command Syntax To display the GPS configuration on the GPS port show gps config To display the GPS status on the GPS port show gps status Example 1 tp5000 show GPS config Response 1 GPS Configuration State enable Priority 2 Mode auto Mask 10 Antenna Delay 0 PQL State disable PQL Value 1 GPS ...

Page 137: ...7 22 42 867 Longitude W121 55 34 552 Height 17 3 GPS Satellites Status Index No SNR Health Azimuth Elevation 1 3 37 healthy 313 23 2 6 38 healthy 309 35 3 15 43 healthy 57 31 4 16 39 healthy 259 24 5 18 39 healthy 300 82 6 21 42 healthy 36 67 7 22 42 healthy 240 47 8 24 42 healthy 85 29 9 26 38 healthy 42 18 10 29 42 healthy 150 26 Level User Config and Admin ...

Page 138: ... value Position can only be provisioned manually when GPS mode is manual Where Latitude is in the format N Sddd mm ss sss for example N37 22 45 123 S48 33 67 456 Longitude is in the format E Wddd mm ss sss for example W121 55 36 123 E157 33 47 456 Height is in meters with one digit after the decimal point for example 17 5 To enable or disable GPS set gps state enable disable To set the GPS priorit...

Page 139: ...egrees Cable Delay 0 to 999999 nanoseconds Priority 1 to 16 where 1 is highest priority and 16 is lowest PQL Value 1 to 3 Default Mask 10 degrees Cable Delay 0 nanoseconds Example 1 To set GPS to auto mode tp5000 set GPS mode auto Example 2 To manually set the GPS to manual mode with a system position of latitude of N37 22 45 123 longitude of W121 55 36 123 and a height 17 5 meters tp5000 set GPS ...

Page 140: ... GPS mask to a value of 25 degrees tp5000 set GPS mask 25 Example 4 To set the GPS cable delay to a value of 220 nanoseconds tp5000 set GPS cable delay 220 Restrictions The system must have the GPS mode of operation provisioned as manual before you can successfully provision the position manually Level Config and Admin only ...

Page 141: ...re status imc Response 1 48V A ok 48V B ok 1 2V 1 211V 1 8V 1 843V 2 5V 2 526V 5 5V 5 490V VCXO 2 526V GPS Power 5 464V GPS Current 24mA GPS Antenna ok FPGA ok Example 2 To show the hardware status for IOC1 tp5000 show hardware status ioc1 Response 2 1 8V 1 805V 10M EFC 1 116V 20M EFC 0 872V 25M EFC 1 155V 24 5M EFC 1 155V 24 7M EFC 1 253V OSC Current 173mA FPGA VCCint 1 005V FPGA VCCaux 2 499V FP...

Page 142: ...and Set tp5000 show hardware status exp3 Response 3 48V A failed 48V B ok VCXO 1 701V 12V 11 807V 1 8V 1 778V 2 5V 2 487V 1 2V 1 173V 0 9V 0 889V 1 0V 0 992V F1 1V 1 082V F1 5V 1 482V F2 5V 2 101V G1 1V 1 082V G1 5V 1 482V G2 5V 2 462V FPGA ok Temp 35C Temp High 41C Temp Low 35C Level User Config and Admin ...

Page 143: ...00 12 24 show event 2 2009 06 10 00 13 15 show firewall 3 2009 06 10 00 16 02 set firewall imc sftp 4 2009 06 10 00 16 31 generate message 5 2009 06 10 00 17 07 show gps 6 2009 06 10 00 19 59 set gps mode auto 7 2009 06 10 00 21 49 set gps mask 10 8 2009 06 10 00 22 40 set gps cable delay 1 9 2009 06 10 00 22 48 set gps cable delay 0 10 2009 06 10 00 23 47 show hardware status imc 11 2009 06 10 00...

Page 144: ...vel User Config and Admin set hostname This command sets the host name for the TimeProvider 5000 Hostname can contain up to 20 characters Command Syntax set hostname hostname_string Example To set the hostname to PTPhost3 tp5000 set hostname PTPhost3 Level Config and Admin only Note The hostname will be used for the SNMP sysName object However if sysName is changed via SNMP SNMP will then use the ...

Page 145: ...2_200810231325 Next boot image 2 IOC1 IMAGE DETAILS Active image 2 1 0 4_200811040858 Backup image 1 1 0 2_200810231322 Next boot image 2 IOC2 IMAGE DETAILS Active image 2 1 0 4_200811040858 Backup image 1 1 0 4_200811040858 Next boot image 2 Exp0 IMAGE DETAILS Active image 2 1 0 4_200811040901 Backup image 1 1 0 2_200810231325 Next boot image 2 Exp4 IMAGE DETAILS Active image 2 1 0 4_200811040901...

Page 146: ... ioc1 2 Remark The module must be rebooted to implement the boot image Level Admin only Note Each image has it s own set of configuration data If Image 1 is set as the boot image the configuration data for Image 1 is applied when the TP 5000 is rebooted If Image 2 is set as the boot image the configuration data for Image 2 is applied when the TP 5000 is rebooted A firmware upgrade is applied to th...

Page 147: ...sponse Port ID State Prio Frame Type CRC St SSM St SSM Bit PQL Val Config Used port1 disable 1 cas disable disable 8 3 no port2 disable 2 freq2048khz disable disable 8 3 yes Note See show io status for current port status and direction Level User Config and Admin set input Use this command to provision the System s Input Port s for the following Priority State Framing Type CRC state for E1 signals...

Page 148: ...f ccs cas freq2048khz freq1544khz To provision the CRC state for the specified input port set input crc port 1 2 enable disable Quality Level DS1 SSM E1 SSM Description 1 0x04 0x02 Stratum 1 PRS PRC 2 0x08 0x00 STU Stratum Unknown presumed ST1 3 0x0C 0x04 Stratum 2 Type II 4 0x0C 0x04 Type I 5 0x78 0x04 Transit Node Type V 6 0x7C 0x08 Type III Stratum 3E 7 0x10 0x0B Type IV Stratum 3 8 0x22 0x0F G...

Page 149: ... Enable for input port 1 tp5000 set input state port1 enable Example 3 To set the frame type to 2048 kHz for input port1 tp5000 set input frametype port1 freq2048khz Example 4 To provision the CRC state to Enable for input port2 tp5000 set input crc port2 enable Example 5 To provision the forced PQL state to Disable for input port1 tp5000 set input pql state port1 disable Note Synchronization Stat...

Page 150: ...meProvider 5000 CLI Command Set Example 6 To provision the SSM PQL Bit value for E1 signals to 6 for input port2 tp5000 set input ssm bit port2 6 Example 7 To set the SSM PQL value to 3 Stratum 2 Type II for input port1 tp5000 set input pql value port1 3 Level Config and Admin only ...

Page 151: ...nfig and Admin only set intra system Use this command to provision which Class of network and IP addresses are used for IMC to IOC and IOC to IOC communications Command Syntax set intra system a b c where A IP address range 10 0 250 8 to 10 0 250 63 B IP address range 172 16 250 8 to 172 16 250 63 C IP address range 192 168 250 8 to 192 168 250 63 Example To set the intra system IP addresses to ra...

Page 152: ...lf serial number Exp shelf hardware version Exp shelf FPGA version clock FPGA Exp shelf compatibility mask Exp shelf firmware version The compatibility information allows the user to verify the compatibility between the hardware and software for each card To be compatible the hex numerical string displayed for the hardware HW of a card must match the numerical string displayed for the software SW ...

Page 153: ...lot Part Num CLEI Num Serial HW Ver FPGA SW Version imc middle 090 50321 01 2 na R62257 A 0x14 3 1 1 ioc1 left 090 50321 01 2 na R62258 04 0x25 3 1 1 ioc2 right 090 50321 01 na P35782 B 0x25 3 1 1 exp 0 090 50321 01 na P35782 B 0x25 3 1 1 exp 2 090 50321 01 na P35782 B 0x25 3 1 1 exp 8 090 50321 01 na P35782 B 0x25 3 1 1 exp 9 090 50321 01 na P35782 B 0x25 3 1 1 Mod HW Compatibility SW Compatibili...

Page 154: ...0 0x00000000 0x00000001 exp9 0x00000000 0x00000000 0x00000001 Remarks Only the asset number can be modified Level User Config and Admin set inventory Use this command to provision the system s user assigned asset value information Command Syntax set inventory asset asset value Range Enter user assigned asset value from 1 to 20 characters Example To set the inventory asset to a value of tcb121 tp50...

Page 155: ...o This command provisions the system s I O module port configuration Command Syntax set io port 1 2 input output Example 1 To set Port 1 of the I O module as an Input tp5000 set io port1 input Example 2 To set Port 2 of the I O module as an Output tp5000 set io port2 output Related show io status Level Config and Admin ...

Page 156: ...ioc1 active ioc2 standby Level User Config and Admin set ioc state Use this command to provision the standby module to become the active module IOC1 refers the IOC module to the left of the IMC and IOC2 refers to the IOC module to the right of the IMC Command Syntax set ioc state ioc1 ioc2 active Example tp5000 set ioc state ioc2 active Remarks Switchover to the standby IOC will be prohibited if t...

Page 157: ...utputs even if SSM is not applicable for that type of output If the current SSM is unknown due to an unknown SSM code or inappropriate frametype then an SSM value of 15 will be displayed Command Syntax show io status Example tp5000 show io status Response Port ID I O Type Signal Type Current Status Current SSM port1 Output T1pulse ON 1 port2 Input E1 2 048MHz OFF 15 port3 Output 1PPS ON 15 port4 O...

Page 158: ... ip config imc ioc1 exp 0 9 To show the current status of the Ethernet interfaces for the specified module show ip status imc ioc1 exp 0 9 vlan id vlan Defaults See Table B 19 for default IP address for the IMC module See Table B 25 for default IP address for IOC1 and IOC2 modules Example 1 To display the configuration of the Ethernet interfaces for the IMC module tp5000 show ip config imc Respons...

Page 159: ...st 192 168 5 255 Mask 255 255 255 0 UP BROADCAST RUNNING MULTICAST MTU 1500 Metric 1 RX packets 70867 errors 0 dropped 0 overruns 0 frame 0 TX packets 1986 errors 0 dropped 0 overruns 0 carrier 0 collisions 0 txqueuelen 1000 RX bytes 4511319 4 3 MiB TX bytes 162895 159 0 KiB Interrupt 21 Base address 0xe000 Example 4 To display the status of the Ethernet interfaces for the IOC module tp5000 show i...

Page 160: ...lisions 0 txqueuelen 1000 RX bytes 360 360 0 B TX bytes 1920 1 8 KiB Level User Config and Admin set ip Use this command to provision the Host Mask and Gateway IP addresses for IMC and IOC Ethernet interfaces The special value of 0 0 0 0 should be used for the gateway value if a gateway router is not required Command Syntax To provision the state of the Ethernet interfaces for the specified module...

Page 161: ... imc address 192 168 2 11 mask 255 255 255 0 gateway 192 168 2 1 tp5000 set ip imc restart Example 4 To set the IP address for Port 2 on the IOC card to 192 168 2 3 the mask to 255 255 255 0 and the gateway 192 168 2 1 tp5000 set ip ioc1 2 address 192 168 2 3 mask 255 255 255 0 gateway 192 168 2 1 tp5000 set ip ioc1 2 restart Example 5 To set the IP address for Port 2 on expansion shelf 4 id exp3 ...

Page 162: ...ider 5000 CLI Command Set Remarks The address format allows IPv4 multiple octet formats Restart the interface after configuring the system in order to implement the new settings Level Config and Admin only Note PTP will be restarted after the IP interface is restarted for the IOC modules ...

Page 163: ...ip mode Use this command to set the DHCP mode for the IMC Ethernet interface You can set up the interface to use either DHCP or a static IP Command Syntax set ip mode imc dhcp static Example tp5000 set ip mode imc dhcp Remarks Use set ip to restart the interface after configuring the system Level Config and Admin only ...

Page 164: ... the expansion shelves Command Syntax show led main exp 0 9 Example 1 tp5000 show led main Response 1 Index Module ID LED LED Status 1 imc bta off 2 imc btb off 3 imc sys red 4 imc alm off 5 imc gps green 6 imc mgmt green 7 ioc1 active green 8 ioc1 alarm amber 9 ioc1 eth1 off 10 ioc1 eth2 green 11 ioc1 holdover off 12 ioc2 active off 13 ioc2 alarm red 14 ioc2 eth1 green 15 ioc2 eth2 off 16 ioc2 ho...

Page 165: ...ider 5000 User s Guide 165 Chapter 3 TimeProvider 5000 CLI Command Set tp5000 show led exp3 Response 2 Index Module ID LED LED Status 1 exp5 pwra off 2 exp5 pwrb red 3 exp5 alm off 4 exp5 mgmt green 5 exp5 ref green Level User Config and Admin ...

Page 166: ...m s Red IMC operational Major Critical Alarm s Flashing Green Software starting up GNSS GPS Status GPS engine status indicator GNSS GPS Green GPS enabled and GPS engine interface is operating normally Amber GPS enabled and GPS engine or antenna interface has operational issues Off GPS disabled Ethernet Management Port LEDs on the Ethernet connector MGMT Left Amber Flash Activity Left Off No Activi...

Page 167: ...o HOLD Off Oscillator is operating in Locked mode Amber Oscillator is operating in Holdover or Acquire modes Flashing Amber Oscillator is operating in Warm up mode Table 3 3 LED Descriptions for Expansion Shelves LED Name Color Description PWR A Red Power A is absent Off Power A is normal PWR B Red Power B is absent Off Power B is normal ALM Red There are active alarms Off There are no active alar...

Page 168: ...excluding old 6 character option keys that were ever added to the TP5000 including those that have been deleted show license history Example tp5000 show license current Response No Feature Option License Key Serial Number 1 Feature 1 4 95ef M12269 2 Feature 2 0 89f5 M12269 3 Option ptp probe 3af9 M12269 4 Option ntp probe 981b M12269 5 Option ntp server 601a M12269 6 Option ntp server 120k dd7e M1...

Page 169: ... The 16 port option for the Ethernet expansion shelf is associated with the expansion shelf serial number System level features or options are normally associated with the IMC card serial number Command Syntax To enter a license key for new features or options set license add The TP 5000 will prompt for the license key To remove an installed feature license set license delete feature feature level...

Page 170: ...ption license tp5000 set license delete option The TP5000 will prompt the user with a list of options that can be deleted Please enter 0 6 to select an option from the list 0 snmp SNMP Agent 1 ptp probe PTP Probe 2 ntp probe NTP Probe 3 eth 16 ports Ethernet Port9 16 on Expansion 4 ntp server NTP Server Default 5 ntp server 120k NTP Server 120K 6 ptp gm PTP Grandmaster 0 Type 0 and press Enter Rem...

Page 171: ...nt entries are displayed The log files are Alarm Log Event Log Command Log Security Log Command Syntax show log alarm event command security index value head tail number of lines Example 1 To display the first 5 entries of the alarm log 5 lines from the head of current log tp5000 show log alarm head 5 Response Jan 01 00 00 10 TP5000 alarmd 002 000 MINOR IMC GPS engine not tracking satellite Jan 01...

Page 172: ...ovider 5000 User s Guide 098 00028 000 Revision F May 2012 Chapter 3 TimeProvider 5000 CLI Command Set To display the latest 20 entries from the current alarm log tp5000 show log alarm Level User Config and Admin ...

Page 173: ...000 show log size alarm Response Log size of alarm log is 100 kilobytes Level User Config and Admin set log size Use this command to provision the specified log file buffer size the maximum number of kilobytes to be stored in the file before it is rotated Command Syntax set log size alarm event command security size value Range 0 to 100 kilobytes Default 100 kilobytes Remarks Provisioning a log fi...

Page 174: ... User s Guide 098 00028 000 Revision F May 2012 Chapter 3 TimeProvider 5000 CLI Command Set logout This command terminates the current user connection Command Syntax logout Example tp5000 logout Level User Config and Admin ...

Page 175: ...reported by the IMC Command Syntax show monitor exp Example tp5000 show monitor exp Response Level User Config and Admin set monitor exp Use this command to specify the monitoring mode for the expansion shelf with specified ID If an expansion shelf has monitoring enabled then a loss of communication with that expansion shelf will cause an alarm If an expansion shelf has monitoring disabled alarm 0...

Page 176: ...ider 5000 User s Guide 098 00028 000 Revision F May 2012 Chapter 3 TimeProvider 5000 CLI Command Set Example To disable monitoring for expansion shelf exp0 tp5000 set monitor exp exp0 disable Level Config and Admin ...

Page 177: ... NTP configuration of the specified port show ntp config ioc x To show the NTP status of the specified port show ntp status ioc x Example 1 To display NTP configuration of the port 1 Ethernet interface on the IOC module tp5000 show ntp config ioc 1 Response 1 NTP State enabled NTP DSCP 0 NTP DSCP State disabled NTP TTL 64 NTP VLAN Id 2 NTP Packet Limit 20000 Example 2 To display NTP status of the ...

Page 178: ...55 To set the value of DSCP to use in NTP packets set ntp dscp ioc1 x 0 63 To enable or disable the DSCP DiffServ Code Point field in NTP packets set ntp dscp state ioc1 x enable disable To set the VLAN ID for the NTP server on the specified port set ntp vlan id ioc1 x 1 4094 Example 1 To enable NTP on port 1 of the IOC card tp5000 set ntp state ioc1 1 enable Example 2 To configure port 1 of the I...

Page 179: ...metricom issued certificate for the unit A new license model is used with TP5000 versions 1 2 and later New features and options are activated with a 40 character MD5 key If the user has a 6 character key the set option command is used to enter the key If the user has a 40 character key the set license command is used to enter the key Command Syntax set option snmp key Example To enable the snmp o...

Page 180: ...t config Response Port ID State Frame Type CRC St SSM St SSM Bit Config Used port1 enable freq2048khz disable disable 8 T1pulse port2 enable freq2048khz disable disable 8 no port3 enable freq2048khz disable disable 8 no port4 enable freq2048khz disable disable 8 no Note See show io status for current port status and direction Related Show Output 10M config Show Output PPS config Level User Config ...

Page 181: ... signal will contain the system SSM value The table below shows the output SSM value based on the clock state of the TP5000 Note If the 1PPS and 10M I O module is installed version 090 50312 01 or 090 50314 01 configuration updates for port 3 and port 4 will be accepted but not used Quality Level DS1 SSM E1 SSM Description 1 0x04 0x02 Stratum 1 PRS PRC 2 0x08 0x00 STU Stratum Unknown presumed ST1 ...

Page 182: ...t4 enable disable To provision the output ssm bit set output ssm bit port1 port2 port3 port4 4 thru 8 To provision the output behavior during the warm up state set output warm up port1 port2 port3 port4 on squelch ais To provision the output behavior during the free run state set output free run port1 port2 port3 port4 on squelch ais To provision the output behavior during the holdover state set o...

Page 183: ...the frame type to 2048 kHz for output Port 1 tp5000 set output frametype port1 freq2048khz Example 3 To Enable CRC for output Port 3 tp5000 set output crc port3 enable Example 4 To Enable SSM for output Port 2 tp5000 set output ssm port2 enable Example 5 To provision the SSM Bit value for E1 signals to 6 for output port2 tp5000 set output ssm bit port2 6 Example 6 To provision the output behavior ...

Page 184: ...havior to ON during the holdover state for port2 tp5000 set output holdover port2 on Example 9 To provision the output behavior to ON during the fast track state for port2 tp5000 set output fast track port2 on Example 10 To generate a T1 isolated pulse on the selected output port tp5000 set output test mode port2 t1pulse Level Config and Admin only ...

Page 185: ...on fast track on 10MHz generation holdover on Level User Config and Admin set output 10m Use this command to provision the System s 10 MHz Output Port state It is also used to provision the behavior of the 10 MHz Output Port during the warm up free run and holdover states Command Syntax To provision the state of the the 10 MHz output port set output 10m state enable disable To provision the output...

Page 186: ...z output port tp5000 set output 10m warm up squelch Example 3 To provision the output behavior to squelch during the free run state for the dedicated 10MHz output port tp5000 set output 10m free run squelch Example 4 To provision the output behavior to ON during the fast track state for the dedicated 10MHz output port tp5000 set output 10m fast track on Example 5 To provision the output behavior t...

Page 187: ... TOD output ports on the expansion shelf This command allows you to provision state frame type CRC for CAS or CCS frametypes only SSM for frame type ESF CCS with CRC or CAS with CRC SSM bit for frame type ESF CCS with CRC or CAS with CRC output generation behavior in warm up free run fast track and holdover states Priority Quality Level PQL values are listed in the following table Quality Level DS...

Page 188: ...1 pps tod state exp 0 9 port 1 12 all enable disable To provision the framework for the specified E1 output port set output exp e1 frametype exp 0 9 port 1 12 all freq2048khz cas ccs 7 0x10 0x0B Type IV Stratum 3 8 0x22 0x0F G 813OPT3 SMC 9 0x30 0x0F DUS Do not Use for Sync 15 Did not receive valid SSM Clock State Output SSM Warm up PQL 9 Do not use for Sync DUS Free run PQL of oscillator Fast loc...

Page 189: ... for the specified E1 output port set output exp e1 free run exp 0 9 port 1 12 all on squelch ais To provision the output behavior during the holdover state set output exp e1 holdover exp 0 9 port 1 12 all on squelch ais To provision the output behavior during the fast track state set output exp e1 fast track exp 0 9 port 1 12 all on squelch ais To provision the output behavior during the warm up ...

Page 190: ...id exp2 tp5000 set output exp pps tod exp2 port6 enable Example 2 To set the frame type to 2048 kHz for E1 output Port 10 on expansion shelf 5 id exp4 tp5000 set output exp e1 frametype exp4 port10 freq2048khz Example 3 To Enable CRC for E1 output Port 3 on expansion shelf 4 id exp3 tp5000 set output exp e1 crc exp3 port3 enable Example 4 To Enable SSM for E1 output Port 9 on expansion shelf 8 id ...

Page 191: ... expansion shelf 8 id exp7 tp5000 set output exp e1 fast track exp7 port9 on Example 10 To provision the output behavior to squelch during the warm up state for E1 output Port 9 on expansion shelf 8 id exp7 tp5000 set output exp e1 warm up exp7 port9 squelch Example 11 To provision the output behavior to squelch during the free run state for E1 output Port 9 on expansion shelf 8 id exp7 tp5000 set...

Page 192: ...pps generation holdover on Level User Config and Admin set output pps Use this command to provision the System s 1PPS Output Port state It is also used to provision the behavior of the 1PPS Output Port during the warm up free run and holdover states Command Syntax To provision the state of the the 1PPS output port set output pps state enable disable To provision the output behavior during the warm...

Page 193: ...000 set output pps warm up squelch Example 3 To provision the output behavior to squelch during the free run state for the dedicated 1PPS output port tp5000 set output pps free run squelch Example 4 To provision the output behavior to ON during the fast track state for the dedicated 1PPS output port tp5000 set output pps fast track on Example 5 To provision the output behavior to ON during the hol...

Page 194: ...he status of the output test mode for all output ports Command Syntax show output test mode Example tp5000 show output test mode Response Port 1 test mode disable Port 2 test mode disable Port 3 test mode disable Port 4 test mode disable Related Show Output config Set Output test mode Show Output 10M config Show Output PPS config Level User Config and Admin ...

Page 195: ...dresses must be set to different subnets Command Syntax set packet service ioc1 x ptp gm ntp server ptp probe ntp probe Example 1 To configure port 2 of the IOC card as a PTP grandmaster set packet service ioc1 2 ptp gm Example 2 To configure port 1 of the IOC card as an NTP server set packet service ioc1 1 ntp server Example 3 To configure port 2 of the IOC card as a PTP probe set packet service ...

Page 196: ...nd to modify the password of the current user Command Syntax password Example tp5000 password Response Prompt for password Prompt for password confirmation Level User Config and Admin Note Be sure to not lose or forget the password Contact Symmetricom support for the password recovery procedure if all admin level user passwords are lost ...

Page 197: ... tp5000 ping imc 192 168 5 100 enter Response 1 Ping imc success Example 2 For port 1 on the active IOC card IP address 192 168 5 110 with VLAN ID of 23 tp5000 ping ioc 1 23 192 168 5 110 Response 2 Ping ioc 1 success Example 3 For port 2 on the active IOC card IP address 192 168 5 112 with no VLAN tp5000 ping ioc 2 192 168 5 112 Response 3 Error Action failed Ping ioc 2 failed Note To minimize sy...

Page 198: ...ay 2012 Chapter 3 TimeProvider 5000 CLI Command Set Example 4 For port 16 on the expansion shelf 4 module id exp3 IP address 192 168 5 110 with VLAN ID of 23 tp5000 ping exp3 port 6 23 192 168 5 110 Response 4 Ping exp3 port 6 success Level User Config and Admin ...

Page 199: ...s information Command Syntax To show pps tod input ports configuration show pps tod config To show pps tod input ports status show pps tod status Example 1 tp5000 show pps tod config Response 1 PPS TOD Input Ports Configuration Port ID State Priority Cable Delay PQL State PQL Value Port 1 enable 3 0 disable 1 Port 2 enable 4 0 disable 1 Example 2 tp5000 show pps tod status Response 2 PPS TOD Input...

Page 200: ...cable delay compensation Command Syntax To provision the state for the specified 1PPS TOD port set pps tod state port1 port2 enable disable To provision the priority of the 1PPS TOD input port set pps tod priority port1 port2 1 16 To provision the cable delay of pps tod port set pps tod cable delay port1 port2 value To set the forced PQL state for the specified 1PPS TOD port set pps tod pql state ...

Page 201: ... a value of 5 tp5000 set pps tod priority port1 5 Example 3 To provision the cable delay value for the 1PPS TOD input port 1 to a value of 2500 ns tp5000 set pps tod cable delay port1 2500 Example 4 To enable the 1PPS TOD input port for a forced pql value tp5000 set pps tod pql state port1 enable Example 5 To provision the 1PPS TOD input port 1 to a forced pql value of 3 tp5000 set pps tod pql val...

Page 202: ... input ports where a PQL value of 15 represents an invalid SSM If SSM is disabled for an input port then the TP5000 will use the user assigned SSM value PQL for that input port Command Syntax show pql ssm Example tp5000 show pql ssm Response Option 1 Table Option 1 SSM hex Clock QL PTP clockClass PQL 0x02 QL PRC 84 1 0x00 STU 82 2 0x04 QL SSU A 90 3 0x04 Type I 90 4 0x08 QL SSU B 96 6 0x0B QL SEC ...

Page 203: ...Option 2 SSM hex Clock QL PTP clockClass PQL 0x04FF QL PRS 80 1 0x08FF QL STU 82 2 0x0CFF QL ST2 86 3 0x0CFF Type I 86 4 0x78FF QL TNC 90 5 0x7CFF QL ST3E 100 6 0x10FF QL ST3 EEC2 102 7 0x22FF QL SMC 106 8 0x30FF QL DUS 110 9 Others or absent Invalid n a 15 Related set input Set Output Level User Config and Admin ...

Page 204: ...igure 4 13 for a diagram of the hierchy for the PTP Multicast commands See Table 4 11 for descriptions of the attributes specific to Multicast Unicast Specific Attributes Non Fixed Unicast Negotiation state Dynamic Lease Interval See Figure 4 14 for a diagram of the hierchy for the PTP Unicast Non Fixed commands See Table 4 12 for descriptions of the attributes specific to Unicast Non Fixed Unicas...

Page 205: ...set the timescale to arb if the unit is locked to any other reference besides gps i e E1 and T1 To provision the Alternate Master mode set ptp alternative master ioc1 1 ioc1 2 exp 0 9 enable disable To provision the state for the specified PTP port on the IOC card or expansion shelf set ptp state ioc1 1 ioc1 2 exp 0 9 enable disable To provision the IP Header Time to Live TTL field for PTP packets...

Page 206: ...e minimum interval maximum rate between PTP delay response messages set ptp delay limit ioc1 1 ioc1 2 delay limit value The interval is 2z seconds where z delay limit value To provision the PTP priority 1 set ptp priority 1 ioc1 1 ioc1 2 exp 0 9 priority 1 value To provision the PTP priority 2 set ptp priority 2 ioc1 1 ioc1 2 exp 0 9 priority 2 value To provision the PTP domain set ptp domain ioc1...

Page 207: ...ges for PTP Multicast set ptp multicast announce int ioc1 1 ioc1 2 exp 0 9 port 1 16 announce int value The interval is 2z seconds where z announce int value To provision the interval between synchronization messages for PTP Multicast set ptp multicast sync int ioc1 1 ioc1 2 exp 0 9 port 1 16 sync int value The interval is 2z seconds where z sync int value To provision the interval between delay r...

Page 208: ...ast static address ioc1 1 ioc1 2 add remove index 1 10 address IP address To provision the PTP Unicast static clock ID set ptp unicast static clockid ioc1 1 ioc1 2 index 1 10 clock id where the Clock ID is in the form xx xx xx xx xx xx xx xx To set the PTP Unicast static VLAN ID set ptp unicast static vlanid ioc1 1 ioc1 2 index 1 10 VLAN ID To set the interval between synchronization messages for ...

Page 209: ...xpansion shelf set ptp two step exp 0 9 enable disable To provision the PTP alternate master for the PTP Synce expansion shelf set ptp alternate master exp 0 9 enable disable To provision the Priority 1 value for the PTP Synce expansion shelf set ptp priority1 exp 0 9 priority1 value To provision the Priority 2 value for the PTP Synce expansion shelf set ptp priority2 exp 0 9 priority2 value To pr...

Page 210: ...p5000 set ptp timescale ioc1 ptp Example 5 Common Attributes To Enable the alternate master mode for IOC1 tp5000 set ptp alternative master ioc1 enable Example 6 Common Attributes To Enable port 1 of IOC1 for PTP Note See Factory Defaults on page 448 in Appendix B for defaults values and ranges for PTP parameters Note Management addressing mode controls whether PTP management messages use Multicas...

Page 211: ... tp5000 set ptp announce limit ioc1 1 1 Example 10 Common Attributes To set the PTP sync limit to no less than 0 125 seconds 2 3 for port 2 tp5000 set ptp sync limit ioc1 2 3 Example 11 Common Attributes To set the PTP delay limit to no less than 0 250 seconds 2 2 for port 1 tp5000 set ptp delay limit ioc1 1 2 Example 12 Common Attributes To provision PTP priority 1 for port 1 to a value of 160 tp...

Page 212: ...kid ioc1 1 aa bb 11 22 33 44 55 66 Example 19 Multicast Attributes To set the PTP Multicast client timeout to 900 seconds for Port 1 set ptp multicast client timeout ioc1 1 900 Example 20 Multicast Attributes To provision the PTP Multicast announce timeout to 5 for Port 1 set ptp multicast announce timeout ioc1 1 5 Example 21 Multicast Attributes To provision the PTP Multicast VLAN ID to 12 for Po...

Page 213: ...c clients Client 1 10 11 11 101 VLAN ID 10 index 1 Clock ID 0A 11 22 33 44 55 66 77 Synchronization interval rate 16 per second sync int value 4 Announce interval rate 1 per second announce int value 0 Delay interval rate 8 per second delay int value 3 Client 2 10 21 21 101 VLAN ID 20 index 2 Clock ID 0A 22 33 44 55 66 77 88 Synchronization interval rate 32 per second sync int value 5 Announce int...

Page 214: ...ndex 1 3 tp5000 set ptp unicast static state ioc1 1 index 1 enable tp5000 set ptp unicast static address ioc1 1 add index 2 10 21 21 101 tp5000 set ptp unicast static vlanid ioc1 1 index 2 vlanid 20 tp5000 set ptp unicast static clockid ioc1 1 add index 2 0A 22 33 44 55 66 77 88 tp5000 set ptp unicast static sync int ioc1 1 index 2 5 tp5000 set ptp unicast static announce int ioc1 1 index 2 0 Leve...

Page 215: ...68 5 33 0 0 00 B0 AE FF FE 01 1A 85 D 0 0 6 Example 2 To show the PTP client attributes for all clients on port 1 of the active IOC module tp5000 show ptp client ioc 1 all Response 2 IP Address VLAN PRI Clock Id Mode Ann Sync Delay Note The TP5000 uses a proprietary technique to create a list of clients in the multicast mode A maximum of 500 clients can be added to the list In multicast mode the T...

Page 216: ...PRI Clock Id Mode Ann Sync Delay 0 0 0 0 0 0 00 B0 AE FF FE 01 1A 85 D 0 0 6 0 0 0 0 0 0 00 B0 AE FF FE 01 1B 85 D 0 0 6 0 0 0 0 0 0 00 B0 AE FF FE 01 1C 85 D 0 0 6 Level Config and Admin only set ptp client disconnect Use this command to disconnect a PTP client using its clock ID Command Syntax set ptp client disconnect ioc x client clock ID value Example To disconnect the PTP client on IOC1 1 wi...

Page 217: ... Message Timeout Client Timeout VLAN ID Sync Message Interval Announce Message Interval Delay Message Interval Unicast Static Specific Attributes Unicast IP addresses VLAN ID Sync Message Interval Announce Message Interval Delay Interval Clock ID Command Syntax To display the specified PTP port s common provisioned attributes show ptp config common ioc1 1 ioc1 2 exp 0 9 port 1 16 To display the sp...

Page 218: ...essing Mode multicast PTP Alternate Master disabled Example 2 To show the PTP Multicast mode configuration for Port 1 on the active IOC tp5000 show ptp config multicast ioc1 1 Response 2 PTP Multicast VlanId 35 PTP Multicast Sync Intv 0 PTP Multicast Announce Intv 0 PTP Multicast Delay Intv 6 PTP Multicast Announce Timeout 3 PTP Multicast Client Timeout 1000 Example 3 To show the PTP Unicast stati...

Page 219: ...show the PTP Common mode configuration for Port 1 on the expansion shelf 7 exp6 tp5000 show ptp config common exp6 port 1 Response 4 PTP Timescale AUTO PTP State enabled PTP Addressing Mode multicast PTP ClockId 00 B0 AE FF FE 01 32 70 PTP Priority 1 128 PTP Priority 2 128 PTP Domain 0 PTP Dither disabled PTP Two Step enabled PTP Alternate Master disabled Example 5 To show the PTP Multicast mode c...

Page 220: ...s client_ip vlan id vlan To display the clock description for the specified PTP port and client show ptp node clock description ioc y address client_ip vlan id vlan To display the null management for the specified PTP port and client show ptp node null mgmt ioc y address client_ip vlan id vlan To display the status of the specified client connected to the specified port show ptp node status ioc y ...

Page 221: ...iled acceptable master table Master1 protocol type IPv4 Master1 ip address 192 168 106 14 Master1 priority1 0 Master2 protocol type IPv4 Master2 ip address 192 168 2 11 Master2 priority1 0 Examples 2 To display the clock description info for the Port 1 client at IP address 192 168 106 99 VLAN ID 4094 tp5000 show ptp node clock description ioc 1 address 192 168 106 99 vlan id 4094 Response 2 Clock ...

Page 222: ...for the Port 1 client at IP address 192 168 106 99 VLAN ID 4094 tp5000 show ptp node status ioc 1 address 192 168 106 99 vlan id 4094 Response 4 Status report from ptp client ip address 192 168 106 99 ptp client vlan id 4094 ptp client clock id 00 b0 ae ff ff 01 22 99 The detailed status Current time is 23 34 52 09 21 2009 Current FLL State Fast FLL FLL State Duration minutes 65 Forward Flow Weigh...

Page 223: ...DV usec 0 103 Forward InterPkt Jitter usec 0 027 Reverse IPDV Below Threshold 100 0 Reverse Maximum IPDV usec 0 111 Reverse InterPkt Jitter usec 0 028 Reference 192 168 106 14 GM1 Flow State Normal GM2 Flow State Waiting for GM to respond to signaling GM1 Clock id 00 b0 ae ff fe 01 90 68 GM2 Clock id 00 00 00 00 00 00 00 00 Last Firmware Upgrade status No upgrade since powered Level Config and Adm...

Page 224: ... optional needed only if this TP5K is on a VLAN subnet To reboot the specified client on the specified PTP port set ptp node reboot ioc y address client_ip vlan id vlan Examples 1 To set the Acceptable Master info for the Port 1 client at IP address 192 168 5 177 VLAN ID 15 Master1 IP address 192 168 5 15 and priority value of 0 with no Master2 tp5000 set ptp node acc master ioc 1 address 192 168 ...

Page 225: ...ver with IP address 192 168 5 100 a user name of user1 and an upgrade file path of upgradefiles ver2 bin tp5000 set ptp node upgrade ioc 1 address 192 168 5 64 upgradefiles ver2 bin ftp 192 168 5 100 user1 Response 3 Password Examples 4 To reboot the port 1 client at IP address 192 168 5 64 no VLAN tp5000 set ptp node reboot ioc 1 address 192 168 5 64 Level Config and Admin only ...

Page 226: ... To display the configuration data of the Probe on port 2 tp5000 show ptp probe config ioc1 2 Example 2 To display the test data from port 1 of the Probe tp5000 show ptp probe data ioc 1 Response F 00011 1229541029 099868364 1229541029 099881920 0000000000 B 00011 1229541029 562553320 1229541029 562539700 0000000000 F 00012 1229541030 099868364 1229541030 099881776 0000000000 B 00012 1229541030 56...

Page 227: ...t Command Syntax To set the IP address and Clock ID for the Grandmaster being tested by the Probe set ptp probe ioc1 y active probe gm clock id clock id gm ip addr vlan id vlan where y 1 2 the port number on the IOC clock id is in the form xx xx xx xx xx xx xx xx To set the PTP profile for the Probe set ptp probe ioc1 y active probe profile default telecom 2008 Ethernet default where y 1 2 the por...

Page 228: ...robe gm clock id 00 B0 AE FF FE 00 00 06 gm ip 192 168 1 11 vlan id 35 For a Grandmaster Clock ID of 00 B0 AE FF FE 00 00 06 GrandmasterIP address of 192 168 1 11 and no VLAN tp5000 set ptp probe ioc1 1 active probe gm clock id 00 B0 AE FF FE 00 00 06 gm ip 192 168 1 11 enter Example 2 For an interval of 0 25 seconds 2 on Port 1 of IOC1 tp5000 set ptp probe ioc1 1 active probe interval 2 Example 3...

Page 229: ...Clock Id 00 B0 AE FF FE 01 CC 44 1 Profile default Port state master Clock class 7 Clock accuracy within 10us Timescale PTP Num clients 0 Client load 0 Example 2 To show the PTP status of the PTP port in expansion shelf 9 id exp8 port 15 tp5000 show ptp status exp8 port 15 Response 2 Grandmaster status information Port enabled yes Clock Id 00 B0 AE FF FE 01 32 70 15 Profile ethernet default Port s...

Page 230: ...uts Example 1 tp5000 reboot imc Response 1 The system is going down NOW Sending SIGTERM to all processes Sending SIGKILL to all processes Requesting system reboot Restarting system U Boot 1 1 6 Oct 23 2008 13 17 59 MPC83XX Symmetricom Time Provider 5000 TP5000 IMC Clock configuration Coherent System Bus 166 MHz Core 333 MHz Local Bus Controller 166 MHz Local Bus 41 MHz DDR 333 MHz SEC 55 MHz I2C1 ...

Page 231: ...TION LED ALARM GREEN BLINKING tp5000 Example 3 For defective IOC or no IOC tp5000 reboot ioc2 Response 3 Error IOC is not present tp5000 Example 4 To reboot expansion shelf 1 module id exp0 which is PTP SyncE tp5000 reboot exp0 Response 4 No response message tp5000 Example 5 To reboot expansion shelf 6 module id exp5 which is E1 1PPS TOD tp5000 reboot exp5 Response 5 No response message tp5000 ...

Page 232: ...232 TimeProvider 5000 User s Guide 098 00028 000 Revision F May 2012 Chapter 3 TimeProvider 5000 CLI Command Set Level Admin only ...

Page 233: ... port status show redundancy active port Example 1 tp5000 show redundancy port ioc1 Response 1 Port redundancy enabled Example 2 tp5000 show redundancy active port Response 2 IOC active port eth1 Response 2a If redundancy is disabled the response to this command is IOC active port no active port redundancy disabled Level User Config and Admin set redundancy Use this command to provision the redund...

Page 234: ...0 CLI Command Set y 1 2 the port number on the active IOC module Example 1 To enable port redundancy on IOC1 module tp5000 set redundancy port ioc1 enable Example 2 To set Port 1 as the active port in the redundancy configuration tp5000 set redundancy active port ioc 1 Level Config and Admin only ...

Page 235: ... show ref Response Reference Info Reference Ref Priority PQL PQL Config PQL Input Reference State State Value Value Status GNSS enable 1 disable 1 1 disqualified GPS enable 2 disable 1 1 selected PPS TOD 1 enable 3 disable 1 1 disqualified PPS TOD 2 enable 4 disable 1 1 disqualified Input 1 enable 7 disable 3 15 disqualified Input 2 enable 8 disable 3 15 disqualified Reference Mode time Reference ...

Page 236: ...ystem selects the new reference based on REF CRITERIA When Ref Criteria is set to PRIORITY the system selects the reference based on the priority setting of the inputs When Ref Criteria is set to SSM the system selects the reference based on the SSM received or provisioned of the inputs Command Syntax To set the criteria for how to switch references set ref criteria priority ssm To set the referen...

Page 237: ...LI Command Set Example 1 To set the reference mode to time tp5000 set ref mode time Example 2 To set the reference mode to frequency tp5000 set ref mode frequency Example 3 To set the reference to be selected based on the priority setting tp5000 set ref criteria priority Level Config and Admin only ...

Page 238: ...show remote syslog Example tp5000 show remote syslog Response State disable Remote Address 0 0 0 0 Level User Config and Admin set remote syslog This command is used to configure a remote syslog server to receive log messages from the TimeProvider 5000 Command Syntax set remote syslog enable host addr disable Example To enable a remote syslog server at IP address 192 168 5 141 tp5000 set remote sy...

Page 239: ... user names only show snmp trapuser To display the SNMP v2 community information show snmp v2 community To display the SNMP TRAP version information show snmp trapversion To display the SNMP V2 state show snmp state v2 To display the SNMP trap MIB has been selected show snmp trap mib To display which SNMP MIB version 1 2 or 2 0 has been selected show snmp sys obj mib Example 1 tp5000 show snmp man...

Page 240: ... Example 3 tp5000 show snmp trapuser Response 3 No SNMP trap user configured Example 4 tp5000 show snmp v2 community Response 4 Index Community Name Access Level 1 test readwrite 2 testteam readwrite Example 5 tp5000 show snmp trapversion Response 5 Trap version v2c Example 6 tp5000 show snmp state v2 Response 6 SNMP v2 state enable Example 7 tp5000 show snmp trap mib Response 7 SNMP Trap MIB Vers...

Page 241: ...ments Command Syntax To add an SNMP user or trapuser set snmp add user trapuser name securelvl noauth auth priv To add an SNMP v2 community set snmp add v2 community name secureLvl read only read write To add an SNMP manager set snmp add manager ip address engineid engine id To delete an SNMP user trapuser or v2 community set snmp delete user trapuser v2 community name To delete an SNMP manager se...

Page 242: ...ponse 1 For security level of priv the TP5000 will prompt for Authentication protocol MD5 or SHA Authentication key Only chars a z A Z 0 9 _ are accepted Privacy protocol DES or AES Privacy key Only chars a z A Z 0 9 _ are accepted If the security level is auth the TP5000 will prompt for authkey authkey value authtype MD5 SHA Example 2 To add SNMP v2 community named groupv2 with a security level o...

Page 243: ...address 192 168 5 177 tp5000 set snmp delete manager 192 168 5 177 Example 6 To set the trap version to SNMP v3 tp5000 set snmp trapversion 3 Example 7 To enable SNMP v2 on the TP5000 tp5000 set snmp state v2 enable Example 8 To set the sys obj MIB to version 2 0 tp5000 set snmp sys obj mib 2 0 Example 9 To set the trap MIB to version 2 0 tp5000 set snmp trap mib 2 0 Level Admin only ...

Page 244: ...ntax show ssm option Example tp5000 show ssm option Response Module or Shelf SSM Option IOC ITU option I EXP0 ITU option I EXP1 ITU option I EXP3 ITU option I set ssm option Use this command to select either E1 or T1 sync network options as defined in G 781 Command Syntax set ssm option all ioc1 exp 0 9 option1 option2 Example To set the ssm option for all to option1 tp5000 set ssm option all opti...

Page 245: ...each IOC Currently Selected ToD Source Reference Input Servo Control Status For The Active IOC Module PTP Packet Service GrandMaster NTP Server or PTP Probe Phase Offset Value Valid in fast lock and normal states for GPS mode Command Syntax show status Example 1 To show status for the main shelf tp5000 show status Response 1 System name TP5000 IMC time 2010 03 08 20 33 30 IMC uptime 7 days 2 hrs 1...

Page 246: ... normal track Combined Clock status normal track Phase Offset 0 ns Packet Service ptp grandmaster SyncE output PQL 2 Example 3 To display the status of E1 1PPS TOD expansion shelf 3 id exp2 tp5000 show status exp2 Response 3 Expansion shelf E1 TOD shelf time 2010 03 08 20 33 30 shelf uptime 7 days 2 hrs 18 mins Main Clock status normal track Shelf clock status normal track Combined Clock status no...

Page 247: ...cy to time Fast track Input becomes qualified Fast track This IOC has a qualified input and clock is stabilizing Bridging This IOC no longer has a qualified input Normal track Clock stabilized Normal This IOC has a qualified input and meets all specifications Fast track Clock not stabilized adequately Bridging This IOC no longer has a qualified input Bridging This IOC no longer has a qualified ref...

Page 248: ...on shelf show synce config exp 0 9 Example 1 To display the SyncE status for expansion shelf 10 id exp9 tp5000 show synce status exp9 Response 1 tp5000 show synce status exp0 SyncE Status Port ID Direction Ethernet Mode ESMC Status Rx PQL Tx PQL Port1 output asynchronous off 0x0f 0x0f Port2 output asynchronous off 0x0f 0x0f Port3 output asynchronous off 0x0f 0x0f Port4 output asynchronous off 0x0f...

Page 249: ...MC State QL State Output QL Mode Forced Input QL Value Port1 output disable enable unidirectional n a Port2 output disable enable unidirectional n a Port3 output disable enable unidirectional n a Port4 output disable enable unidirectional n a Port5 output disable enable unidirectional n a Port6 output disable enable unidirectional n a Port7 output disable enable unidirectional n a Port8 output dis...

Page 250: ...the ESMC state for the specified SyncE expansion shelf port set synce esmc exp 0 9 port 1 16 all enable disable To set the SyncE SSM QL state for the specified expansion shelf port set synce ql state exp 0 9 port 1 16 all enable disable To set the SyncE SSM QL directional mode for the specified expansion shelf output set synce output ql mode exp 0 9 port 1 16 all unidirectional bidirectional Defau...

Page 251: ...mmand Set tp5000 set synce ql state exp0 all enable Example 4 To set the SSM QL directional mode to bidirectional for all ports on expansion shelf 1 id exp0 tp5000 set synce output ql mode exp0 all bidirectional Remarks This command only applies to PTP SyncE expansion shelves Level Config and Admin only ...

Page 252: ...nt session Command Syntax set timeout Range 0 to 86400 seconds Default 0 seconds Example tp5000 set timeout Response Prompt for value Timeout 0 86400 sec 1800 1800 sec timeout set successfully Level User Config and Admin show timeout This command displays the inactivity timeout to the defined time interval in seconds Command Syntax show timeout Example tp5000 show timeout Response The current sess...

Page 253: ...ided by GPS or the System The set ref mode command replaces the set tod source command The set tod source command is supported for backward compatibility Command Syntax set tod source gps sys Example 1 tp5000 set tod source gps Remarks Command set tod source GPS has the same meaning as set ref mode time and set tod source sys has the same meaning as set ref mode frequency See Set REF command Level...

Page 254: ...Use this command to force the system to synchronize the phase and time to the current reference This command is required to clear alarmID 8 manual sync IOC to IMC required Command Syntax sync tod source now Example tp5000 sync tod source now Remarks This command can cause jitter or jump of 1PPS output Level Config and Admin only ...

Page 255: ...xample 1 To upgrade the IMC using the upgrade file path of symm tp5000 current_imc_upd FTP server IP address 192 168 5 56 and a user name of bob321 tp5000 upgrade imc symm tp5000 current_imc_upd ftp 192 168 5 56 bob321 Response 1 Password Upgrade of imc is in progress Note The FTP firewall is set to Block by default Use the following command to set the IMC firewall to Allow for ftp communications ...

Page 256: ...c_upd 192 168 5 57 bob321 Response 2 See Response 1 Example 3 To upgrade the PTP SyncE expansion shelf ID 4 using the upgrade file path of symm tp5000 current_ptp_exp_upd FTP server IP address 192 168 5 56 and a user name of bob321 Password bob123 tp5000 upgrade exp4 symm tp5000 current_ptp_exp_upd ftp 192 168 5 56 bob321 Response 3 Password bob123 enter Upgrade of exp4 is in progress Upgrade of e...

Page 257: ...er s Guide 257 Chapter 3 TimeProvider 5000 CLI Command Set tp5000 upgrade exp0 symm tp5000 current_e1_exp_upd ftp 192 168 5 56 bob321 Response 4 Password bob123 enter Upgrade of exp0 is in progress Upgrade of exp0 is successfully completed Level Admin only ...

Page 258: ...vel User Config and Admin set user Use this command to provision the local user password and access level to delete the specified user to modify the password of a specified user Command Syntax To add a new user set user add name username access level user config admin To modify the password of an existing user set user modify username password To delete a user set user delete username Example 1 To...

Page 259: ...000 set user modify tester123 password Response 2 Prompt for new password Prompt for password confirmation Example 3 To delete user tester123 tp5000 set user delete tester123 Level Admin only Note Take care to avoid losing admin passwords or deleting all admin users Adding new users requires at least one admin user Contact Symmetricom support for the password recovery procedure if all admin level ...

Page 260: ... 20 0 24 3 23 0 en 10 31 31 101 255 255 255 0 30 30 30 1 30 30 30 0 24 4 24 0 en 10 41 41 101 255 255 255 0 40 40 40 1 40 40 40 0 24 5 25 0 en 10 51 51 101 255 255 255 0 50 50 50 1 50 50 50 0 24 6 26 0 en 10 61 61 101 255 255 255 0 60 60 60 1 60 60 60 0 24 7 27 0 en 10 71 71 101 255 255 255 0 70 70 70 1 70 70 70 0 24 8 82 0 en 10 81 81 101 255 255 255 0 80 80 80 1 80 80 80 0 24 9 29 0 en 10 91 91 ...

Page 261: ...4 11 255 255 255 0 0 0 0 0 5 2 0 enable 192 168 125 11 255 255 255 0 0 0 0 0 6 2 0 enable 192 168 126 11 255 255 255 0 0 0 0 0 7 2 0 enable 192 168 127 11 255 255 255 0 0 0 0 0 8 2 0 enable 192 168 128 11 255 255 255 0 0 0 0 0 9 2 0 enable 192 168 129 11 255 255 255 0 0 0 0 0 10 2 0 enable 192 168 130 11 255 255 255 0 0 0 0 0 11 2 0 enable 192 168 131 11 255 255 255 0 0 0 0 0 12 2 0 enable 192 168...

Page 262: ...automatically deleted Command Syntax To provision the VLAN mode for the specified port or expansion shelf set vlan mode ioc1 1 ioc1 2 exp 0 9 enable disable To add a fixed VLAN for the specified port set vlan config add ioc1 1 ioc1 2 index 1 thru 16 vlan id vlan id priority priority address ip address netmask mask gateway gateway To add a non fixed VLAN set vlan config add ioc1 1 ioc1 2 non fixed ...

Page 263: ...set vlan config delete ioc1 1 ioc1 2 non fixed vlan id vlan id To provision the state of the fixed VLAN for the specified index on the specified port set vlan config state ioc1 1 ioc1 2 index 1 thru 16 enable disable To provision the state of the non fixed VLAN for the specified VLAN ID on the specified port set vlan config state ioc1 1 ioc1 2 non fixed vlan id vlan id enable disable To provision ...

Page 264: ...twork 192 168 3 0 24 Example 3 To modify Index 3 on an existing fixed VLAN on IOC1 1 with the new IP address of 192 168 1 7 Netmask 255 255 255 0 and Gateway 192 168 1 1 tp5000 set vlan config modify ioc1 1 index 3 address 192 168 1 7 netmask 255 255 255 0 gateway 192 168 1 1 Example 3a To modify the existing non fixed VLAN with VLAN ID of 99 on IOC1 1 with the new IP address of 192 168 3 35 Netma...

Page 265: ...5 on port 1 of IOC1 tp5000 set vlan config state ioc1 1 index 5 enable Example 5a To Enable the non fixed VLAN configuration for VLAN ID 75on port 1 of IOC1 tp5000 set vlan config state ioc1 1 non fixed vlan id 99 enable Example 6 To Enable the VLAN for expansion shelf 1 id exp0 tp5000 set vlan mode exp0 enable Example 7 To configure a VLAN on port 3 of expansion shelf 5 id exp4 with VLAN ID 25 Pr...

Page 266: ...ort 161 becomes the port of standard SNMP interactive communications and port 162 becomes the trap port SNMP is an optional feature for the TP5000 that must be enabled to function See Provisioning for SNMP on page 354 for details Management Information Base The Management Information Base MIB is a virtual database of managed objects their object identifiers and variables Typical MIB object identif...

Page 267: ...c MIBs The Symmetricom implementation of SNMP uses the definitions of MIB II variables described in RFC 1213 and definitions of SNMP traps described in RFC 1215 Symmetricom provides its own private MIB extensions with every system that is licensed for the SNMP option Symmetricom private MIBs comply with the guidelines described in the relevant RFCs unless otherwise noted in the documentation Figur...

Page 268: ...w Private MIB symmCommonModelv1 Private MIB and its MIB modules is rooted in the Symmetricom directory Figure 3 4 shows the top level objects for the symmCommonModelV1 Private MIB module See the TP 5000 SNMP Agent User s Guide 098 00385 000 for the functions and details of these objects Figure 3 4 Hierarchy of Symmetricom Private MIBs for TimeProvider 5000 ...

Page 269: ...TP 5000 MIB The original MIB for the TP5000 tp5000 is kept to maintain full backward compatibility with TP5000 release v1 2 Most of the functions in the tp5000 MIB are already duplicated in the new private MIB modules The tp5000 MIB is only used for a few remaining functions alarm management PTP client management and SNMP administration The tp5000 MIB will be deprecated when these remaining functi...

Page 270: ...270 TimeProvider 5000 User s Guide 098 00028 000 Revision F May 2012 Chapter 3 Simple Network Management Protocol SNMP ...

Page 271: ... Ethernet Ports Ethernet Auto Negotiation Provisioning VLAN Provisioning PTP Provisioning NTP Provisioning the Input Reference Setting GPS Port as Reference Setting GNSS Port as Reference Setting an E1 T1 Input as Reference Setting a 1PPS TOD Input as Reference Provisioning the Programmable E1 T1 Inputs Provisioning the 1PPS TOD Inputs Provisioning the Programmable E1 T1 Outputs Provisioning the D...

Page 272: ...e to connect the TimeProvider 5000 to a terminal or a computer with terminal emulation via a straight through serial cable 1 Connect one end of a straight through serial cable to the serial port on the computer or terminal and the other end to the EIA 232 connector on the IMC 2 Configure the emulation software for 8 data bits 1 stop bit no parity 57600 baud rate and no flow control 3 Start the ter...

Page 273: ...s for these parameters Use the dotted decimal format xxx xxx xxx xxx to enter the address parameters with the following commands Example 1 Using Static IP tp5000 set ip imc address 192 168 0 10 netmask 255 255 255 0 gateway 192 168 0 254 tp5000 set ip imc restart Example 2 Using DHCP tp5000 set ip mode imc dhcp Connecting Through an Ethernet LAN 1 Ensure that the TimeProvider 5000 is connected to ...

Page 274: ...s are required to enter a user name and password to log in to the system Users can access or modify only the parameter settings allowed by their assigned security level Use the procedures in this section to manage user access to the TimeProvider 5000 Note SSH can be used to connect to the TP5000 The SSH firewall is set to Allow by default Caution To avoid a possible service call do not lose or mis...

Page 275: ...pt appears Adding a User Use the following procedure to add a user to the system access list 1 Login at the Admin level see Logging In on page 275 2 Type show user and press Enter to view the current list of users Note The telnet firewall is set to Block by default Use the following command to set the IMC firewall to Allow for telnet communications set firewall imc telnet allow Note The unit s def...

Page 276: ...d prompt 7 Retype the password and press Enter The system indicates that CLI user has been added user 8 Type show user and press Enter to verify that the account exists 9 Repeat steps 3 through 8 of this procedure to add other users Deleting A User Use the following procedure to delete user ABCD1234 from the system access list Do not delete the default username and password 1 Login at the Admin le...

Page 277: ...fy user name password and press Enter Follow the prompts Change the password when prompted 4 Repeat Steps 2 and 3 to modify other user passwords Note User passwords can consist of alphanumeric characters _ and with a minimum of 8 characters and a maximum of 32 characters Usernames can consist of numbers upper and lower case letters dash and underscore _ with a maximum of 20 characters Usernames ca...

Page 278: ...you for the access level for the user 6 Type in the desired access level user config or admin and press Enter The system prompts you for a password 7 Type a password and press Enter The password you enter will be the log in password for the user The system responds with the confirm password prompt 8 Retype the password and press Enter The system indicates that CLI user has been added user 9 Type s...

Page 279: ...and authentication key for server access 1 Type set authentication radius address address key key and press Enter address is the server IP address for example 192 168 0 10 key is up to 32 ASCII characters 2 Type set authentication radius enable and press Enter Configuring the RADIUS Server For a FreeRADIUS server configuration requires placing the TP5000 user information in the file etc raddb user...

Page 280: ...word test3c Reply Message Level 3 access granted n User Name remote_user The secret key must also be configured in the RADIUS server For a FreeRADIUS server this is configured in the etc raddb clients conf file Provisioning the Ethernet Ports Provisioning IMC Ethernet Port The TimeProvider 5000 supports static as well as dynamically allocated IP addresses on the MGMT Management port The dynamicall...

Page 281: ...r Static IP Mode Use the following procedure to configure the TimeProvider 5000 IP parameters Host Address Subnet Mask and Gateway Address in Static IP mode on the MGMT port Use the dot decimal notation format xxx xxx xxx xxx to enter the address parameter See Figure 4 2 Example 1 Login at the Admin or Config user level see Logging In on page 275 2 Type set ip mode imc static and press Enter 3 Typ...

Page 282: ...re the redundant ports share the same IP address and MAC address See Figure 4 3 The TP5000 allows VLAN over the redundant port as well as over independent ports Enabling or disabling port redundancy does not require the user to issue the set IP restart command The TP5000 also supports redundant IOC cards see Appendix D Redundant IOC Cards Both IOC cards will have the same IP addresses for the Ethe...

Page 283: ...ancy on page 483 for a thorough description of IP addresses MAC addresses and Clock IDs On system power up IOC1 will be active After initial warm up the Rb IOC in a mixed Rb IOC Qtz IOC card configuration will be active If the active IOC card fails or loses its Ethernet connection the TP5000 will switch over to the standby card within 10 seconds The active IOC card sends a gratuitous ARP after swi...

Page 284: ...ration Therefore the redundant ports share the same IP address and MAC address For all commands that indicate a specific port on an IOC card the port will be referred to as IOC y or IOC1 y in the command description where y 1 or 2 If port redundancy is enabled then y 1 for all commands Use the following procedure to configure ports on IOC1 as a redundant pair 1 Login at the admin or Config user le...

Page 285: ...ype set ip ioc1 1 restart and press Enter 5 Type set ip ioc1 2 address 192 168 2 12 netmask 255 255 255 0 gateway 192 168 2 1 and press Enter 6 Type set ip ioc1 2 restart and press Enter Ethernet Auto Negotiation The Ethernet ports on IOC modules can be configured to allow automatic negotiation of their connection speeds When Ethernet auto negotiation is enabled the TP5000 will advertise connectio...

Page 286: ... Ethernet auto negotiation In this example Port 1 allows all connection speeds and Port 2 only allows a connection speed of 100 M 1 Login at the admin or Config user level 2 Type set eth auto neg state ioc1 1 enable and press Enter 3 Type set eth auto neg speed ioc1 1 all and press Enter 4 Type set eth auto neg state ioc1 2 enable and press Enter 5 Type set eth auto neg speed ioc1 2 100m and press...

Page 287: ...lete ioc1 x index command The command hierarchy for configuring fixed VLANs is shown in Figure 4 7 Fixed VLANs include a gateway address The remaining 484 VLANs are considered to be non fixed VLANs each of which can be configured with one static route When a non fixed VLAN is removed the route will be automatically deleted whether the TP 5000 is in bonding or non bonding mode A non fixed VLAN can ...

Page 288: ...288 TimeProvider 5000 User s Guide 098 00028 000 Revision F May 2012 Chapter 4 Provisioning Provisioning VLAN Figure 4 7 Fixed VLAN Set Vlan Config Commands ...

Page 289: ...098 00028 000 Revision F May 2012 TimeProvider 5000 User s Guide 289 Chapter 4 Provisioning Provisioning VLAN Figure 4 8 Non Fixed VLAN Set Vlan Commands Example ...

Page 290: ...he configuration 6 Type show ip status ioc 1 and press Enter to verify VLAN is up Example Use the following procedure to configure a non fixed VLAN on ETH1 with VLAN ID of 99 priority of 5 next hop IP address of 192 168 3 1 and Destination Network Net Prefix 192 168 4 0 24 1 Login at the Admin or Config user level 2 Type set vlan config add ioc1 1 non fixed vlan id 99 priority 5 address 192 168 3 ...

Page 291: ...f the Common parameters and Table B 30 for defaults and ranges including those commands for setting the ptp profile management addressing mode and two step clock mode Packet Service Modes Each Ethernet port on the TP5000 IOC module can be configured as either a PTP grandmaster or as an NTP server with PTP grandmaster as the default The exception is for versions that are purchased as dedicated NTP ...

Page 292: ... Default multicast profile SSM Mapping to PTP Clock Class The Default Hybrid and Telecom 2008 PTP profiles Unicast Multicast and Multicast hybrid address mode for the TP5000 were implemented before the ITU approved the PTP telecom profile in 2010 Table 4 3 PTP Profiles for the TP 5000 PTP Profile Mapping to Address Mode addr mode in prev release Description Default Multicast Default profile in IEE...

Page 293: ...ard Table 4 5 shows the compliance of the Default multicast PTP profile for the TP5000 to IEEE 1588 2008 Annex J Table 4 6 and Table 4 7 show the attributes for the proprietary Telecom 2008 unicast and Hybrid multicast hybrid PTP profiles respectively Table 4 4 ITU T G 8265 1 Profile Compliance Attribute Default for ITU T G 8265 1 Default for TP 5000 Range for ITU T G 8265 1 Range for TP 5000 cloc...

Page 294: ...able 4 8 Option 1 SSM Mapping to QL and clockClass per G 781 and G 8265 1 Option 1 SSM hex Clock QL PTP clockClass PQL 04FF QL PRC 84 1 08FF STU 82 2 0CFF QL SSU A 90 3 0CFF Type I 90 4 78FF QL SSU B 96 6 10FF QL SEC EEC1 104 7 30FF QL DNU 110 9 Others or absent Invalid n a 15 Table 4 9 Option 2 SSM Mapping to QL and clockClass per G 781 and G 8265 1 Option 2 SSM hex Clock QL PTP clockClass PQL 04...

Page 295: ...the Unicast Static parameters and Table B 31 for defaults and ranges The TP5000 can be configured with both dynamically allocated and static clients at the same time Unicast Dynamic The default condition for Unicast negotiate is Enable with a lease duration of 1000 seconds Use the following procedure to configure Port 1 of IOC1 for PTP Unicast dynamic clients with a lease duration of 250 seconds 1...

Page 296: ... per second announce int value 0 Delay interval rate 16 per second delay int value 4 1 Login at the Admin or Config user level 2 Type set ptp profile ioc1 1 telecom 2008 and press Enter 3 Type set ptp unicast static address ioc1 1 index 1 10 11 11 101 and press Enter 4 Type set ptp unicast static vlanid ioc1 1 index 1 add 10 and press Enter 5 Type set ptp unicast static clockid ioc1 1 index 1 0A 1...

Page 297: ...ecifies that each PTP message sent from the grandmaster is capable of being received and processed by all PTP ports on the same PTP communication path The set ptp multicast command is used to provision parameters specific to multicast addressing mode hybrid or Default profile See Figure 4 13 for the hierarchy of the set ptp multicast commands and Table 4 11 for defaults and ranges In multicast mod...

Page 298: ...ing unicast This minimizes the amount of network traffic The TP5000 will support unicast negotiation for the delay requests If the client limit is reached then the unicast negotiation request will be denied The TP5000 will also support lease less clients These clients will operate in multicast hybrid mode but will not request a lease via unicast negotiation To support this the TP5000 will respond ...

Page 299: ...is independent of the PTP synchronization addressing mode Use the set ptp mgmt addr mode IOC1 y multicast unicast command to configure the TP5000 for multicast or unicast management address mode The default management address mode is unicast Only one VLAN is supported in multicast mode See Provisioning VLAN on page 287 for details Use the following procedure to configure Port 1 of IOC 1 for unicas...

Page 300: ...ot include a follow up packet after the Sync packet from the grandmaster as shown in Figure 4 17 If two step clock mode is disabled the grandmaster uses one step clock mode Two step clock mode is disabled by default Use the following procedure to configure Port 1 of IOC1 for two step clock mode 1 Login at the Admin or Config user level 2 Type set ptp two step ioc1 1 enable and press Enter Figure 4...

Page 301: ... F May 2012 TimeProvider 5000 User s Guide 301 Chapter 4 Provisioning Provisioning PTP Figure 4 11 Set PTP Command Hierarchy Common Figure 4 12 Set PTP Command Hierarchy Common cont d Figure 4 13 Set PTP Multicast Hierarchy ...

Page 302: ... Description profile Use to control whether Grandmaster operates with Default Multicast Hybrid Multicast hybrid Telecom 2008 Unicast or ITU G 8265 1 profile for the specified port mgmt addr mode Use to control whether PTP management messages should use unicast or multicast This setting is independent of the addr mode For example management can be set for multicast while PTP synchronization is usin...

Page 303: ... master Use to set the alternate master flag If the alternate master flag is set the TP5000 will not run the BMC algorithm and will always be master max client Sets the maximum number of PTP clients the user chooses to allow for the specified port The TP5000 has a capacity for up to 500 clients per port announce limit Use to limit the minimum interval between announcements maximum rate from the sp...

Page 304: ...ynchronized to clocks in another domain dscp The Differentiated Services Code Point is an 6 bit field in the 8 bit Differentiated Services DS field of the IP packet header to specify what classes of traffic will be provided what guarantees are needed for each class and how much data will be sent for each class When used with the TP5000 it provides a way to prioritize packets for PTP traffic dscp s...

Page 305: ... Hybrid PTP profiles announce int Sets the announce interval for the TP5000 Grandmaster how often to send announce messages to clients on the specified port Applies to Default Multicast and Hybrid PTP profiles The interval is 2z seconds where z announce int value sync int Sets the synchronization interval for the TP5000 Grandmaster how often to send synchronization messages to clients on the speci...

Page 306: ...ent on the specified port The VLAN must configured and enabled in order to use this See Provisioning VLAN on page 287 sync int Sets the synchronization interval for the TP5000 Grandmaster how often to send synchronization messages T1 to clients on the specified port The interval is 2z seconds where z sync int value announce int Sets the announce interval for the TP5000 Grandmaster how often to sen...

Page 307: ...098 00028 000 Revision F May 2012 TimeProvider 5000 User s Guide 307 Chapter 4 Provisioning Provisioning PTP Figure 4 17 One Step Clock ...

Page 308: ... command hierarchy Use the set ntp command to enable NTP on an IOC port and to configure the DSCP and TTL parameters See Figure 4 18 for the set ntp command hierarchy Use the command set packet service ioc1 x ptp gm to return an IOC port to a packet service mode of PTP grandmaster Figure 4 18 Set NTP Command Hierarchy Note The NTP Server feature can either be ordered in a new system or added to a ...

Page 309: ...ed a DSCP value of 64 and TTL value of 25 1 Login at the Admin or Config user level 2 Type show ntp config ioc 2 to check current NTP status 3 Type set packet service ioc1 2 ntp server and press Enter 4 Type set ntp dscp state ioc1 2 enable and press Enter 5 Type set ntp dscp ioc1 2 64 and press Enter 6 Type set ntp ttl ioc1 2 25 and press Enter 7 Type set ntp state ioc1 2 enable and press Enter 8...

Page 310: ... input reference With a frequency input reference the system will only track the frequency of the reference Table 4 14 Configurable Parameters for Reference Selection Parameter Value Range Description Notes Reference Mode Time Frequency Selecting Time means some outputs need to track reference time and phase Selecting Frequency means it is not necessary for the outputs to track reference time and ...

Page 311: ... Priority settings or the SSM settings for each qualified input port to determine which input port to use as the reference Example 1 Login at the Admin or Config user level see Logging In on page 275 2 Type set ref criteria priority and press Enter Note The command set ref mode time has the same meaning as set tod source GPS and set ref mode frequency has the same meaning as set tod source sys The...

Page 312: ... there must be at least one qualified time reference for the system to get out of the warm up state and into normal track state If all time references are disabled or disqualified after the system gets to a normal track state a frequency reference will be used for time holdover In Frequency mode all reference inputs time reference and frequency reference are used The reference selection is based o...

Page 313: ...u must specify the latitude longitude and height You can also specify the elevation mask which filters the satellites used by the system Table 4 15 Reference Modes and Priorities Input Port Card Ref Type Reference Criteria Priority Default Predefined Preference PQL Default GNSS IMC Time Priority 1 1 1 GPS IMC Time Priority 2 2 1 1PPS TOD Port 1 I O Time Priority 3 3 1 1PPS TOD Port 2 I O Time Prio...

Page 314: ... provision the TimeProvider 5000 for a GPS reference in auto mode perform the following steps 1 Login at the Admin or Config user level see Logging In on page 275 2 Type set ref mode time and press Enter 3 Type set gps mode auto and press Enter 4 Type set gps state enable and press Enter 5 Type show ref and press Enter to verify that the reference mode has been set to Time ...

Page 315: ...satellite RF inputs Future implementations of the IMC card may support RF inputs from other satellites The GNSS track mode parameter is used to specify the tracking priority for the GNSS port GPS Only checks for qualified GPS on this port Beidou Only checks for qualified Beidou on this port Priority beidou Checks for qualified Beidou signal before checking for GPS Priority gps Checks for qualified...

Page 316: ...ference Ports 1 and 2 on the 090 50315 01 version of the I O module are 1PPS TOD inputs Use the following procedure to set these ports as reference inputs and to enable the inputs Example To provision the TimeProvider 5000 for a 1PPS TOD input reference perform the following steps 1 Login at the Admin or Config user level 2 Type set ref mode time and press Enter 3 Type set pps tod state port1 enab...

Page 317: ...rt1 input and press Enter 5 Type set io port2 input and press Enter 6 Type set input state port1 enable and press Enter 7 Type set input state port2 enable and press Enter 8 Type show ref and press Enter to verify that the reference mode has been set to Frequency Note Command set ref mode time has the same meaning as set tod source GPS and the command set ref mode frequency has the same meaning as...

Page 318: ...2 Set IO Command Hierarchy Figure 4 23 Set Input Command Hierarchy Synchronization Status Message SSM Synchronization Status Message SSM is a means by which elements in a synchronization network can communicate the traceability of their sync quality level SSM is only supported for the frametypes ESF CAS with CRC4 and CCS with CRC4 SSM should not be enabled for other input frame types The messages ...

Page 319: ... Frametypes SSM States and SSM values PQL Value The PQL value parameter that is used with the set input command corresponds to the Priority Quality Level PQL values for reference input signal types as shown in Table 4 17 The PQL is a representation of traceability for the signal presented at the input ports where a PQL value of 15 represents an invalid SSM If SSM is disabled for an input port then...

Page 320: ...SSM bit is not applicable to T1 signals The TP5000 will allow the user to set the SSM bit parameter for T1 signals but it will have no effect Priority Quality Level PQL DS1 T1 SSM E1 SSM Description 1 0x04 0x02 Stratum 1 PRS PRC 2 0x08 0x00 STU Stratum Unknown presumed ST1 3 0x0C 0x04 Stratum 2 Type II 4 0x0C 0x04 Type I 5 0x78 0x04 Transit Node Type V 6 0x7C 0x08 Type III Stratum 3E 7 0x10 0x0B T...

Page 321: ...s Enter 5 Type set input ssm port1 disable and press Enter 6 Type set input pql value port1 3 and press Enter 7 Type set input priority port1 1 and press Enter 8 Type set input state port1 enable and press Enter CCS Frame Type To provision Port 2 as an input port with a frametype of CCS with CRC enabled SSM enabled SSM bit of 8 Priority value of 2 and enable the port 1 Login at the Admin or Config...

Page 322: ...pe set input ssm bit port2 7 and press Enter 7 Type set input priority port2 1 and press Enter 8 Type set input state port2 enable and press Enter Provisioning T1 Inputs Use the following procedures to provision I O 1 or I O 2 RJ 48 ports as a T1 input applies only to I O module 090 50314 01 1544kHz Frame Type To provision Port 1 as an input port with a frametype of 1544kHz SSM disabled a Priority...

Page 323: ...e Admin or Config user level 2 Type set io port2 input and press Enter 3 Type set input frametype port2 d4 and press Enter 4 Type set input ssm port2 disable and press Enter 5 Type set input priority port2 2 and press Enter 6 Type set input state port2 enable and press Enter ESF Frame Type To provision Port 2 as an input port with a frametype of ESF SSM enabled Priority value of 1 and to enable th...

Page 324: ...ollowing procedure to set the priority value for these ports set the cable delay value and to enable the inputs Priority 5 cable delay 2500 ns in this example 1 Login at the Admin or Config user level 2 Type set pps tod priority port1 5 and press Enter 3 Type set pps tod cable delay port1 2500 and press Enter 4 Type set pps tod state port1 enable and press Enter Note Disabling the input port will ...

Page 325: ...e configurable as E1 outputs Two I O ports on version 090 50314 01 of the I O module Port1 I O 1 and Port 2 I O 2 are software configurable as T1 outputs The set io command is used to set Ports 1 and 2 as outputs See Figure 4 22 The set output command is used to provision the E1 output characteristics See Figure 4 24 Figure 4 24 Set Output Command Hierarchy Note SSM is only supported for the frame...

Page 326: ... press Enter 3 Type set output frametype port1 freq2048khz and press Enter 4 Type set output crc port1 disable and press Enter 5 Type set output ssm port1 disable and press Enter 6 Type set output state port1 enable and press Enter CCS Frame Type To provision Port 2 as an output port with a frametype of CCS CRC enabled SSM enabled SSM bit of 4 and to enable the port 1 Login at the Admin or Config ...

Page 327: ... cas and press Enter 4 Type set output crc port1 enable and press Enter 5 Type set output ssm port1 enable and press Enter 6 Type set output ssm bit port1 5 and press Enter 7 Type set output state port1 enable and press Enter Provisioning T1 Outputs Use the following procedures to provision I O 1 or I O 2 RJ 48 ports as a T1 output 1544kHz Frame Type To provision Port 1 as an output port with a fr...

Page 328: ...and press Enter 5 Type set output state port2 enable and press Enter ESF Frame Type To provision Port 2 as an output port with a frametype of ESF SSM enabled SSM bit of 6 and to enable the port 1 Login at the Admin or Config user level 2 Type set io port2 output and press Enter 3 Type set output frametype port2 esf and press Enter 4 Type set output ssm port2 enable and press Enter 5 Type set outpu...

Page 329: ...er level 2 Type set output warm up port1 squelch and press Enter 3 Type set output free run port1 ais and press Enter 4 Type set output holdover port1 ais and press Enter 5 Type set output fast track port1 ais and press Enter Note For the 090 50312 01 and 090 50314 01 versions of the IOC card Port 3 and Port 4 are configured as dedicated 1PPS and 10 MHz output ports respectively Use the set output...

Page 330: ...rametype port3 freq2048khz and press Enter 3 Type set output crc port3 disable and press Enter 4 Type set output ssm port3 disable and press Enter 5 Type set output state port3 enable and press Enter CCS Frame Type To provision output Port 4 with a frametype of CCS CRC enabled SSM enabled SSM bit of 6 and to enable the port 1 Login at the Admin or Config user level 2 Type set output frametype port...

Page 331: ...enable and press Enter 5 Type set output ssm bit port4 8 and press Enter 6 Type set output state port4 enable and press Enter Provisioning Output Generation Behavior The behavior of the dedicated output ports during warm up free run fast track and holdover states can be provisioned using the set output warm up set output free run set output fast track and set output holdover commands as shown in F...

Page 332: ...be used to provision the behavior of the 10 MHz and 1PPS output ports during warm up free run and holdover states Figure 4 26 Set Output PPS Commands Figure 4 27 Set Output 10M Commands Provisioning 1PPS Port To enable the 1PPS output port and provision its output behavior as Squelch for the warm up state On for the free run state and On for the holdover state use the following procedure 1 Login a...

Page 333: ...tput 10m warm up squelch and press Enter 3 Type set output 10m free run on and press Enter 4 Type set output 10m holdover squelch and press Enter 5 Type set output 10m fast track squelch and press Enter 6 Type set output 10m state enable and press Enter Provisioning TP 5000 for Expansion Shelf Verify that the TP 5000 and expansion are connected as shown in Figure 2 21 It is critical that each expa...

Page 334: ... level 2 Type set exp if eth imc exp state enable and press Enter 3 Type set exp if dti imc exp enable and press Enter To Disable If there are no expansion shelves being used with the TP5000 Symmetricom recommends that the Ethernet port of the exp if interface be disabled The DTI port of this interface can also be disabled however it is not necessary to do so Use the following procedure to disable...

Page 335: ...098 00028 000 Revision F May 2012 TimeProvider 5000 User s Guide 335 Chapter 4 Provisioning Provisioning TP 5000 for Expansion Shelf Figure 4 28 DTI Ethernet Port Command Hierarchy ...

Page 336: ...ig user level 2 Type set exp if dti exp0 in1 enable and press Enter 3 Type set exp if dti exp0 in2 enable and press Enter Provisioning E1 Output Signals for Expansion Shelf The TP E30 expansion shelf supports three frame types for the E1 outputs freq2048khz CCS and CAS The following parameters can also be configured CRC SSM SSM bit State See Figure 4 29 for the hierarchy of commands to provision t...

Page 337: ...onfig user level 2 Type set output exp e1 frametype exp0 port3 frqe2048khz and press Enter 3 Type set output exp e1 crc exp0 port 3 disable and press Enter 4 Type set output exp e1 ssm exp0 port 3 disable and press Enter 5 Type set output exp e1 state exp0 port 3 enable and press Enter Note SSM is only supported for the frametypes CAS with CRC4 and CCS with CRC4 SSM should not be enabled for other...

Page 338: ...ame Type To provision E1 output Port 4 on expansion shelf 1 ID exp0 with a frametype of CAS CRC enabled SSM bit of 8 and to enable the port 1 Login at the Admin or Config user level 2 Type set output exp e1 frametype exp0 port 4 cas and press Enter 3 Type set output exp e1 crc exp0 port 4 enable and press Enter 4 Type set output exp e1 ssm exp0 port 4 enable and press Enter 5 Type set output exp e...

Page 339: ... 1PPS TOD outputs can be provisioned on the TP E30 E1 1PPS TOD expansion shelf as well as the output generation behavior for each 1PPS TOD port See Figure 4 29 and Figure 4 30 for the hierarchy of commands to provision the expansion shelf 1PPS TOD outputs State of Output Ports The state of output ports can be configured independently for individual ports on the specified expansion shelf or all 1PP...

Page 340: ...configured independently for individual ports or the same behavior can be configured for all 1PPS TOD ports on the specified expansion shelf 1 Login at the Admin or Config user level 2 Type set output exp pps tod warm up exp0 all squelch and press Enter 3 Type set output exp pps tod free run exp0 port 7 squelch and press Enter 4 Type set output exp pps tod holdover exp0 all on and press Enter 5 Ty...

Page 341: ... parameters can be provisioned for the PTP outputs on the TP E10 PTP SyncE expansion shelf State Timescale Clock Mode One Step vs Two Step Alternative Master Priority Level Domain Dither Clock ID The TP E10 expansion shelf only supports the Default multicast PTP profile The TP E10 operates per the multicast communication model which specifies that each PTP message sent from the expansion shelf PTP...

Page 342: ... then the client timeout value must be increased Since one way PTP operation does not use delay request and delay response messages the client list will not be populated in this mode Only one VLAN is supported in multicast mode See Provisioning VLAN on page 287 for details PTP Parameters for Expansion Shelf Use the following procedure to provision expansion shelf 0 for one step clock mode PTP time...

Page 343: ...e set ptp dither exp0 enable and press Enter 8 Type set ptp domain exp0 225 and press Enter 9 Type set ptp clockid exp0 aa bb 11 22 33 44 55 66 and press Enter 10 Type set ptp state exp0 port1 enable and press Enter Figure 4 31 Set PTP Command Hierarchy for PTP Expansion Shelf Figure 4 32 Set PTP Command Hierarchy for PTP Expansion Shelf cont d ...

Page 344: ...fore can be used with syncE Normally syncE nodes use the ESMC messages However if the downstream devices do not use the ESMC messages then the messages can be disabled The system PQL value is normally sent in the QL value SSM field in the ESMC message If desired this can be disabled and a value of DNU will be inserted in the ESMC message The user should set the appropriate SSM option with the set ...

Page 345: ...l and press Enter ESMC for SyncE Outputs 1 Login at the Admin or Config user level 2 Type set synce esmc exp0 port 1 enable and press Enter Setting the System Date and Time The TimeProvider 5000 Time of Day can be set either by an external source or manually with the set clock command You can set the time and date only in the frequency reference mode or SYS tod source mode but if the reference mod...

Page 346: ...ress Enter Provisioning Alarms This section describes the commands used to provision and manage alarms in the TimeProvider 5000 The user can provision the alarms to be enabled or disabled and set thresholds to turn the alarms on and off For a list of all alarms see Appendix A System Messages Software commands allow you to perform the following Provision the severity level Provision the alarm enabl...

Page 347: ...d allows you to enable or disable specified alarms Example To disable the GNSS GPS antenna open circuit alarm alarm 13 enter the following 1 Login at the Admin or Config user level see Logging In on page 275 2 Type set alarm config state alarm 13 disable and press Enter Showing Current Alarm Settings The Show Alarm Config command displays the set and clear alarm thresholds for every alarm type Exa...

Page 348: ...r the following 1 Type show alarm and press Enter Displaying Alarm and Unit Status The Show Status command displays the system status information as follows Assigned System Name Uptime for the IMC card and IOC card System date and time Number of standing system alarms Active IOC card Standby IOC card Currently selected reference mode Reference Input Clock status of active IOC card PTP Service Mode...

Page 349: ...e following 1 Type show status and press Enter Saving and Restoring Provisioning Data Symmetricom recommends that you keep an electronic version and or a written version of the provisioning changes you make to the TimeProvider 5000 Use the set configuration command to back up or restore provisioning data See Figure 4 35 Figure 4 35 Set Configuration Command Hierarchy ...

Page 350: ... configuration of expansion shelf with ID 3 to the IMC card enter the following 1 Type set configuration backup exp3 to imc and press Enter Example 4 To back up the configuration data of the active IOC to a remote site which is an SFTP server with the IP address of 172 16 33 33 id tp5000 password backup with a file name for backup data of tp5k_ioc_backup txt 1 Type set configuration backup remote ...

Page 351: ... expansion shelf with ID 6 to a remote site which is an SFTP server with the IP address of 172 16 33 33 id tp5000 password backup with a file path for backup data of c sftp tp5k_exp6_backup txt 1 Type set configuration backup remote exp6 c sftp tp5k_exp6_backup txt sftp 172 16 33 33 tp5000 and press Enter 2 The system will prompt for the password Enter the password and press Enter ...

Page 352: ...guration data with a file name of tp5k_ioc_backup txt for the active IOC from a remote site which is an SFTP server with the IP address of 172 16 33 33 id tp5000 password backup 1 Type set configuration restore remote ioc c sftp tp5k_ioc_backup txt sftp 172 16 33 33 tp5000 and press Enter 2 The system will prompt for the password Enter the password and press Enter Notes Setting the configuration t...

Page 353: ... the configuration data file tp5k_exp6_backup txt back to an expansion shelf with ID 6 from the SFTP server with the IP address of 172 16 33 33 id tp5000 password backup 1 Type set configuration restore remote exp6 tp5k_exp6_backup txt sftp 172 16 33 33 tp5000 and press Enter 2 The system will prompt for the password Enter the password and press Enter ...

Page 354: ...SNMP functionality is provisioned on the TP5000 using the CLI command set snmp see Figure 4 36 The TimeProvider 5000 MIB has one SNMP container OID for alarms and one SNMP container OID for events All alarms are reported from the same OID The object tp5000TrapAlarm 1 3 6 1 4 1 9070 1 2 4 6 2 2 3 is the container OID used to report alarms via SNMP trap All events are reported from the same OID The ...

Page 355: ...vents and can be used to poll the active events The Alarm Event ID element should be used to determine which alarm or event was generated Alarm and Event IDs are listed in Appendix A System Messages Enabling the SNMP Option SNMP is an optional feature on the TP5000 It must be enabled To enable this feature use the set option command with the 40 character key printed on the Symmetricom issued certi...

Page 356: ...lete manager command to delete a manager IP address The TP5000 will support a maximum of 3 manager IP addresses Example To add the SNMP manager IP address 192 100 100 100 using an engineID 0x12345678901234567890 1 Type set snmp add manager 192 100 100 100 engineid 0x12345678901234567890 then press Enter Provisioning to Generate v2 Traps Use the set snmp trapversion command to provision the trap ve...

Page 357: ...er levels that are based on authentication and privacy settings The authentication algorithm is either HMAC SHA 1 96 or MD5 with a key up to 32 characters in length The privacy settings are based on either the CBC DES or AES encryption standard with a with a key up to 32 characters in length All keys are uppercase Use the set snmp add user command to add a v3 user Use the set snmp delete user comm...

Page 358: ...ntication key 123456789ABCDEFGHIJK and 16 character DES privacy key ABCDEFG123456789 1 Type set snmp add trapuser test12 securlvl priv then press Enter 2 Enter MD5 at the authentication protocol prompt 3 Enter 123456789ABCDEFGHIJK at the authentication key prompt 4 Enter DES at the privacy protocol prompt 5 Enter ABCDEFG123456789 at the privacy key prompt Example Remove Trap User To remove an exis...

Page 359: ...eleting Users Saving Present Configuration To Non volatile Memory Restoring Default Configuration Determining Status Forcing Unit To Send New Time in Time Reference Mode Switching Active And Standby IOC Cards Displaying Alarms Log Displaying Events Log Managing PTP Clients Configuring PTP Clients Monitoring PTP Client Performance Monitoring PTP Client Alarm Event Information Upgrading PTP Client F...

Page 360: ...guration To Non volatile Memory Use the following commands to save IMC module settings to the IOC memory and to save the active IOC module settings in the IMC memory set configuration backup imc to ioc set configuration backup ioc to imc Restoring Default Configuration The user can restore the TimeProvider 5000 to Symmetricom factory default values in two ways The default mode preserves user login...

Page 361: ...ssible system responses are shown in Table 5 1 below Note The sync tod source command forces the TimeProvider 5000 to immediately start using the new reference time The use of this command should be carefully planned since it may cause jitter in the 1PPS output of the TimeProvider 5000 Table 5 1 Force Unit to Send New TIme vs Auto Sync Condition of TP5000 Auto Sync State System Response Unit is st...

Page 362: ... 1 IOC1 and IOC2 Modules Example If IOC1 is the active card IOC2 is the standby card This example demonstrates switching IOC2 to be the active card then using the show ioc state command to verify the switch tp5000 set ioc state ioc2 active tp5000 show ioc state Automatic IOC Card Switches The active card continually assesses its own health level compared with the health level of the standby card I...

Page 363: ...s will have the following impact on the various output signals on the IO card During switchover the PTP outputs may be interrupted for a maximum of 10 seconds All continuous outputs 10MHz 1PPS and E1 will not exhibit any loss of signal during switchover but may exhibit phase movement of up to 240 ns Displaying Logs This section describes the commands used to display the TP5000 alarm and event logs...

Page 364: ...is not recommended to restart the entire system unless required Only the admin user can issue the reboot command The reboot imc command restarts the IMC card and no output will be lost If the system has two IOC modules each IOC can be rebooted separately to preserve the output Example 1 Type reboot imc and press Enter 2 Type reboot ioc1 and press Enter 3 Type show status and press Enter to check t...

Page 365: ...nts The set ptp node command is used to provision the acceptable master clocks reboot and upgrade the firmware for TP500 clients through the TP5000 GrandMaster See Figure 5 2 The show ptp node status command is used to monitor TP500 client performance The TimeProvider 5000 also offers a means to monitor alarm and event information for TimeProvider 500 clients using Simple Network Management Protoc...

Page 366: ...o non zero IP addresses the TimeProvider 500 will attempt to establish PTP flow with both If a flow problem persists or no flow can established at all with one of the candidate masters then the other one will be used as long as it has acceptable PTP flow How to Set PTP Client Acceptable Master Clocks The example is for Port 1 on the active IOC card with the following additional parameters Client I...

Page 367: ...lient Performance The TimeProvider 5000 Grandmaster provides a way to monitor performance of clients TimeProvider 500 clients only The show ptp node status command allows the user to view the current status of a specific client Figure 5 3 shows a typical status response from a TP500 client Figure 5 3 Client Status Information ...

Page 368: ... Protocol SNMP which is available as an option The TimeProvider 5000 supports SNMPv2c and SNMPv3 Client alarm and event information is not accessible through the TP5000 with CLI commands SNMP is an application layer protocol that allows you to manage network devices SNMP is based on a client server query response mode that requires an Ethernet connection A manager application software installed on...

Page 369: ...no VLAN Port 1 of the active IOC card client IP address of 192 168 1 200 a user name of user1 on the FTP server and an upgrade file named Maincode bin the command is set ptp node upgrade ioc 1 address 192 168 1 200 Maincode bin ftp 192 168 5 64 user1 3 When prompted enter the password for the server The new software is loaded into the client 4 Type set ptp node reboot IOC 1 address 192 168 1 220 a...

Page 370: ...370 TimeProvider 5000 User s Guide 098 00028 000 Revision F May 2012 Chapter 5 Operating Managing PTP Clients ...

Page 371: ...nosing the IOC Reading LED Conditions Diagnosing the IMC Reading LED Conditions Repairing the TimeProvider 5000 Removing the IOC Replacing the IOC Replacing the IMC Upgrading the Firmware TP5000 Upgrade Loss of Outputs TP5000 with Redundant IOC Modules v1 2 3 No Loss of Outputs TP5000 with Redundant IOC Modules v1 1 8 No Loss of Outputs Upgrading an Expansion Shelf Downgrading the Firmware TimePro...

Page 372: ... ESD wrist straps when installing or working on all TimeProvider 5000 equipment and modules Plug the user supplied wrist strap into the TimeProvider 5000 Place IMC and IOC modules into static free bags when not in use Caution To avoid electromagnetic discharge damage to the circuitry never attempt to vacuum the TimeProvider 5000 Caution To avoid damage under no circumstances should the interior ch...

Page 373: ...ive Action No LED lit on any module No power to unit Check power supply Check to ensure that UPS if applicable is operating correctly Both A and B fuses on the branch over current protection unit are blown Remove both fuses and replace Loss of ground Re attach ground wires Loose power cabling to unit Check that power cables to unit are securely fastened Chassis is faulty Contact Symmetricom Global...

Page 374: ...ng for TP5000 exceeded If number of clients exceeds max setting for TP5000 extra clients are ignored Change max clients setting with set ptp max client command PTP domain setting for GM does not match client s domain Verify domain setting for GM matches the domain setting for the client Check GM domain setting with show ptp config common command for the port PTP Unicast Dynamic negotiation disable...

Page 375: ...sing the Up and Left arrow buttons to retrieve and modify previous commands Type commands in directly with alpha numeric keys Upgrading firmware failed Attempting to upgrade the IMC with IOC file or vice versa Verify path to correct file for upgrade Ensure that upgrade file is for the same card type being upgraded Try upgrade again with correct file path Flash memory failed Retry upgrade If upgrad...

Page 376: ... ToD source GPS or E1 invalid Check Input source Check alarms with show alarm config command Warm up still in progress Typical warm up time for the Active card is Quartz 30 40 minutes Rubidium 50 60 minutes Standby IOC starts locking to Active IOC after Active IOC enters normal track Allow an additional 20 minutes for Standby card to completes warm up Table 6 3 LED Conditions for the IOC Indicator...

Page 377: ...heck alarms with show alarm config commands Green Active IOC n a IOC Alarm IOC module alarm fault indicator ALM Off IOC operating normally n a Flashing Green Software starting up Wait for IOC to finish booting Amber IOC operational Minor Alarm s Use show alarm command to view alarm IDs and descriptions See Table A 1 in Appendix A System Messages for corrective actions Red IOC has Failed or has Maj...

Page 378: ...ns Verify that interface is enabled with show ip config ioc1 command Verify that SFP connector models are recommended and supported Check that either Ethernet Auto Negotiation is enabled or that speed has been set to a compatible level with the connecting network element with show eth config command Make sure that only full duplex network devices are used The TP5000 does not support half duplex de...

Page 379: ...w eth config command Make sure that only full duplex network devices are used The TP5000 does not support half duplex devices such as hubs for PTP connections Local Oscillator State Indicates the current mode of operation of the LO servo HOLD Off Oscillator is operating in Locked mode n a Amber Oscillator is operating in Holdover or Acquire modes Check the reference input source to verify that it ...

Page 380: ... No LED lit on any module for probable causes and more corrective actions 48V A Bus A Bus Battery Indicator IMC BT A Off A Bus power OK n a Red A Bus power failed Check power level from power supply to power module A Check connections to primary power module A Check ground connections Check A fuse on the branch over current protection unit and replace if it is blown 48V B Bus B Bus Battery Indicat...

Page 381: ...rective actions After taking corrective actions use reboot command to reboot the card that had the major or critical alarm IMC Alarm IMC module alarm fault indicator ALM Off IMC operating normally n a Flashing Green Software starting up Wait for IMC to finish booting Amber IMC operational Minor Alarm s Use show alarm command to view alarm IDs and descriptions See Table A 1 in Appendix A System Mes...

Page 382: ...orrective actions Use show GPS command to see detected satellites and their signal levels Off ToD source is not GPS This LED should only be OFF if the TP5000 is not using GPS Ethernet Management Port LEDs on the Ethernet connector MGMT Left Amber Flash Activity n a Left Off No Activity n a Right Green Link has been established n a Right Off Link has not been established Check cable and connections...

Page 383: ...r module B Check ground connections Check B fuse on the branch over current protection unit and replace if it is blown Expansion Shelf alarm fault indicator ALM Off Expansion shelf operating normally n a Flashing Green Software starting up Wait for expansion shelf to finish booting Amber Expansion shelf operational Minor Alarm s Use show alarm command to view alarm IDs and descriptions See Table A...

Page 384: ... repair DTI ETH Expansion shelf Port LEDs on the Ethernet connector MGMT Green Activity on link to TP 5000 IMC DTI ETH expansion port n a Green Flash Link to TP 5000 IMC DTI ETH expansion port has been established n a Off Link to TP 5000 IMC DTI ETH expansion port has not been established Check cable and connections GPS Status GPS engine status indicator REF Green Exp clock is in fast tracking or ...

Page 385: ...er 2 Attach a wrist grounding strap and connect it to the TimeProvider 5000 chassis 3 Loosen the captive retaining screws and pull out on them to unseat the IOC from the chassis 4 Place the IOC in a static free bag or on a static free surface Install a new IOC using the appropriate procedure in Replacing the IOC on page 385 Replacing the IOC This section contains procedures for replacing IOC in th...

Page 386: ...acing One of Two IOCs In a Chassis Ensure that the IOC card that is to be replaced is the standby card before removing it For this example assume that IOC1 is the card that is to be replaced and that it is the active card Therefore IOC2 is the standby card This example demonstrates switching IOC2 to be the active card then using the show ioc state command to verify the switch 1 Attach a wrist grou...

Page 387: ...e Then replace the other module If it does not matter whether outputs are interrupted use the Replacing the Only IOC In a Chassis procedure above to replace each IOC module For this example assume that IOC1 is the card that is to be replaced first and that it is the active card Therefore IOC2 is the standby card This example demonstrates switching IOC2 to be the active card then using the show ioc...

Page 388: ...at the standby card has been switched to active 11 Repeat steps 4 through 8 of this procedure for IOC2 Replacing the IMC You can remove the IMC from the chassis and replace it without affecting outputs 1 Save the contents of the IMC memory in an IOC example is for IOC1 by issuing the following command Type set configuration backup imc to ioc1 and press Enter 2 Attach a wrist grounding strap and co...

Page 389: ...P5000 with a single IOC module upgrading from 1 1 8 or 1 2 3 release to 2 0 4 please follow the procedure TP5000 Upgrade Loss of Outputs below TP5000 with Redundant IOC modules upgrading from 1 1 8 release to 2 0 4 please follow the step by step procedure TP5000 with Redundant IOC Modules v1 1 8 No Loss of Outputs below TP5000 with Redundant IOC modules upgrading from 1 2 3 release to 2 0 4 please...

Page 390: ...o restore outputs Use the commands set packet service ioc1 1 ptp gm and set packet service ioc1 2 ptp gm to return to grandmaster mode Caution To avoid a possible service call do not issue a command to the TimeProvider 5000 do not remove power from the TimeProvider 5000 and do not remove an IOC or IMC from the chassis during the upgrade process Doing so could corrupt the flash memory in a module d...

Page 391: ...ername where x is either 1 or 2 but DO NOT reboot 4 Reboot system with reboot system CLI command 5 Verify that the TimeProvider 5000 is running correctly by issuing commands show status show alarm and show inventory If the system is showing an alarm for a setting that is disabled re enable and disable that setting and the alarm will be cleared Note The FTP firewall is set to Block by default Use t...

Page 392: ...with the show alarm CLI command If any alarms are present resolve these issues first before proceeding 3 Upgrade IMC to 2 0 4 using the command upgrade imc filepath ftp sftp ftp ip address username but DO NOT reboot 4 Upgrade both IOCs to 2 0 4 using the command upgrade iocx filepath ftp sftp ftp ip address username where x is either 1 or 2 but DO NOT reboot 5 Once all modules have been loaded wit...

Page 393: ...oc state iocx active where x is the standby IOC either 1 or 2 10 Verify IOC switch state with show ioc state CLI command Also verify that the current standby IOC is running the previous firmware version with show inventory 11 Reboot standby IOC with reboot iocx where the x is the standby IOC position either 1 or 2 Immediately after the prompt returns reboot IMC with reboot imc 12 After the standby...

Page 394: ...eboot 4 Upgrade both IOCs to 2 0 4 using the command upgrade iocx filepath ftp sftp ftp ip address username where x is either 1 or 2 but DO NOT reboot 5 Once all modules have been loaded with the 2 0 4 revision issue the show status command taking note as to which IOC module is standby and which is active 6 Reboot the standby IOC module by issuing the command reboot iocx where the x is the standby...

Page 395: ...command set ip ioc1 1 restart b Use the command set ip ioc1 2 restart 9 Verify IOC switch state with the command show ioc state Also verify that the current standby IOC is running the previous firmware version with show inventory 10 Reboot standby IOC with reboot iocx where the x is the standby IOC position either 1 or 2 Immediately after the prompt returns reboot IMC with reboot imc 11 After the ...

Page 396: ... IP address 192 168 5 64 a user name of user1 and an upgrade path of ver2 bin the command is upgrade exp4 ver2 bin ftp 192 168 5 64 user1 Example SFTP For a TP E30 E1 1PPS TOD expansion shelf with ID 4 an SFTP server with IP address 192 168 5 65 a user name of user1 and a upgrade file path of ver2 bin the command is upgrade exp4 ver2 bin 192 168 5 65 user1 Note The FTP firewall is set to Block by ...

Page 397: ...There will be loss of outputs at reboot and the configuration must be set to factory defaults 1 Verify that SSH or telnet connection to IMC is available 2 Downgrade IMC to 1 2 3 or 1 1 8 using the command upgrade imc filepath ftp sftp ftp ip address username but DO NOT reboot Note The system will transfer the file from the specified server and then upgrade the expansion shelf Note If the file is n...

Page 398: ...abled re enable and disable that setting and the alarm will be cleared TimeProvider 5000 Part Numbers The TimeProvider 5000 can operate in either a basic configuration or in a redundant configuration in one chassis Basic configuration consists of the following components 1 Chassis 1 IMC module 1 IOC module Redundant configuration consists of the following components 1 Chassis 1 IMC module 2 IOC mo...

Page 399: ...L or higher 1 2 3 This module can t distinguish between 090 50301 01 and 090 50301 02 chassis Rev K or lower 1 0 6 This module can t distinguish between 090 50301 01 and 090 50301 02 chassis 090 50331 02 2 0 4 090 50331 04 2 0 4 090 50331 05 2 0 4 IMC Module NTP 090 50332 01 2 0 4 This module can t distinguish between 090 50301 01 and 090 50301 02 chassis I O Module 090 50311 01 1 0 6 090 50312 01...

Page 400: ...E10 Expansion Shelf SyncE Ethernet 990 50401 01 2 0 4 Must be used w 090 50331 02 090 50331 04 090 50331 05 TimeProvider E30 Expansion Shelf E1 PPS TOD 990 50401 02 2 0 4 Must be used with 090 50331 02 090 50331 04 090 50331 05 Table 6 7 Component Part Numbers Item Part Number Base Units TimeProvider 5000 Front Access ETSI Chassis includes User s Documentation CD and Installation Kit 990 50301 01 ...

Page 401: ...r E10 Ethernet expansion shelf with user documentation and installation hardware 990 50401 01 TimeProvider E30 E1 1PPS TOD expansion shelf with user documentation and installation hardware 990 50401 02 Air filter replacement kit for TimeProvider E10 PTP SyncE expansion shelf 093 01206 000 Installation and Rack Mounting Adaptor Kits Hardware Installation Kit included in 990 50301 01 093 00050 000 2...

Page 402: ... empty Table 6 8 Connection Accessories Item Part Number Optical 1000 Base LX Single Mode Ethernet 1310nm SFP Transceiver 121 20621 10 2 Optical 1000 Base SX Multi Mode Ethernet 850nm SFP Transceiver 121 20621 11 2 RJ45 100 1000 Base T Full Duplex SFP Transceiver 121 20621 12 2 Mini BNC to BNC Adaptor Cable Kit 4 cables 093 00068 000 Table 6 9 GPS Antenna Kits Part Number Description 990 13091 006...

Page 403: ...replacements only Part Number Description 58521A 001 1 Meter LMR400 Interconnect Cable connectorized 58521A 002 2 Meter LMR400 Interconnect Cable connectorized 58521A 005 5 Meter LMR400 Interconnect Cable connectorized 58521A 010 10 Meter LMR400 Interconnect Cable connectorized 58521A 015 15 Meter LMR400 Interconnect Cable connectorized 58521A 030 30 Meter LMR400 Interconnect Cable connectorized 5...

Page 404: ...r RMA before returning the product for service You can request an RMA on the internet at www symmetricom com Support req_repair htm Retain the assigned RMA number for future reference 2 Provide a description of the problem product item number serial number and warranty expiration date 3 Provide the return shipping information customer field contact address telephone number and so forth 4 Ship the ...

Page 405: ...nada Symmetricom Inc 2300 Orchard Parkway San Jose CA 95131 1017 Toll free in North America 1 888 367 7966 Telephone 408 428 7907 Fax 408 428 7998 email us_canada_sales symmetricom com Internet www symmetricom com Europe Middle East and Africa EMEA Symmetricom Global Services EMEA Altlaufstrasse 42 85635 Hoehenkirchen Siegertsbrunn Germany Telephone 49 700 3288 6435 Fax 49 8102 8961 533 E mail eme...

Page 406: ...406 TimeProvider 5000 User s Guide 098 00028 000 Revision F May 2012 Chapter 6 Maintenance and Troubleshooting Contacting Technical Support ...

Page 407: ...ages that are displayed in response to a provisioning event or to an alarm that occurs when an associated threshold or timer is outside of the provisioned setting These system messages apply to the TimeProvider 5000 as well as the TimeProvider E10 and TimeProvider E30 expansion shelves In This Appendix Message provisioning System Notification Messages ...

Page 408: ...vider 500 Messages events and alarms Severity codes 2 critical Critical critical conditions 3 major Error error conditions 4 minor Warning warning conditions 5 event Notice normal but significant condition The syslog message format is as follows Mmm dd hh mm ss host_name Process name AlarmID Index Severity MsgText Where Mmm Month dd date hh mm ss system time Notes 1 Severity codes 2 3 and 4 are al...

Page 409: ... according to facility code and or severity Syslog messages with facility code 4 are stored in the Security Log Syslog messages with facility code 20 and a severity of 2 3 4 are stored in the Alarm Log Syslog messages with facility code 20 and a severity of 5 are stored in the Event Log Syslog messages with facility code 21 are stored in the Command Log Syslog messages with facility code 22 are no...

Page 410: ...or any system alarms and rectify as needed None required GNSS GPS receiver not tracking satellite See Table A 2 for Secondary Index Info IMC 2 Minor No GNSS GPS receiver not tracking satellite GNSS GPS receiver not tracking satellite cleared Check antenna and connections None required System time invalid See Table A 2 for Secondary Index Info IMC 3 Major No System time source invalid System time s...

Page 411: ...e cleared voltage value Hardware failure Replace module None required GNSS GPS antenna voltage out of range IMC 10 Major No GNSS GPS antenna voltage out of range voltage value GNSS GPS antenna voltage out of range cleared voltage value Check antenna connections None required GNSS GPS antenna current out of range IMC 11 Major No GNSS GPS antenna current out of range current value GNSS GPS antenna c...

Page 412: ...15 Major No Battery 48V B failure Battery 48V B failure cleared Troubleshoot the 48V power supply Check voltage supply to B side of shelf None required FPGA access failure IMC IOC1 IOC2 EXPx x 0 9 16 Critical No FPGA access failure FPGA access failure cleared Hardware fault Replace module None required Flash partition failure See Table A 2 for Secondary Index Info IMC IOC1 IOC2 EXPx x 0 9 17 Criti...

Page 413: ...OC detected Reboot system None required Module reboot IMC IOC1 IOC2 EXPx x 0 9 22 Event Yes Module reboot None required Real Time Engine RTE communication to peer error IOC 23 Major No RTE communication to peer error RTE communication to peer error cleared Reboot System If alarm remains replace IOC module None required Entered warmup mode IOC1 IOC2 EXPx x 0 9 24 Minor No Entered warmup mode Transi...

Page 414: ...de IOC1 IOC2 EXPx x 0 9 29 Minor No Entered holdover mode Transitioned out of holdover mode Check input system reference None required In holdover mode for extended period IOC 30 Major No In holdover mode for extended period Transitioned out of extended holdover mode Check input system reference None required Operational failure See Table A 2 for Secondary Index Info IMC IOC 31 Critical No Operati...

Page 415: ...quired Input phase error See Table A 2 for Secondary Index Info IMC IOC 36 Minor No input phase error input phase error cleared Check system input reference None required Internal phase lock loop IPLL to Input not settled See Table A 2 for Secondary Index Info IMC IOC 37 Minor No input IPLL not settled input IPLL settled Check system input reference None required Input frequency error See Table A ...

Page 416: ...x Info IOC 42 Minor No PTP server exceeded x of client limit on port PTP server near client limit cleared on port Increase number of clients allowed or reduce number of clients total None required PTP client is unreachable See Table A 2 for Secondary Index Info IOC 43 Event No PTP client IP address unreachable PTP client IP address unreachable cleared Check IP address for correct configuration pos...

Page 417: ...ne required No IOC present IMC 49 Minor No No IOC present At least one IOC present Check IOC slot in shelf for module None required Transitioned to active state IOC 50 Event Yes Transitioned to active state None required Transitioned to standby state IOC 51 Event Yes Transitioned to standby state None required Input software loop not settled proprietary algorithm See Table A 2 for Secondary Index ...

Page 418: ...or Secondary Index Info IMC IOC1 IOC2 EXPx x 0 9 57 Minor No Direct access image error Use JFFS2 image Direct access image corrupted Run upgrade to recover the image IMC IOC FPGA link failed IMC IOC 58 Critical No IMC IOC FPGA link failed IMC IOC FPGA link failure cleared Hardware failure replace module None required Excessive traffic on Ethernet port See Table A 2 for Secondary Index Info IOC1 IO...

Page 419: ...OC 64 Minor No Internal reference data loss Internal reference data loss cleared This alarm could occur during configuration If the alarm still present 1 minute after configuration reboot system If alarm still present replace IOC module None required OBSOLETE n a 65 n a n a n a n a IO module not present IMC 66 Event Nos IO module not present IO module present Check IO module slot None required Red...

Page 420: ...essage Refer to Client for Troubleshooting PTP client transient event See Table A 2 for Secondary Index Info IOC 72 Event Yes PTP client IP address message Refer to Client for Troubleshooting Real Time Engine RTE phase lock loop PLL to input signal unlock See Table A 2 for Secondary Index Info IOC1 IOC2 EXPx x 0 9 73 Critical No RTE PLL unlock RTE PLL unlock cleared Reboot IOC that is showing alar...

Page 421: ... A 2 for Secondary Index Info IOC 79 Event No PTP client dropped from client list None required PTP client added to client list See Table A 2 for Secondary Index Info IOC 80 Event No PTP client added to client list None required PTP client IP address to be changed See Table A 2 for Secondary Index Info IOC 81 Event No PTP client IP address to be changed None required PTP client changed to new addr...

Page 422: ...te disabled See Table A 2 for Secondary Index Info IOC1 IOC2 EXPx x 0 9 88 Event Yes PTP port state on port changed to disabled None required DTI Loss of signal See Table A 2 for Secondary Index Info EXPx x 0 9 89 Major No DTI Loss of signal DTI Loss of signal cleared Check expansion cable connection Check expansion cable Check DTI output configuration on main shelf IMC and I O cards DTI reference...

Page 423: ...e Table A 2 for Secondary Index Info IMC 94 Event Yes EXP ID changed n a None required Exp Interface link down See Table A 2 for Secondary Index Info IMC EXPx x 0 9 95 Minor No Exp Interface link down Exp Interface link down cleared Check expansion cable connection Check expansion cable Check IMC EXP IF ETH state configuration EXP has duplicated shelf ID See Table A 2 for Secondary Index Info IMC ...

Page 424: ...dex Info EXPx x 0 9 99 Minor No Fan failure Fan failure cleared If single fan failed system will operate properly If multiple fans failed alarm ID 100 the expansion shelf needs to be repaired Multiple fans failure EXPx x 0 9 100 Major No Multiple fans failure Multiple fans failure cleared The expansion shelf needs to be repaired PPS TOD input communication error IMC 101 Major No PPS TOD input comm...

Page 425: ...n shelf 512 packets sec for each group of 8 ports 1 8 and 9 16 PPS TOD input unusable IMC 102 Minor No PPS TOD input unusable PPS TOD input unusable cleared Check 1PPS TOD connection Check 1PPS TOD cable Check 1PPS TOD source Time and phase questionable IMC 103 Minor No Time and phase questionable Time and phase questionable There should be other alarms regarding the time reference source Fixing t...

Page 426: ...SS GPS antenna current out of range n a n a 12 GNSS GPS antenna short circuit 0 1 0 GPS 1 GNSS 13 GNSS GPS antenna open circuit 0 1 0 GPS 1 GNSS 14 Battery 48V A failure n a n a 15 Battery 48V B failure n a n a 16 FPGA access failure n a n a 17 Flash partition failure 0 3 index is internal code 18 PLL unlock error n a n a 19 Internal communication error 0 2 index is internal code 20 FPGA temperatu...

Page 427: ... INPUT 2 6 PPS_TOD 1 7 PPS_TOD 2 36 Input phase error 0 4 0 Time 3 INPUT 1 4 INPUT 2 37 Input IPLL not settled 3 4 3 INPUT 1 4 INPUT 2 38 Input frequency error 3 4 3 INPUT 1 4 INPUT 2 39 Input out of frame 3 4 3 INPUT 1 4 INPUT 2 40 Input alarm indication signal 3 4 3 INPUT 1 4 INPUT 2 41 PTP server near packet limit 0 1 255 0 ETH1 1 ETH2 255 redundant port pair 42 PTP server near client limit 0 1...

Page 428: ...roduction configuration data error n a n a 57 Direct access image error Use JFFS2 image 0 1 0 fatal bad uImage1 1 fatal bad uImage2 58 IMC IOC FPGA link failed n a n a 59 Excessive traffic on Ethernet port 0 254 60 Unsupported SFP on Ethernet port 0 1 ETHy y 1 16 61 Input poor SSM 0 4 0 GPS 3 Input1 4 Input2 62 Input SSM changed 0 4 0 GPS 3 Input1 4 Input2 63 Time input not tracking n a n a 64 Int...

Page 429: ...55 0 ETH1 1 ETH2 255 redundant port pair 80 PTP client added to client list 0 1 255 0 ETH1 1 ETH2 255 redundant port pair 81 PTP client IP address to be changed 0 1 255 0 ETH1 1 ETH2 255 redundant port pair 82 PTP client changed to new address 0 1 255 0 ETH1 1 ETH2 255 redundant port pair 83 PTP client list refreshed n a n a 84 FPGA in failed state n a n a 85 PTP state master 0 15 255 0 ETH1 1 ETH...

Page 430: ...wn 0 3 0 ETH1 1 ETH2 2 ETH3 3 ETH4 96 EXP has duplicated shelf ID index is shelf ID 97 IMC EXP software incompatible 0 9 index is expansion shelf ID number 98 GNSS mode changed 0 1 0 to GPS 1 to Beidou 99 Fan failure 0 3 0 fan 1 1 fan 2 2 fan 3 3 fan 4 100 Multiple fans failure n a n a 101 PPS TOD input communication error 0 1 0 PPS_TOD 1 1 PPS_TOD 2 102 PPS TOD input unusable 0 1 0 PPS_TOD 1 1 PP...

Page 431: ...for the TimeProvider 5000 as well as for the TimeProvider E10 and TimeProvider E30 expansion shelves In This Appendix Specifications including TP 5000 Main Shelf Output Signal Specifications TP E10 Expansion Shelf Output Signal Specifications TP E30 Expansion Shelf Output Signal Specifications Factory Defaults TP 5000 Main Shelf Defaults TP E10 Expansion Shelf Defaults TP E30 Expansion Shelf Defau...

Page 432: ...scription Mounting 19 in Rack Rack Mounting Position For front mounting location unit protrudes 0 65 in 1 651 cm See Figure 2 5 Figure 2 6 and Figure 2 7 for drawings with detailed chassis dimensions Width 17 24 in 438 mm Height 1 73 in 44 mm Depth 17 12 in 435 mm TP 5000 9 37 in 236 mm TP E10 TP E30 Weight 9 6 lb 4 4 kg fully loaded TP 5000 8 4 lb 3 8 kg TP E10 TP E30 Table B 2 TimeProvider 5000 ...

Page 433: ...ximum DC Power 43 W typical Table B 3 TimeProvider E10 Expansion Shelf Power Specifications Parameter Description DC Input Power 48 VDC 60 VDC nominal 0 75 A typical 0 6A for 60VDC 38 4 VDC min 72 VDC max DC Recommended Battery Feed Fuse 2 A maximum DC Power 36 W typical Table B 4 TimeProvider E30 Expansion Shelf Power Specifications Parameter Description DC Input Power 48 VDC 60 VDC nominal 0 45 ...

Page 434: ... Bits 8 Parity Bit None Stop Bits 1 Flow Control None Table B 6 TimeProvider 5000 Main Shelf LAN Port Specifications Connector Description MGMT RJ 45 10Base T 100 Base T Supports telnet sessions and SSH sessions over TCP IP Table B 7 TimeProvider 5000 Main Shelf Input Signal Specifications Parameter Specification GPS Requirement Total gain should be between 25 dB and 35 dB including gain of antenn...

Page 435: ...tes the time of the current 1 PPS rising edge and is sent at a rate of once per second Rise Time 1PPS Pulse 50 ns Pulse Width 50 ms Pulse width 200 ms TOD Frame TOD messages use whole 8 bit bytes for transmission with check sum protection Message type and message ID are used to clarify messages Follows Big Endian convention when a field is longer than one byte where bit 0 represents the least sign...

Page 436: ...e for 1 PPS TOD Input Table B 8 TP 5000 TOD Frame Field Descriptions for 1PPS TOD Input Field Name Field Length Description Sync Char 1 1 byte Part of Frame Header 0x43 ASCII character C Sync Char 2 1 byte Part of Frame Header 0x4D ASCII character M Class 1 byte Basic classification of TOD message ID 1 byte Serial number of of TOD message Length 2 bytes Length of payload only Does not include Fram...

Page 437: ...ue of FCS is set to 0xFF and there is no need to negate the input data Checksum calculation uses right shift calculation and there is no need to negate the output frame check data When the frame check sequence is transmitted the LSB bit 0 is transmitted first Table B 9 TP 5000 Time Information Message Payload Contents for 1PPS TOD Input Byte Offset Data Type Name Units Notes 0 U4 Time of Week TOW ...

Page 438: ...ity crystal clock in holdover mode 0x04 Transport carrier equipment in holdover mode Other values are reserved 12 U1 TAcc PPS jitter category 0 255 0 0 ns 1 15 ns 2 30 ns 3 45 ns 255 not defined Note This value is fixed to 255 for transmission and base station equipment 13 U1 Reserved Reserved 14 U1 Reserved Reserved 15 U1 Reserved Reserved Table B 9 TP 5000 Time Information Message Payload Conten...

Page 439: ...fix 0x01 Dead reckoning only 0x02 2D fix 0x03 3D fix 0x04 GPS dead reckoning combined 0x05 time only fix 0x06 0xff reserved 3 U2 Week Number Clock source status alarms Bit 0 not used Bit 1 Antenna open Bit 2 Antenna shorted Bit 3 Not tracking satellites Bit 4 not used Bit 5 Survey in progress Bit 6 No stored position Bit 7 Leap second pending Bit 8 In test mode Bit 9 Position is questionable Bit 1...

Page 440: ... Resolution Comments U1 Unsigned Char 1 0 to 255 1 I1 Signed Char 1 128 to 127 1 2 s complement U2 Unsigned Short 2 0 to 65535 1 I2 Signed Short 2 32768 to 32767 1 2 s complement U4 Unsigned Long 4 0 to 4 294 967 295 1 I4 Signed Long 4 2 147 483 648 to 2 147 483 647 1 R4 IEEE 754 Single Precision 4 1 x 2127 to 2 x 2127 Value x 2 24 R8 IEEE 754 Double Precision 8 1 x 21023 to 2 x 21023 Value x 2 53...

Page 441: ...se T E1 Type G 703 Section 9 Framed E1 or G 703 Section 13 2048 kHz Format CAS or CCS CRC4 enable disable Impedance 75 ohms Connector Mini BNC or SMB coax 10 MHz Impedance 50 unbalanced Amplitude 1 5 dBm to 4 5 dBm Signal type Sine Connector Mini BNC Long term Frequency Stability 0 01 ppb when locked to PRC GPS Phase Noise minimum 1 Hz 60 dBc Hz 10 Hz 80 dBc Hz 100 Hz 100 dBc Hz 1 kHz 110 dBc Hz 1...

Page 442: ...on F May 2012 Appendix B Specifications and Factory Defaults Specifications Long term Frequency Stability 0 01 ppb when locked to PRC GPS Phase Error 100 ns when locked to GPS TP 5000 Main Shelf Output Signal Specifications Continued Parameter Specification ...

Page 443: ...erence between the PTP outputs and input time 50 ns SyncE Ports Ethernet Small Form factor Pluggable SFP Optical 1000 Base X SyncE is only accessible on Ports 1 16 with optical SFP 1PPS Impedance 50 unbalanced Amplitude 2 0 Vpp Signal type Square Wave Rise Time 20 ns Connector SMB male Pulse Width 5 s 10 Long term Frequency Stability 0 01 ppb when locked to PRC GPS 1PPS Output Stability System tra...

Page 444: ...he tramission is completed within 500 ms as shown in Figure B 3 This TOD message indicates the time of the current 1 PPS rising edge and is sent at a rate of once per second Rise Time 1PPS Pulse 50 ns Pulse Width 50 ms Pulse width 200 ms TOD Frame TOD messages use whole 8 bit bytes for transmission with check sum protection Message type and message ID are used to clarify messages Follows Big Endia...

Page 445: ...for 1 PPS TOD Outputs Table B 14 TP E30 TOD Frame Field Descriptions for 1PPS TOD Output Field Name Field Length Description Sync Char 1 1 byte Part of Frame Header 0x43 ASCII character C Sync Char 2 1 byte Part of Frame Header 0x4D ASCII character M Class 1 byte Basic classification of TOD message ID 1 byte Serial number of of TOD message Length 2 bytes Length of payload only Does not include Fra...

Page 446: ...e of FCS is set to 0xFF and there is no need to negate the input data Checksum calculation uses right shift calculation and there is no need to negate the output frame check data When the frame check sequence is transmitted the LSB bit 0 is transmitted first Table B 15 TP E30 Time Information Message Payload Contents for 1PPS TOD Outputs Byte Offset Data Type Name Units Notes 0 U4 Time of Week TOW...

Page 447: ...ty crystal clock in holdover mode 0x04 Transport carrier equipment in holdover mode Other values are reserved 12 U1 TAcc PPS jitter category 0 255 0 0 ns 1 15 ns 2 30 ns 3 45 ns 255 not defined Note This value is fixed to 255 for transmission and base station equipment 13 U1 Reserved Reserved 14 U1 Reserved Reserved 15 U1 Reserved Reserved Table B 15 TP E30 Time Information Message Payload Content...

Page 448: ...fix 0x01 Dead reckoning only 0x02 2D fix 0x03 3D fix 0x04 GPS dead reckoning combined 0x05 time only fix 0x06 0xff reserved 3 U2 Week Number Clock source status alarms Bit 0 not used Bit 1 Antenna open Bit 2 Antenna shorted Bit 3 Not tracking satellites Bit 4 not used Bit 5 Survey in progress Bit 6 No stored position Bit 7 Leap second pending Bit 8 In test mode Bit 9 Position is questionable Bit 1...

Page 449: ...signed Short 2 0 to 65535 1 I2 Signed Short 2 32768 to 32767 1 2 s complement U4 Unsigned Long 4 0 to 4 294 967 295 1 I4 Signed Long 4 2 147 483 648 to 2 147 483 647 1 2 s complement R4 IEEE 754 Single Precision 4 1 x 2127 to 2 x 2127 Value x 2 24 R8 IEEE 754 Double Precision 8 1 x 21023 to 2 x 21023 Value x 2 53 CH ASCII ISO 8859 1 Encoding 1 Table B 18 TimeProvider 5000 IOC Clock Specifications ...

Page 450: ...irewall Block Allow Block SFTP Firewall Allow Allow Block User 1 Name admin 20 ASCII Characters User 1 Password symmadmin 32 ASCII Characters a Minimum of 8 User 1 Access level admin user config admin IMC EIA 232 Port 57 6k 8 N 1 fixed IMC IP Mode Static DHCP Static IMC IP State Enable Enable Disable IMC IP Address 192 168 0 100 Valid IPv4 Address IMC Gateway Address 0 0 0 0 Valid IPv4 Address whe...

Page 451: ...r Up to 3 None Username Max of 20 ASCII Characters Security Level noauth auth private Auth Type MD5 SHA Auth Key Max of 32 ASCII Characters Min of 8 ASCII Characters Privacy Protocol DES AES Privacy Key Max of 32 ASCII Characters Minimum of 8 SNMP v2 Community Up to 10 None Name Max of 20 ASCII Characters Access read only read write SNMP Trap Version 2 2 3 SNMP v2 State Enable Enable Disable SNMP ...

Page 452: ...e Value Range GPS State Enable Enable Disable GPS Priority 2 1 to 16 GPS Antenna Cable Delay 0 0 to 999 999 ns GPS Position Mode Auto Auto Manual GPS Position Lat N37 22 43 425 Long W121 55 34 815 Elevation 13 7m LAT Ndd mm ss ss or Sdd mm ss sss LONG Eddd mm ss ss or Wddd mm ss sss ELEV hhhh h height in meters 999 9 to 40 000 0 meters GPS Elevation Mask 10 5 to 45 degrees GPS PQL State Disable En...

Page 453: ... Port 1 PQL State Disable Enable Disable 1PPS TOD Input Port 1 PQL Value 1 1 to 3 1PPS TOD Input Port 1 Cable Delay 0 0 200 000 ns 1PPS TOD Input Port 2 State Enable Enable Disable 1PPS TOD Input Port 2 Priority 4 1 16 1PPS TOD Input Port 2 PQL State Disable Enable Disable 1PPS TOD Input Port 2 PQL Value 1 1 to 3 1PPS TOD Input Port 2 Cable Delay 0 0 200 000 ns Reference Criteria Priority Priority...

Page 454: ...SM State Disable Enable Disable see note below Telecom Input Port 2 SSM Bit 8 4 5 6 7 8 Telecom Input Port 2 SSM PQL Value 3 1 to 9 Note The reference criteria MANUAL is no longer supported Only PRIORITY and SSM are supported for reference selection Manual selection of a reference input can be done by disabling all reference input ports except the desired one The set ref override command is no lon...

Page 455: ...eq2048khz Telecom Output Port Frame Type RJ 45 connector freq2048khz D4 ESF freq1544khz Telecom Output Port CRC Disable Enable Disable Telecom Output Port SSM Disable Enable Disable Telecom Output Port SSM Bit 8 4 5 6 7 8 Output Generation Warm up Squelch Squelch On AIS Output Generation Free run Squelch Squelch On AIS Output Generation Holdover On Squelch On AIS Output Generation Fast track On Sq...

Page 456: ...IP Address IOC1 1 IOC1 2 192 168 1 11 192 168 2 11 Valid IPv4 Address IOC1 y IP Mask 255 255 255 0 Valid IPv4 Mask IOC1 y IP Gateway 0 0 0 0 Valid IPv4 Address special value of 0 0 0 0 is used for no gateway IOC1 Port Redundancy Bonding Disable Enable Disable IOC IP State Enable Enable Disable Table B 26 VLAN Parameters Fixed Index 1 16 Description Default Value Value Range IOCx y Address IOC1 1 I...

Page 457: ... Value Range Ethernet Port Address expansion shelf No VLAN configured Valid IPv4 Address Ethernet Port Mask No VLAN configured Valid IPv4 Mask Ethernet Port Gateway No VLAN configured Valid IPv4 Address ID 0 not visible in VLAN table 1 to 4094 Priority 0 0 to 7 Mode Disable Enable Disable State Disable Enable Disable Description Default Value Value Range Auto negotiation state Enable Enable Disabl...

Page 458: ... 64 bit value PTP IOC1 y Priority 1 128 0 to 255 PTP IOC1 y Priority 2 128 0 to 255 PTP IOC1 y Domain 4 for ITU G 8265 1 profile 0 for all other profiles 0 to 255 PTP IOC1 y TTL Value 64 1 to 255 PTP IOC1 y DSCP State Disable Enable Disable PTP IOC1 y DSCP Value 0 0 to 63 PTP Sync Limit 7 7 to 7 PTP Announce Limit 3 4 to 4 PTP Delay Limit 7 7 to 7 PTP State Enable Enable Disable PTP Max Number of ...

Page 459: ... Address PTP IOCx y Static Unicast Clock ID ff ff ff ff ff ff ff ff 64 bit Value PTP IOCx y Static Unicast VLAN ID 0 1 to 4094 0 is used to signify no VLAN PTP IOCx y Static Unicast Sync Message Rate 2 y 3 7 to 7 PTP IOCx y Static Unicast Announce Message Rate 2 y 1 4 to 4 PTP IOCx y Static Unicast Delay Response Message Rate 2 y 3 7 to 7 Table B 32 PTP Grand Master Multicast Parameters Descriptio...

Page 460: ...ate Limit 20 000 transactions second 120 000 or 20 000 NTP transactions second by license NTP VLAN ID 2 1 to 4094 Note The NTP Server feature can either be ordered in a new system or added to a previously ordered system as a field upgrade Field upgrades require a license activation key Contact your Symmetricom representative for more information Table B 34 PTP Grand Master Multicast Parameters Des...

Page 461: ...erval 6 if using CLI commands 0 in TimeMonitor PDV 20 1 6 to 7 Active Probe Duration 300 10 to 1000 seconds Description Default Value Value Range SSM Option Option 1 Option 1 Option 2 Table B 36 TP E10 Expansion Port Parameters Description Default Value Value Range Exp IF DTI Port State Enable Enable Disable Table B 34 PTP Grand Master Multicast Parameters Continued Description Default Value Value...

Page 462: ...ort 5 Port 6 Port 7 Port 8 Port 9 Port 10 Port 11 Port 12 Port 13 Port 14 Port 15 Port 16 192 168 21 11 192 168 22 11 192 168 23 11 192 168 24 11 192 168 25 11 192 168 26 11 192 168 27 11 192 168 28 11 192 168 29 11 192 168 30 11 192 168 31 11 192 168 32 11 192 168 33 11 192 168 34 11 192 168 35 11 192 168 36 11 Valid IPv4 Address Port x IP Mask 255 255 255 0 Valid IPv4 Mask Port x IP Gateway 0 0 ...

Page 463: ... 168 26 11 192 168 27 11 192 168 28 11 192 168 29 11 192 168 30 11 192 168 31 11 192 168 32 11 192 168 33 11 192 168 34 11 192 168 35 11 192 168 36 11 Valid IPv4 Address Port x Mask 255 255 255 0 Valid IPv4 Mask Port x Gateway 0 0 0 0 Valid IPv4 Address ID 2 1 to 4094 Priority 0 0 to 7 Mode Disable Enable Disable Table B 39 TP E10 Ethernet Auto Negotiation Parameters Description Default Value Valu...

Page 464: ...Dither Disable Enable Disable PTP Clock Identity MAC based value i e FF FE inserted in the middle of MAC address 64 bit value PTP Multicast Sync Interval 0 7 to 7 PTP Multicast Announce Interval 1 4 to 4 PTP Multicast Delay Interval 7 7 to 7 PTP Multicast Announce Timeout 3 2 to 10 PTP Multicast Client Timeout 300 10 to 3600 sec Table B 41 TP E10 Output Port Parameters Description Default Value Va...

Page 465: ...E1 Output Port x SSM Disable Enable Disable E1 Output Port x SSM Bit 8 4 5 6 7 8 Output Generation Warm up Squelch Squelch On AIS Output Generation Free run Squelch Squelch On AIS Output Generation Holdover On Squelch On AIS Output Generation Fast track On Squelch On AIS Table B 43 TP E30 1PPS TOD Output Port Parameters Description Default Value Value range 1PPS TOD Output Port State Enable Enable...

Page 466: ...ions and Factory Defaults Factory Defaults Alarm Default Values Table B 44 GPS Port Alarm Parameters Description Default Value Value Range Alarm Delay Time 0 0 to 500000 Alarm State for each alarm Enable Enable Disable Alarm Severity Level See System Notification Messages on page 407 2 to 5 ...

Page 467: ...ference Antenna is one component of a complete line of GPS accessories for your GPS antenna system provided by Symmetricom These accessories are designed to deliver precise GPS signals over a wide temperature range and in harsh environmental conditions In This Document Antenna Kits and Accessories Installing the Antenna ...

Page 468: ...al loss of the internal and external coaxial cable and connectors The optimal gain at the GPS radio receiver input is 30 dB The total gain is the gain of the GPS antenna less the loss of the transient eliminator connectors and cables All antenna kits include the GPS L1 antenna mounting pipe floor flange transient eliminator pre assembled coaxial cable for antenna to transient eliminator roll of 3M...

Page 469: ...ennas Table C 2 provides specifications for GPS antennas with internal LNA Table C 1 GPS Antennas with Internal LNA Part Number Description Minimum Cable Length 990 13091 006 26 dB Antenna with 3 m 3 m cable 3 m 10 ft 990 13091 013 26 dB Antenna with 3 m 10 m cable 3 m 10 ft 990 13073 070 40 dB Antenna with 10 m 60 m cable 30 m 100 ft 990 13074 150 48 dB Antenna with 10 m 140 m cable 76 m 250 ft 9...

Page 470: ...antenna lead enters the facility Table C 4 provides the transient eliminator specifications Element Right Hand Circular Carrier L1 1545 42 MHz Bandwidth 10 MHz Noise Figure 2 5 dB Output Impedance 50 Gain Marine 26 Marine 40 Marine 50 26 5 dB 3 dB 40 dB minimum 48 dB minimum Table C 3 26 dB L1 GPS Antenna Accessory Kit Part Number Description 112 43400 00 3 Transient Eliminator 90 Volts 1 5 GHz N ...

Page 471: ...ifications for the amplifier Insertion Loss 0 25dB 1 575 MHz VSWR 1 6 1 1 575 MHz DC Breakdown Voltage 90 Volts Dissipation Capacity 10 000 Amperes impulse 8 20 µsec Connector Type N Type Temperature 55 C to 70 C Relative Humidity 100 Non immersed Altitude 200 ft 60 m below sea level to 13 000 ft 3962 m above sea level Table C 5 GPS L1 Inline Amplifier Specifications Characteristic Specification M...

Page 472: ...ing a GPS antenna Before beginning the installation review Planning the Installation on page 473 and gather the necessary tools and materials described in Antenna Installation Tools and Materials on page 476 Table C 6 Antenna Cable Specifications Cable Type Measured Loss 1 575 GHz dB per foot DC Resistance per foot Type Center Conductor Flammability RG213 U Belden 8267 0 093 dB 0 0030 Stranded 13 ...

Page 473: ... This connection is used for a radio receiver antenna connection only Installation procedures for GPS antennas are outlined below Planning the Installation Prior to installing the antenna you should plan the site antenna location grounding scheme cable route and all other details Locating the Antenna Use Figure C 1 as a guide to locating the antenna Figure C 1 Locating the GPS Antenna Caution To a...

Page 474: ...he following location and environment influences before installing the GPS antenna If possible provide the antenna with an unobstructed 360 degree view of the sky from the horizon In general do not allow obstructions that obscure the horizon as viewed from the antenna by more than 10 degrees as shown in Figure C 1 Locate the antenna well away from and preferably in a plane above electrical equipme...

Page 475: ...g scheme to earth ground through a conductor Symmetricom makes no recommendation as to whether to install transient eliminators Symmetricom can provide suitable transient eliminators as an option Never connect antenna systems to the same earth ground connector as heating and cooling systems elevator or pump motors or other motors or machinery which can induce noise in the antenna system Caution To...

Page 476: ...u to use the factory installed crimped connector Symmetricom does not recommend cutting the antenna cables provided in the GPS Antenna Kits If you must cut the cables please ensure that the following requirements are met Be aware of these cable and connector requirements before cutting antenna cables Cable Requirements The total cable length from the radio receiver to the antenna must not be short...

Page 477: ... the GPS Antenna Kit The mounting surface and the local building codes determine the type and number of fasteners screws bolts and so forth that may be required To mount the antenna on the side of a building or tower use the optional right angle mounting bracket part number 12010210 000 0 To secure the coaxial cable to the mast use one or more 8 inch cable ties or appropriate cable clamps Connecti...

Page 478: ...he transient eliminator within 30 feet 9 m of the GPS antenna If required mount a second transient eliminator near the GPS antenna To install the transient eliminator 1 If necessary cut the coaxial cable and install mating connectors see Cutting Antenna Cables on page 476 2 Using the DVM measure the resistance between the center conductor and shield to verify that the center conductor and shield a...

Page 479: ...ing the GPS antenna to the TimeProvider 5000 see Antenna Connection Overview on page 473 Then follow the instructions below 1 Verify that the center conductor is not shorted to the shield If the reading shows a short or open you may have a shorted or open cable or transient eliminator if installed Therefore apply the same measurements directly to the GPS antenna This requires disconnecting the ant...

Page 480: ...Installation Completeness Checklist To verify that antenna installation is complete Verify that all power and ground wires are installed correctly and securely fastened Verify that all input and output cables are properly installed Verify that all antenna connectors are secure tight and weatherproofed Recommendation Symmetricom recommends coiling excess cable to avoid gain mismatch between the GPS...

Page 481: ...Guide 481 Appendix D Redundant IOC Cards In This Appendix Overview Parameters with IOC Card Redundancy Causes of Switchovers Between IOC Cards Setting the Active IOC Card at Power Up Output Performance During Switchover IOC Card Redundancy Related CLI Commands ...

Page 482: ... either card but with different MAC addresses for each IOC card Neither card is primary and redundancy is not revertive However IOC1 will be the active IOC if the entire system is rebooted or powered up and preference is given to a Rb IOC on initial warmup If the TP5000 v1 1 is configured with one IOC card the card can be located in either the IOC1 or IOC2 position On system power up IOC1 will be ...

Page 483: ...dded on both redundant IOCs ETH1 and ETH2 will become the slave interface of bond0 Interface bond0 will use the ETH1 MAC address and ETH1 IP address As slave interfaces ETH1 and ETH2 will not carry an IP address ETH1 will use its own MAC address while ETH2 will use the ETH1 MAC address The redundant IOC bond0 interface will have the same IP address as the active IOC However the MAC addresses of bo...

Page 484: ...ng as a TP5000 chassis continuously has a powered IOC module in it assuming that the IOC has been powered long enough to take on Clock IDs the chassis will maintain the same Clock IDs for ETH1 and ETH2 The Clock ID can also be manually assigned by the user with the CLI command set ptp clockid command or via SNMP Clock IDs with IOC Card Redundancy and Port Redundancy In port redundancy mode IOC1 an...

Page 485: ...voided by issuing the set configuration default command to the TP5000 with the newly installed IOC card before putting the unit into service as a Grandmaster All IOC parameters will be reset to default values see Appendix B of the TP5000 User s Guide for descriptions of default values but user logins and communication attributes such as IP addresses of the MGMT port on the IMC will be preserved Th...

Page 486: ...dby card will be switched to Active but the Active card will be not become the Standby card because it has become non functional The TP5000 uses the Symmetricom assigned priority ranks for the conditions or alarms to determine switchover The IOC switchover process will not be affected by user changes to the alarm enable disable state or severity The top priority rank category includes failures tha...

Page 487: ...tting the Active IOC Card at Power Up If an IOC card is installed in the IOC1 slot of the TP5000 chassis the TP5000 will start the state machine for the IOC1 card to determine its appropriate state If two IOC cards are installed in a TP5000 at power up the TP5000 will start the start the state machine for IOC2 one minute after starting the state machine IOC1 as shown in Figure D 4 IOC1 will normal...

Page 488: ...or an IOC card Table D 1 describes aspects of the state machine such as possible IOC states the next possible state and the conditions required for the next state transition Table D 1 IOC States and Related Conditions IOC STATE Description Possible Next State Conditions Required For Next State Transition Allowed State of Other IOC Initial Not an actual state The IOC has powered up or rebooted and ...

Page 489: ...ce all GPS validation has been completed and time has been set Other IOC is Active Active Warmup Active Warmup Other IOC State Standby Warmup Standby Fail or Non existent Active This IOC is in a normal operating mode It is actually providing all IOC user input and output related functions Standby Internally generated health reason User issued command to switch Standby Warmup Standby Fail Non exist...

Page 490: ...Active Warmup Active Fail Non existent Non existent There is no IOC card in this physical slot See Initial IOC State in this table Insertion of IOC into this physical slot Active Warmup Active Fail Non existent Disabled The user has taken action to soft reboot this IOC This condition will temporarily exist while the IOC prepares to reboot In this transient state the IOC is not available to become ...

Page 491: ...Guide 491 Appendix D Redundant IOC Cards IOC Card Redundancy Related CLI Commands IOC Card Redundancy Related CLI Commands The following CLI commands are related to IOC card redundancy show ioc state set ioc state set ptp clockid Show PTP config common clock id ...

Page 492: ...492 TimeProvider 5000 User s Guide 098 00028 000 Revision F May 2012 Appendix D Redundant IOC Cards IOC Card Redundancy Related CLI Commands ...

Page 493: ... Additionally you can obtain these licenses and the open source software by contacting Symmetricom Technical support at the following numbers Worldwide Main Number 1 408 428 7907 USA Canada Latin America including Caribbean Pacific Rim including Asia Australia and New Zealand 1 408 428 7907 USA toll free 1 888 367 7966 1 888 FOR SYMM Europe Middle East Africa 49 700 32886435 An administrative fee ...

Page 494: ...lowing is a list of third party software applications provided with the TimeProvider 5000 busybox dropbear dtc elfutils libelf libs ethtool expect glibc iproute iptables libgcc libpcap libs libxml linux 2 6 20 logrotate mtd utils net snmp openssl pam libs pam modules pam_radius popt libs sudo syslogd tcl dev tcpdump tftpd hpa u boot wget zlib libs ...

Page 495: ...Appendix Overview Requirements for Measurements Installing the Probe Controlling the Probe With TimeMonitor PDV Provisioning the Probe Enable the Probe Option on the TP 5000 Enable Port as a PTP Probe Return Port to Grandmaster Mode Set the IP Address for Probe MGMT Port Set Probe IP Address Set Grandmaster PTP IP Address Set Synchronization Interval Set Lease Duration Operating the Probe Probe Da...

Page 496: ...t does not adjust its clock but only time stamps the received packets using its own clock Performance of the network can be measured relative to the location of the Probe device and traffic conditions By measuring Packet Delay Variation PDV users can characterize a network and determine its suitability for delivering sync packets Measurements include PDV and packet Minimum Time Deviation MinTDEV T...

Page 497: ...r 5000 The Probe function is enabled via a special software key If a TimeProvider 5000 is configured in Probe mode it cannot be used in Grandmaster mode at the same time Figure F 1 IEEE 1588 Grandmaster Server and Client Figure F 2 IEEE 1588 Grandmaster Server and Probe Note The PTP probe option must be purchased to enable the functionality of all ptp probe commands ...

Page 498: ...Ethernet network connections Optional Equipment Traffic simulator for lab based measurements Installing the Probe See Figure F 3 and Figure F 4 below for TP 5000 Probe connectors and LEDs To physically install the TP 5000 Probe use the following procedures from Chapter 2 Installing Rack Mounting the Chassis Ground Connections Power Connections Control Management Connection EIA 232 Serial Craft Por...

Page 499: ...1 are recommended and supported Other SFP transceivers are not supported and may cause the TimeProvider 5000 to not comply with regulatory requirements Figure F 4 Probe Input Connections IOC Module Use the following procedure to make the connections for PTP measurements Table F 1 Recommended and Supported SFP Transceivers Type Transceiver Optical 1000 Base LX Single Mode Ethernet 1310nm Symmetrico...

Page 500: ...e directly into the packet network as shown in Figure F 5 Figure F 5 Test Setup for TP 5000 Probe power connections not shown Controlling the Probe With TimeMonitor PDV The TP 5000 Probe can also be provisioned and operated with the TimeMonitor PDV software module The TimeMonitor PDV Software has three major functions Configure the TP 5000 probe for PTP packet timing measurement data collection Co...

Page 501: ... PDV is launched the main screen will appear Anatomy of the GUI Main Screen The GUI main screen for TimeMonitor PDV is shown in Figure F 6 with numeric markers at the various buttons fields and boxes Descriptions for these buttons fields and boxes corresponding to the numerical markers are presented in Table F 2 All examples for provisioning and operating the Probe will include instructions for bo...

Page 502: ... TP 5000 probe Must be in Disconnect mode to change between RS 232 and TCP IP for communicating with probe or to change communication settings see Item 3 Check Click Check button to verify the test setup before beginning the PDV measurements for the selected port Start Click Start button to start PDV measurements for the selected port Stop Click Stop button to stop PDV measurements for the selecte...

Page 503: ...on Probe Enable Probe Disable Use these buttons to Enable or Disable the Probe Mode for the selected port The Command mode see Item 1 must be selected in order to use these buttons and user must be logged in to the TP 5000 probe Probe Address This button is used to set the IP address for the selected TP 5000 probe Ethernet port using the info in the Address fields for the TP 5000 probe see Item 6 ...

Page 504: ...Symmetricom TimeMonitor Measurement Software The topics covered are either not found in other documentation or are judged to be important enough to warrant restatement ABOUT Displays the Version and Revision number and other information about the Symmetricom TimeMonitor PDV Software SETUP Selecting this menu item brings up a dialog box which can be used to adjust the maximum number of samples for ...

Page 505: ...he Probe TimeMonitor PDV must be in Command mode see Item 1 to use this feature Click the Send button see Item 25 to send the command to the Probe Title Bar Shows the product name The cursor has a pointer shape in this area Message If live data is being collected then the Elapsed Time is shown Main Display Probe measurement data points are displayed in this section when the Check button see Item 2...

Page 506: ...506 TimeProvider 5000 User s Guide 098 00028 000 Revision F May 2012 Appendix F PTP Probe Option Controlling the Probe With TimeMonitor PDV Figure F 7 TimeMonitor PDV Functionality Groupings ...

Page 507: ...ct RS 232 or TCP IP Disconnect mode First time connection to a network requires connection via RS 232 to change IP address of MGMT port for TP 5000 Probe b Login to TP 5000 Probe Command mode c Turn off Telnet firewall of TP 5000 Probe Command mode logged in 2 Configure TimeMonitor and TP 5000 Probe address Command mode a Select Probe port b Enter Grandmaster IP address and Probe IP address c Ente...

Page 508: ...gin button to login to the TP 5000 probe 3 Enter the Username and Password for the TP 5000 probe when prompted in the main display area of the screen 4 In the Command field enter the desired CLI command as the following example image illustrates 5 Click the Send button to send the command to the TP 5000 probe for execution Any response will be shown in the main display area of the screen Terminal ...

Page 509: ...eMonitor Refer to the TimeMonitor PDV User s Guide for instructions on installing the TimeMonitor software suite Provisioning the Probe Establish a Connection to the TP 5000 Probe When using TimeMonitor PDV to provision the TP 5000 the first step is to connect the serial port of the computer to the Craft port on the IMC module The MGMT port on the IMC can also be used for the initial connection as...

Page 510: ... the TP 5000 as a probe Use the show license command to check if the probe option has been enabled yet for the TP 5000 Use the set license command to enter the authentication key for Example To enable the probe option with an authentication key of ABCDEFGHIJ1234567890KLMNOPQRST0987654321 tp5000 set license add The TP 5000 will prompt for the license key License key ABCDEFGHIJ1234567890KLMNOPQRST09...

Page 511: ...st be set to different subnets See Table F 4 for procedures Table F 4 Enable Port as PTP Probe Procedure TimeMonitor PDV CLI Command 1 Click on the Command radio button to put TimeMonitor PDV into the proper mode for making Probe changes 2 Click the Login button to login to the Probe The Probe will prompt for Username and Password 3 Select the desired Probe port using the radio buttons 4 Click on ...

Page 512: ...rval settings of 0 5 seconds 2 Hz or slower The IP address for the MGMT port can only be set with CLI commands It may be necessary to connect to the TP 5000 via the Craft port to set the IP address Table F 5 Return to Grandmaster Mode Procedure TimeMonitor PDV CLI Command 1 Click on the Command radio button to put TimeMonitor PDV into the proper mode for making Probe changes 2 Click the Login butt...

Page 513: ...t radio button to put TimeMonitor PDV into the proper mode for making MGMT port changes 2 Click on the TCP IP radio button 3 Click on the button on the right side of TCP IP to bring up the TCP IP Settings dialog box 4 Enter the IP Address that was set with CLI commands and the Port number 5 Click the OK button to return to the main screen This procedure describes how to set the IP address for the ...

Page 514: ...same IP address and MAC address The default condition for Ethernet ports on an IOC card is Port Redundancy OFF However Symmetricom does not recommend using the TP 5000 as a Probe with redundant ports The IOC Ethernet ports can only be configured with static IP addresses The TP 5000 allows VLAN over the redundant port as well as over independent ports Enabling or disabling redundancy does not requi...

Page 515: ... ID for the selected Probe port optional Use the show ptp probe command to find the clock ID 6 Click the Probe Address button to send the address information to the Probe 7 Repeat steps 3 through 6 for the other port Use the command set ip IOC1 x address addr_value netmask mask_value gateway gateway value Example Independent Probe Ports 1 Login at the admin or Config user level 2 Type set ip ioc1 ...

Page 516: ...tons 4 Enter the IP address Netmask and Gateway for the 1588 Master server for selected port 5 If Master is part of a VLAN click VLAN check box Enter VLAN ID in the box that appears 6 Enter the Clock ID for the Master server NOTE For a TP 5000 Grandmaster use the show ptp status command to find clock ID 7 Repeat steps 3 through 6 for the other port Use the command set ptp probe IOC1 x active probe...

Page 517: ...value is 300 seconds Table F 9 Set Synchronization Interval Procedures TimeMonitor PDV CLI Command 1 Click on the Command radio button see Item 1 in Figure F 6 to put TimeMonitor PDV into the proper mode for making Probe changes 2 Click the Login button to login to the Probe The Probe will prompt for Username and Password 3 Click on the radio button that corresponds to the desired SYNC rate Use th...

Page 518: ...DV into the proper mode for making Probe changes 2 Click the Login button to login to the Probe The Probe will prompt for Username and Password 3 In the Duration box see Item 5 enter the desired value for the lease duration in seconds Use the command set ptp probe IOC1 x active probe duration value where x is the port number on the IOC card Example For a duration of 500 on Port 1 of IOC1 1 Login a...

Page 519: ...lick on the Start button to start the measurement process The top of main screen will display the elapsed time of measurement 7 Click on the Stop button to stop measurement Symmetricom recommends that users ping from the probe to the grandmaster s PTP IP address to verify the network connection before attempting to gather data Improper network setup and configuration is the most common error encou...

Page 520: ...5000 User s Guide 098 00028 000 Revision F May 2012 Appendix F PTP Probe Option Operating the Probe Figure F 8 Typical Probe Response if Setup Is Correctly Configured Figure F 9 Typical Probe Stats at End of Measurement ...

Page 521: ...ta includes the following information Message Type Sequence Number GM seconds GM nanoseconds Probe seconds Probe nanoseconds Correction field in nanoseconds GM Clock ID See Figure F 10 for a description of the anatomy of a probe message See Table F 12 and Table F 13 for descriptions of message types and message parameters See below for a typical stream of Probe data ...

Page 522: ...e0084f2 The Probe can return three different types of messages as shown in Table F 12 Each message includes a single letter m f or b to indicate the type of message Examples of informational messages are shown below Example Table F 12 Message Types From The Probe Letter Message Type m Message informational and errors f Forward Sync Messages b Backward Delay Messages Table F 13 Sync and Delay Messa...

Page 523: ... Refer to the TimeMonitor PDV User s Guide or Help for instructions on how to save Probe data with TimeMonitor PDVsoftware If operating the TP 5000 Probe with the CLI command show ptp probe data ioc1 x capture or copy the data displayed in the terminal emulator and save or paste the data into a txt file Before loading the data file to TimeMonitor Analyzer for analysis the extension of the file nee...

Page 524: ...524 TimeProvider 5000 User s Guide 098 00028 000 Revision F May 2012 Appendix F PTP Probe Option Analyzing Probe Data ...

Page 525: ...messages 130 severity codes 406 alarm configuration setting 102 alarm log display 171 alarm reporting delay 102 alarm severity 346 alarm severity changing 102 346 alarm status 51 alarms display status information 348 enable disable procedure 346 provisioning 55 alarms disable 346 alarms provisioning 346 alias command 104 altitude specifications GPS antenna 469 announce 306 announce limit 204 303 a...

Page 526: ... 316 show alarm 348 show alarm config 347 show log alarm 363 show log event 363 show status 348 command history 143 Command Line Interface CLI 94 command log display 171 commands password 196 ping 197 reboot 230 set alarm config 102 show alarm 97 show alarm config 98 sync tod source 254 upgrade 255 commands alphabetical listing description 97 communications ports IMC management Ethernet 52 IMC ser...

Page 527: ...EIA 232 connector pin assignments 37 EIA 232 serial connection 33 EIA 232 see serial port electrical specifications GPS antenna 469 GPS L1 inline amplifier 471 electromagnetic compatibility EMC 59 electrostatic discharge ESD 60 elevation 136 138 email address Symmetricom 402 468 enable alarms 346 enable VLAN 263 environmental specifications 430 GPS antenna 469 equipment installation 59 ESD 372 Eth...

Page 528: ... and IMC 152 heat dissipation 58 history command 143 HMAC SHA 1 96 266 357 holdover specification quartz 448 rubidium 448 holdover status 51 holdover bridging time 109 holes mounting 63 host address setup 280 hostname display 144 hostname set 144 Humidity 59 I I 43 68 332 I O module 33 I O module port configuration 155 I O ports 33 I O display config status 157 image firmware 145 IMC communication...

Page 529: ...n 476 max clients PTP 210 211 max client 303 mechanical specifications 430 GPS antenna 469 GPS L1 inline amplifier 471 messages system notification 408 MGMT port 352 pin assignmetns 70 MGMT port specifications 432 modify password 196 258 259 module LED descriptions 90 166 module slots vacant 397 module I O 33 modules handling 67 removing 68 mounting bracket assembly 470 GPS antenna specifications ...

Page 530: ...rity 1 211 priority 2 211 provisioning 291 sync limit 211 timescale 210 unicast dynamic commands 302 unicast dynamic parameter descriptions 305 unicast static commands 302 unicast static parameter descriptions 305 306 ptp 365 PTP configuration display 217 ptp node 223 acceptable master list 220 221 client status 220 222 clock description 220 221 NULL_MANAGEMENT messages 222 ptp output connection 4...

Page 531: ... 179 output 180 output 10m 185 output pps 192 ptp node 223 redundancy 233 remote syslog 238 snmp 241 timeout 252 tod source 253 user 258 vlan 261 set configuration command 350 352 set io command 317 set redundancy command 284 285 516 set tod source command 311 312 314 316 severity codes alarms 406 severity alarm 346 SFP 40 373 399 SFP transceivers 73 499 SFTP 255 375 show alarm command 348 show al...

Page 532: ...254 synchronization limit maximum 206 synchronize ToD source 254 sync limit 303 syslog messages 407 System 408 system reboot 230 system date time setting 345 system health LED 90 166 system messages 373 system notification messages 408 system reference display 235 system status 349 T technical assistance 58 temperature 59 GPS antenna specifications 469 time current IMC 110 current IOC 110 setting ...

Page 533: ...g 278 user access levels displaying 276 user access list managing 274 user list display 258 user password changing 277 user delete 259 user modify password 259 UTI 33 V v2 community 242 v2 community add or delete 357 v2 trap provisioning 356 v2 SNMP 266 v3 trap provisioning 356 v3 SNMP 266 vacant module slots 397 VLAN 374 add 264 commands 287 delete 263 264 265 enable 263 ID 213 296 305 306 modify...

Page 534: ...Index W W 534 TimeProvider 5000 User s Guide 098 00028 000 Revision F May 2012 ...

Reviews: