background image

Rinnai Australia

3

Operation & Installation Manual

ABOUT YOUR HEATER

Exchanging an existing Bevelled Fascia with a Square Fascia

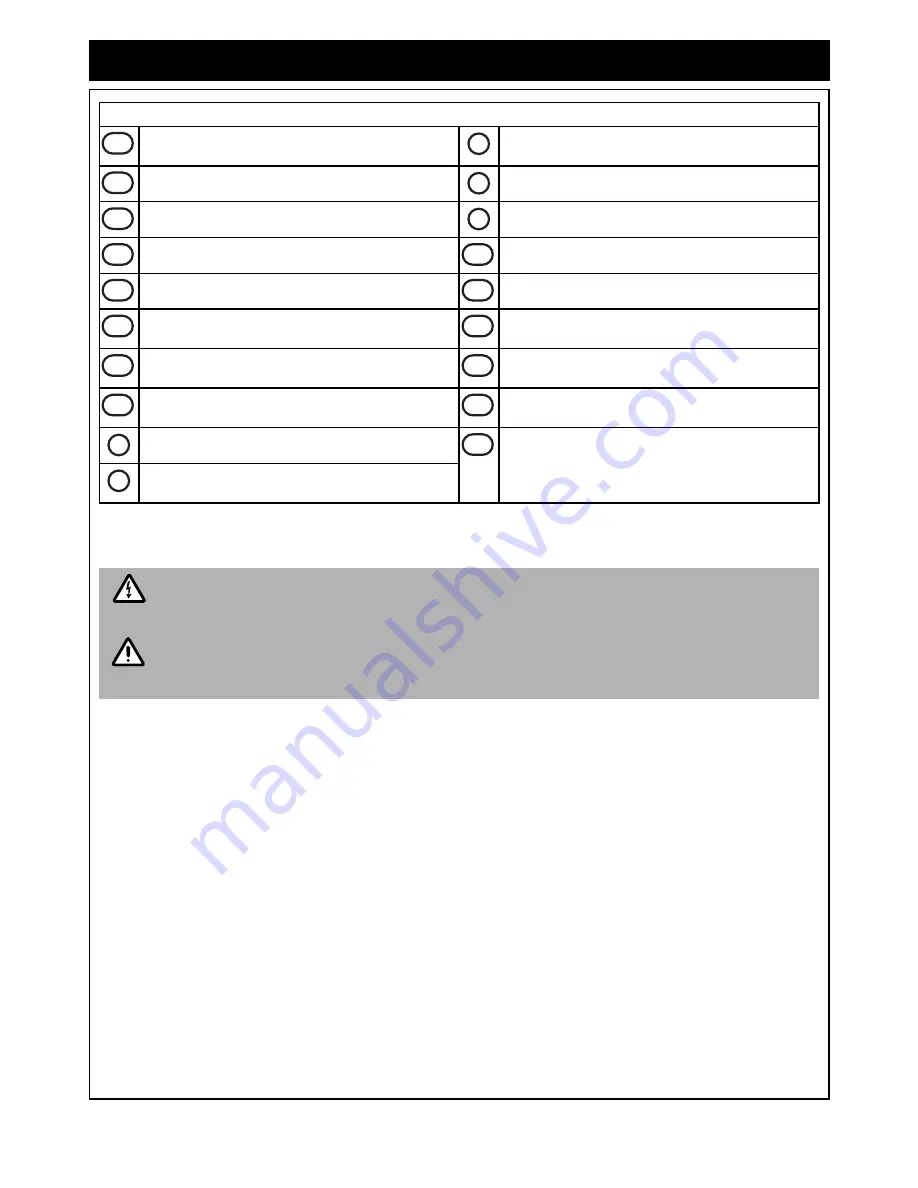
Unit Features

Bevelled Fascia Mesh Dress Guard

Manual Control Switch Panel

(Removal by qualified persons Only!)

Square Fascia Mesh Dress Guard Frame

Lintel Stand-Off Brackets

Bevelled Fascia Mesh Dress Guard Frame

LED Power Indicator

Square Fascia Mesh Dress Guard

Remote Sensor Receiver

Bevelled Fascia Surround

‘ON’ / ‘OFF’ Button

Square Fascia Surround

Cladding Support Bracket

(Fitted to RDV3611ETR Models Only!)

Bevelled Fascia Manual Control Switch

Flame Increase / Flame Decrease

(Square Fascia Models Only!)

Square Fascia Manual Control Switch

Bevelled Fascia Manual Control Switch Cover

(For use with Square Fascia Models)

Glass Panel Assembly

RJ45 Extension Cable

(For use with Square Fascia Models and is to be
installed by qualified persons Only!) 

Lower Horizontal Cover Panel

(Removal by qualified persons Only!)

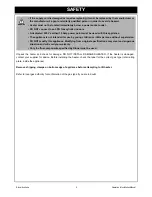
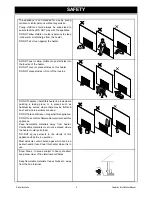
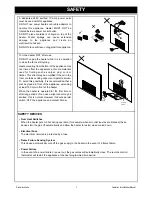
Wiring inside this appliance may be at 240V potential.Qualified persons only must carry out the
exchange. 

Power must be turned off to the appliance and the appliance electrically isolated.

Failing to electrically isolate the appliance increases the risk of electric shock from exposed wiring
and circuitry when cover panels are removed.

DO NOT leave the appliance unattended when power is connected and the panels are removed.

1a

7

1b

8

2a

9

2b

10

3a

11

3b

12

4a

13

4b

14

5

15

6

WARNING

CAUTION

Summary of Contents for RDV3610ETR

Page 1: ...ons Current AS NZS 3000 AS NZS 5601 Local Regulations and Municipal Building Codes This appliance must be installed serviced and repaired by an Authorised Person SYMMETRY Gas Log Flame Fire Operation Installation Manual MODELS RDV3610ETR RDV3611ETR All Rinnai gas products are A G A certified ...

Page 2: ...r Symmetry Heater We trust you will have many years of enjoyment from your appliance THIS MANUAL CONTAINS IMPORTANT INFORMATION FOR SAFETY PLEASE READ CAREFULLY BEFORE PROCEEDING WITH ASSEMBLY INSTALLATION AND OPERATION OF YOUR NEW FLAME FIRE AND GAIN A FULL UNDERSTANDING OF THE APPLIANCE ...

Page 3: ...ard 2 x Lintel Spacers attached with 4 x 8g x 8mm long self tapping pan head screws 4 x securing brackets with 16 x 8g x 8mm long self tapping pan head screws 1 x RF Combination Remote and Thermostatic Control with wall mount and securing screws 2 x AA Batteries 1 x Flue Baffle with 2 x 8g x 8mm long self tapping pan head screws 1 x Rinnai Symmetry Heater 1 x Operation and Installation Manual 1 x ...

Page 4: ... 10 REMOTE CONTROLLER AUTOMATIC OPERATION 11 WIRELESS CONTROLLER THERMOSTAT 12 TO TURN YOUR HEATER ON WITH REMOTE THERMOSTATIC CONTROL 14 MODES OF OPERATION 14 PROGRAMMING OF PROGRAM MODES 16 CUSTOMER INFORMATION OPERATION 18 MODES OF OPERATION 18 TO TURN REMOTE ON or OFF 18 MANUAL TEMPERATURE MODE 18 AUTOMATIC TIMER MODE 18 FLAME MODE 18 MANUALLY OVERRIDING THE SET PROGRAM 18 PROGRAM MODES 18 FLA...

Page 5: ...______________ Certificate of Compliance Certification Number _________________________________________________ Authorised Persons Licence Number ________________________________________________________ Installers Signature _______________________________________________________________________ Installation Date _______________________________________________________________________ APPLIANCE DETA...

Page 6: ...ETR RDV 3611ETR N L FRONT LAYOUT Bevelled Fascia Square Fascia Cladding support bracket fitted to RDV3611ETR models Only 7 RJ45 Connector 4a 8 Typical 2 places 6 4b 3a 2a 2b 1a 1b 3b 5 4a 4a 12 12 RDV3611ETR RDV3610ETR Bevelled Fascia Square Fascia 9 11 10 4a 11 9 4b 13 15 14 ...

Page 7: ...ascia Models Only Square Fascia Manual Control Switch Bevelled Fascia Manual Control Switch Cover For use with Square Fascia Models Glass Panel Assembly RJ45 Extension Cable For use with Square Fascia Models and is to be installed by qualified persons Only Lower Horizontal Cover Panel Removal by qualified persons Only Wiring inside this appliance may be at 240V potential Qualified persons only mus...

Page 8: ...s Heat emanating from the front of this heater may over time affect the appearance of some materials used for flooring such as carpet vinyl cork or timber This effect may be amplified if the air in the room contains cooking vapours or cigarette smoke To avoid this possibility it is recommended that a mat be placed in front of the appliance extending at least 750 mm in front of the air outlet This ...

Page 9: ...t If the supply cord is damaged or requires replacing it must be replaced by the manufacturer or the manufacturer s agent or similarly qualified person in order to avoid a hazard Heater must not be located immediately below a power socket outlet DO NOT connect to an LPG Gas cylinder indoors A dedicated 240 V earthed 10 Amp power point must be used with this appliance The appliance is not intended ...

Page 10: ...OT operate install this heater in areas where painting is taking place or in places such as hairdressing salons where there may be fluff and dust and where aerosols are used DO NOT place articles on or against this appliance DO NOT use or store flammable materials near this appliance Keep flammable materials away from heater Combustible materials must not be placed where the heater could ignite th...

Page 11: ... cooking vapours or cigarette smoke To avoid this possibility it is recommended that a mat be placed in front of the appliance extending at least 750 mm in front of the heater When the heater is operated for the first time or after long periods of non use a slight odour may be emitted this is normal However if odours persist switch OFF the appliance and contact Rinnai SAFETY DEVICES Over Heat Swit...

Page 12: ...TRICITY SUPPLY To restart your heater once power has been restored follow the steps for TO TURN YOUR HEATER ON above RESTART PROCEDURE AFTER INTERRUPTION TO GAS SUPPLY The instant gas supply is interrupted the heater will attempt re ignition for a period of 60 seconds If the heater has not re lit after 60 seconds the gas control will go to Gas Lock out The convection fan will remain on for 4 minut...

Page 13: ... indicator Indicates that the thermostat is in programming mode Manual mode indicator Indicates if the thermostat is in manual mode Setting UP Button Increase hours minutes day or temperature OK Button Accepts the current function and advances to the next function PWR Power Button Switches the thermostat ON and OFF To turn ON press and release the PWR and OK Buttons at the same time this will turn...

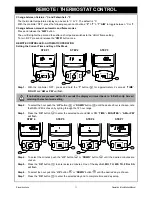
Page 14: ...ed to the OFF condition Changing the temperature The Symmetry has temperature increments of 1 which can be changed using the UP and DOWN buttons The temperature control range is 7 32 C When batteries are changed all settings other than synchronisation are lost and the controller will revert back to the Initial set up screen Before proceeding with synchronisation ensure that the gas and electricity...

Page 15: ...ycling through the 12 hour range Step 3 Press the OK button to enter the selected hour and AM or PM TIME MINUTES AM or PM will flash Step 4 To select the minutes push the UP button or DOWN button until the desired minutes are chosen Step 5 Press the OK button to enter selected minutes One of the days SU MO TU WE TH FR or SA will flash Step 6 To select the hour push the UP button or DOWN button unt...

Page 16: ... Transmit Indicator Indicates the thermostat is transmitting to the receiver the symbol with appear on the LCD for 1 second Battery Indicator This symbol will flash when batteries need replacing The thermostat will remain functional for approximately 5 days before shutting off Re programming of the controller will be required after battery replacement Temperature Display Displays current temperatu...

Page 17: ...ote will then commence automatically cycling through all the display characters finally displaying the full screen as shown below This process takes approximately 20 seconds and does not affect any programming If any of the characters are not displayed contact your Rinnai stockist for a replacement controller The Fan and Snowflake symbols displayed are not utilized in the operation of the Symmetry...

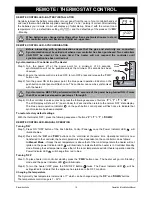
Page 18: ...rease the temperature in increments of 1 C BEFORE PROCEEDING ENSURE THE GAS AND ELECTRICITY ARE TURNED ON Before remote thermostatic control can be used the heater must be taken out of the OFF STANDBY condition supply connected and switched ON but the heater turned OFF do this as follows Press ON OFF button once the electronic ignition sparker will be able to be heard The electronic ignition stops...

Page 19: ...button or DOWN button to increase or decrease the flame height Manually Overriding The Set Program At any time the temperature or fan speed may be adjusted UP or DOWN similarly to operating in Manual Temperature Mode on page 14 When the fire first ignites it remains on highest flame for the first 60 seconds before changing to the selected flame height The fan speed automatically adjusts to the cor...

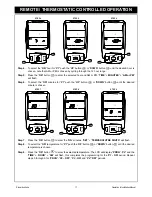
Page 20: ...eriods per week A weekday program can be set so the program is used Monday to Friday Similarly a weekend program can be set for Saturday to Sunday The entire week can also have the same program PROGRAMMING OF PROGRAM MODES Step 1 With the controller OFF press and hold the P button for approximately 2 seconds The LCD will display PROG Pd and the current time and the day MO will flash Step 2 To sele...

Page 21: ...ET TEMPERATUTRE DIGITS will flash Step 8 To select the ON temperature for P1 push the UP button or DOWN button until the desired temperature is chosen Step 9 Press the OK button to enter the selected temperature The LCD will display PROG P2 and the TIME HOUR AM will flash this completes the programming for the P1 ON period Repeat steps 3 through 9 for PROG P2 OFF P3 ON and P4 OFF periods 10 15 STE...

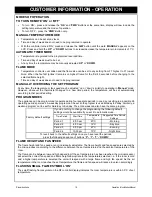
Page 22: ...e can be programmed to operate during four separate periods in one day resulting in a possible 28 operating periods per week A weekday program can be set so the program is used Monday to Friday Similarly a weekend program can be set for Saturday to Sunday The entire week can also have the same program FLAME HEIGHT AND FAN SPEED The flame height and fan speed are not individually adjustable The fla...

Page 23: ...nction time and minutes flash Step 1 Press and release or press and hold the UP or DOWN button to increase or decrease the minute setting by 1 minute similarly to the hour setting Step 2 Press OK to accept and select the day of the week Setting the run period starting time Step 1 After setting the day the AM PM settings will flash To set the P1 starting time press and release the UP or DOWN button...

Page 24: ...power operation indicator on the control panel will flash once to indicate that synchronisation has been accepted To restore factory default settings With the thermostat OFF press the following sequence of buttons P T T DOWN Turning ON and OFF Turning ON Press the ON OFF button which is located on the Manual Control Switch Panel at the bottom right of the heater The Power Operation Indicator on th...

Page 25: ...ntil desired temperature is achieved For Bevelled Fascia only NO lower adjustment of temperature is possible without re engaging the thermostatic controller LOSS OF REMOTE CONTROL FUNCTION NOTE Once the Manual Switch Mode has been selected the heater will only operate by pressing the Manual Switch once you have pressed the Manual Switch the heater will not respond to the remote controller TO REGAI...

Page 26: ...of the normal operation of the appliance and do not indicate a fault CHARACTERISTIC EXPLANATION At ignition Warm air does not start when the burner lights The room fan air is started automatically after a short delay This is to allow the heat exchanger to warm up helping to avoid cold draughts Smoke or strange smells are produced on the first start up after installation This is caused by grease oi...

Page 27: ...lass door Appliance turns OFF soon after start up and does not relight Flame appears overly orange yellow Fault Condition Probable Cause Burners fail to ignite Smell of gas Fan Not Working Minor soot deposits Severe sooting Glass Condensating Glass Streaky lines Remote not working Fault Condition Simplest Possible Remedy Not plugged in or turned off Plug in power cord and turn power ON Mains power...

Page 28: ...STALLATION 33 HEATER INSTALLATION OVERVIEW 33 HEATER INSTALLATION DETAIL 33 CONSTRUCTING THE FRAME 33 UNPACK THE APPLIANCE 33 PREPARING THE APPLIANCE FOR INSTALLATION 33 INSERT AND FIX THE APPLIANCE TO THE FRAME WORK 34 CONNECT FLUE AND INSTALLING THE FLUE RESTRICTOR 35 CONNECT THE APPLIANCE TO CONSUMER GAS PIPING 36 INSTALL THE LOG SET 36 REPLACE THE GLASS PANEL ASSEMBLY 37 CONNECT TO ELECTRICITY...

Page 29: ...e Balanced Co Axial Flue Inner 100 mm or 4 Outer 170 mm or 6 x 5 8 for Flueing configuations refer page 30 Gas connection 15mm 1 2 male flare Gas types Natural Gas Universal LPG Propane Ignition Continuous Spark Electronic Ignition Input Output Refer data plate and energy rating label on appliance Power Consumption High 50 W Standby 0 3 W 1500 mm cord is supplied with a 3 pin plug on right hand si...

Page 30: ...t 845 Depth 600 All dimensions are in mm Depth Adjustable to allow for cladding material 310 1090 715 520 890 995 500 1060 400 149 BEVELLED FASCIA SQUARE FASCIA RDV3611ETR 643 RDV3610ETR 639 668 RDV3611ETR 538 538 RDV3610ETR 534 750 775 845 MAIN BODY OUTER SURROUNDS 14 25 1110 1155 NOTE ...

Page 31: ...CE TO CONSUMER GAS PIPING on page 36 for appliance gas inlet location Gas pipe sizing must consider the gas input to this appliance as well as all other gas appliances in the premises The gas meter and regulator must be specified for the total gas rate Suitable sizing chart such as the one in AS NZS 5601 should be used PURGING THE GAS SUPPLY All foreign materials such as filings must be purged fro...

Page 32: ...rom materials such as wood or plaster The only exception is the cladding above the appliance which must be non combustible and extend at least 400 mm above the appliance in accordance with the drawings on page 4 page 27 and page 39 If the appliance is elevated from the ground a base must be constructed using suitable material with supporting joists capable of easily supporting a minimum of 175kg F...

Page 33: ...ler end user to check the installation instructions of these items and to ensure the location is suitable This caution also extends to but is not limited to ornaments such as Paintings Prints Photographs Tapestries Mirrors Stuffed Animals etc Please note the recommended clearances in the image below Use either a shelf or mantle below the TV or ornament or alternately you can construct a recess to ...

Page 34: ...Rise 600 Max 800 Min 300 Only one 90 change of direction allowed on any installation For horizontal flue installations no baffle plate is required Vertical Flue Installation Vertical Offset Flue Installation Horizontal Flue Installation For vertical and vertical offset flue installations a baffle plate will need to be fitted Total Flue length not to exceed 5400 5 0 0 CAUTION FLUE INSTALLATION CONF...

Page 35: ...From any other flue terminal cowl or combustion air intake 500 300 Appliances 0 0 3 0 0 5 t u p n i h J M 0 5 1 o t p u Appliances over 150 MJ h input up to 200 MJ h input 1500 300 Appliances over 200 MJ h input up to 250 MJ h input 1500 500 Appliances 0 0 5 1 0 0 5 1 t u p n i h J M 0 5 2 r e v o All fan assisted flue appliances in the direction of discharg e 1500 0 0 0 1 0 0 5 1 r e w o l b a p ...

Page 36: ...6DVA E90 Abey Order Code DV990G 45 Elbow 46DVA E45 Abey Order Code DV945G Pipe length 24 inch 46DVA E24 600mm Abey Order Code DV904 Pipe length 12 inch 46DVA 12 300mm Abey Order Code DV906 Pipe length 9 inch 46DVA 09 230mm Abey Order Code DV907 Adjustable Pipe Length 11 14 inch DV911B 275 375mm Abey Order Code DV911 Square Horizontal Terminal Cap 46DVA E48 600mm Abey Order Code DV984 High Wind Ter...

Page 37: ... heater is supplied in two cartons check to ensure you have all contents as listed on page i at the start of this manual before proceeding Remove shipping clamps on bottom edge of appliance before attempting to lift heater Carefully remove carton by removing the straps and lifting the box off the appliance Remove all packaging materials and check all components for damage If any damage is evident ...

Page 38: ...oeuvre the appliance into the enclosure frame ensuring that both the consumer gas piping and the flue system are aligned correctly with the appliance connections NOTE The flue system must be fully assembled located and secured into place before the heater is installed into the enclosure frame Refer to page 30 for flue details The flue system must be supported independently of the appliance 240 VOL...

Page 39: ...locates correctly over the locating tabs fixed to the base of the burner box PLEASE NOTE Also available in 900mm Flue Length Part No RDV903 No restrictor installed Heater shipped in this state For horizontal installations and vertical vertical offset flue installations that do not exceed 1 8 m etres Restrictor installed in position 3 Vertical vertical offset flue installations that exceed 3 m etre...

Page 40: ...HED REMOVE ANY RESIDUE WITH A RAG PREVENT ANY SOAPY SOLUTION FROM COMING IN CONTACT WITH ELECTRICAL COMPONENTS For clarity the drawings are displayed without showing the entire heater DO NOT remove the burner from heater to install the log set Use extreme care when handling the Log Set components they are made from a very fragile high temperature material and will damage if handled roughly Only re...

Page 41: ...ed log Right and left ends locates in recesses in pieces 2 3 consecutively The middle of this piece has a knot which has point contact with the tip of Piece1 Piece 6 7 Stones The stones are to be placed over the burner assembly visible at left and right of the burner pad One over each hole Final layout Complete Step 8 REPLACE THE GLASS PANEL ASSEMBLY Replace glass panel assembly in reverse sequenc...

Page 42: ...ning nut clockwise increases the outlet pressure whilst turning anti clock wise decreases the outlet pressure 5 Low Pressure Setting Turn OFF the power to the POV by separating the connector of the two yellow wires that power the POV The POV will automatically default to Low Pressure operation Keep the high pressure adjusting nut stationary using a 10 mm spanner Use an appropriate screwdriver for ...

Page 43: ...DV3610ETR ensure non combustible material is used in the areas depicted in the drawings below RDV3610ETR ONLY Non combustible cladding dimensions marked below are minimum size requirements only the non combustible cladding may extend beyond the dimensions stipulated RDV3611ETR Cladding MUST NOT extend lower than the cladding support bracket WARNING 400 150 1120 Non combustible Cladding shaded Top ...

Page 44: ...eases the risk of electric shock from exposed wiring and circuitry when cover panels are removed DO NOT leave the appliance unattended when power is connected and the panels are removed The dress guard fitted to this appliance reducing the risk of fire and injury and no part of it should be permanently removed For protection of young children or the infirm a secondary guard is required If the heat...

Page 45: ... your heater such as blocked gas injectors or the artificial logs burn media have shifted from when the heater was first installed There are some warning signs that could indicate a problem If any of the signs occur please call Rinnai Normal Abnormal Signs of abnormal flame performance Continuous unusual smell from the appliance Continued difficulty or delay in establishing a flame Flame appears e...

Page 46: ...ontrol Sparker Earth Flame Rod Sparker 5 4 2 3 1 1 2 CONTROL PANEL RECEIVER IGNITION PACK 579 DBC SIT FAN MOTOR 10 9 8 7 6 Modulating Coil 50 Hz High Speed OH SWITCH 2 1 ACTIVE NEUTRAL AC 230V 240V TEST CONNECTION Medium Speed BROWNN BROWN GRN YLW YELLOW YELLOW GREY GREY BLACK BROWN BROWN BLACK BLACK BLUE GRN YLW BROWN BLUE FLAME ROD YELLOW ...

Page 47: ...tion of young children or the infirm a secondary guard is required Ensure this Operation and Installation manual is left with the customer Ensure the Customer understands that No part of this appliance should be permanently removed Paper or other material must not be burnt in this appliance Young children and the infirm should be supervised at all times To be completed by certified Gas Installer N...

Page 48: ...of a local call Higher from mobile or public phones Australia Pty Ltd ABN 74 005 138 769 Internet www rinnai com au E mail enquiry rinnai com au Rinnai has a Service and Spare Parts network with personnel who are fully trained and equipped to give the best service on your Rinnai appliance If your appliance requires service please call our Help Line Rinnai recommends that this appliance be serviced...

Reviews: