background image

EN

- 32 -

Sometimes a performance problem can be easily solved by checking seemingly apparent but often overlooked
possibilities. Before arranging for service, check these items. It could save your time and money.

TV Mode

PROBLEM

CORRECTIVE ACTION

No picture or sound

• Make sure the AC cord is connected to an AC outlet.
• Check antenna connection.
• Press 

[SELECT]

to select TV mode. 

Then try other TV feature.

• Let the unit program its tuner memory.

No picture or poor picture on the 

• Adjust direction or replace antenna.

unit

• Adjust picture controls.
• Check for broken pin of the antenna cable.

No sound or poor sound

• Adjust volume control on remote control or main unit.
• Press 

[MUTE]

to restore sound.

Bars on screen

• If outside antenna is being used, check for broken wire.
• Check for local interference.

Picture distorted or blurred

• Try a new channel, if OK, then possible station trouble.
• If outside antenna is being used, check for broken wire.

Picture rolls vertically

• Try a new channel, if OK, then possible station trouble.

Lines or streaks in picture

• If outside antenna is being used, check for broken wire.
• Check for local interference.

No color

• Try a new channel, if OK, then possible station trouble.
• Check the antenna or cable connection to the main unit.
• If outside antenna is being used, check for broken wire.
• Adjust 

“COLOR”

control.

Poor reception on some channels

• Try a new channel, if OK, then possible station trouble.

Ghosts in picture

• Check the antenna or cable connection to the main unit.
• If outside antenna is being used, check for broken wire.
• Check for local interference.

Weak picture

• Try a new channel, if OK, then possible station trouble.
• Check the antenna or cable connection to the main unit.
• If outside antenna is being used, check for broken wire.
• Adjust 

“CONTRAST”

“BRIGHTNESS”

control.

If the unit does not perform properly when operated as instructed in this Owner’s Manual, check the unit, 
consulting the following checklist.

PROBLEM

CORRECTIVE ACTION

No power

• Make sure the power plug is connected to an AC outlet.
• Make sure the power is turned on.

No operation by infrared remote

• Check if the power plug is connected to an AC outlet.

control

• Check the batteries in the remote control.
• Aim the remote control directly at the remote sensor. If necessary,

remove all the obstacles between the sensor and the remote control.

• Refer to “IR SIGNAL CHECK” on page 34.
• You have to be within 23 feet (7m) of the unit.
• Check if the correct mode is selected. If not, switch the mode by 

pressing 

[SELECT]

, whichever you need.

T

ROUBLESHOOTING GUIDE

Summary of Contents for CSTL20D6

Page 1: ...D6 20 inch If you need additional operating assistance after reading this owner s manual or to order replacement accessories please call TOLL FREE 1 800 242 7158 Or visit our WEB SITE at http www Symphonic us ...

Page 2: ...nit and to protect it from overheating and these openings must not be blocked or covered The openings should never be blocked by placing the unit on a bed sofa rug or other similar surface This unit should never be placed near or over a radiator or heat register This unit should not be placed in a built in installation such as a bookcase or rack unless proper ventilation is provided or the manu fa...

Page 3: ...of any materials in accordance with your local recycling regulations Batteries should never be thrown away or incinerated but disposed of in accordance with your local regulations con cerning chemical wastes The serial number of this product may be found on the back of the unit No other unit has the same serial number as yours You should record the number and other vital information here and retai...

Page 4: ...ration Do not place the unit near strong magnetic fields Avoid moving the unit to locations where temperature differences are extreme Be sure to remove a disc and unplug the AC power cord from the outlet before carrying the unit Do not handle the power cord with wet hands Do not pull on the power cord when disconnecting it from an AC wall outlet Grasp it by the plug If by accident water is spilled...

Page 5: ... 17 PLAYING A DISC 18 BASIC PLAYBACK 18 DISC MENU 19 TITLE MENU 19 RESUME 19 PAUSE 19 STEP BY STEP PLAYBACK 19 FAST FORWARD FAST REVERSE 20 SLOW FORWARD SLOW REVERSE 20 ZOOM 20 SEARCH FUNCTION 21 TRACK SEARCH 21 TITLE CHAPTER SEARCH 21 TIME SEARCH 22 MARKER SET UP SCREEN 22 SPECIAL PLAYBACK FUNCTION 23 REPEAT 23 A B REPEAT 23 PROGRAM 24 RANDOM PLAYBACK 24 CHANGING THE SETTINGS 25 SUBTITLE LANGUAGE...

Page 6: ...VD menus in a desired language You can display DVD menus in a desired language if available on a DVD Screen saver If the screen saver program is set to ON it starts when there is no input from the unit for 5 minutes in stop mode Subtitles in a desired language You can select a desired language for the display subtitles if that language is available on a disc Selecting a camera angle You can select...

Page 7: ...rogram random screen in stop mode Press to call up the Black Level Setting Virtual Surround screen during playback 13 SEARCH MODE button P 21 Press to locate a desired point 14 AUDIO button For TV mode P 14 Press to select TV sound mode STEREO SAP MONO For DVD mode P 25 Press to select a desired audio language if available 15 EJECT A button P 18 Press to remove a disc from the unit 16 SELECT butto...

Page 8: ...nt damage or injury from possible battery leakage Do not try to recharge batteries not intended to be recharged they can overheat and rupture 31 MENU button Press to enter or exit the setup menu of TV DVD 32 STOP C button P 18 Press to stop operation of the disc 33 PLAY B button P 18 Press to playback of the disc 34 EJECT A button P 18 Press to remove a disc from the unit 35 VOLUME Y X buttons P 1...

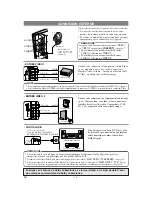
Page 9: ...DIG ITAL AUDIO OUT C OAXIA L R L Y Pb Pr R L VIDE O S VIDE O VIDEO 2 CP MPO NE NT AUDIO AUDIO VIDEO 1 AN T HE AD PH ON E ANT OUT IN 75 ohm Coaxial Cable Cable Box or Satellite Box Rear of this unit from Cable Company or Satellite dish Note to CATV system installer This reminder is provided to call the CATV system installer s attention to Article 820 40 of the NEC that provides guidelines for prope...

Page 10: ... of this unit If you connect VIDEO jack and S VIDEO jack simultaneously the S VIDEO jack is given priority over the VIDEO jack AUDIO OUTPUT VIDEO2 INPUT VIDEO1 INPUT EXTERNAL CONNECTION Audio Cable Video Cassette Recorder ex OUT OUT OUT S Video Cable Video Cable OR R L S VIDEO VIDEO VIDEO1 AUDIO NOTE L Y Pb Pr R COMPONENT VIDEO2 AUDIO Component Video Cable Audio Cable Video Game Video Camera ex OU...

Page 11: ... UP by LANGUAGE menu or CHANNEL SET UP menu Refer to MENU LANGUAGE on page 16 or CHANNEL SET UP on page 12 1 Press POWER to turn on the unit If the TV screen shows snow noise and there is no operation for more than 5 seconds HELPFUL HINTS appears Follow the instructions listed on screen If those settings do not work properly please call our help line on the front page of this owner s manual 2 Pres...

Page 12: ...cable box or satellite box ADDING DELETING CHANNELS The channels you no longer receive or seldom watch can be deleted from the memory Of course you can add the deleted channel into the memory again 1 Press SETUP then press K or L to point to CHANNEL SET UP 2 Press ENTER then press K or L to point to ADD DELETE CH 3 Press ENTER then press the Number but tons or CH K K L L to select the desired chan...

Page 13: ... Timer function turns off the unit without using POWER after a desired period of time 1 Press SLEEP 2 Press SLEEP repeatedly until the desired sleep time is displayed Each press increases the time by 10 minutes up to 90 minutes After 5 seconds the Sleep Timer setting will disappear automatically If you select SLEEP 0 MINUTE Sleep Timer setting is canceled 13 EN 13 EN PICTURE CONTROL BRIGHTNESS PIC...

Page 14: ...u select OFF Closed Caption System set ting is canceled 3 Press SETUP to exit the menu Even if there is a power failure of any kind the unit will retain its memory for this feature TO SELECT TV SOUND MODE 1 Press AUDIO repeatedly to select the MTS output mode The output mode changes as described below every time you press AUDIO Second Audio Program SAP Sometimes broadcasters add another channel of...

Page 15: ...s of TV Y7 TV PG TV 14 or TV MA you will have the option of setting sub rating categories Press K or L to select a rating with sub ratings you wish to block then press ENTER twice Press K or L to select a sub rating then press ENTER to set it to BLOCK or VIEW The blocked sub ratings will appear next to the rating category in the TV RATING menu 15 EN V CHIP SET UP B TV RATING MPAA RATING CHANGE COD...

Page 16: ... to exit the menu Your personal access code will be erased and will return to the default 0000 when a power failure occurs or when you turn off the power using a wall switch If you have forgotten the code unplug the power cord for 10 seconds to restore the access code to 0000 1 Press SETUP then press K or L to point to LANGUAGE 2 Press ENTER repeatedly to select ENGLISH ESPAÑOL Spanish or FRANÇAIS...

Page 17: ... be compromised 7 You may play back the unfinalized DVD R RW disc recorded in the video format on our brand s DVD recorder However depend ing on the recording status of a disc the disc may not be played back at all or normally the picture or sound may not be smooth etc In this case you need to finalize the disc with the DVD recorder Refer to the manual accompanying the DVD recorder 8 Only the disc...

Page 18: ... has been switched to the TV mode the DVD mode shuts down first and then the TV picture and sound appears in about 4 seconds Similarly when POWER is pressed to turn off in the DVD mode this mode shuts down first and then the unit is turned off may appear at the top right on the TV screen during operation warning that a pro hibited operation has been encountered by the DVD or the disc With DVDs tha...

Page 19: ...tions may vary between discs Refer to the manual accompanying the disc for details 1 During playback press STOP C Resume message will appear on the TV screen 2 Press PLAY O playback will resume from the point at which playback was stopped To cancel resume press STOP C twice The resume information stays on even when the power is turned off 1 During playback press PAUSE F Playback will pause and sou...

Page 20: ...he disc Approximate speed is 1 1 16 2 1 8 and 3 1 2 4 To return to normal playback press PLAY O The Zoom function allows you to enlarge the video image and to pan through the enlarged image 1 Press ZOOM during playback Playback will continue 2 Press ZOOM repeatedly to select the required zoom factor ZOOM1 ZOOM2 ZOOM3 or OFF 3 Press K L s or B to move the zoomed picture across the screen 4 To exit ...

Page 21: ...p subsequent tracks Press SKIP H to go back to beginning of the cur rent track Press it repeatedly to go to the previous tracks If SKIP H G is pressed while the play back is paused the playback will be paused again after skipping to the next track SKIP H G are not operative when playback is stopped 1 Press SEARCH MODE once for the Chapter search twice for the Title search during play back 2 Within...

Page 22: ...ars in the display 3 When you reach the desired point press ENTER The Title or Track and elapsed playing time will appear in the TV screen 4 To return to the Marker later press SEARCH MODE repeatedly during playback to display the Marker screen Then press s or B to choose the desired marker then press ENTER Operations which erase all Markers Turning off the power Ejecting a disc from the unit Pres...

Page 23: ...int A appears briefly on the TV screen 2 Press A B again at your chosen end point A B appears briefly on the TV screen and the repeat sequence begins 3 To exit the sequence press A B The A B repeat section can only be set within the current title for DVDs or current track for Audio CDs A B repeat is not available with some scenes in DVD To cancel the A point which was set press CLEAR A B repeat pl...

Page 24: ...gram canceled Up to 99 tracks can be entered To erase all tracks in the program at once select ALL CLEAR at the bottom of the list at step 2 If you like to repeat the current track in the program press REPEAT several times until TRACK appears during playback If you like to repeat the entire program press REPEAT several times until ALL appears during playback This function shuffles the playing orde...

Page 25: ... letter language code the code will be displayed every time you change the Subtitle language setting If you choose any other languages will be displayed instead Refer to page 31 The unit allows you to select a language during DVD disc if multi languages are available playback 1 Press AUDIO during playback 2 Press AUDIO repeatedly to select your desired language Pressing AUDIO may not work on some ...

Page 26: ...itch ON or OFF ON Makes the dark parts brighter OFF Shows the original picture as recorded Initial setting 2 Press MODE twice or RETURN to exit The setting will be saved even if the unit is turned off You can enjoy surround sound effect over two speak ers on this unit 1 Press MODE repeatedly during playback then press ENTER to set it 1 2 or OFF 1 Natural effect 2 Emphasized effect OFF Original Sou...

Page 27: ... status DVD SECTION C HANGING THE SETTINGS T HE ON SCREEN INFORMATION CH Chapter Current chapter number Total chapters 11 16 0 00 00 0 03 30 Elapsed time of the current chapter Remaining time of the current chapter Current playback status Angle icon appears only when avail able on the DVD TT Titlea Current title number Total titles 1 3 0 00 00 1 23 45 Elapsed time of the current title Remaining ti...

Page 28: ...upported by the disc can be selected 5 Press SETUP to exit the menu Language Setting for Audio and Subtitle are not valid for some discs due to default setting of the disc In this case set them by pressing AUDIO and SUBTITLE Refer to page 25 If you select a language that is not supported by the disc subtitle will automatically be set OFF and the first item of the audio languages will be automatica...

Page 29: ... kHz default OFF Output the original sound When playing disc with copyright protection If you select OFF copyright protection will be activated and sound will be down sampled at 48kHz DOLBY DIGITAL Set to BITSTREAM when the unit is connected to a Dolby Digital Decoder BITSTREAM Output a Dolby Digital signal default PCM Convert the Dolby Digital to PCM 2 channel stereo 4 Press SETUP to exit the men...

Page 30: ... adult and gen eral use prohibited OTHER SETTINGS Follow steps 1 to 2 in the on page 28 3 Press K or L to select the below items then press ENTER ANGLE ICON Press ENTER repeatedly to turn Angle icon ON or OFF The default setting is ON SCREEN SAVER Press ENTER repeatedly to turn Screen Saver ON or OFF The default setting is OFF If you select ON the screen saver program starts when there is no input...

Page 31: ... Croatian 6554 Sesotho 6566 Setswana 6660 Language Code Shona 6560 Sindhi 6550 Singhalese 6555 Siswat 6565 Slovak 6557 Slovenian 6558 Somali 6561 Spanish SPA 5165 Sundanese 6567 Swahili 6569 Swedish SWE 6568 T Tagalog 6658 Tajik 6653 Tamil 6647 Tatar 6666 Telugu 6651 Thai 6654 Tibetan 4861 Tigrinya 6655 Tonga 6661 Tsonga 6665 Turkish TUR 6664 Turkmen 6657 Twi 6669 U Z Ukrainian 6757 Urdu 6764 Uzbe...

Page 32: ... possible station trouble Check the antenna or cable connection to the main unit If outside antenna is being used check for broken wire Adjust COLOR control Poor reception on some channels Try a new channel if OK then possible station trouble Ghosts in picture Check the antenna or cable connection to the main unit If outside antenna is being used check for broken wire Check for local interference ...

Page 33: ...ain closed caption program The decoder cannot read the compressed information and captions will be lost Black box in the TV screen You are in TEXT mode Select a CAPTION mode CAPTION1 CAPTION2 or Caption OFF PROBLEM CORRECTIVE ACTION Sound OK picture poor Try a new channel if OK then possible station trouble Check the antenna or cable connection to the main unit If outside antenna is being used che...

Page 34: ... The DVD does not contain sequences recorded from different camera angles This is not a malfunction Audio or subtitle language cannot be The DVD does not contain audio source or subtitles in the selected changed language This is not a malfunction Prohibited icon appears on the That operation is prohibited by the unit or the disc screen prohibiting an operation This is not a malfunction CD sound dr...

Page 35: ... case when it is not used To clean off use a soft cloth Do not use a hard cloth since this will mar the disc Wipe the disc in a straight line from center to edge Never wipe with a circular motion Do not use detergent or abrasive cleaning agents MAINTENANCE DISC HANDLING LCD 20 inch Television system NTSC M Closed caption system 15 119 FCC Channel coverage VHF 2 13 UHF 14 69 CATV 2 13 A W W 1 W 84 ...

Page 36: ...h results from fire flood lightning or other acts of God THIS WARRANTY DOES NOT COVER PACKING MATERIALS ANY ACCESSORIES EXCEPT REMOTE CONTROL ANY COSMETIC PARTS COMPLETE ASSEMBLY PARTS DEMO OR FLOOR MODELS FUNAI CORP AND ITS REPRESENTATIVES OR AGENTS SHALL IN NO EVENT BE LIABLE FOR ANY GENERAL INDIRECT OR CONSEQUENTIAL DAMAGES ARISING OUT OF OR OCCASIONED BY THE USE OF OR THE INABILITY TO USE THIS...

Page 37: ...renseignements supplémentaires ou si on veut commander des pièces ou accessoires de rechange appeler SANS FRAIS 1 800 242 7158 Ou visiter notre SITE WEB à http www Symphonic us Prière de lire avant d utiliser cet appareil MANUEL DE L UTILISATEUR pouces SEUL Disque ...

Page 38: ...ntation indiquée sur l étiquette Si le type d alimentation de la maison est en doute consulter le concessionnaire ou le fournisseur d électricité Pour les appareils devant fonctionner sur piles ou sur une autre source d alimentation consulter le manuel de l utilisateur 11 Mise à la terre ou polarisation Cet appareil est équipé d une fiche de courant alternatif polarisé une fiche ayant un plot plus...

Page 39: ...les les mettre au rebut conformément au règlement local sur les déchets chimiques Le numéro de série de cet appareil se trouve au dos de l appareil Aucun autre appareil n a le même numéro de série Inscrire le numéro et les autres renseignements importants dans ce manuel et le conserver comme preuve d achat et pour faciliter l identification de l appareil en cas de vol Les numéros de série de sont ...

Page 40: ...ation Installer l appareil à niveau Éviter les endroits sujets à de fortes vibrations Ne pas placer l appareil près de champs magnétiques forts Éviter de déplacer l appareil à des endroits où l amplitude des températures est importante Avant de transporter l appareil s assurer de le débrancher et de retirer tout disque à l intérieur Ne pas manipuler le câble d alimentation les mains mouillées Ne p...

Page 41: ...ISIBLES 17 LECTURE D UN DISQUE 18 LECTURE DE BASE 18 MENU DU DISQUE 19 MENU DE TITRES 19 REPRISE 19 PAUSE 19 LECTURE PAS À PAS 19 AVANCE RAPIDE MARCHE ARRIÈRE RAPIDE 20 RALENTI EN AVANT EN ARRIÈRE 20 ZOOM 20 FONCTION DE RECHERCHE 21 RECHERCHE PAR PISTE 21 RECHERCHE PAR TITRE CHAPITRE 21 RECHERCHE HORAIRE 22 ÉCRAN DE RÉGLAGE DES MARQUEURS 22 FONCTIONS DE LECTURES SPÉCIALES 23 RÉPÉTITION 23 RÉPÉTITI...

Page 42: ...us DVD dans la langue souhaitée Il est possible d afficher les menus DVD dans la langue souhaitée si cette option est disponible sur le DVD Économiseur d écran Si le programme d économiseur d écran est réglé à EF il se met en marche lorsque l appareil en mode arrêt ne reçoit pas de commande pendant cinq minutes Sous titrage dans la langue voulue Il est possible de choisir la langue d affichage des...

Page 43: ...au de noir ambiophonie virtuelle 13 Touche SEARCH MODE P 21 Appuyer sur cette touche pour trouver un point voulu 14 Touche AUDIO Pour le mode TV P 14 Appuyer sur cette touche pour sélectionner me mode son TV STÉRÉO SAP MONO Pour le mode DVD P 25 Appuyer sur cette touche pour avoir la langue de son choix si disponible 15 Touche EJECT A A P 18 Appuyer sur cette touche pour retirer un disque de l app...

Page 44: ... 29 Touche REPEAT P 23 Cette touche répète la lecture du disque titre chapitre ou piste 30 Touche SUBTITLE P 25 Appuyer sur cette touche pour avoir les sous titres dans une langue au choix PANNEAU DE COMMANDE 31 40 37 38 39 33 32 34 35 36 MISE EN PLACE DES PILES 1 Ouvrir le couvercle du logement des piles en appuyant sur le couvercle dans la direction de la flèche 2 Insérer deux piles stylo AA dan...

Page 45: ...ibution ou de l antenne ANT DIG ITAL AUDIO OUT C OAXIA L R L Y Pb Pr R L VIDE O S VIDE O VIDEO 2 CP MPO NE NT AUDIO AUDIO VIDEO 1 AN T HE AD PH ON E ANT SORTIE ENTRÉE Câble coaxial de 75 Ohm Boîte de câblodistribution ou boîte de télédistribution Arrière de cet appareil de la compagnie de câble ou de l antenne parabolique Remarque pour l installateur de câblodistribution Rappelons aux installateur...

Page 46: ...une meilleure image Utiliser cette connexion sur l équipement audio vidéo p ex Caméra vidéo jeu vidéo si les connecteurs femelles de sortie est de vidéo Composants Y Pb Pr Cette connexion offre la meilleure image DIGITAL AUDIO OUT COAXIAL Chaîne haute fidélité Décodeur Dolby Digital Vers le connecteur femelle COAXIAL DIGITAL AUDIO INPUT ENTRÉE AUDIO NUMÉRIQUE COAXIALE On peut apprécier un son DVD ...

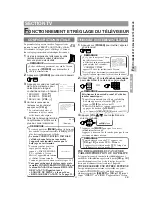
Page 47: ...areil sous tension S il y a de la neige sur l écran du téléviseur et si vous n effectuez aucune commande pendant plus de 5 secondes CONSEILS UTILES apparaît Suivez les instructions à l écran Si ces réglages ne fonctionnent pas correctement veuillez appeler le numéro apparaissant sur la couverture du manuel 2 Utilisez CH K L ou les Touches numériques pour sélectionner le numéro de canal souhaité Sé...

Page 48: ... voulu sur la boîte de câblodistribution ou sur la boîte de télédistribution AJOUT SUPPRESSION DE CANAUX Les canaux qui ne sont plus reçus ou qui sont rarement regardés peuvent être effacés de la mémoire Il est évidemment possible de rajouter ce canal à la mémoire 1 Appuyer sur SETUP puis sur K K ou L L pour pointer sur RÉGLAGE DES CANAUX 2 Appuyer sur ENTER puis sur K K ou L L pour pointer sur AJ...

Page 49: ...AL ou FONCE 3 Appuyer sur SETUP La fonction minuterie de sommeil diffère la mise hors tension de l appareil sans utiliser POWER 1 Appuyer sur la touche SLEEP 2 Appuyer sur SLEEP à plusieurs reprises jusqu à ce que l heure voulue soit affichée Chaque pression diffère la mise hors tension de 10 minutes jusqu à concurrence de 90 minutes Après 5 secondes le réglage de la minuterie de sommeil s efface ...

Page 50: ...r sélectionner le menu de sous titres S TIT1 S TIT2 TEXT1 ou TEXT2 La sélection de HF la fonction de réglage des sous titres est annulée 3 Appuyer sur SETUP pour sortir du menu Même en cas de panne de courant quelle qu elle soit l appareil gardera ces réglages en mémoire POUR SÉLECTIONNER LE MODE SON TV 1 Appuyer sur AUDIO à plusieurs reprises pour sélectionner le mode MTS sortie de son multicanau...

Page 51: ...omatiquement VISION 5 Lorsque les cotes TV Y7 TV PG TV 14 ou TV MA sont choisies on a la possibilité de régler une cote secondaire Appuyer sur K ou L pour sélectionner une cote mère ayant des cotes secondaires qu on desire bloquer puis appuyer deux fois sur ENTER Appuyer sur K ou L pour sélectionner une cote secondaire puis appuyer sur ENTER pour sélectionner BARRÉ ou VISION Les cotes secondaires ...

Page 52: ...courant ou lorsque l appareil est mis hors tension depuis un commutateur mural le code d accès personnel est effaçé et revient à la valeur par défaut 0000 Si on a oublié le code débrancher le cordon d alimentation pendant 10 secondes pour remettre le code d accès à 0000 1 Appuyer sur SETUP puis sur K ou L pour pointer sur LANGAGE 2 Appuyer sur ENTER à plusieurs reprises pour sélectionner ENGLISH a...

Page 53: ...e d être compromise 7 Il est posible de lire un disque DVD R RW non finalisé enregistré en format vidéo sur un enregistreur DVD de notre marque Cependant selon l état d enregistrement d un disque le disque peut ne pas être lu normalement ou pas du tout l image ou le son peuvent ne pas être réguliers etc Auquel cas il faut finaliser le disque à l aide de l enregistreur DVD Se référer au manuel de l...

Page 54: ...TV le mode DVD se ferme d abord puis environ 4 secondes plus tard l image de la TV apparaît et le son se fait entendre Ainsi lorsqu on appuie sur POWER pour éteindre le mode DVD ce mode se ferme d abord et ensuite l appareil est mis hors tension L icône peut apparaître en haut à droite de l écran pendant le fonctionnement avertissant que le lecteur DVD ou le disque a rencontré une opération interd...

Page 55: ...que à l autre Se référer au manuel accompagnant le disque pour plus de renseignements 1 Pendant la lecture appuyer sur STOP C Le message de reprise s affiche à l écran 2 Appuyer sur PLAY O la lecture reprend du point où elle a été arrêtée Pour annuler la reprise appuyer à deux reprises sur STOP C Les renseignements concernant la reprise restent à l écran même lorsqu l appareil est mis hots tension...

Page 56: ...rrière varient avec le disque La vitesse approximative est 1 1 16 2 1 8 3 1 2 4 Pour reprendre la lecture normale appuyer sur PLAY O La fonction Zoom permet d aggrandir l image vidéo et de faire un panoramique sur l image aggrandie 1 Appuyer sur ZOOM pendant la lecture La lecture continue 2 Appuyer à plusieurs reprises sur ZOOM pour sélectionner le facteur d aggrandissement ZOOM1 ZOOM2 ZOOM3 ou HF...

Page 57: ...s fois pour sauter les pistes suivantes Appuyer sur la touche SKIP H en commençant à la piste active L appuyer à plusieurs reprises pour sauter les pistes antérieures Si SKIP H G est appuyée pendant que la lecture est en pause la lecture sera en pause après avoir sauté à la piste suivante Les touches SKIP H G ne sont pas fonctionnelles lorsque la lecture est arrêtée 1 Appuyer une fois sur SEARCH M...

Page 58: ... bien à l écran 3 Arrivé au point souhaité appuyer sur ENTER Le titre ou la piste et le temps de lecture écoulé s affichent 4 Pour revenir au marqueur plus tard pendant la lecture appuyer à plusieurs reprises sur SEARCH MODE pour afficher l écran des marqueurs Puis appuyer sur s ou B pour choisir le marqueur souhaité et appuyer sur ENTER Certaines opérations effaceront tous les marqueurs Mise hors...

Page 59: ...ment à l écran 2 Appuyer à nouveau sur la touche A B au point final choisi A B apparaît brièvement à l écran et la séquence de répétition commence 3 Pour sortir de la séquence appuyer sur A B La section de répétition A B ne peut être réglée que dans le titre courant pour les DVD ou la piste courante pour les CD Audio La répétition A B n est pas disponible pour certaines scènes sur DVD Pour annuler...

Page 60: ...rogramme en une seul fois sélectionner ANNUL TOUT au bas de la liste à l étape 2 Si on souhaite répéter la piste courante du programme appuyer plusieurs fois sur REPEAT jusqu à ce que PISTE apparaisse pendant la lecture Si on souhaite répéter le programme en entier appuyer plusieurs fois sur REPEAT jusqu à ce que TOUT apparaisse pendant la lecture Cette fonction réorganise aléatoirement l ordre de...

Page 61: ...e de langue de 3 lettres le code s affichera à chaque fois qu on change le réglage de la langue de sous titrage Si l on choisit n importe quelle autre langue sera affiché à la place voir page 31 Cet appareil permet de sélectionner une langue pendant la lecture d un DVD si plusieurs langues dont disponibles sur le DVD 1 Appuyer sur AUDIO pendant la lecture 2 Appuyer à plusieurs reprises sur la touc...

Page 62: ...HF Montre l image originale telle qu enregistrée Réglage initial 2 Appuyer deux fois sur MODE ou RETURN pour sortir Le réglage sera sauvegardé même si l appareil mis hors tension Cet appareil permet d apprécier l effet d ambiophonie sur deux haut parleurs 1 Appuyer sur la touche MODE pendant la lecture lors de la pression sur la touche ENTER pour la régler à 1 2 ou HF 1 Effet naturel 2 Effet accen...

Page 63: ...raît que lorsque le réglage répétition est activé C Répétition du chapitre T Répétition du titre A B Répétition A B T L1 DÉBIT BINAIRE La quantité de données audio et vidéo présentement lues Le nombre de couches n apparaît qu au cours d une lecture d un disque à deux couches L0 La couche 0 est lue L1 La couche 1 est lue 4 12 0 03 21 0 02 15 T TR plage Nombre de piste courante Pistes totales Temps ...

Page 64: ...ue souhaitée Voir page 31 Seules les langues supportées par le disque peuvent être sélectionnées 5 Appuyer sur SETUP pour quitter le menu Le réglage de la langue pour le son et les sous titres ne sont pas valides pour certains disques à cause de leur réglage par défaut Dans ce cas les régler en appuyant sur AUDIO et SUBTITLE voir page 25 Si on sélectionne une langue non supportée par le disque les...

Page 65: ...ns doux à forts Le réglage par défaut est EF SOUS ÉCHANTILLON EF Sortie à 48 kHz par défaut HF Fournit le son original À la lecture d un disque avec protection des droits d auteur Si on sélectionne HF la protection des droits d auteur sera activée et le son sera sous échantilloné à 48 kHz DOLBY DIGITAL Régler à TRAIN BINAIRE lorsque l appareil est raccordé à un décodeur Dolby Digital TRAIN BINAIRE...

Page 66: ...tapes 1 à 2 dans le à la page 28 3 Appuyer sur K ou L pour sélectionner les options ci dessous puis appuyer sur ENTER ICÔNE DE L ANGLE Appuyer à plusieurs reprises sur la touche ENTER pour commuter l icône EF ou HF Le réglage par défaut est EF ÉCRAN DE VEILLE Appuyer à plusieurs reprises sur la touche ENTER pour commuter l économiseur d écran EF ou HF Le réglage par défaut est HF Si on sélectionne...

Page 67: ...Langue Code Serbe 6564 Serbo croate 6554 Sesotho 6566 Setswana 6660 Shona 6560 Sindhi 6550 Siswat 6565 Slovaque 6557 Slovène 6558 Somali 6561 Soudanais 6567 Swahili 6569 Suédois SWE 6568 T Tagalog 6658 Tajik 6653 Tamil 6647 Tatar 6666 Tchèque CZE 4965 Telugu 6651 Thaï 6654 Tibétain 4861 Tigrinya 6655 Tonga 6661 Tsonga 6665 Turc TUR 6664 Turkmène 6657 Twi 6669 U Z Ukrainien 6757 Urdu 6764 Vietnamie...

Page 68: ... tout est OK c est la station qui a des problèmes Vérifiez la connexion de l antenne ou du câble sur le téléviseur Si on utilise une antenne extérieure vérifier qu aucun câble n est cassé Régler le contrôle COULEUR Réception mauvaise sur quelques chaînes Essayer une nouvelle chaîne si tout est OK c est la station qui a des problèmes Images Résiduelles Vérifiez la connexion de l antenne ou du câble...

Page 69: ...t pas lire les données comprimées et les sous titres sont perdus Boîte noire présente à l écran La TV est au mode TEXT Séleclionner le mode S TITRES S TIT1 S TIT2 ou S TITRES HF PROBLÈME ACTION CORRECTRICE Son OK mauvaise image Essayer une nouvelle chaîne si tout est OK c est la station qui a des problèmes Vérifiez la connexion de l antenne ou du câble sur le téléviseur Si on utilise une antenne e...

Page 70: ...avec des angles changé de camera différents Ceci n est pas une anomalie Impossible de modifier la langue du Le DVD ne contient pas de source son ou de sous titres dans la son ou du sous titrage langue sélectionnée Ceci n est pas une anomalie Icône interdit apparaît sur l écran Cette operation est interdite par le lecteur ou le disque interdisant une opération Ceci n est pas une anomalie Défaut d e...

Page 71: ... Ne pas utiliser de chiffon rêche il pourrait rayer le disque Essuyer le disque en suivant une ligne droite allant du centre vers le bord Ne jamais essuyer en un movement circulaire Ne pas utiliser de détergent ou d agent nettoyant abrasif MANIPULATION DES DISQUES ENTRETIEN Le design et les caractéristiques techniques peuvent être modifiés sans préavis En cas de désaccord entre les langues la lang...

Page 72: ...d autres cas de force majeure CETTE GARANTIE NE COUVRE PAS LES MATÉRIAUX D EMBALLAGE LES ACCESSOIRES SAUF LA TÉLÉCOMMANDE LES PARTIES ESTHÉTIQUES LES PIÈCES D ASSEMBLAGE COMPLET LES MODÈLES DE DÉMONSTRATION OU DE SURFACE FUNAI CORP ET SES REPRÉSENTANTS OU AGENTS NE SERONT EN AUCUN CAS RESPONSABLES DE TOUT DOMMAGE GÉNÉRAL INDIRECT OU CONSÉQUENTIEL SURVENANT OU OCCASIONNÉ PAR L EMPLOI OU L INCAPACIT...

Reviews: