background image

REW/

s

F.FWD/

B

BRIGHT

to decrease 

to increase 

brightness

brightness

CONTRAST

to decrease 

to increase 

contrast

contrast

COLOR

to pale

to brilliant

TINT

to purple

to green

SHARPNESS

to soft

to clear

- 11 -

EN

DEGAUSSING

This television has a degaussing circuit that will clear
up color errors on the TV screen that are caused by
any excess magnetism which happens to get too close
to the TV. This circuit is designed to operate once
when the set is first plugged in. 

If minor color errors

are seen in some locations on the screen, please
unplug the TV for approximately 30 minutes.

When

the TV is plugged back in, the degaussing circuit will
operate once to clear them up. Repeat this procedure
any time the TV screen is accidentally magnetized or
when the TV is moved or relocated.

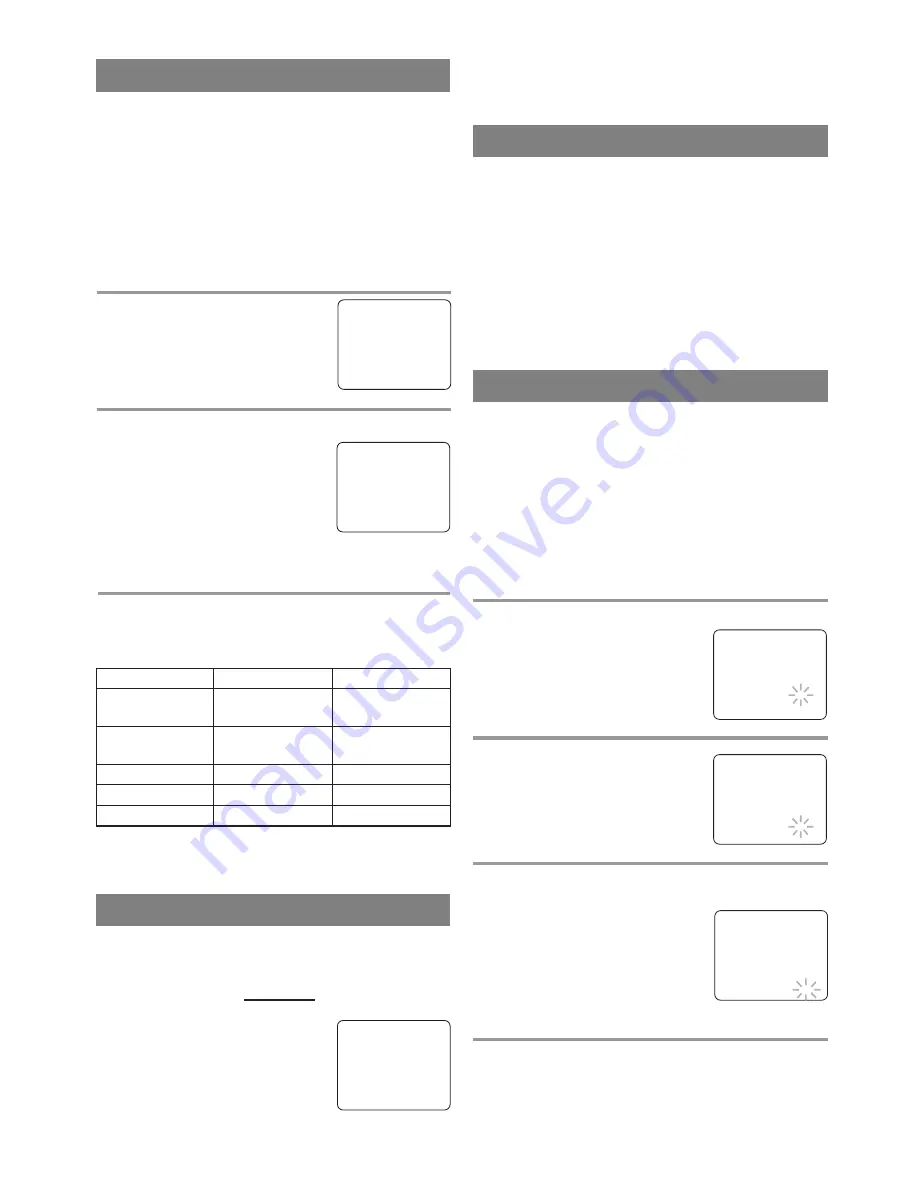
PICTURE CONTROL

The unit’s picture controls – 

BRIGHT, CON-

TRAST, COLOR, TINT

and 

SHARPNESS

– are

preset to factory specifications. Although they are
usually the best, you may need to make some further
adjustments for a more natural looking image.

NOTE:

When setting the Picture Control, the Game mode
will be cancelled.

Make sure ...

The unit power must be turned on.

1

Select “PICTURE CONTROL”

Hit 

[MENU]

on the remote control.

Press 

[PLAY/

K

K

]

or 

[STOP/

L

L

]

to

point to “PICTURE CONTROL”.
Then, hit 

[F.FWD/

B

B

]

.

2

Select item you want to adjust

Press 

[PLAY/

K

K

]

or 

[STOP/

L

L

]

until desired control is displayed.

BRIGHT
CONTRAST
COLOR
TINT
SHARPNESS

GAME MODE

This function enables you to decrease the TV screen
contrast and making it suitable for use with a video
game. 

NOTE:

This function 

CANNOT

be set during

recording.
Hit 

[GAME]

on the remote control.

“GAME” appears on the screen.
When you hit 

[GAME]

;

The unit comes on automatically
if it is off.

The unit will be in external input
mode automatically.

GAME

Even if there is a power failure of any kind, the
unit will retain its memory for this feature.

– M E N U –

TIMER PROGRAMMING

B

PICTURE CONTROL
SETTING CLOCK
CHANNEL SET UP
USER’S SET UP
V-CHIP SET UP
LANGUAGE  [ENGLISH]
CAPTION  [OFF]
ZERO RETURN
TIME SEARCH

3

Adjust the picture control

Press 

[REW/

s

s

]

or 

[F.FWD/

B

B

]

to adjust to your

desired level within 5 seconds.

WAKE UP TIMER

The Wake Up Timer function turns on the unit
without using 

[POWER]

after a desired period of

time.

NOTES:

Use the remote control for this procedure.

Clock must be set to the correct time before setting
the timer.

If you want to select [TAPE], you must insert a
cassette tape in the unit. The tape will start
playback automatically on your desired time.

1

Call up “WAKE-UP TIMER” setting

Hit 

[WAKE-UP/SLEEP]

once, and

confirm “ON/OFF” is pointed.
Press 

[REW/

s

s

]

or 

[F.FWD/

B

B

]

until “ON” appears.

2

Select “TV” or “TAPE”

Press 

[PLAY/

K

K

]

or 

[STOP/

L

L

]

until to point to “TV/TAPE”.
Press 

[REW/

s

s

]

or 

[F.FWD/

B

B

]

,

and select [TV] or [TAPE].

3

Set wake up time

Press 

[PLAY/

K

K

]

or 

[STOP/

L

L

]

until

to point to “TIME”.
Press 

[REW/

s

s

]

or 

[F.FWD/

B

B

]

until your desired wake up time
appears.
Each additional press will increase
(or decrease) the time by 10
minutes.

4

Exit the Wake Up Timer setting

Hit 

[MENU]

to return to TV mode.

TO CANCEL THE WAKE UP TIMER

Select [OFF] at step 

1

.

WAKE UP

B

ON/OFF

[ON]

TIMER

TV/TAPE

[TV]

TIME [12:00AM]  

WAKE UP

ON/OFF

[ON]

TIMER

B

TV/TAPE

[TV]

TIME [12:00AM]  

BRIGHT

– 

P

P P

P P

P P

P P

P P

P P

P C

C P

P P

P P

P P

P P

P P

P P

P          

+

WAKE UP

ON/OFF

[ON]

TIMER

TV/TAPE

[TV]

B

TIME [12:00AM]  

TO CANCEL THE GAME MODE

Press 

[GAME]

or 

[CHANNEL

K

/

L

]

on the remote

control.

Summary of Contents for SC313E

Page 1: ...d additional assistance for set up or operating after reading owner s manual please call TOLL FREE 1 800 242 7158 Or visit our WEB SITE at http www Symphonic us Please read before using this equipment...

Page 2: ...cabinet and the back or bottom are provided for ventilation and to ensure reliable operation of the unit and to protect it from overheating and these openings must not be blocked or covered The open i...

Page 3: ...mage Requiring Service Unplug this unit from the wall outlet and refer servicing to qualified service personnel under the following conditions a When the power supply cord or plug is damaged or frayed...

Page 4: ...ing unit to locations where temperature differences are extreme Be sure to unplug the AC power cord from the out let before carrying the unit Do not handle the power cord with wet hands Do not pull on...

Page 5: ...LANGUAGE 15 V CHIP SET UP 16 C VIDEO CASSETTE 17 CPLAYBACK 18 NORMAL PLAYBACK 18 TRACKING ADJUSTMENT 18 STILL PICTURE 18 C SPECIAL PLAYBACK 19 RENTAL PLAYBACK 19 AUTO REPEAT PLAYBACK 19 C SEARCH 20 Z...

Page 6: ...in SLP mode will show a fairly clear picture Digital Auto Tracking DTR Automatically adjusts the tracking for each tape you play Rental play mode Improves playback picture quality from worn tapes such...

Page 7: ...he cassette from the unit 8 REW b b button Hit to rewind the tape or to view the picture rapidly in reverse during play back mode Rewind Search s s button Remote control Hit to select a mode from the...

Page 8: ...l Hit again to return to the present channel 27 EJECT A button Hit in the stop mode to remove the cassette from the unit 28 WAKE UP SLEEP button Sets the Wake up or Sleep Timer Refer to page 11 or 12...

Page 9: ...IN OUT Rod Antenna Supplied Rod Antenna Connection You can use the Rod Antenna supplied if incoming cable is not available ANT ANT NOTE Before plugging the antenna into the ANT jack of the unit check...

Page 10: ...ect the channel number Press CHANNEL K L or the Number buttons to select your desired channel number Note for using the Number buttons You must precede single digit channel numbers with a zero for exa...

Page 11: ...ng Hit GAME on the remote control GAME appears on the screen When you hit GAME The unit comes on automatically if it is off The unit will be in external input mode automatically GAME Even if there is...

Page 12: ...language if available NOTES Not all programs are broadcast with closed cap tions Your unit is designed to provide error free closed captions from high quality antenna cable and VCR signals Conversely...

Page 13: ...ht blue Deleted channel Light red M E N U TIMER PROGRAMMING PICTURE CONTROL SETTING CLOCK B CHANNEL SET UP USER S SET UP V CHIP SET UP LANGUAGE ENGLISH CAPTION OFF ZERO RETURN TIME SEARCH CHANNEL SET...

Page 14: ...or STOP L L to select SETTING CLOCK then hit F FWD B B 2 Set AUTO CLOCK to ON Hit F FWD B B until AUTO CLOCK ON appears 3 Begin AUTO CLOCK CH SEARCH Hit STOP L L to select AUTO CLOCK CH SEARCH Then hi...

Page 15: ...E N U TIMER PROGRAMMING PICTURE CONTROL B SETTING CLOCK CHANNEL SET UP USER S SET UP V CHIP SET UP LANGUAGE ENGLISH CAPTION OFF ZERO RETURN TIME SEARCH SETTING CLOCK AUTO CLOCK ON AUTO CLOCK CH SEARCH...

Page 16: ...Blocking TV programs Press PLAY K K or STOP L L to select a rating that you wish to block Hit F FWD B B repeatedly to set it to BLOCK or VIEW V CHIP SET UP B TV Y VIEW TV Y7 VIEW TV G VIEW TV PG VIEW...

Page 17: ...e heat high humidity and magnetic fields Do not tamper with the cassette mechanism Do not touch the tape with your fingers INSERTING A CASSETTE Insert the cassette in the direction as shown Push in ge...

Page 18: ...y there will be video noise lines black and white streaks or dots on the screen This is normal If the tape was originally recorded in SP or LP mode the still picture will be black and white in additio...

Page 19: ...a blank part which is blank for more than 10 seconds 1 Select USER S SET UP Hit MENU Press PLAY K K or STOP L L to point to USER S SET UP then hit F FWD B B 2 Select ALL or BLANK Press PLAY K K or ST...

Page 20: ...ther direction 1 Call up TIME SEARCH setting Hit TIME SEARCH 2 Enter your desired time Press PLAY K K or STOP L L until your desired time appears Example 2 50 stands for 2 hours 50 min utes You can al...

Page 21: ...necessary rewind or fast forward the tape to the point at which you want to begin recording NOTE This unit will ONLY record and view the same channel You can ONLY watch the same TV program that is be...

Page 22: ...it SPEED to select the desired tape speed SP SLP 3 Begin OTR Hit REC OTR on the unit as many times as needed The record ing length will be determined by the number of times you hit REC OTR Each time i...

Page 23: ...ector on the unit must be select ed to the output channel of the boxes CH 3 or CH 4 and then the actual channel to be recorded must be selected on the boxes Clock must be set to the correct time and d...

Page 24: ...ECT A PROGRAM While setting a program hit REW s s to go back one step and enter the correct numbers using PLAY K K or STOP L L After setting a program 1 Hit POWER 2 Repeat steps 1 to 2 on page 23 3 Hi...

Page 25: ...The following is a chart of common cable channel designations TV Display TV Display TV Display TV Display TV Display TV Display TV Display TV Display CATV channel TV Display W 80 W 81 W 82 W 83 W 84...

Page 26: ...lor fades in and out You can not copy a copyrighted video tape You are experiencing when making a copy of a video tape copy guard protection Different color marks on screen Magnetism from nearby appli...

Page 27: ...kewarm water and wrung dry Never use a solvent or alcohol Do not spray insec ticide liquid near the unit Such chemicals may cause damage and discoloration to the exposed sur faces AUTO HEAD CLEANING A...

Page 28: ...r la repro ducci n Bot n K Mando a distancia Presione para seleccionar un modo o cifra del men de ajustes 10Bot n F FWD a a Presione para avanzar r p idamente la cinta o para ver la imagen en avance r...

Page 29: ...esione para seleccionar un modo o cifra en el men num ricos de ajustes 19Bot n RECORD Presione para iniciar la grabaci n manual 20Bot n SPEED Presione para elegir la veloci dad de grabaci n deseada SP...

Page 30: ...uste de canal de salida del equipo y seleccione el canal deseado en el equipo PARA MIRAR UN PROGRAMA DE TV PARA VER UNA ENTRADA EXTERNA Cuando se conecta un equipo externo en las tomas de entrada AUDI...

Page 31: ...que aparezca el a o deseado Ejemplo 2005 Presione F FWD B B 6 Seleccione la hora Presione PLAY K o STOP L hasta que aparezca la hora deseada Ejemplo 5 PM Presione F FWD B B 7 Seleccione los minutos Pr...

Page 32: ...improper maintenance commercial use such as hotel rental or office use of this product or damage which results from fire flood lightning or other acts of God THIS WARRANTY DOES NOT COVER PACKING MATER...

Reviews: