DOC-1000544-A-
1
SPECIFICATIONS
•
Dim Control Max Load: 30 mA Source/Sink
•
Radio Frequency: 2.4 GHz (IEEE 802.15.4)
•
RF Transmission Output Power: +20dBM
•
Operating Temperature: -40 to +85 C
•
Operating Humidity: 10 to 90%, non-condensing
•
Drivers: Limited to 4 LED Drivers
•
Dimensions: 2.25”L x 2.0”W X .3”H
(57 X 50.8 X 7.6 mm)
MODELS
•
DIM10-087-06 (Uses external antenna)
•
DIM10-087-06-F (internal antenna)
CAUTION
DIM10-087-06 controllers must be installed in
accordance with national, state, and local electrical
codes and requirements
NEEDED MATERIAL
•
u.FL Insertion Tool:
Part Number U.FL-LP-IN
from Hirose Electric (for DIM10-087-06 only)
•
u.FL Extraction Tool:
Part number U.FL-LP-N-2
from Hirose Electric (for DIM10-087-06 only)
•
u.FL Connector and 14mm bulkhead:
A cable
with a u.FL connector on one end and a female
14mm bulkhead connector on the other end is
required to route the signal from the DIM10-087-
06 through the fixture housing to an external
antenna.
•
50 OHM Terminator plug RP-SMA:
Part number
132360RP from Amphenol.
•
Mounting Hardware:
(1) #4 and M3 screws and
standoff recommended
•
Antenna Kit:
For available antenna options please
refer to our latest documents located on our
website.
www.synapsewireless.com/documentation
INSTALLATION INSTRUCTIONS
WARNING: TO AVOID FIRE, SHOCK, OR DEATH:
TURN OFF POWER
AT CIRCUIT BREAKER OR FUSE
AND VERIFY THAT POWER IS OFF BEFORE WIRING!
MOUNTING
Secure with 1 #4 screw (
max diameter of .312
inches)
and standoff.
1.
Mounting Options:
Mount in an LED Fixture or a
Troffer. For the DIM10-087-06, an external
antenna utilizing a u.FL connector must be used to
provide RF connectivity to the SNAP mesh
network.
2.
Place the DIM10-087-06 in desired location and
secure it using #4 sized screw and stand-off using
the mounting hole located in the center of the
board. Prior to permanently mounting the DIM10-
087-06, make sure the antenna is free of any
objects within 3 in. of the internal or external
antenna.
Note:
When installing the DIM10-087-06 into an
enclosure, consideration of the internal or external
antenna position and interference is required in order
to provide the most optimum wireless signal strength.
•
When installing the DIM10-087-06 into an
enclosure, consideration of the external antenna
position and interference is required in order to
provide the most optimum wireless signal
strength. Prior to permanently mounting it, make
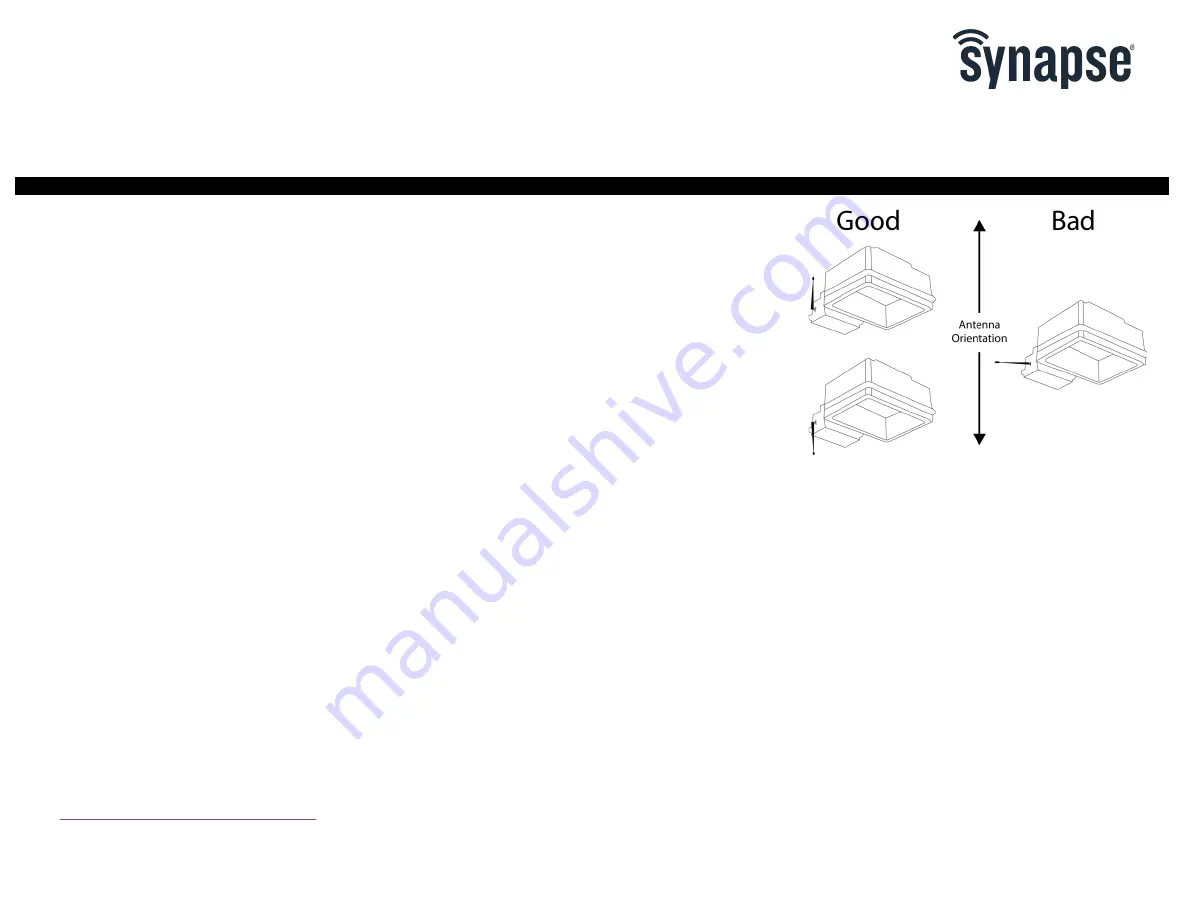
sure the antenna points directly upward or
downward and is free of any metal objects within
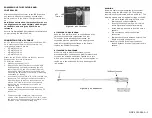
12 in. of the antenna (Figure 1).
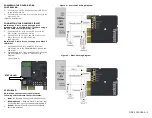
Figure 1 - Proper External Antenna Installation
CONNECTING SENSORS
Note: Steps 1-4 are for adding sensors to the
DIM10-087-06 controller; if you are not
connecting sensors skip this section.
There are two sensor inputs on the DIM10-087-06
designed for low powered (24v DC) type sensors.
•
The
Input A
is used to connect sensor A.
•
The
Input B
is used to connect sensor B.
1.
Connect the sensor power wire to the AUX out on
the LED driver (the LED driver powers the sensor).
2.
Connect the sensor common to the
COMMON/DALI- or COMMON/DIM- based on the
LED driver you have.
3.
Connect the sensor CTRL/Control wire to the
Input
A+ or Input B+ o
f the DIM10-87-06 controller.
4.
If you are using more than one sensor then
duplicate the installation as described above.
(See Figures 2 AND 3)
WARNING AND CAUTIONS:
•
TO AVOID FIRE, SHOCK, OR DEATH; TURN OFF POWER
AT CIRCUIT BREAKER
OR FUSE AND TEST THAT POWER IS OFF BEFORE INSTALLING!
•
PROPER GROUNDING REQUIRED TO AVOID STATIC DISCHARGE WHICH
CAN DAMAGE CONTROLLERS DURING INSTALLATION.
•
DIM10-087-06 Controller
Load Ratings: 700mW @ 5 to 24V DC
Operating Temperature: -40 to +85 C / Operating Humidity: 10 to 90%, non-condensing
WARNING AND CAUTIONS:
•
If you are unsure about any part of these instructions, consult an electrician; all
work should be performed by qualified personnel.
•
Disconnect power at circuit breaker or fuse when servicing, installing or removing
fixture or changing lamps.
INSTALLATION GUIDE


